Page 9 of 12

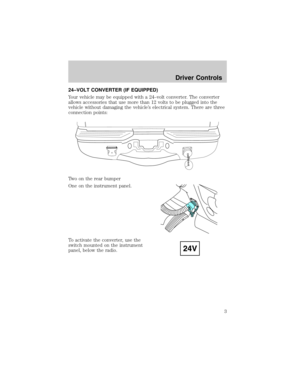
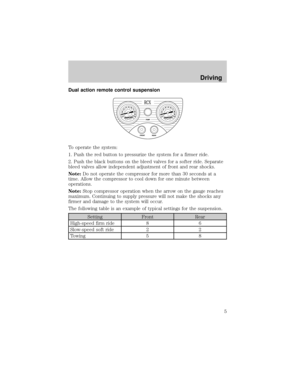
The compressor is controlled by an
instrument panel mounted switch
below the radio. The compressor
cannot be turned on unless the
vehicle ignition is in the ON position
Note:The air compressor uses significant electrical current when
operating. It is recommended that the engine be running when the
compressor is in use to avoid discharging the battery.
When the compressor is switched to the on position, a light in the switch
will be illuminated and the reservoir pressure will increase until it
reaches the pre-set limit. The light will remain on even when the pre-set
pressure limit is reached and the compressor turns off. With the switch
turned on, the compressor may start at any time the ignition switch is in
the ON position. You should turn the compressor switch off until you
plan on using compressed air to avoid possible injuries and minimize
wear on the compressor and system.
Note:When the system is pressurized, all air lines from the compressor
to the outlet chuck are pressurized as well. Do not attempt to work on
the system or loosen any fittings unless you have drained all pressure
from the system by opening the drain on the air reservoir.
Whenever the air compressor has been used, be sure to drain the air
system of all pressure by opening the drain valve at the front of the
reservoir until air no longer escapes.Do not leave the system
pressurized when the vehicle is not in use.This will help to assure
the safety of those who may need to work on the truck and prevent the
condensation of water in the reservoir, extending the life of air system
components.
The air compressor inlet is equipped with a filter to prevent the
ingestion of contamination into the compressor and air system. This filter
is located underneath the truck, by the forward stake pocket on the left
side of the bed. If operating the air system in dusty areas, periodically
inspect this filter and replace it if found to be clogged or damaged, or if
the time needed to pressurize the system starts to become extended.
Tires, Wheels and Loading
9
Page 10 of 12

Using the air system to fill tires
To fill your tires, first be sure to stop the truck in a safe place. You
should be far enough off the road that passing traffic will not be a danger
to you. You should have an accurate tire pressure gauge to measure the
pressure in the tires and inflate them to the settings on the tire pressure
placard, which is usually inside the door on the truck.
Remove the air hose from under the clamp on the floor of the truck.
Attach the connector end of the hose to the coupling in the trim panel
behind the driver's seat by using one hand to slide the coupling collar
toward the trim panel and the other to insert the fitting on the end of
the hose into the coupling. When the fitting is seated in the coupling,
slide the collar back to its original position.
Extend the hose to reach the tire needing air. Remove the cap from the
tire valve stem and attach the clamp-on air chuck by squeezing the
locking mechanism while placing the chuck over the valve stem. Release
the locking mechanism when the air chuck is seated on the stem. Air will
flow from the system to the tire until you remove the chuck. Be sure to
use your gauge to set the pressure according to the placard. When the
tire pressure is correct, disconnect the hose and re-stow it under the
clamp on the floor behind the passenger seat. Do not forget to re-install
the cap on the valve stem.
Tires, Wheels and Loading
10
Page 11 of 12
CHANGING A FLAT TIRE
Refer to yourOwner's Guidefor the tire changing procedure. Follow the
F-350 Dual Rear Wheel (DRW) jacking instructions.
FUSING
Note:Fuse 29 in the instrument panel box, located beow and to the left
of the steering wheel, should be a 15A mini fuse. Always replace the fuse
you removed with a fuse with the same amperage rating.
Roadside emergencies
11
Page 12 of 12


 jacking instructions.
FUSING
Note:Fuse 29 in the instrument panel box, located be")
