2007 FORD FIESTA table
[x] Cancel search: tablePage 1029 of 1226
Automatic Transmission/Transaxle -
Vehicles With: 4-Speed Automatic
REMOVAL AND INSTALLATION
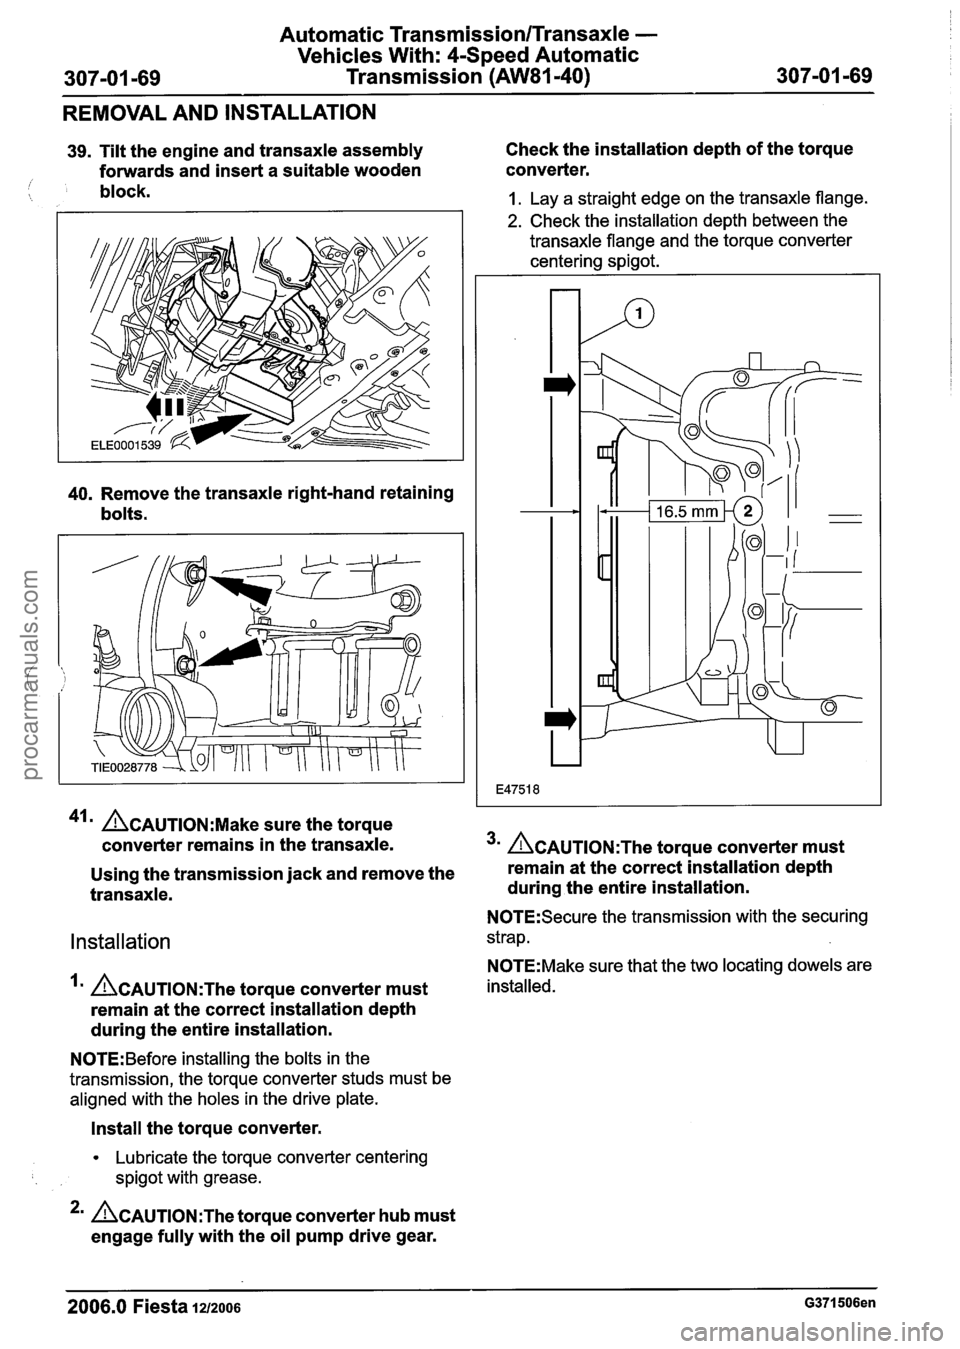
39. Tilt the engine and transaxle assembly Check
the installation depth of the torque
forwards and insert a suitable wooden converter.
/ block. 1. Lay
a straight edge on the transaxle flange.
2. Check the installation depth between the
transaxle flange and the torque converter
centering spigot.
40. Remove the transaxle right-hand retaining
bolts.
41m ~CAUTION:M~~~ sure the torque
converter remains in the transaxle.
3m ~CAUTION:T~~ torque converter must
Using the transmission jack and remove the remain
at the correct installation depth
transaxle. during the entire installation.
N0TE:Secure the transmission with the securing
Installation strap.
N0TE:Make sure that the two locating dowels are
ACAUTION:T~~ torque converter must installed.
remain at the correct installation depth
during the entire installation.
N0TE:Before installing the bolts in the
transmission, the torque converter studs must be
aligned with the holes in the drive plate.
Install the torque converter.
Lubricate the torque converter centering
spigot with grease.
*' ACAUTION:T~~ torque converter hub must
engage fully with the oil pump drive gear.
2006.0 Fiesta 1212006 G371506en
procarmanuals.com
Page 1030 of 1226
Automatic Transmission/Transaxle -
Vehicles With: 4-Speed Automatic
Transmission
(AW81-40)
REMOVAL AND INSTALLATION
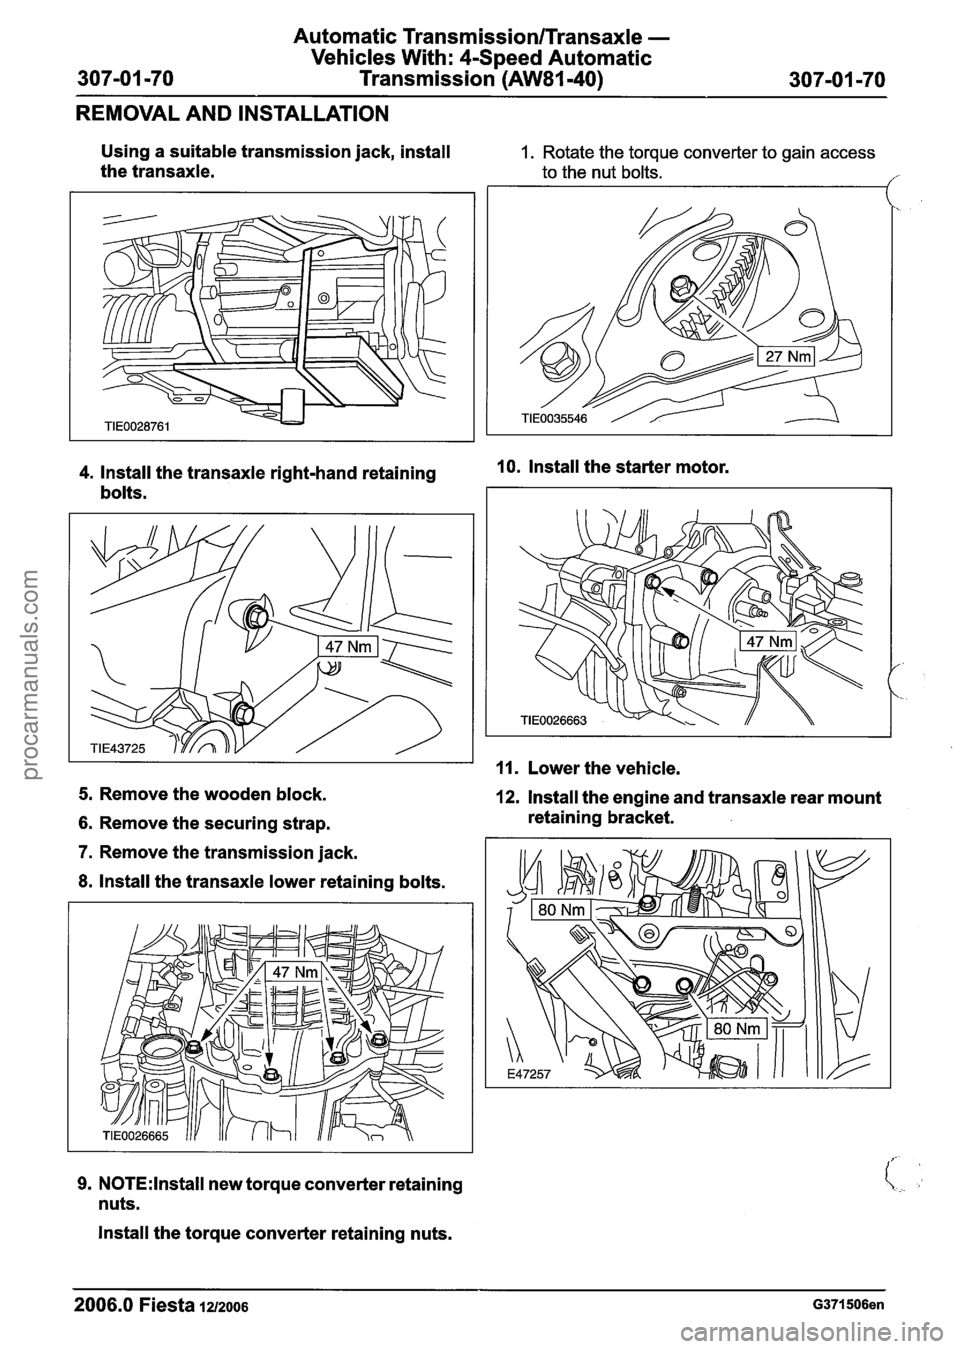
Using a suitable transmission jack, install
the transaxle. 1. Rotate the torque converter to gain access
to the nut bolts.
/I
4. Install the transaxle right-hand retaining 10. Install the starter motor.
bolts.
11. Lower the vehicle.
5. Remove the wooden block. 12. Install the engine and transaxle rear mount
6. Remove the securing strap. retaining
bracket.
7. Remove the transmission jack.
8. lnstall the transaxle lower retaining bolts.
9. N0TE:lnstall new torque converter retaining
nuts.
lnstall the torque converter retaining nuts.
2006.0 Fiesta 1212006 G371506en
procarmanuals.com
Page 1040 of 1226
TransmissionlTransaxle Cooling - Vehicles
With: 4-Speed Automatic Transmission
307-0214 (AW81-40) 307-02-4
REMOVAL AND INSTALLATION
Transmission Fluid Cooler(l7 834 0)
Removal
A WARN1NG:Refer to the Material Safety Data
Sheets for the Automatic Transmission
Fluid E-AW. Failure to follow this
instruction. may result in personal injury.
Certain Transmission and Power Steering
fluids supplied to Ford contain additives
which may cause skin irritation or other
skin reactions after contact.
For additional information, refer to: Health
and Safety Precautions (1 00-00 General
4m AWARNING:~~~~ releasing the
transmission fluid, take care to prevent
scolding. Failure to follow this instruction
may result in personal injury.
A CAUTI0N:PIug the transmission fluid
cooler lines to prevent fluid loss or dirt
ingress.
For additional information, refer to: Health
and Safety Precautions (1 00-00 General
Information, Description and Operation).
See
- Transmission Fluids.
Information, and Operation)' NOTE:Mark the position of the feed and return See - Transmission Fluids. lines to aid installation.
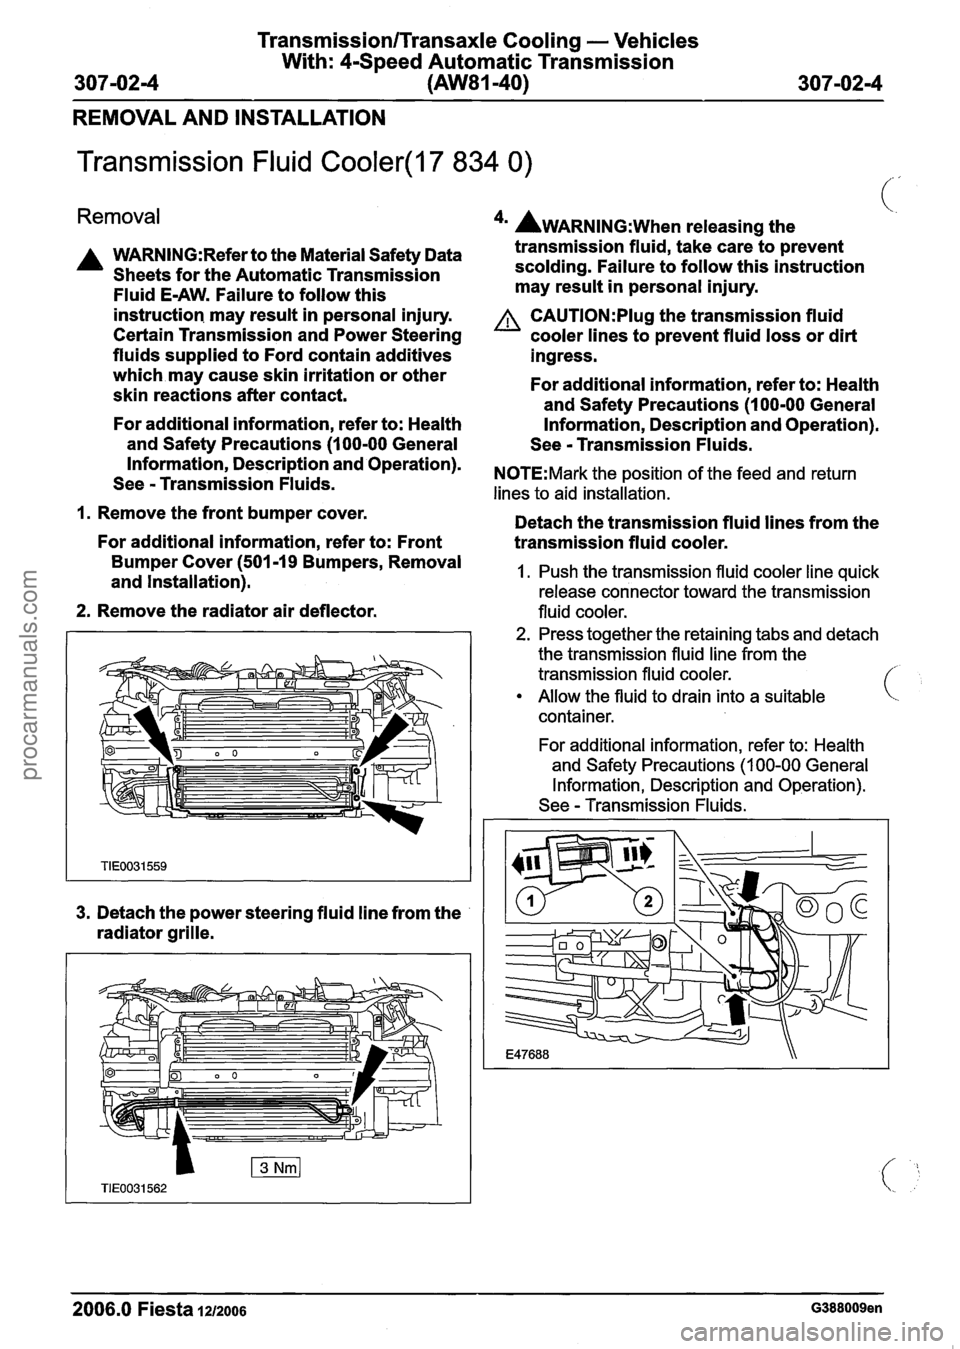
1. Remove the front bumper cover.
Detach the transmission fluid lines from the
For additional information, refer to: Front
transmission fluid cooler.
Bumper Cover (501-19 Removal 1. Push the transmission fluid cooler line quick and Installation). release connector toward the transmission
2. Remove the radiator air deflector. fluid cooler.
3. Detach the power steering fluid line from the
radiator grille.
2. Press together the retaining tabs and detach
the transmission fluid line from the
transmission fluid cooler.
Allow the fluid to drain into a suitable
container.
For additional information, refer to: Health
and Safety Precautions
(1 00-00 General
Information, Description and Operation).
See
- Transmission Fluids.
2006.0 Fiesta 1~12006 G388009en
procarmanuals.com
Page 1042 of 1226
TransmissionlTransaxle Cooling - Vehicles
With: 4-Speed Automatic Transmission
307-02-6 (AW81-40)
307-0216
REMOVAL AND INSTALLATION
Transmission Fluid Cooler Tubes(l7 857 0)
Removal See - Transmission Fluids.
A WARNING:Refer to the Material Safety Data
Sheets for the Automatic Transmission
Fluid
E-AW. Failure to follow this
instruction may result
in personal injury.
Certain Transmission and Power Steering
fluids supplied to Ford contain additives
which may cause skin irritation or other
skin reactions after contact.
For additional information, refer to: Health
and Safety Precautions (1
00-00 General
Information, Description and Operation).
See
- Transmission Fluids.
1. Raise and support the vehicle.
For additional information, refer to: Lifting
(1
00-02 Jacking and Lifting, Description
and Operation).
*' AWARNING:~~~~ releasing the
transmission fluid, take care to prevent
scolding. Failure to follow this instruction
may result
in personal injury.
A CAUTl0N:Plug the transmission fluid
cooler lines to prevent fluid loss or dirt
ingress.
For additional information, refer to: Health
and Safety Precautions (1
00-00 General
Information, Description and Operation).
See
- Transmission Fluids.
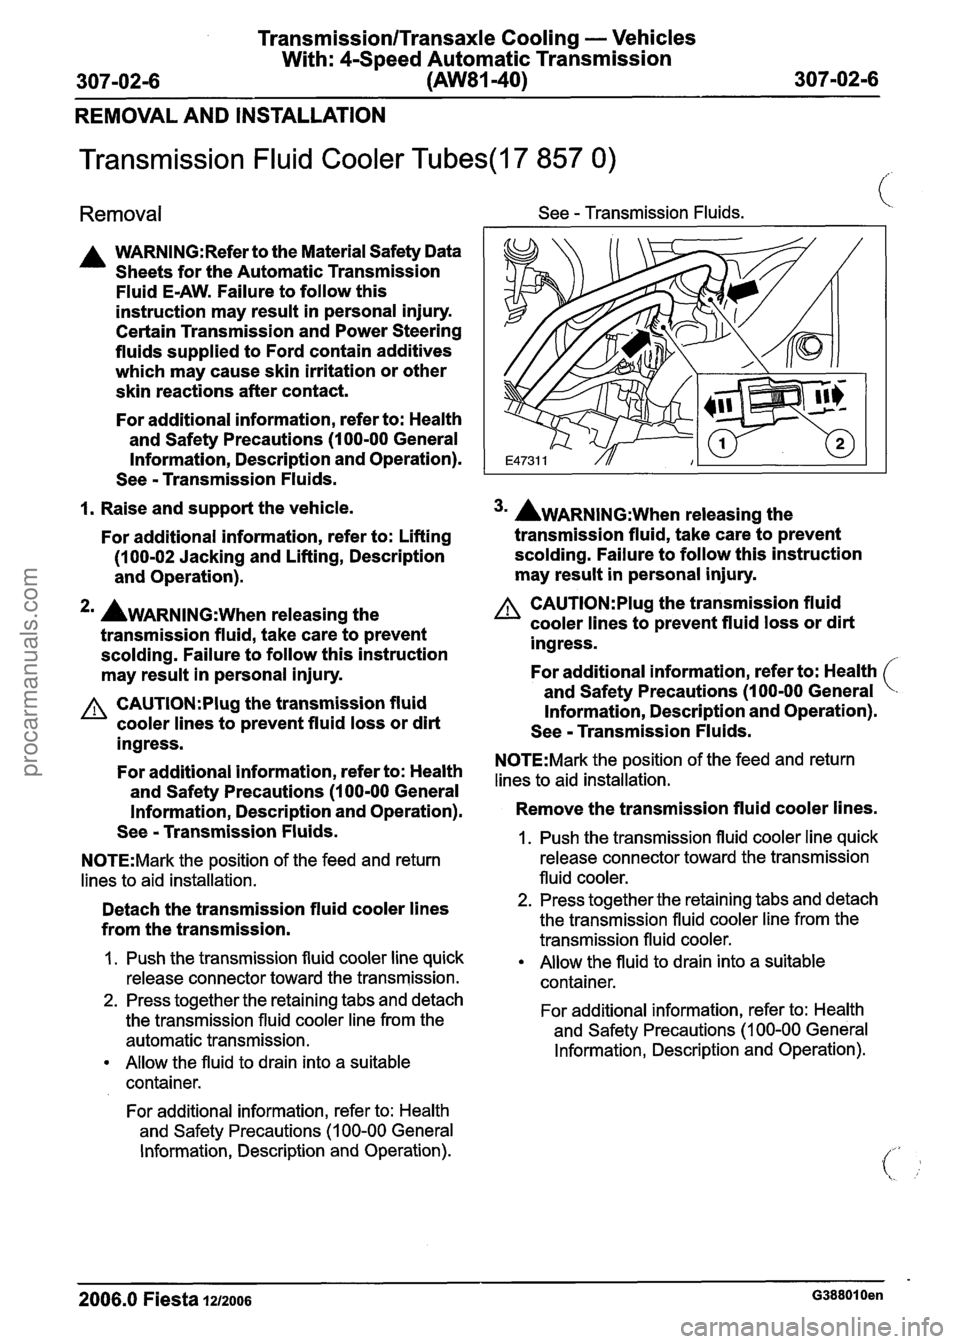
N0TE:Mark the position of the feed and return
lines to aid installation.
Detach the transmission fluid cooler lines
from the transmission.
I. Push the transmission fluid cooler line quick
release connector toward the transmission.
2. Press together the retaining tabs and detach
the transmission fluid cooler line from the
automatic transmission.
Allow the fluid to drain into a suitable
container.
For additional information, refer to: Health
and Safety Precautions
(1 00-00 General
Information, Description and Operation).
3m AWARNING:~~~~ releasing the
transmission fluid, take care to prevent
scolding. Failure to follow this instruction
may result
in personal injury.
A CAUTI0N:PIug the transmission fluid
cooler lines to prevent fluid loss or dirt
ingress.
For additional information, refer to: Health
and Safety Precautions (1
00-00 General
Information, Description and Operation).
See
- Transmission Fluids.
N0TE:Mark the position of the feed and return
lines to aid installation.
Remove the transmission fluid cooler lines.
1. Push the transmission fluid cooler line quick
release connector toward the transmission
fluid cooler.
2. Press together the retaining tabs and detach
the transmission fluid cooler line from the
transmission fluid cooler.
Allow the fluid to drain into a suitable
container.
For additional information, refer to: Health
and Safety Precautions
(1 00-00 General
Information, Description and Operation).
2006.0 Fiesta 1212006 G388010en
procarmanuals.com
Page 1052 of 1226
- -
Automatic Transmission/Transaxle External
Controls -Vehicles With:
4Speed Automatic
307-05-8 Transmission
(AW81-40) 307-05-8
REMOVAL AND INSTALLATION
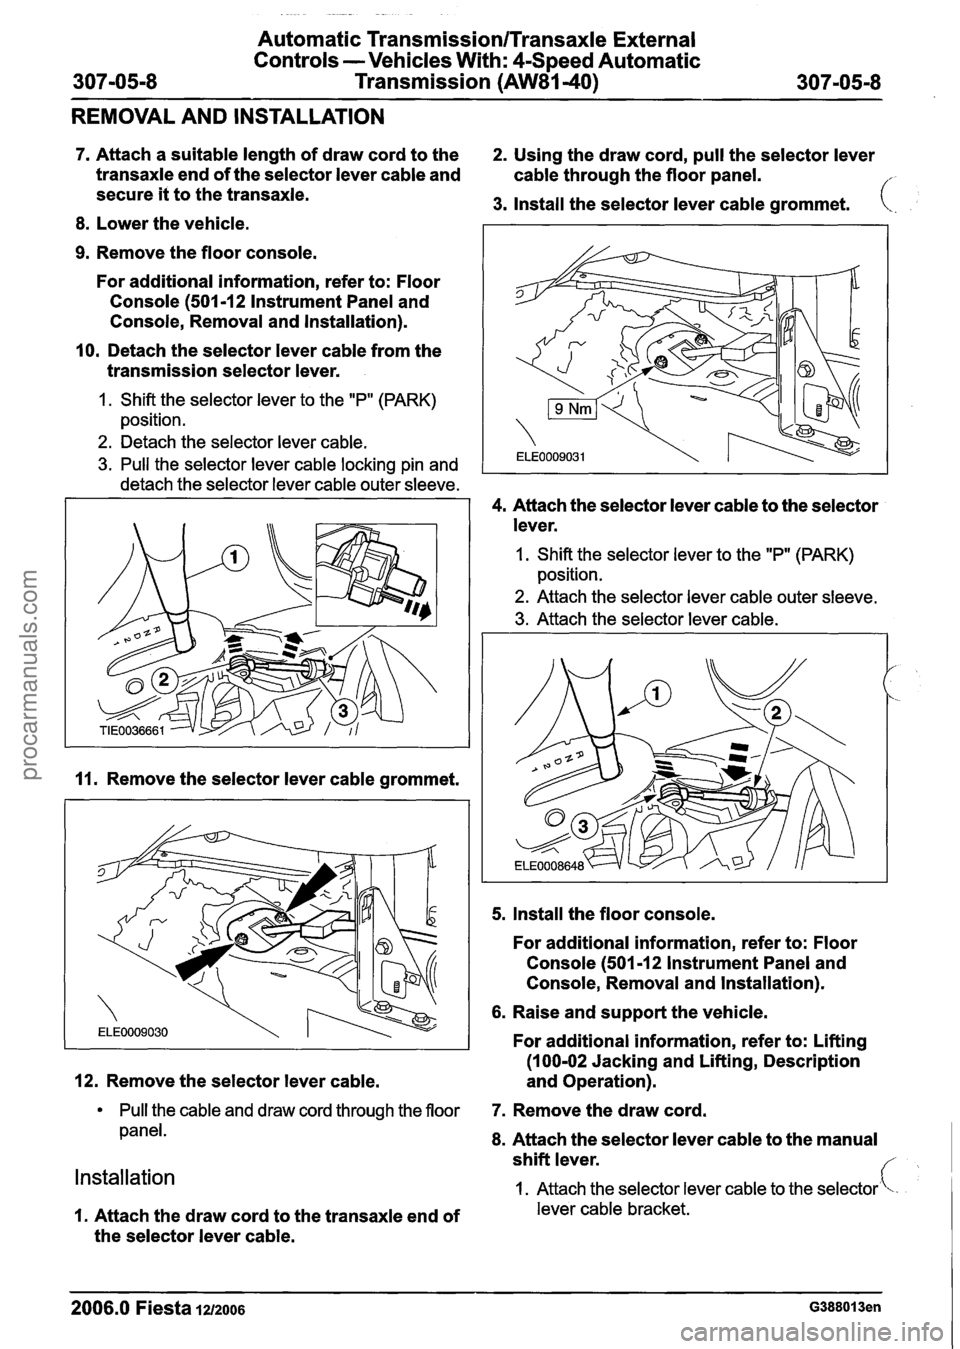
7. Attach a suitable length of draw cord to the 2. Using the draw cord, pull the selector lever
transaxle end of the selector lever cable and
cable through the floor panel.
secure
it to the transaxle. 3. Install the selector lever cable grommet.
8. Lower the vehicle.
9. Remove the floor console.
For additional information, refer to: Floor
Console
(501 -1 2 Instrument Panel and
Console, Removal and lnstallation).
10. Detach the selector lever cable from the
transmission selector lever.
1. Shift the selector lever to the "P" (PARK)
position.
2. Detach the selector lever cable.
3. Pull the selector lever cable locking pin and
detach the selector lever cable outer sleeve.
4. Attach the selector lever cable to the selector
lever.
11. Remove the selector lever cable grommet.
12. Remove the selector lever cable.
1. Shift the selector lever to the "P" (PARK)
position.
2. Attach the selector lever cable outer sleeve.
3. Attach the selector lever cable.
5. Install the floor console.
For additional information, refer to: Floor
Console
(501-12 lnstrument Panel and
Console, Removal and lnstallation).
6. Raise and support the vehicle.
For additional information, refer to: Lifting
(100-02 Jacking and Lifting, Description
and Operation).
Pull the cable and draw cord through the floor 7. Remove the draw cord.
panel. 8. Attach the selector lever cable to the manual
Installation
shift lever. f
1. Attach the selector lever cable to the selector''-
1. Attach the draw cord to the transaxle end of lever cable bracket.
the selector lever cable.
2006.0 Fiesta 1212006 G388013en
procarmanuals.com
Page 1061 of 1226

Manual Transmission/Transaxle and Clutch -
308-00-3 General Information 308-00-3
DIAGNOSIS AND TESTING
Manual Transaxle and Clutch
lnspection and Verification
General Equipment selected with the engine running and the parking
brake applied, without any concerns, the clutch
2. If the gear@) cannot be selected, REFER to
Symptom Chart.
Ultraviolet
fluid leak detection equipment
1. Verify the customer concern.
Transaxle noise concerns
2. Visually inspect for obvious signs of mechanical is
OK.
damage. 1. Check the engine and transaxle support for
Oil leaks.
Visibly damaged or worn components.
Visual lnspection Chart insufficient gap between the transaxle and the
body.
REFER to:
RoadlRoller Testing (1 00-00 General
Information, Description and Operation).
Mechanical 2. Road test the vehicle.
4. If the cause is not evident, verify the symptom
and REFER to Symptom Chart.
Oil leakage concerns
Loose or missing nuts or bolts.
( I The following checks should be carried out before
repairing or installing a new transaxle. 1.
Check the transaxle fluid level. If necessary,
3. If a noise occurs in various gears at the same
- - drain off any excess fluid.
The inspection and verification of manual transaxle
concerns can be considered in three main areas. 2. Clean the transaxle and the adjacent areas
carefully and road test the vehicle.
engine speed,
check if the noise also occurs in
3. If an obvious cause for an observed or reported the neutral position.
If it does, the noise is not
concern is found, correct the cause (if possible) caused
by the transaxle.
before proceeding to the next step. 4.
REFER to Symptom Chart.
Gear shifting concerns REFER to: RoadlRoller Testing (1 00-00 General
Information, Description and Operation).
1, Check the operation of the clutch: Lay a block 3. U~ing suitable ultraviolet fluid leak detection
of wood approximately
25 mm thick under the equipment, locate
the leak and check whether
clutch pedal and depress the clutch pedal as the leaking fluid
is transaxle fluid, brake fluid
far as the stop. If first or second gear can be (from the hydraulically operated clutch)
or
engine oil.
4. REFER to Symptom Chart.
Symptom Chart
Symptom Possible Sources Action
I
Clutch slippage Clutch master
cylinder.
Clutch slave cylinder.
Clutch pressure plate.
Clutch disc.
Engine or transaxle housing oil
or fluid
leak@).
GO to Pinpoint Test A.
Clutch chatter or shudder Engine and transaxle
mounts. REFER to:
Noise, Vibration and
Harshness (NVH) (1 00-04,
Diagnosis and Testing).
Clutch pressure plate.
Clutch disc.
Flywheel.
--
GO to Pinpoint Test B.
- -
2006.0 Fiesta 1212006 G25629en
procarmanuals.com
Page 1084 of 1226
Clutch Controls
DESCRIPTION
AND OPERATION
Because of this separate chamber, the braking
system remains operational if a leak occurs in the
hydraulic clutch system.
Function
Pressure is created in the master cylinder when
the clutch pedal is operated.
The hydraulic fluid in the master cylinder is put
under pressure and fed through the pressure pipe
to the slave cylinder.
The displaced hydraulic fluid moves the piston in
the slave cylinder and this in turn slides the release
bearing axially.
The release bearing pushes the bearing inner ring
against the tongues of the diaphragm spring.
The spring induced grip between the clutch disc
and the flywheel is broken.
When the clutch pedal is released the diaphragm
spring presses the piston in the slave cylinder back
to its starting position. The spring induced grip
between the clutch disc and the flywheel is created
again.
A spring in the slave cylinder ensures preload on
the release bearing.
The release bearing is always touching the
pressure plate because of this preload. The extra
travel caused by clutch lining wear is compensated
for by the preload.
There is a choke assembly in the slave cylinder
which helps to increase smoothness when pulling
away.
Because of the choke assembly, the pressure drop
of the fluid leaving the slave cylinder and returning
to the reservoir is delayed.
Because of this, the clutch closing time is delayed
when the clutch pedal is released suddenly, and
a soft and comfortable clutch engagement is
achieved.
Choking does not occur during clutch
disengagement.
A CAUTI0N:Vehicles with an automated shift
manual (ASM) transmission have
a slave
cylinder without
a choke assembly. The
slave cylinders must not be exchanged for
one another.
N0TE:The clutch pedal travel cannot be adjusted.
The release bearing is an interference fit in the
slave cylinder and cannot be renewed separately.
2006.0 Fiesta 1212006 G281360en
procarmanuals.com
Page 1086 of 1226
308-02-6 Clutch Controls 308-02-6
REMOVAL AND INSTALLATION
Clutch Slave Cylinder(l6 862 4) /'
Materials Alf brake fluid is spilt on the paintwork, the
Name Specification affected
area must be
immediately washed
ESDM-1 C220-A down with cold water. High-temperature
grease
ADO not apply grease on any area of the
clutch slave cylinder.
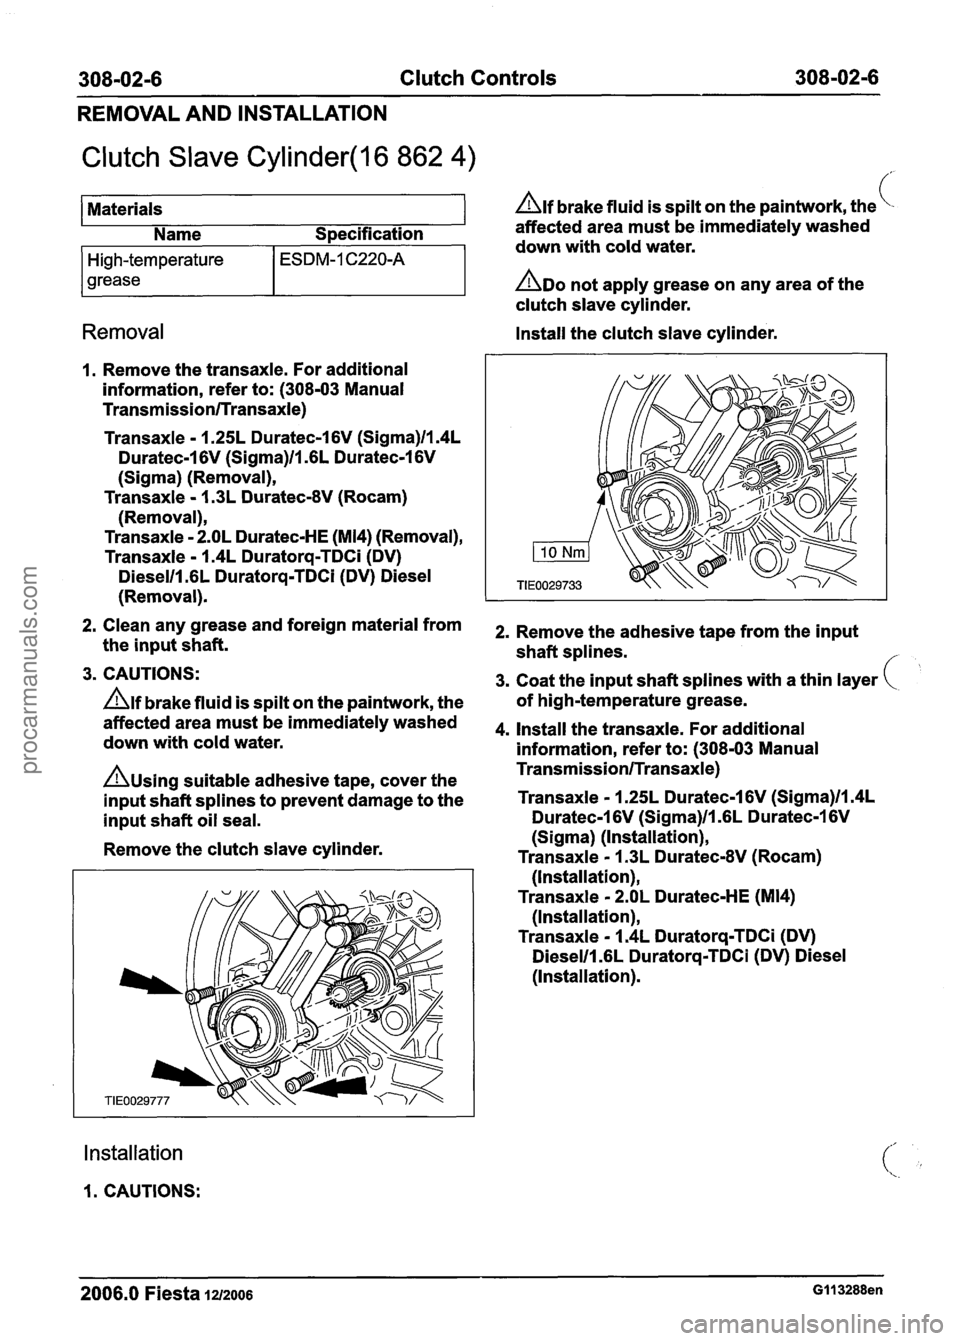
Removal Install the clutch slave cylinder.
I. Remove the transaxle. For additional
information, refer to: (308-03 Manual
TransmissionlTransaxle)
Transaxle - 1.2 5L Duratec-1 6V (Sigma)ll.4L
Duratec-1 6V (Sigma)ll .6L Duratec-1 6V
(Sigma) (Removal),
Transaxle - 1.3L Duratec-8V (Rocam)
(Re m ova I),
Transaxle - 2.OL Duratec-HE (M14) (Removal),
Transaxle - 1.4L Duratorq-TDCi (DV)
Dieselll.6L Duratorq-TDCi (DV) Diesel
(Removal).
2. Clean any grease and foreign material from
the input shaft.
3. CAUTIONS:
Alf brake fluid is spilt on the paintwork, the
affected area must be
immediately washed
down with
cold water.
Ausing suitable adhesive tape, cover the
input shaft
splines to prevent damage to the
input shaft
oil seal.
Remove the clutch slave cylinder.
Installation
1. CAUTIONS: 2.
Remove the adhesive tape from the input
shaft
splines.
3. Coat the input shaft splines with a thin layer
of high-temperature grease.
4.
Install the transaxle. For additional
information, refer to: (308-03 Manual
TransmissionlTransaxle)
Transaxle - 1.25L Duratec-1 6V (Sigma)ll.4L
Duratec-1 6V (Sigma)ll .6L Duratec-1 6V
(Sigma) (Installation),
Transaxle - 1.3L Duratec-8V (Rocam)
(Installation),
Transaxle - 2.OL Duratec-HE (M14)
(Installation),
Transaxle - 1.4L Duratorq-TDCi (DV)
Dieselll.6L Duratorq-TDCi (DV) Diesel
(Installation).
2006.0 Fiesta 1212006 GI1 3288en
procarmanuals.com