Page 255 of 344

Removing the spare tire
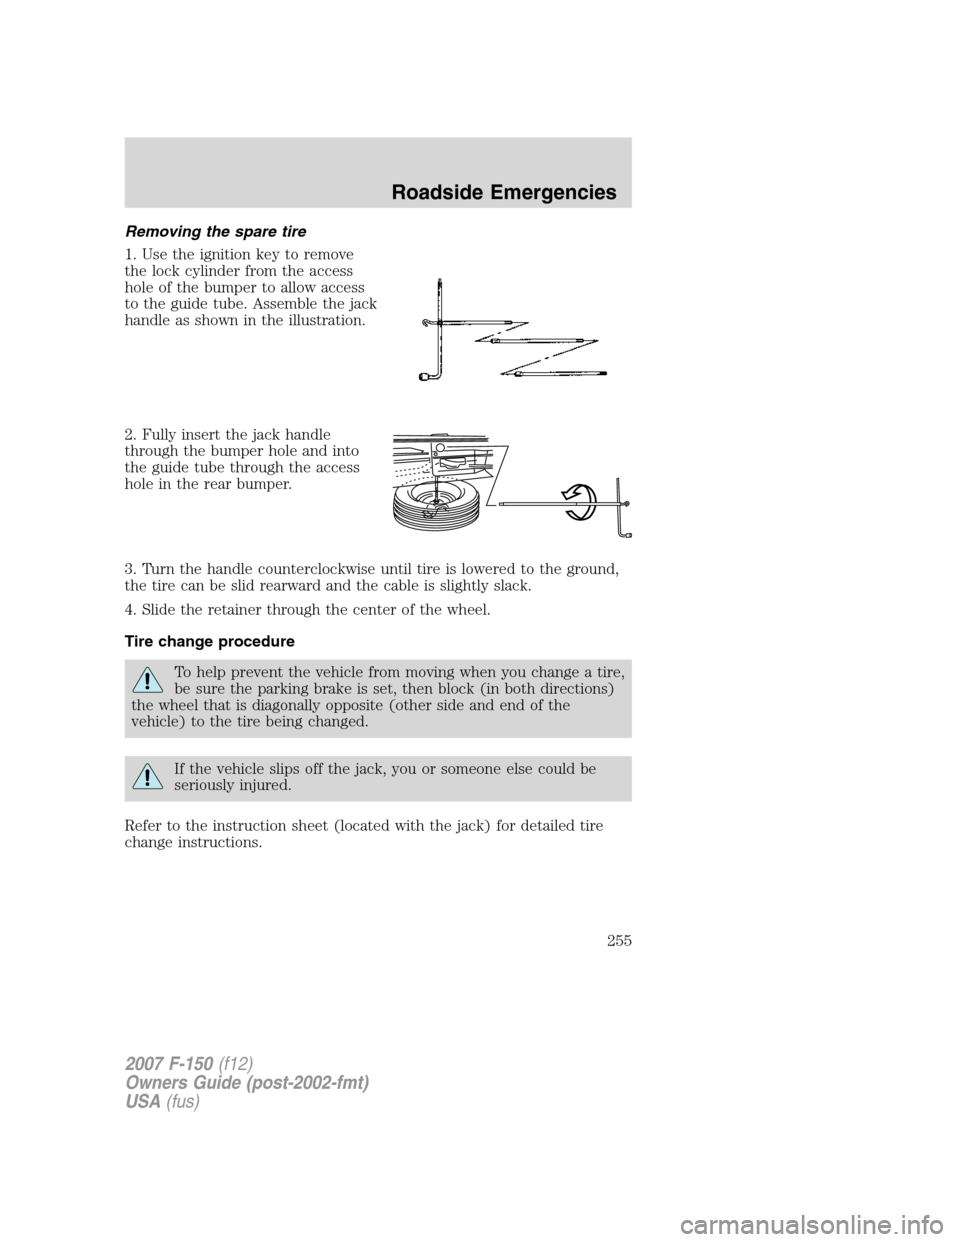
1. Use the ignition key to remove
the lock cylinder from the access
hole of the bumper to allow access
to the guide tube. Assemble the jack
handle as shown in the illustration.
2. Fully insert the jack handle
through the bumper hole and into
the guide tube through the access
hole in the rear bumper.
3. Turn the handle counterclockwise until tire is lowered to the ground,
the tire can be slid rearward and the cable is slightly slack.
4. Slide the retainer through the center of the wheel.
Tire change procedure
To help prevent the vehicle from moving when you change a tire,
be sure the parking brake is set, then block (in both directions)
the wheel that is diagonally opposite (other side and end of the
vehicle) to the tire being changed.
If the vehicle slips off the jack, you or someone else could be
seriously injured.
Refer to the instruction sheet (located with the jack) for detailed tire
change instructions.
2007 F-150(f12)
Owners Guide (post-2002-fmt)
USA(fus)
Roadside Emergencies
255
Page 256 of 344

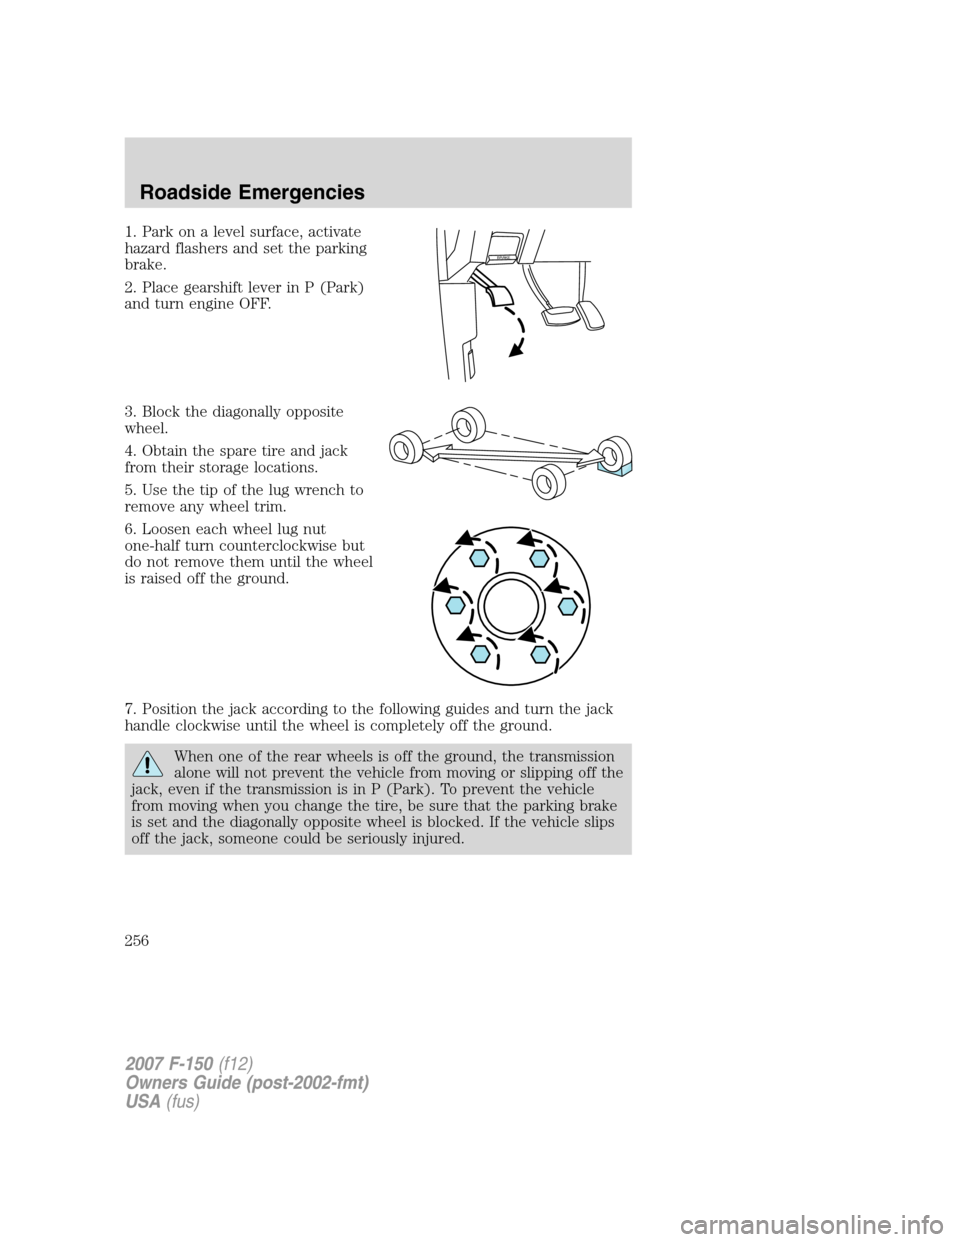
1. Park on a level surface, activate
hazard flashers and set the parking
brake.
2. Place gearshift lever in P (Park)
and turn engine OFF.
3. Block the diagonally opposite
wheel.
4. Obtain the spare tire and jack
from their storage locations.
5. Use the tip of the lug wrench to
remove any wheel trim.
6. Loosen each wheel lug nut
one-half turn counterclockwise but
do not remove them until the wheel
is raised off the ground.
7. Position the jack according to the following guides and turn the jack
handle clockwise until the wheel is completely off the ground.
When one of the rear wheels is off the ground, the transmission
alone will not prevent the vehicle from moving or slipping off the
jack, even if the transmission is in P (Park). To prevent the vehicle
from moving when you change the tire, be sure that the parking brake
is set and the diagonally opposite wheel is blocked. If the vehicle slips
off the jack, someone could be seriously injured.
BRAKE
2007 F-150(f12)
Owners Guide (post-2002-fmt)
USA(fus)
Roadside Emergencies
256
Page 257 of 344
•Front
Note:Use the frame rail as the jacking location point, NOT the control
arm.
•Rear
To lessen the risk of
personal injury, do not put
any part of your body under the
vehicle while changing a tire. Do
not start the engine when your
vehicle is on the jack. The jack is
only meant for changing the tire.
•Never use the front or rear
differential as a jacking point.
8. Remove the lug nuts with the lug wrench.
9. Replace the flat tire with the spare tire, making sure the valve stem is
facing outward. Reinstall the lug nuts until the wheel is snug against the
hub. Do not fully tighten the lug nuts until the wheel has been lowered.
10. Lower the wheel by turning the jack handle counterclockwise.
2007 F-150(f12)
Owners Guide (post-2002-fmt)
USA(fus)
Roadside Emergencies
257
Page 258 of 344

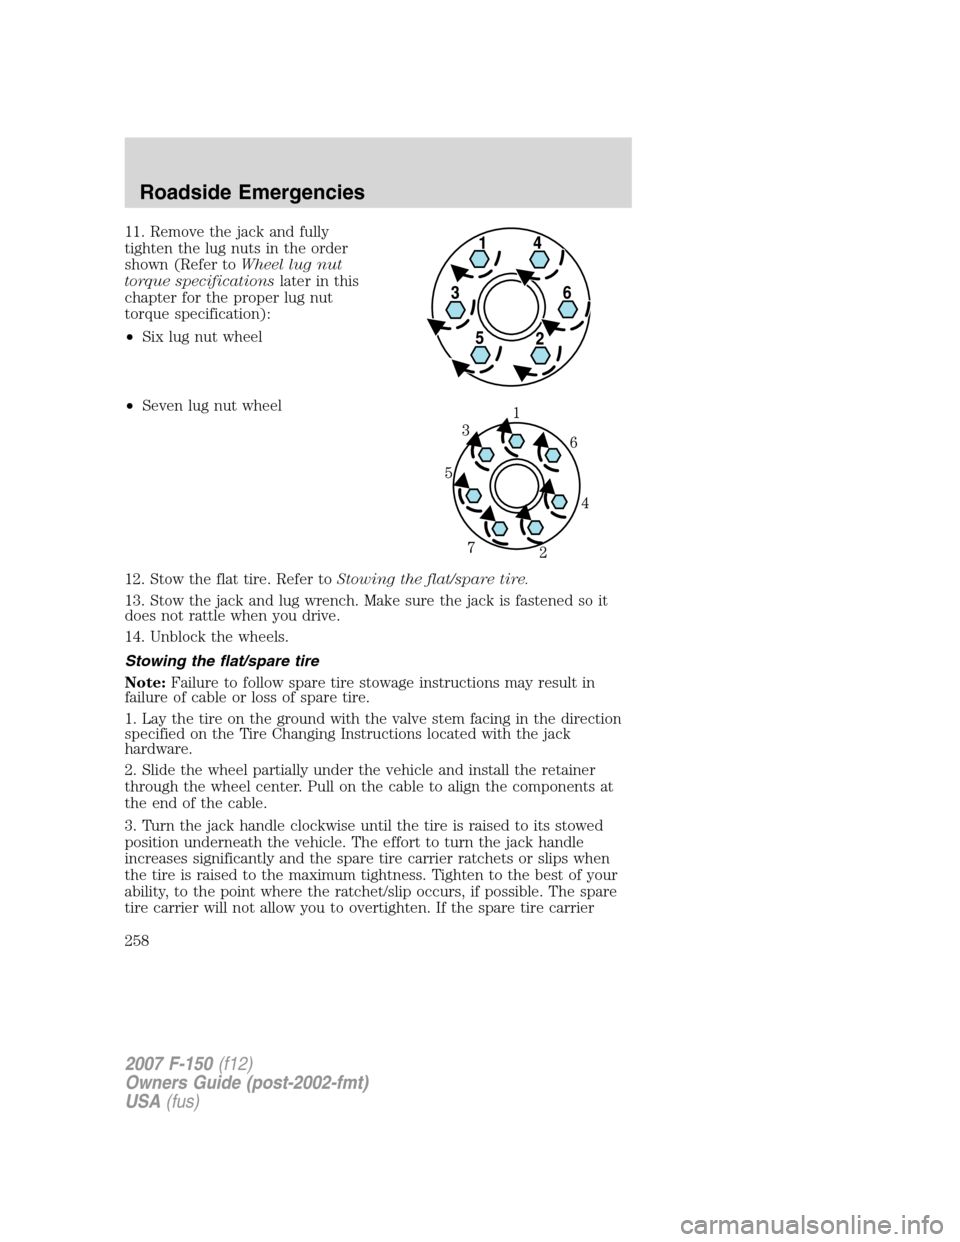
11. Remove the jack and fully
tighten the lug nuts in the order
shown (Refer toWheel lug nut
torque specificationslater in this
chapter for the proper lug nut
torque specification):
•Six lug nut wheel
•Seven lug nut wheel
12. Stow the flat tire. Refer toStowing the flat/spare tire.
13. Stow the jack and lug wrench. Make sure the jack is fastened so it
does not rattle when you drive.
14. Unblock the wheels.
Stowing the flat/spare tire
Note:Failure to follow spare tire stowage instructions may result in
failure of cable or loss of spare tire.
1. Lay the tire on the ground with the valve stem facing in the direction
specified on the Tire Changing Instructions located with the jack
hardware.
2. Slide the wheel partially under the vehicle and install the retainer
through the wheel center. Pull on the cable to align the components at
the end of the cable.
3. Turn the jack handle clockwise until the tire is raised to its stowed
position underneath the vehicle. The effort to turn the jack handle
increases significantly and the spare tire carrier ratchets or slips when
the tire is raised to the maximum tightness. Tighten to the best of your
ability, to the point where the ratchet/slip occurs, if possible. The spare
tire carrier will not allow you to overtighten. If the spare tire carrier
2007 F-150(f12)
Owners Guide (post-2002-fmt)
USA(fus)
Roadside Emergencies
258
Page 259 of 344

ratchets or slips with little effort, take the vehicle to your authorized
dealer for assistance at your earliest convenience.
4. Check that the tire lies flat against the frame and is properly
tightened. Try to push or pull, then turn the tire to be sure it will not
move. Loosen and retighten, if necessary. Failure to properly stow the
spare tire may result in failure of the winch cable and loss of the tire.
5. Repeat this tightness check procedure when servicing the spare tire
pressure (every six months, as per yourscheduled maintenance
information),or at any time that the spare tire is disturbed through
service of other components.
6. If removed, install the spare tire lock (if equipped) into the bumper
drive tube with the spare tire lock key (if equipped) and jack handle.
WHEEL LUG NUT TORQUE SPECIFICATIONS
Retighten the lug nuts to the specified torque within 100 miles (160 km)
after any wheel disturbance (rotation, flat tire, wheel removal, etc.).
Bolt size Wheel lug nut torque*
lb.ft. N•m
M14 x 2.0 150 200
* Torque specifications are for nut and bolt threads free of dirt and
rust. Use only Ford recommended replacement fasteners.
When a wheel is installed, always remove any corrosion, dirt or
foreign materials present on the mounting surfaces of the wheel
or the surface of the wheel hub, brake drum or brake disc that
contacts the wheel. Ensure that any fasteners that attach the rotor to
the hub are secured so they do not interfere with the mounting
surfaces of the wheel. Installing wheels without correct metal-to-metal
contact at the wheel mounting surfaces can cause the wheel nuts to
loosen and the wheel to come off while the vehicle is in motion,
resulting in loss of control.
JUMP STARTING
The gases around the battery can explode if exposed to flames,
sparks, or lit cigarettes. An explosion could result in injury or
vehicle damage.
2007 F-150(f12)
Owners Guide (post-2002-fmt)
USA(fus)
Roadside Emergencies
259
Page 339 of 344

Spark plugs,
specifications .....................322, 328
Special notice
ambulance conversions ..............8
four-wheel drive vehicles .......240
utility-type vehicles ....................8
Specification chart,
lubricants ...................................324
Speed control ..............................79
Starting a flex fuel vehicle .......211
Starting your
vehicle ........................208–209, 211
jump starting ..........................259
Steering wheel
controls ......................................81
tilting .........................................68
T
Tailgate ........................................98
Temperature control
(see Climate control) .................48
Tilt steering wheel ......................68
Tire Pressure Monitoring
System (TPMS)
Tires, Wheels and Loading ....184
Tires ...........................169–170, 252
alignment ................................177
care ..........................................173
changing ..........................252, 255
checking the pressure ............173
inflating ...................................171
label .........................................183
replacing ..................................175
rotating ....................................177
safety practices .......................176
sidewall information ...............178
snow tires and chains ............188
spare tire .................................252terminology .............................171
tire grades ...............................170
treadwear ........................170, 174
Towing .......................................194
recreational towing .................206
trailer towing ..........................194
Traction control ........................215
Traction-lok rear axle ...............216
Transfer case
fluid checking .........................319
Transmission .............................217
brake-shift interlock
(BSI) ................................217–218
fluid, checking and adding
(automatic) .............................316
fluid, checking and adding
(manual) .................................318
fluid, refill capacities ..............324
lubricant specifications ..........324
manual operation ....................223
Turn signal ..................................61
V
Vehicle Identification Number
(VIN) ..........................................330
Vehicle loading ..........................188
Ventilating your vehicle ...........212
W
Warning lights (see Lights) .......12
Washer fluid ..............................288
Water, Driving through .............238
Windows
power .........................................74
power down back window .......75
2007 F-150(f12)
Owners Guide (post-2002-fmt)
USA(fus)
Index
339
Page:
< prev 1-8 9-16 17-24