2007 FORD F SERIES MOTORHOME AND COMMERCIAL CHASSIS light
[x] Cancel search: lightPage 57 of 128
Forced downshifts
•Allowed in D (Overdrive) with the Tow/Haul feature on or off.
•Depress the accelerator to the floor.
•Allows transmission to select an appropriate gear.
If your vehicle gets stuck in mud or snow
If your vehicle gets stuck in mud or snow, it may be rocked out by
shifting between forward and reverse gears, stopping between shifts in a
steady pattern. Press lightly on the accelerator in each gear.
Do not rock the vehicle if the engine is not at normal operating
temperature or damage to the transmission may occur.
Do not rock the vehicle for more than a minute or damage to the
transmission and tires may occur, or the engine may overheat.
DRIVING THROUGH WATER
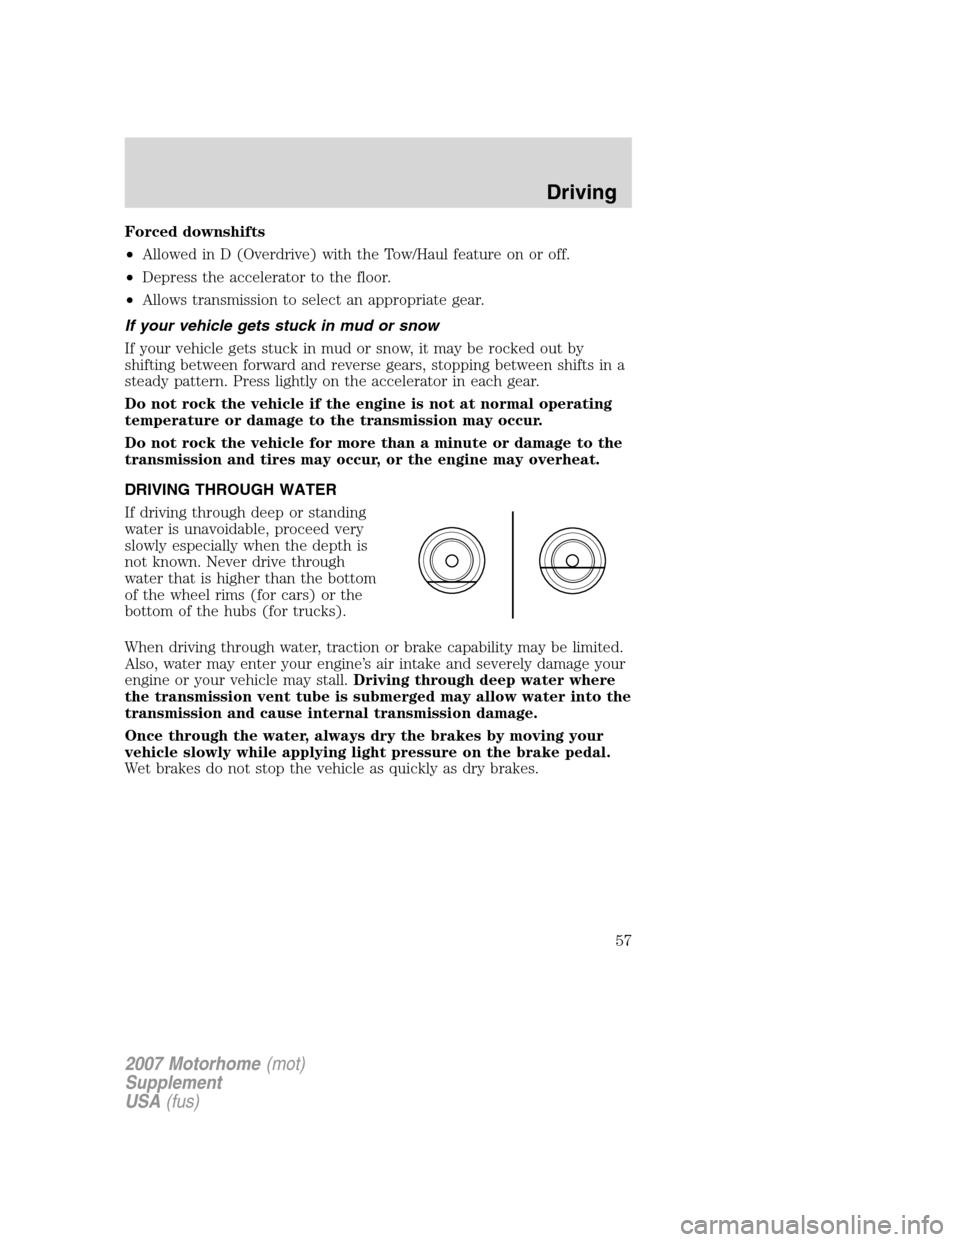
If driving through deep or standing
water is unavoidable, proceed very
slowly especially when the depth is
not known. Never drive through
water that is higher than the bottom
of the wheel rims (for cars) or the
bottom of the hubs (for trucks).
When driving through water, traction or brake capability may be limited.
Also, water may enter your engine’s air intake and severely damage your
engine or your vehicle may stall.Driving through deep water where
the transmission vent tube is submerged may allow water into the
transmission and cause internal transmission damage.
Once through the water, always dry the brakes by moving your
vehicle slowly while applying light pressure on the brake pedal.
Wet brakes do not stop the vehicle as quickly as dry brakes.
2007 Motorhome(mot)
Supplement
USA(fus)
Driving
57
Page 59 of 128
HAZARD LIGHTS CONTROL
Use only in an emergency to warn traffic of vehicle breakdown,
approaching danger, etc. The hazard flashers can be operated when the
ignition is off.
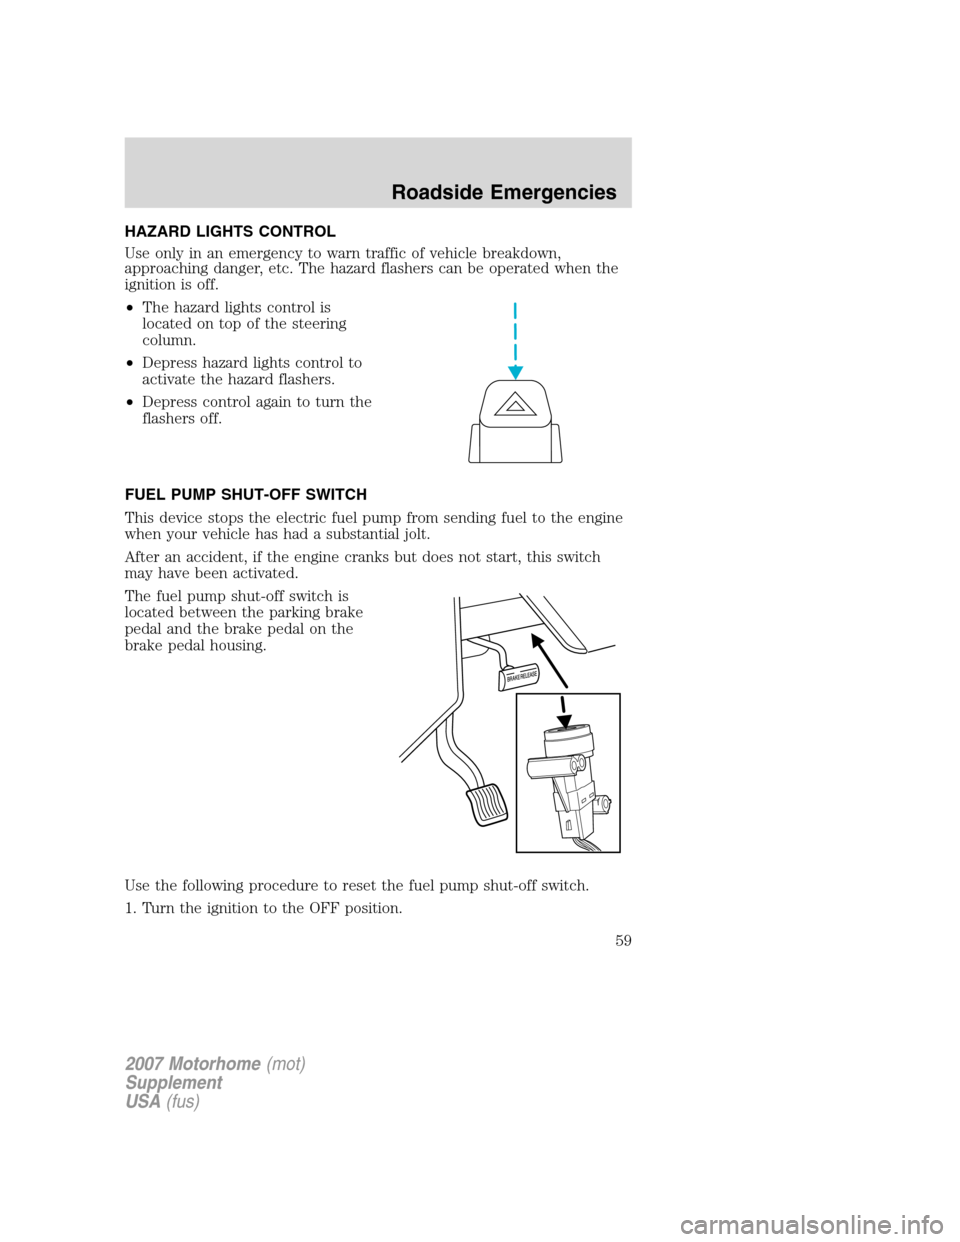
•The hazard lights control is
located on top of the steering
column.
•Depress hazard lights control to
activate the hazard flashers.
•Depress control again to turn the
flashers off.
FUEL PUMP SHUT-OFF SWITCH
This device stops the electric fuel pump from sending fuel to the engine
when your vehicle has had a substantial jolt.
After an accident, if the engine cranks but does not start, this switch
may have been activated.
The fuel pump shut-off switch is
located between the parking brake
pedal and the brake pedal on the
brake pedal housing.
Use the following procedure to reset the fuel pump shut-off switch.
1. Turn the ignition to the OFF position.
2007 Motorhome(mot)
Supplement
USA(fus)
Roadside Emergencies
59
Page 66 of 128
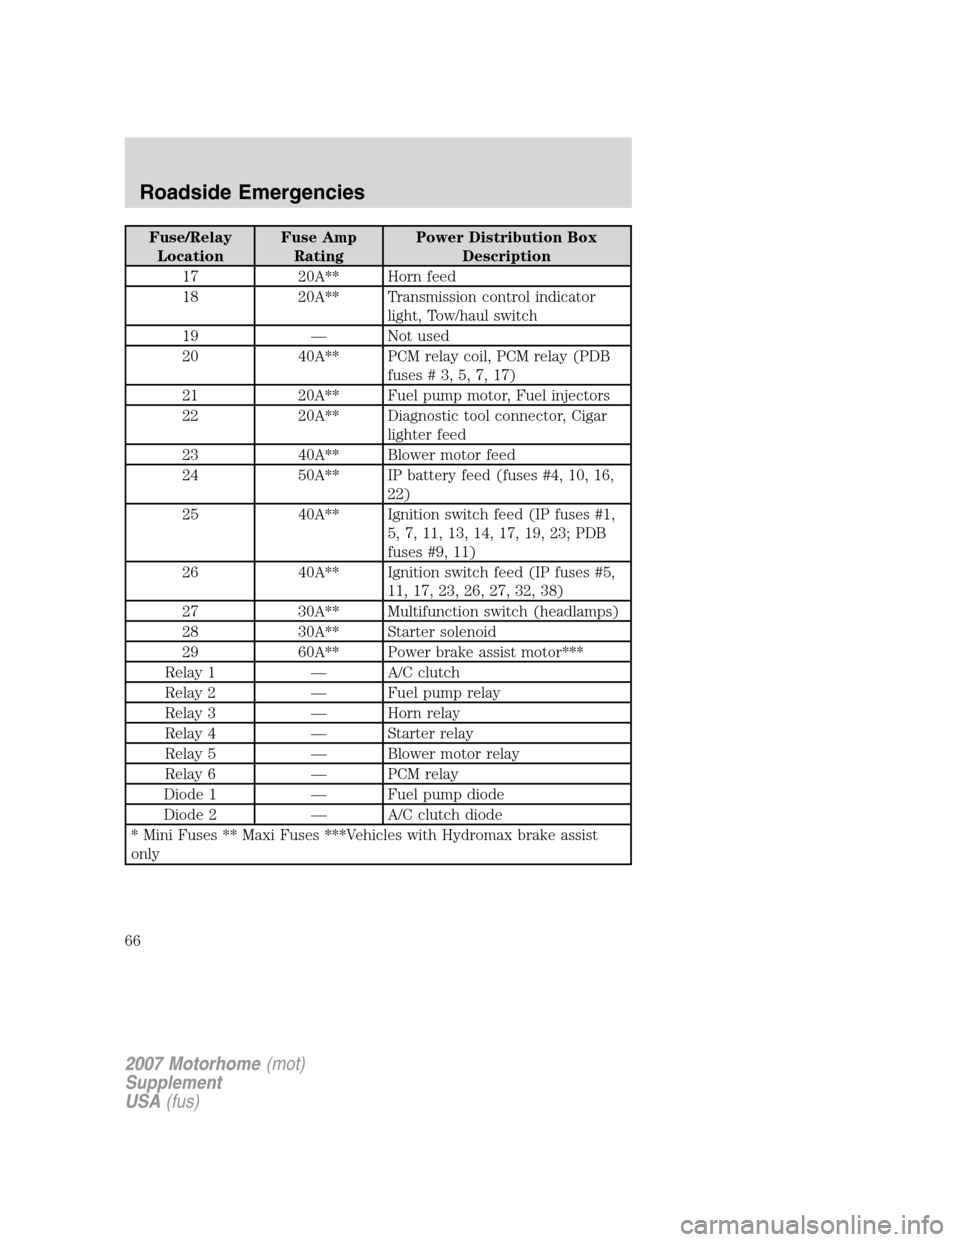
Fuse/Relay
LocationFuse Amp
RatingPower Distribution Box
Description
17 20A** Horn feed
18 20A** Transmission control indicator
light, Tow/haul switch
19 — Not used
20 40A** PCM relay coil, PCM relay (PDB
fuses#3,5,7,17)
21 20A** Fuel pump motor, Fuel injectors
22 20A** Diagnostic tool connector, Cigar
lighter feed
23 40A** Blower motor feed
24 50A** IP battery feed (fuses #4, 10, 16,
22)
25 40A** Ignition switch feed (IP fuses #1,
5, 7, 11, 13, 14, 17, 19, 23; PDB
fuses #9, 11)
26 40A** Ignition switch feed (IP fuses #5,
11, 17, 23, 26, 27, 32, 38)
27 30A** Multifunction switch (headlamps)
28 30A** Starter solenoid
29 60A** Power brake assist motor***
Relay 1 — A/C clutch
Relay 2 — Fuel pump relay
Relay 3 — Horn relay
Relay 4 — Starter relay
Relay 5 — Blower motor relay
Relay 6 — PCM relay
Diode 1 — Fuel pump diode
Diode 2 — A/C clutch diode
* Mini Fuses ** Maxi Fuses ***Vehicles with Hydromax brake assist
only
2007 Motorhome(mot)
Supplement
USA(fus)
Roadside Emergencies
66
Page 73 of 128
4. Check all battery terminals and remove any excessive corrosion before
you attach the battery cables. Ensure that vent caps are tight and level.
5. Turn the heater fan on in both vehicles to protect from any electrical
surges. Turn all other accessories off.
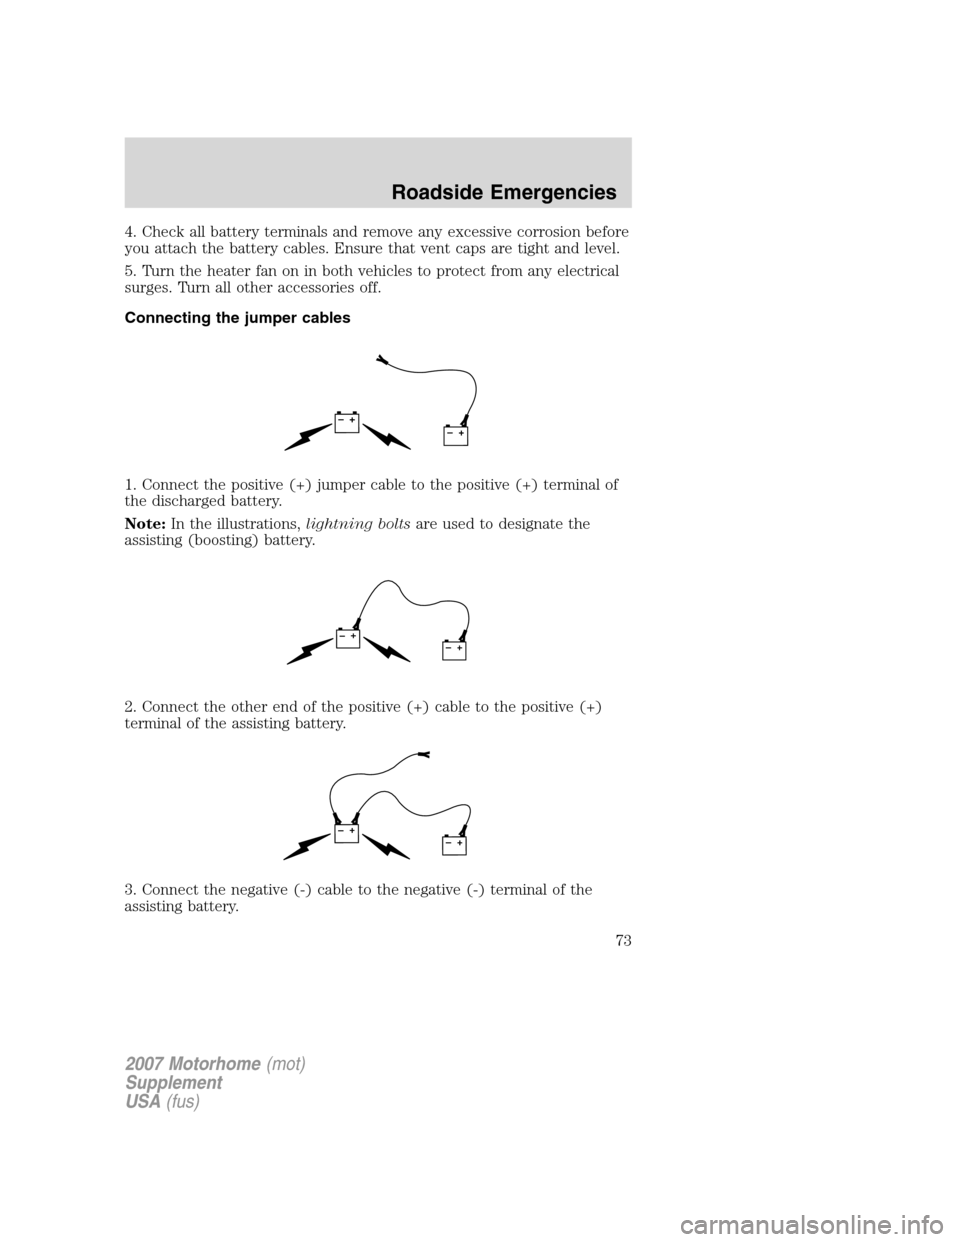
Connecting the jumper cables
1. Connect the positive (+) jumper cable to the positive (+) terminal of
the discharged battery.
Note:In the illustrations,lightning boltsare used to designate the
assisting (boosting) battery.
2. Connect the other end of the positive (+) cable to the positive (+)
terminal of the assisting battery.
3. Connect the negative (-) cable to the negative (-) terminal of the
assisting battery.
+–+–
+–+–
+–+–
2007 Motorhome(mot)
Supplement
USA(fus)
Roadside Emergencies
73
Page 75 of 128
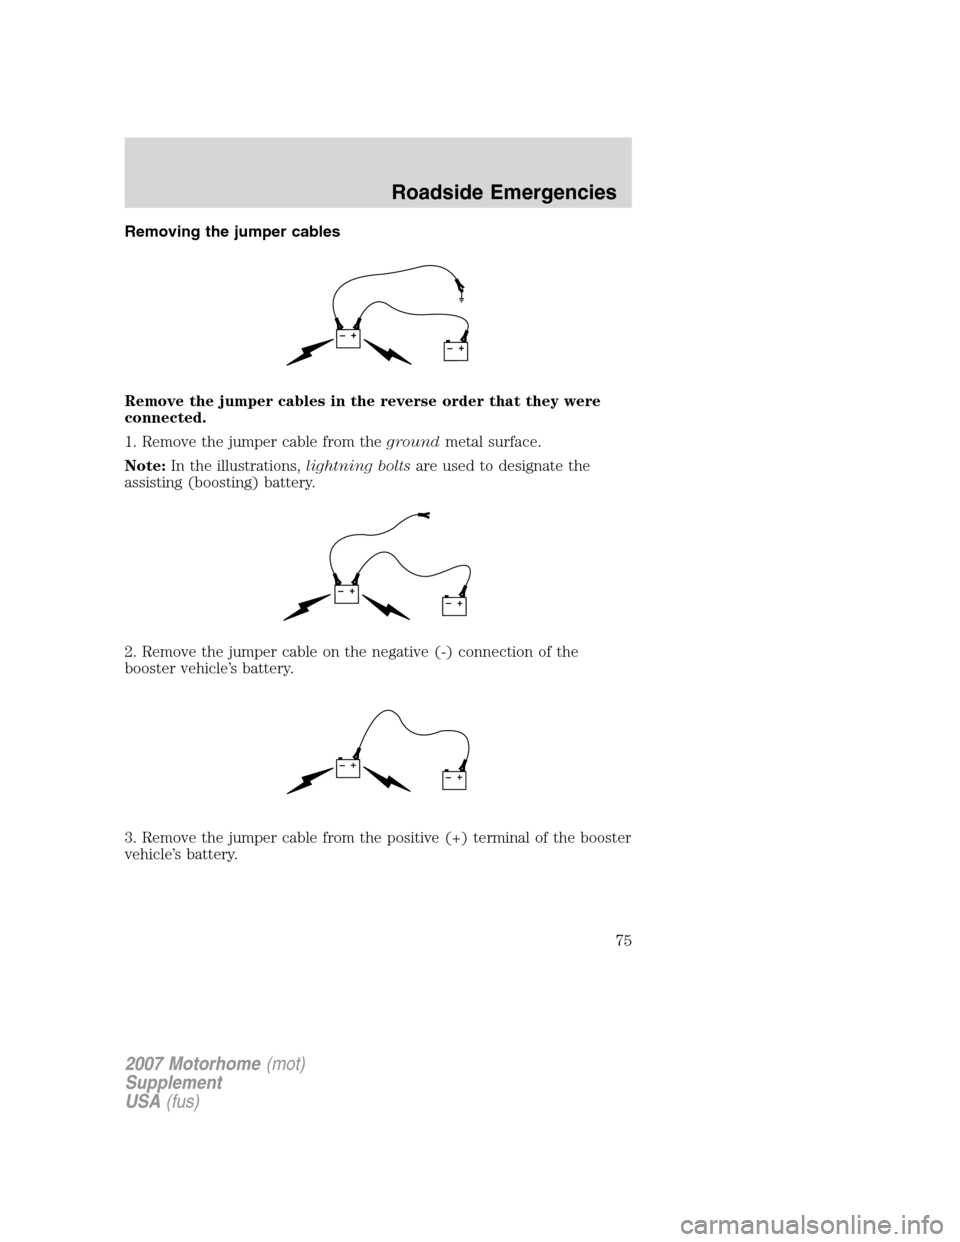
Removing the jumper cables
Remove the jumper cables in the reverse order that they were
connected.
1. Remove the jumper cable from thegroundmetal surface.
Note:In the illustrations,lightning boltsare used to designate the
assisting (boosting) battery.
2. Remove the jumper cable on the negative (-) connection of the
booster vehicle’s battery.
3. Remove the jumper cable from the positive (+) terminal of the booster
vehicle’s battery.
+–+–
+–+–
+–+–
2007 Motorhome(mot)
Supplement
USA(fus)
Roadside Emergencies
75
Page 80 of 128
UTILIZING THE MEDIATION/ARBITRATION PROGRAM
(CANADA ONLY)
For vehicles delivered to authorized Canadian dealers. In those cases
where you continue to feel that the efforts by Ford of Canada and the
authorized dealer to resolve a factory-related vehicle service concern
have been unsatisfactory, Ford of Canada participates in an impartial
third party mediation/arbitration program administered by the Canadian
Motor Vehicle Arbitration Plan (CAMVAP).
The CAMVAP program is a straight-forward and relatively speedy
alternative to resolve a disagreement when all other efforts to produce a
settlement have failed. This procedure is without cost to you and is
designed to eliminate the need for lengthy and expensive legal
proceedings.
In the CAMVAP program, impartial third-party arbitrators conduct
hearings at mutually convenient times and places in an informal
environment. These impartial arbitrators review the positions of the
parties, make decisions and, when appropriate, render awards to resolve
disputes. CAMVAP decisions are fast, fair, and final as the arbitrator’s
award is binding both to you and Ford of Canada.
CAMVAP services are available in all territories and provinces. For more
information, without charge or obligation, call your CAMVAP Provincial
Administrator directly at 1-800-207-0685.
FORD EXTENDED SERVICE PLAN
You can get more protection for your new car or light truck by
purchasing Ford Extended Service Plan (Ford ESP) coverage. It provides
the following:
•Benefits during the warranty period depending on the plan you
purchase (such as: reimbursement for rentals; coverage for certain
maintenance and wear items).
•Protection against covered repair costs after your Bumper-to-Bumper
Warranty expires.
You may purchase Ford ESP from any participating authorized dealer.
There are several plans available in various time, distance and deductible
combinations which can be tailored to fit your own driving needs. Ford
ESP also offers reimbursement benefits for towing and rental coverage.
When you buy Ford ESP, you receive Peace-of-Mind protection
throughout the United States and Canada, provided by a network of
more than 4,600 participating authorized dealers.
2007 Motorhome(mot)
Supplement
USA(fus)
Customer Assistance
80
Page 90 of 128
Batteries normally produce explosive gases which can cause
personal injury. Therefore, do not allow flames, sparks or lighted
substances to come near the battery. When working near the battery,
always shield your face and protect your eyes. Always provide proper
ventilation.
When lifting a plastic-cased battery, excessive pressure on the end
walls could cause acid to flow through the vent caps, resulting in
personal injury and/or damage to the vehicle or battery. Lift the battery
with a battery carrier or with your hands on opposite corners.
Keep batteries out of reach of children. Batteries contain sulfuric
acid. Avoid contact with skin, eyes or clothing. Shield your eyes
when working near the battery to protect against possible splashing of
acid solution. In case of acid contact with skin or eyes, flush
immediately with water for a minimum of 15 minutes and get prompt
medical attention. If acid is swallowed, call a physician immediately.
Battery posts, terminals and related accessories contain lead and
lead compounds.Wash hands after handling.
To account for customer driving habits and conditions, your automatic
transmission electronically controls the shift quality by using an adaptive
learning strategy. The adaptive learning strategy is maintained by power
from the battery. When the battery is disconnected or a new battery is
installed, the transmission must relearn its adaptive strategy. Optimal
shifting will resume within a few hundred kilometers (miles) of operation.
If the shift quality does not improve within a few hundred
kilometers (miles) of operation, or if the downshifts and other
throttle conditions do not function normally or after a long
deceleration period, see your authorized dealer or a qualified
service technician as soon as possible.
Because your vehicle’s engine is also electronically controlled by a
computer, some control conditions are maintained by power from the
battery. When the battery is disconnected or a new battery is installed,
the engine must relearn its idle and fuel trim strategy for optimum
driveability and performance. To begin this process:
1. With the vehicle at a complete stop, set the parking brake.
2007 Motorhome(mot)
Supplement
USA(fus)
Maintenance and Specifications
90
Page 94 of 128
For vehicles with overflow coolant systems with a non-pressurized cap
on the coolant recovery system, add coolant to the coolant recovery
reservoir when the engine is cool. Add the proper mixture of coolant and
water to the “FULL COLD” level. For all other vehicles which have a
coolant degas system with a pressurized cap, or if it is necessary to
remove the coolant pressure relief cap on the radiator of a vehicle with
an overflow system, follow these steps to add engine coolant.
To reduce the risk of personal injury, make sure the engine is
cool before unscrewing the coolant pressure relief cap. The
cooling system is under pressure; steam and hot liquid can come out
forcefully when the cap is loosened slightly.
1. Before you begin, turn the engine off and let it cool.
2. When the engine is cool, wrap a thick cloth around the coolant
pressure relief cap on the coolant reservoir (a translucent plastic bottle).
Slowly turn cap counterclockwise (left) until pressure begins to release.
3. Step back while the pressure releases.
4. When you are sure that all the pressure has been released, use the
cloth to turn it counterclockwise and remove the cap.
5. Fill the coolant reservoir slowly with the proper coolant mixture (see
above), to within the “COLD FILL RANGE” or the “FULL COLD” level on
the reservoir. If you removed the radiator cap in an overflow system, fill
the radiator until the coolant is visible and radiator is almost full.
6. Replace the cap. Turn until tightly installed. (Cap must be tightly
installed to prevent coolant loss.)
After any coolant has been added, check the coolant concentration (refer
toChecking engine coolant). If the concentration is not 50/50
(protection to –34°F/–36°C), drain some coolant and adjust the
concentration. It may take several drains and additions to obtain a 50/50
coolant concentration.
Whenever coolant has been added, the coolant level in the coolant
reservoir should be checked the next few times you drive the vehicle. If
necessary, add enough 50/50 concentration of engine coolant and
distilled water to bring the liquid level to the proper level.
If you have to add more than 1.0 quart (1.0 liter) of engine coolant per
month, have your authorized dealer check the engine cooling system.
Your cooling system may have a leak. Operating an engine with a low
level of coolant can result in engine overheating and possible engine
damage.
2007 Motorhome(mot)
Supplement
USA(fus)
Maintenance and Specifications
94