Page 166 of 328
The tether strap anchors in your vehicle are in the following positions
(shown from top view):
•Second row bench seat
•Second row bucket seats
Attach the tether strap only to the appropriate tether anchor as
shown. The tether strap may not work properly if attached
somewhere other than the correct tether anchor.
Second row seating positions
1. Position the child safety seat on the seat cushion.
2. Locate the tether anchor at the bottom back of the seat.
•outboard seating positions
2007 Expedition(exd)
Owners Guide (post-2002-fmt)
USA(fus)
Seating and Safety Restraints
166
Page 167 of 328
•center seating position (if
equipped)
3. Route the child safety seat tether strap under the head restraint
(outboard seats) and over the back of the seat.
4. Grasp the tether strap and
position it to the seat frame.
5. Rotate the tether strap, and clip
the tether strap to the anchor on
the seat frame.
2007 Expedition(exd)
Owners Guide (post-2002-fmt)
USA(fus)
Seating and Safety Restraints
167
Page 169 of 328

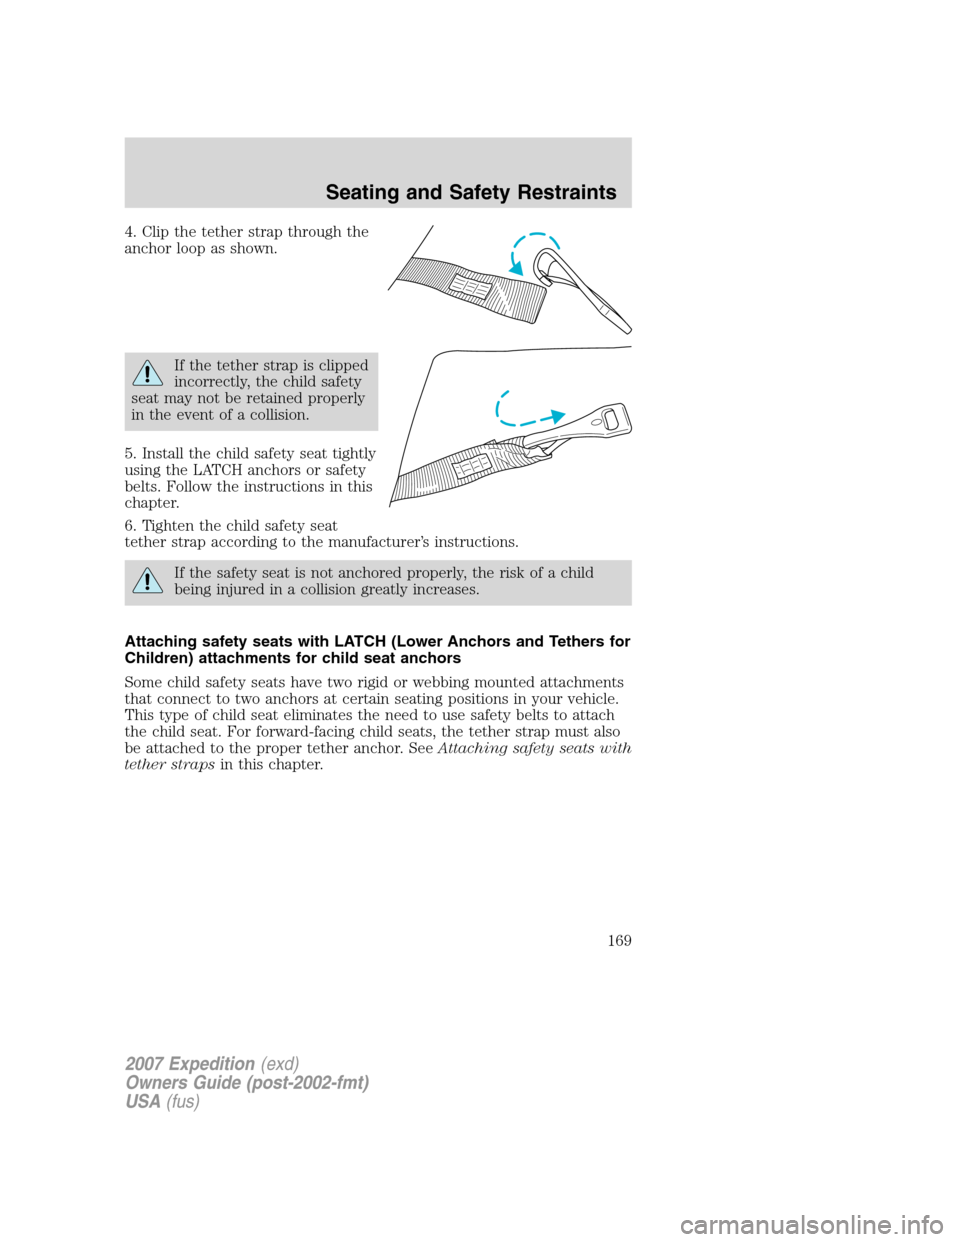
4. Clip the tether strap through the
anchor loop as shown.
If the tether strap is clipped
incorrectly, the child safety
seat may not be retained properly
in the event of a collision.
5. Install the child safety seat tightly
using the LATCH anchors or safety
belts. Follow the instructions in this
chapter.
6. Tighten the child safety seat
tether strap according to the manufacturer’s instructions.
If the safety seat is not anchored properly, the risk of a child
being injured in a collision greatly increases.
Attaching safety seats with LATCH (Lower Anchors and Tethers for
Children) attachments for child seat anchors
Some child safety seats have two rigid or webbing mounted attachments
that connect to two anchors at certain seating positions in your vehicle.
This type of child seat eliminates the need to use safety belts to attach
the child seat. For forward-facing child seats, the tether strap must also
be attached to the proper tether anchor. SeeAttaching safety seats with
tether strapsin this chapter.
2007 Expedition(exd)
Owners Guide (post-2002-fmt)
USA(fus)
Seating and Safety Restraints
169
Page 170 of 328
Your vehicle has LATCH anchors for child seat installation at the seating
positions marked with the child seat symbol:
Never attach two LATCH child safety seats to the same anchor.
In a crash, one anchor may not be strong enough to hold two
child safety seat attachments and may break, causing serious injury or
death.
The lower anchors for child seat
installation are located at the rear
section of the second row seat
between the cushion and seat back.
The LATCH anchors are below the
locator symbols on the seat back.
The locator symbols are on round plastic buttons on the center seat and
on rectangular tags on the outboard seats.
Follow the child seat manufacturer’s instructions to properly install a
child seat with LATCH attachments.
2007 Expedition(exd)
Owners Guide (post-2002-fmt)
USA(fus)
Seating and Safety Restraints
170
Page 247 of 328
Power distribution box
The power distribution box is located in the engine compartment. The
power distribution box contains high-current fuses that protect your
vehicle’s main electrical systems from overloads.
Always disconnect the battery before servicing high current
fuses.
To reduce risk of electrical shock, always replace the cover to
the Power Distribution Box before reconnecting the battery or
refilling fluid reservoirs.
If the battery has been disconnected and reconnected, refer to the
Batterysection of theMaintenance and Specificationschapter.
The high-current fuses are coded as follows:
Fuse/Relay
LocationFuse Amp
RatingPower Distribution Box
Description
1 — Blower relay
2 — Not used
3 — Rear window defroster relay
4 30A** Third row seats (driver side)
5 40A** Trailer tow connector (electric
brake)
6 60A** ABS (valves)
2007 Expedition(exd)
Owners Guide (post-2002-fmt)
USA(fus)
Roadside Emergencies
247
Page 248 of 328
Fuse/Relay
LocationFuse Amp
RatingPower Distribution Box
Description
7 — Not used
8 40A** Heated/cooled seats
9 60A** ABS (pump)
10 20A** Rear console power point
11 30A** Auxiliary blower
12 25A* Trailer tow connector (park
lamps)
13 30A * Trailer tow connector (battery
charge)
14 — Not used
15 — Not used
16 — A/C clutch relay
17 — Not used
18 — Fuel pump relay
19 — Back-up relay
20 — Trailer tow connector relay (left
turn signal)
21 — Trailer tow connector relay (right
turn signal)
22 — Not used
23 15A* Heated mirrors
24 40A** Blower motor
25 — Not used
26 — Not used
27 30A** Power liftgate
28 40A** Rear window defroster, Heated
mirror
29 30A** Passenger seat
30 10A* A/C clutch
31 15A* Brake lamps
32 20A* Fuel pump
33 20A* Back-up lamps
2007 Expedition(exd)
Owners Guide (post-2002-fmt)
USA(fus)
Roadside Emergencies
248
Page 249 of 328
Fuse/Relay
LocationFuse Amp
RatingPower Distribution Box
Description
34 25A* Trailer tow connector (stop/turn
lamps)
35 20A* 4x4 module
36 10A* Powertrain Control Module
(PCM) – Keep alive power,
Canister vent
37 15A* Transmission B+
38 30A** Third row seats (passenger side)
39 50A** Air suspension pump
40 30A** Starter motor
41 20A** IP/Console power point
42 — Not used
43 20A** 4x4 module motor
44 — Not used
45 30A** Driver seat
46 40A** Run/Start bus bar
47 30A** Air suspension – solenoids
48 — Not used
49 30A** Front wipers/washer
50 30A** PCM – bus bar
51 20A** Cargo power point
52 20A** Cigarette lighter
53 — Air suspension relay
54 — Starter relay
55 — Trailer tow connector relay (park
lamp)
56 — Trailer tow connector relay
(battery charge)
57 — Run/Start relay
58 — Not used
59 — PCM relay
60 — Not used
2007 Expedition(exd)
Owners Guide (post-2002-fmt)
USA(fus)
Roadside Emergencies
249
Page 254 of 328

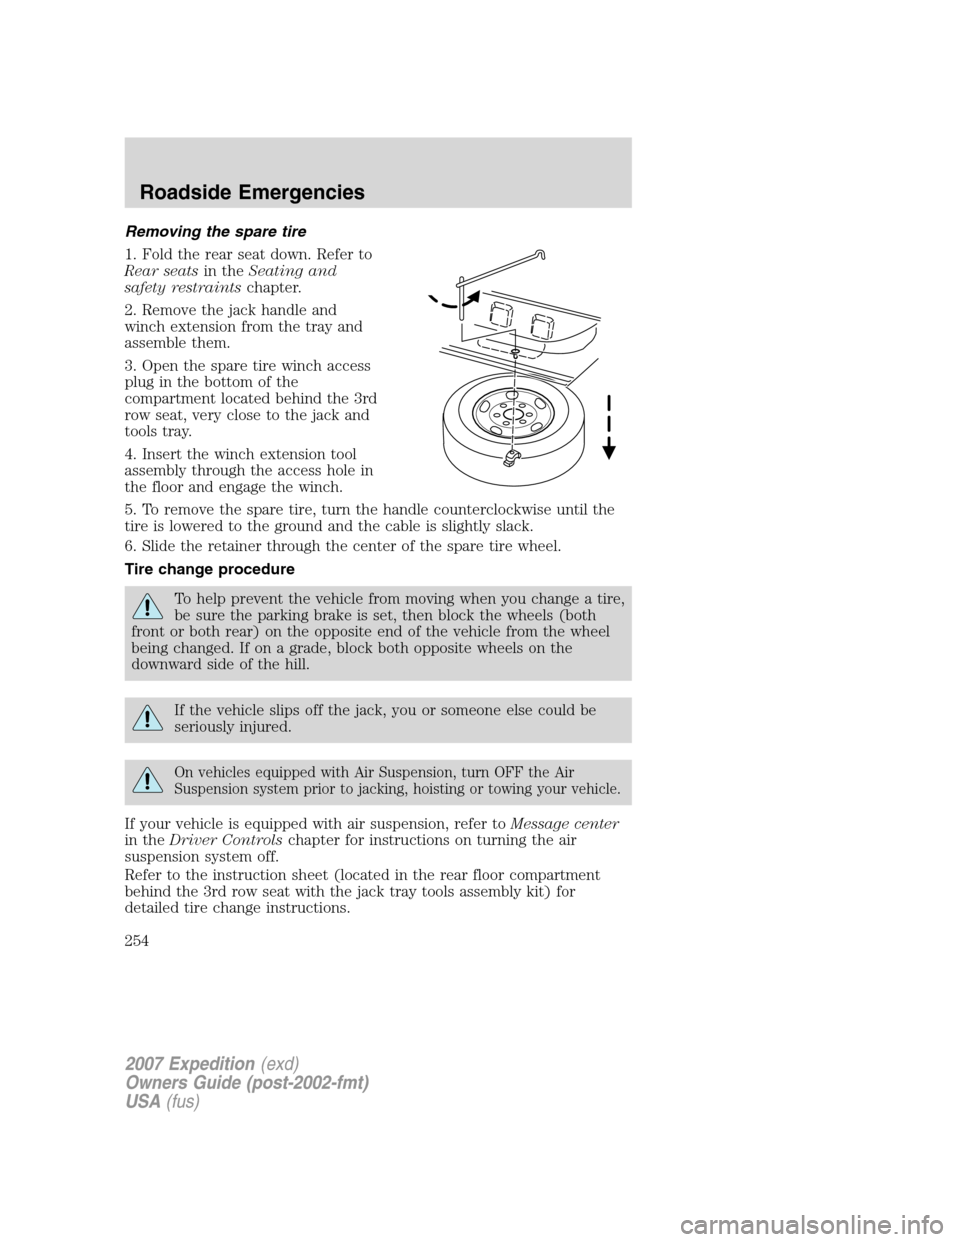
Removing the spare tire
1. Fold the rear seat down. Refer to
Rear seatsin theSeating and
safety restraintschapter.
2. Remove the jack handle and
winch extension from the tray and
assemble them.
3. Open the spare tire winch access
plug in the bottom of the
compartment located behind the 3rd
row seat, very close to the jack and
tools tray.
4. Insert the winch extension tool
assembly through the access hole in
the floor and engage the winch.
5. To remove the spare tire, turn the handle counterclockwise until the
tire is lowered to the ground and the cable is slightly slack.
6. Slide the retainer through the center of the spare tire wheel.
Tire change procedure
To help prevent the vehicle from moving when you change a tire,
be sure the parking brake is set, then block the wheels (both
front or both rear) on the opposite end of the vehicle from the wheel
being changed. If on a grade, block both opposite wheels on the
downward side of the hill.
If the vehicle slips off the jack, you or someone else could be
seriously injured.
On vehicles equipped with Air Suspension, turn OFF the Air
Suspension system prior to jacking, hoisting or towing your vehicle.
If your vehicle is equipped with air suspension, refer toMessage center
in theDriver Controlschapter for instructions on turning the air
suspension system off.
Refer to the instruction sheet (located in the rear floor compartment
behind the 3rd row seat with the jack tray tools assembly kit) for
detailed tire change instructions.
2007 Expedition(exd)
Owners Guide (post-2002-fmt)
USA(fus)
Roadside Emergencies
254