2007 FIAT SEDICI change time
[x] Cancel search: change timePage 124 of 266
123
User ID Entry
Once the ID is set up, this unit displays
“SEC” to prompt you to enter your user
ID when the power is turned on again in
the case of removal of this unit or the bat-
tery.
The unit cannot be used unless the ID is
entered in the following order.
NOTE The unit does not display “SEC”
when the power is turned on within 20
seconds from the last use.
❒With the up button (4) kept depressed,
press the numbered button (19) with
number [1].
The unit displays “- - - -”.
❒Press the numbered buttons (19) with
number [1] to [4], and enter the user
ID. Each button corresponds to each
digit. Enter the stored user ID.
❒Press program type button (11) for
about 2 second or more to enter.
Power is switched off.
When you switch the unit back on, it is
in radio mode for normal use.Erasing User ID
Your stored user ID can be erased. After
erasing it, you may set a new user ID.
Therefore, you can change your user ID
as often as you like.
❒Press the power on/off knob (1) to turn
off the power.
❒With the numbered buttons (19) with
numbers [3] and [4] kept depressed at
the same time, press the power on/ off
know (1) for about 1 second or more.
The unit displays “SEC”.
❒With the up button (4) kept depressed,
press the numbered button (19) with
number [1].
The unit displays “- - - -”.
❒Press the numbered buttons (19) with
number [1] to [4], and enter the user ID.
Each button corresponds to each digit.
Enter the stored user ID.
❒Press the program type button (11) for
about 2 seconds or more to enter.
The power is turned off approx, 10 sec-
onds after “- - - -” is displayed.
❒Press the numbered buttons (19) with
number [1] to [4], and enter the user
ID. Each button corresponds to each
digit, and the number increases each
time the button is pressed. For exam-
ple, to raise the digit second from the
left to 3, press the numbered button
(19) with number [2] four times.
❒Press the program type button (11) for
about 2 second or more to enter.
Power is switched off after the unit dis-
plays “SEC”.
Once the ID is set up, the ID is re-
quired at power-on when this unit or
the battery has been removed.
069-128 Fiat16 New GB 27-11-2007 11:26 Pagina 123
Page 133 of 266
132
FUEL FILLER CAP
The fuel filler cap is located on the left rear
side of the vehicle. The fuel filler lid can be
unlocked by pulling up the opener lever lo-
cated on the outboard side of the driver’s
seat and locked by simply closing the lid.
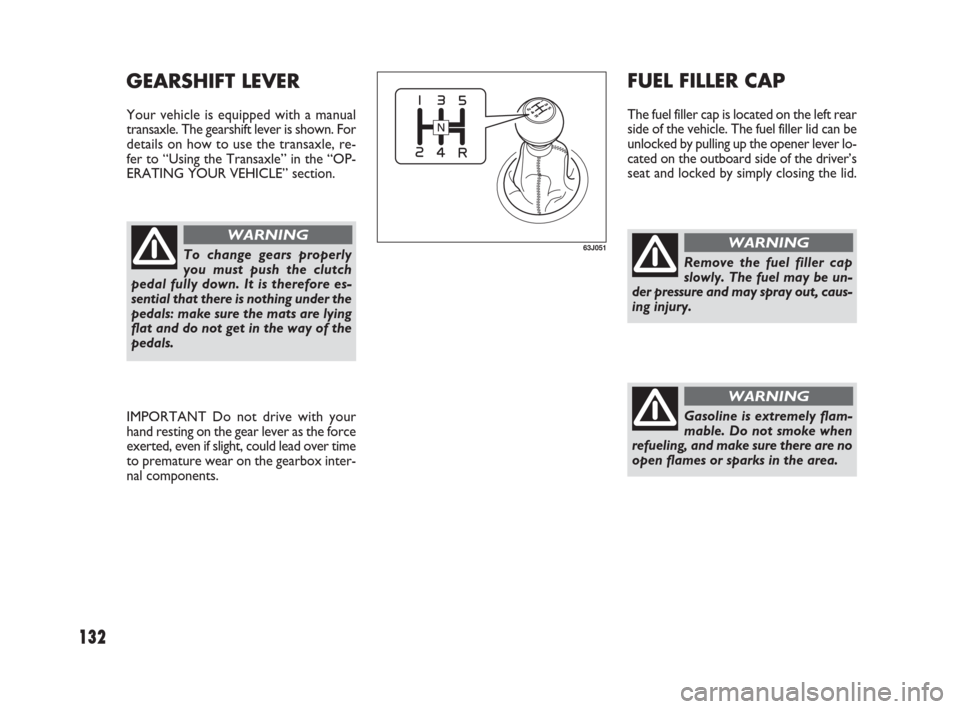
GEARSHIFT LEVER
Your vehicle is equipped with a manual
transaxle. The gearshift lever is shown. For
details on how to use the transaxle, re-
fer to “Using the Transaxle” in the “OP-
ERATING YOUR VEHICLE” section.
63J051
Remove the fuel filler cap
slowly. The fuel may be un-
der pressure and may spray out, caus-
ing injury.
WARNING
Gasoline is extremely flam-
mable. Do not smoke when
refueling, and make sure there are no
open flames or sparks in the area.
WARNING
To change gears properly
you must push the clutch
pedal fully down. It is therefore es-
sential that there is nothing under the
pedals: make sure the mats are lying
flat and do not get in the way of the
pedals.
WARNING
IMPORTANT Do not drive with your
hand resting on the gear lever as the force
exerted, even if slight, could lead over time
to premature wear on the gearbox inter-
nal components.
129-148 Fiat16 New GB 27-11-2007 11:27 Pagina 132
Page 157 of 266
156
79J002
Reduce your speed and
downshift to a lower gear
before going down a long or steep hill.
A lower gear will allow the engine to
provide braking. Avoid riding the
brakes or they may overheat, result-
ing in brake failure.
When driving on slippery roads, be
sure to slow down before downshift-
ing. Excessive and or sudden changes
in engine speed may cause loss of
traction, which could cause you to
lose control.
Make sure that the vehicle is com-
pletely stationary before you shift in-
to reverse.
WARNING
79J140
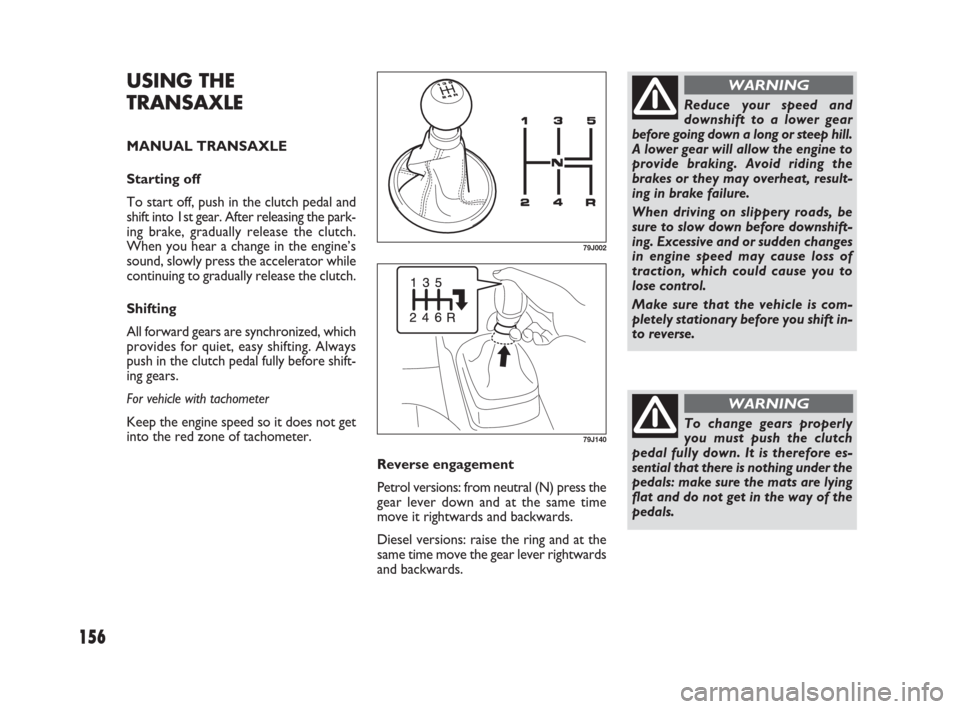
Reverse engagement
Petrol versions: from neutral (N) press the
gear lever down and at the same time
move it rightwards and backwards.
Diesel versions: raise the ring and at the
same time move the gear lever rightwards
and backwards.
To change gears properly
you must push the clutch
pedal fully down. It is therefore es-
sential that there is nothing under the
pedals: make sure the mats are lying
flat and do not get in the way of the
pedals.
WARNING
USING THE
TRANSAXLE
MANUAL TRANSAXLE
Starting off
To start off, push in the clutch pedal and
shift into 1st gear. After releasing the park-
ing brake, gradually release the clutch.
When you hear a change in the engine’s
sound, slowly press the accelerator while
continuing to gradually release the clutch.
Shifting
All forward gears are synchronized, which
provides for quiet, easy shifting. Always
push in the clutch pedal fully before shift-
ing gears.
For vehicle with tachometer
Keep the engine speed so it does not get
into the red zone of tachometer.
149-166 Fiat16 New GB 27-11-2007 11:27 Pagina 156
Page 160 of 266
159
IMPORTANT
❒Never use the “4WD LOCK” mode
when driving on dry paved roads.
Avoid using the “4WD LOCK” mode
when driving on wet paved roads as
much as possible. Use of the “4WD
LOCK” mode in above conditions will
apply excessive force to the driving
system and may cause a critical failure.
Also, the tires may wear faster and fu-
el consumption may be affected ad-
versely.
❒Note that 4WD vehicles are not al-
laround vehicles. Be sure to observe
following instructions when driving
your vehicle.
– Do not drive through water like
crossing a river.
– Do not drive continuously where
front wheels tend to race such as in
the sand and mud.
– When any wheel is in the air for such
reason as running off the road, do
not race it needlessly.
❒If the “4WD AUTO” and the “4WD
LOCK” indicator lights stay on and
come on simultaneously when driving,
there may be something wrong the
4WD system. Have the system in-
spected by an authorized Fiat Dealer-
ship.IMPORTANT Unevenly worn tires can
cause problems in the operation of the
2WD/4WD switch. Be sure to rotate the
tires according to the maintenance sched-
ule. Refer to “Tires” and “Maintenance
Schedule” in the “INSPECTION AND
MAINTENANCE” section for proper tire
rotation procedures.
❒While making turns or accelerating and
decelerating, operating the 2WD/
4WD switch or turning off the key
switch in the “4WD AUTO” or “4WD
LOCK” mode may cause a shock, but
this is not a system malfunction.
❒While driving in the “4WD LOCK”
mode, as the vehicle speed increases,
the driving mode changes to the “4WD
AUTO” mode automatically. Even
when the vehicle speed reduces, on the
other hand, the driving mode does not
return to the “4WD LOCK” mode au-
tomatically. You should press the
“4WD LOCK” switch according to the
driving conditions.
❒Any forcible operation while driving of-
froad in the sand or water or when a
wheel has run off the road, the differ-
ence of the revolution between front
wheels and rear wheels increases
(wheels run idle). If this state continues,
the oil temperature of the driving sys-
tem parts rises.
In such case, the “4WD AUTO” indi-
cator light blinks and the driving mode
changes to the 2WD mode to protect
the driving system parts.
When you operate your vehicle in the
4WD mode continuously, park the ve-
hicle at a safe place and run the engine
idle. After some time, the “4WD AU-
TO” indicator light turns on again and
the driving mode returns to the “4WD
AUTO” mode.
149-166 Fiat16 New GB 27-11-2007 11:27 Pagina 159
Page 163 of 266
162
HOW THE ABS WORKS
A computer continuously monitors wheel
speed. The computer compares the
changes in wheel speed when braking. If
the wheels slow suddenly, indicating a
skidding situation, the computer will
change braking pressure several times
each second to prevent the wheels from
locking. When you start your vehicle af-
ter a stop you may hear a momentary mo-
tor noise as the system checks itself.
The ABS may not work
properly if tires or wheels
other than those specified in the own-
er’s manual are used. This is because
the ABS works by comparing changes
in wheel speed. When replacing tires
or wheels, use only the size and type
specified in this owner’s manual.
WARNING
ELECTRONIC STABILITY
PROGRAM (ESP®)
(if equipped)
ESP®is a registered trademark of Daim-
lerChrysler AG.
The Electronic Stability Program (ESP
®)
helps to control the vehicle during cor-
nering if the vehicle is understeering or
oversteering. It also assists you in main-
taining traction while accelerating on loose
or slippery road surfaces. It does this by
regulating the engine’s output, and by se-
lectively applying the brakes. In addition,
ESP
®helps to avoid skidding by controlling
braking pressure.
The ESP®cannot enhance
the vehicle’s driving stabili-
ty in all situations and does not con-
trol your vehicle’s entire braking sys-
tem. The ESP
®cannot prevent acci-
dents, including those resulting from
excessive speed in turns, or hy-
droplaning. Only a safe and attentive
driver can prevent accidents. The ca-
pabilities of an ESP
®- equipped ve-
hicle must never be used as a substi-
tute for careful driving.
WARNING
The ESP®has the following three systems:
STABILITY CONTROL SYSTEM
The vehicle stability control system helps
provide integrated control of systems such
as anti- lock brakes, traction control, en-
gine control, etc. This system automati-
cally controls the brakes and engine to
help prevent the vehicle from skidding
when cornering on a slippery road surface
or when turning the steering wheel
abruptly.
TRACTION CONTROL SYSTEM
The traction control system automatical-
ly helps prevent the spinning of wheels
when the vehicle is started or accelerated
on slippery road surfaces. The system op-
erates only if it senses that some of the
wheels are spinning or beginning to lose
traction. When this happens, the system
operates the front or rear brakes and re-
duces engine power to limit wheel spin.
NOTE You may hear a clicking sound in
the engine compartment for a few seconds
when you start the engine or just after the
vehicle begins to move. This means that
the above systems are in the self-check
mode. This sound does not indicate a mal-
function.
149-166 Fiat16 New GB 27-11-2007 11:27 Pagina 162
Page 176 of 266
175
ADDITIONAL TRAILER
TOWING WARNINGS
Never overload your trailer
or your vehicle. Gross trail-
er weight must never exceed the
“Towing capacity”. Gross vehicle
weight (sum of the weights of the ve-
hicle, all the occupants, accessories
including tow bars and a trailer hitch,
cargo and trailer nose weight) must
never exceed the Gross Vehicle
Weight Rating (GVWR) listed in the
“SPECIFICATIONS” section.
WARNING
Connect trailer lights and
hook up safety chains every
time you tow.
WARNING
IMPORTANT Because towing a trailer
puts additional stress on your vehicle,
more frequent maintenance will be re-
quired than under normal driving condi-
tions. Follow the schedule for “Mainte-
nance Recommended under Severe Dri-
ving Conditions”.
Your vehicle will handle dif-
ferently when towing a trail-
er. For your safety and the safety of
others, you should observe the fol-
lowing precautions:
– Practice turning, stopping, and re-
versing before you begin towing in
traffic. Do not tow in traffic until you
are confident that you can handle the
vehicle and trailer safely.
– Never exceed towing speed limits or
80 km/h (50 mph), whichever is low-
er.
– Never drive at a speed that causes
shaking or swaying of the trailer. If
you notice even the slightest sign of
shaking or swaying, slow down.
– When roads are wet, slippery or
rough, drive at a slower speed than
you would on dry, smooth roads.
Failure to slow down when road con-
ditions are bad can result in loss of
control.
– Always have someone guide you
when reversing.
– Allow adequate stopping distance.
Stopping distance is increased when
you tow a trailer. For each 16 km/h
(10 mph) of speed, allow at least one
vehicle and trailer length between
you and the vehicle ahead. Follow at
a greater distance if roads are wet or
slippery.
WARNING
– If the trailer has over-run
brakes, apply the brakes
gradually to avoid snatching caused
by the trailer wheels locking.
– Slow down before corners and
maintain a steady speed while cor-
nering. Deceleration or acceleration
while cornering can result in loss of
control. Remember that a larger than
normal turning radius is needed be-
cause the trailer wheels will be clos-
er than vehicle wheels to the inside of
the turn.
– Avoid sudden acceleration and
stopping of the vehicle. Do not make
quick maneuvers unless they are nec-
essary.
– Slow down in cross winds and be
prepared for gusts of wind from large
passing vehicles.
– Be careful when overtaking other
vehicles. Be sure to allow enough
room for your trailer before you
change lanes, and signal well in ad-
vance.
– Slow down and shift into a lower
gear before you reach long or steep
downhill grades. It is hazardous to at-
tempt downshifting while you are de-
scending a hill.
WARNING
171-180 Fiat16 New GB 27-11-2007 11:29 Pagina 175
Page 186 of 266
185
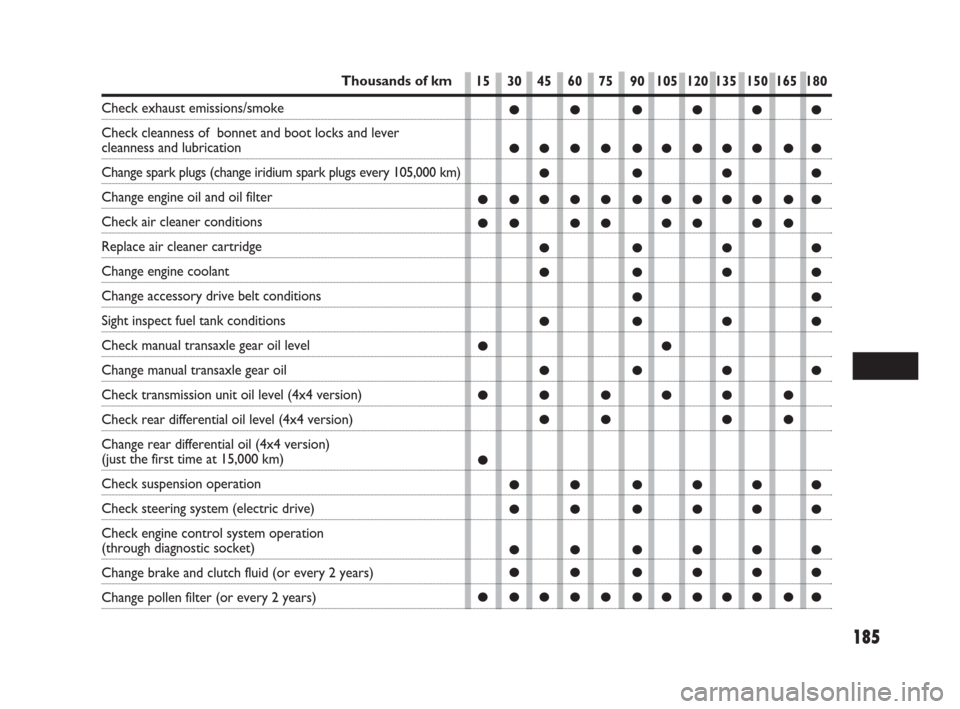
15 30 45 60 75 90 105 120 135 150 165 180
●● ●●●●
●●●● ●●●●●●●
●●●●
● ●●●● ●●●●●●●
●● ●● ●● ●●
●●●●
●●●●
●●
●●●●
●●
●●●●
●●●●●●
●● ●●
●
●● ●●●●
●● ●●●●
●● ●●●●
●● ●●●●
● ●●●● ●●●●●●●
Thousands of km
Check exhaust emissions/smoke
Check cleanness of bonnet and boot locks and lever
cleanness and lubrication
Change spark plugs (change iridium spark plugs every 105,000 km)
Change engine oil and oil filter
Check air cleaner conditions
Replace air cleaner cartridge
Change engine coolant
Change accessory drive belt conditions
Sight inspect fuel tank conditions
Check manual transaxle gear oil level
Change manual transaxle gear oil
Check transmission unit oil level (4x4 version)
Check rear differential oil level (4x4 version)
Change rear differential oil (4x4 version)
(just the first time at 15,000 km)
Check suspension operation
Check steering system (electric drive)
Check engine control system operation
(through diagnostic socket)
Change brake and clutch fluid (or every 2 years)
Change pollen filter (or every 2 years)
181-224 Fiat16 New GB 27-11-2007 11:29 Pagina 185
Page 188 of 266
187
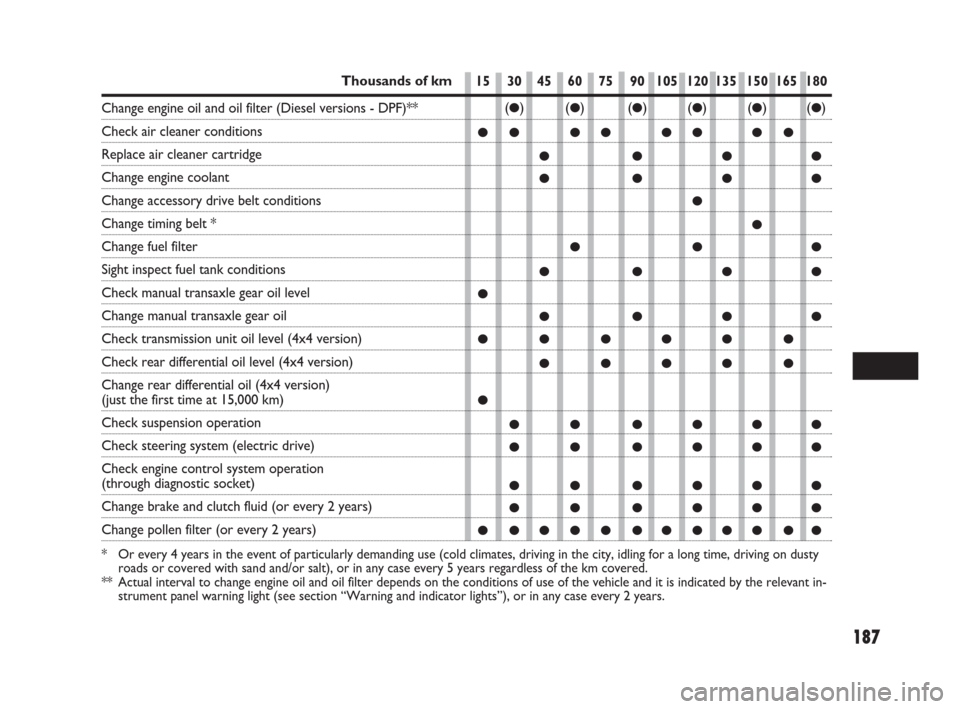
15 30 45 60 75 90 105 120 135 150 165 180
(●)(●)(●)(●)(●)(●)
●● ●● ●● ●●
●●●●
●●●●
●
●
●●●
●●●●
●
●●●●
●●●●●●
●●●●●
●
●● ●●●●
●● ●●●●
●● ●●●●
●● ●●●●
● ●●●● ●●●●●●●
Thousands of km
Change engine oil and oil filter (Diesel versions - DPF)**
Check air cleaner conditions
Replace air cleaner cartridge
Change engine coolant
Change accessory drive belt conditions
Change timing belt *
Change fuel filter
Sight inspect fuel tank conditions
Check manual transaxle gear oil level
Change manual transaxle gear oil
Check transmission unit oil level (4x4 version)
Check rear differential oil level (4x4 version)
Change rear differential oil (4x4 version)
(just the first time at 15,000 km)
Check suspension operation
Check steering system (electric drive)
Check engine control system operation
(through diagnostic socket)
Change brake and clutch fluid (or every 2 years)
Change pollen filter (or every 2 years)
* Or every 4 years in the event of particularly demanding use (cold climates, driving in the city, idling for a long time, driving on dusty
roads or covered with sand and/or salt), or in any case every 5 years regardless of the km covered.
** Actual interval to change engine oil and oil filter depends on the conditions of use of the vehicle and it is indicated by the relevant in-
strument panel warning light (see section “Warning and indicator lights”), or in any case every 2 years.
181-224 Fiat16 New GB 27-11-2007 11:29 Pagina 187