Page 79 of 166
– Lower horizontal bar icon keys, en-
abled or disabled according to the
case:
“Home”: makes access to the ad-
dress defined as Home.
“Back”: displays previously shown
card.
“Go”: goes to input address screen
(direct access or “bookmark” recall);
“Interrupt”: stops current deck load-
ing;
“
N”, “O”: scrolls up/down when
card cannot be entirely displayed.
During loading operations, an hour-
glass is displayed on the current page.Low bar and right icon keys are ac-
tive only when they are necessary and
they are greyed when not consistent;
for example “
N” and “O” keys are ac-
tive only when window size is not
enough to show the entire card.
Rotate the knob 15-fig. 1to select
card action key; after selecting the re-
quired key press the knob 15-fig. 1to
confirm; the relevant screen will be
displayed.
Press “ESC” 14-fig. 1and confirm to
quit the WAP mode, the display will
return to the main telephone screen
(TEL).
“Go” low bar icon key
This graphic key fig. 63-64, which
is selected by pressing the corre-
sponding key 16-fig. 1, below the
writing, makes it possible to get con-
nected to the specified Web address
(if allowed for by the provider).Proceed as follows:
– rotate the knob 15-fig. 1, select
“Address” fig. 65and then press the
knob to confirm; the display will show
a keypad for typing in the required net
address;
or, if address is already stored in the
directory:
– rotate the knob 15-fig. 1, select
“Site directory” fig. 65and then press
the knob to confirm; the display will
show the stored site directory;
– rotate the knob 15-fig. 1to se-
lect the required address and then
press the knob to confirm.
During these operations “
N”, “O”,
“Home”, “Back” and “Interrupt” are
disabled.
78
CONNECT NAV+
Page 83 of 166
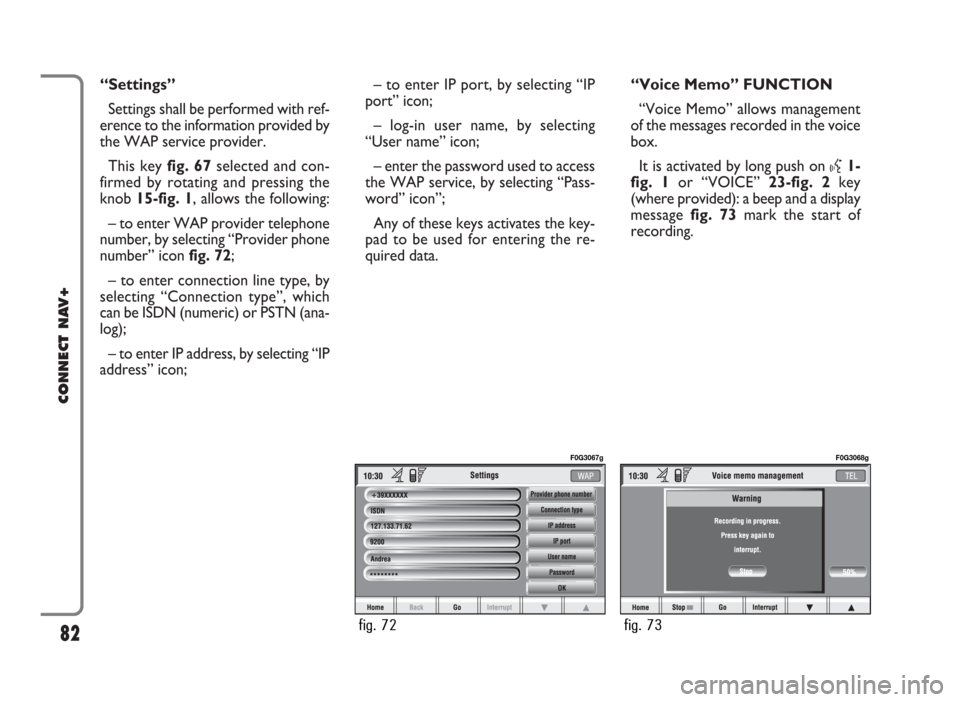
“Settings”
Settings shall be performed with ref-
erence to the information provided by
the WAP service provider.
This key fig. 67selected and con-
firmed by rotating and pressing the
knob 15-fig. 1, allows the following:
– to enter WAP provider telephone
number, by selecting “Provider phone
number” icon fig. 72;
– to enter connection line type, by
selecting “Connection type”, which
can be ISDN (numeric) or PSTN (ana-
log);
– to enter IP address, by selecting “IP
address” icon;– to enter IP port, by selecting “IP
port” icon;
– log-in user name, by selecting
“User name” icon;
– enter the password used to access
the WAP service, by selecting “Pass-
word” icon”;
Any of these keys activates the key-
pad to be used for entering the re-
quired data.“Voice Memo” FUNCTION
“Voice Memo” allows management
of the messages recorded in the voice
box.
It is activated by long push on
}1-
fig. 1or “VOICE” 23-fig. 2key
(where provided): a beep and a display
message fig. 73mark the start of
recording.
82
CONNECT NAV+
fig. 72
F0G3067g
fig. 73
F0G3068g
Page 84 of 166
A maximum of 1 minute of user’s
voice sampling is available and can be
split in several recording sessions.
A further push of
}key 1-fig. 1
stops sampling. Next sampling will be
queued after the previous one.
After 1 minute recording operation
is stopped and the display shows the
screen in fig. 74, the function will be
disabled.Push on “Voice memo” key in main
telephone screen displays the screen
in fig. 75, where percentage of mem-
ory occupied/available and active mes-
sage number (compared with total
memorized messages number) are
shown.The icon keys at the bottom of the
display can be activated by the corre-
sponding multifunction keys on the
keypad 17-fig. 1. Options are the fol-
lowing:
Play
˙plays active message;
Stop
■stops message playback
or recording;
Skip
¯¯skips to previous mes-
sage;
Skip
˙˙skips to next message;
Record
çstarts recording;
Deletedeletes all recorded mes-
sages.
83
CONNECT NAV+
fig. 74
F0G3069g
fig. 75
F0G3070g
Page 85 of 166
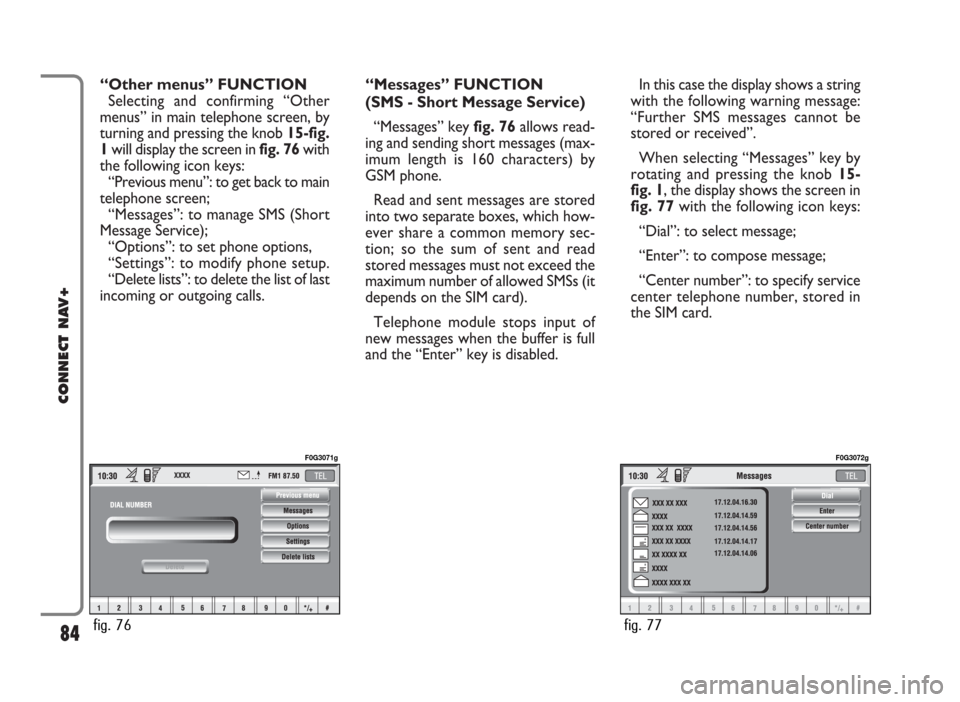
“Other menus” FUNCTION
Selecting and confirming “Other
menus” in main telephone screen, by
turning and pressing the knob 15-fig.
1will display the screen in fig. 76with
the following icon keys:
“Previous menu”: to get back to main
telephone screen;
“Messages”: to manage SMS (Short
Message Service);
“Options”: to set phone options,
“Settings”: to modify phone setup.
“Delete lists”: to delete the list of last
incoming or outgoing calls.“Messages” FUNCTION
(SMS - Short Message Service)
“Messages” key fig. 76allows read-
ing and sending short messages (max-
imum length is 160 characters) by
GSM phone.
Read and sent messages are stored
into two separate boxes, which how-
ever share a common memory sec-
tion; so the sum of sent and read
stored messages must not exceed the
maximum number of allowed SMSs (it
depends on the SIM card).
Telephone module stops input of
new messages when the buffer is full
and the “Enter” key is disabled.In this case the display shows a string
with the following warning message:
“Further SMS messages cannot be
stored or received”.
When selecting “Messages” key by
rotating and pressing the knob 15-
fig. 1, the display shows the screen in
fig. 77with the following icon keys:
“Dial”: to select message;
“Enter”: to compose message;
“Center number”: to specify service
center telephone number, stored in
the SIM card.
84
CONNECT NAV+
fig. 76
F0G3071g
fig. 77
F0G3072g
Page 88 of 166
Enter
IMPORTANTThe “Dial” graphic
key can only be selected if enough
storing space is available in the SIM
card message memory. Otherwise,
one or several messages need be
cleared in order to make space avail-
able in the message memory.
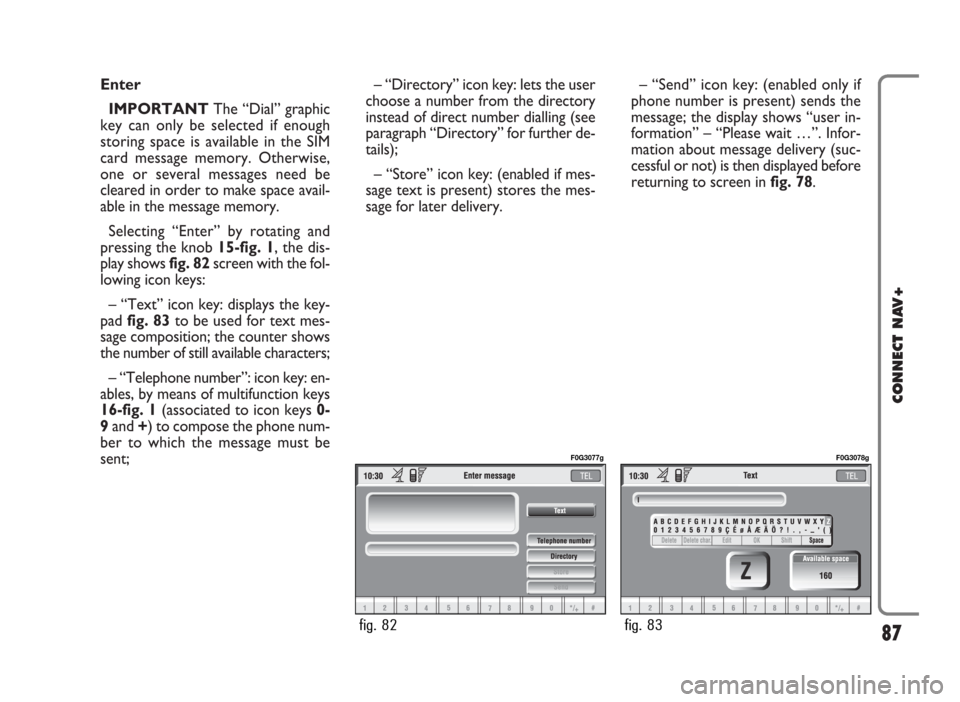
Selecting “Enter” by rotating and
pressing the knob 15-fig. 1, the dis-
play shows fig. 82screen with the fol-
lowing icon keys:
– “Text” icon key: displays the key-
pad fig. 83to be used for text mes-
sage composition; the counter shows
the number of still available characters;
– “Telephone number”: icon key: en-
ables, by means of multifunction keys
16-fig. 1(associated to icon keys 0-
9and +) to compose the phone num-
ber to which the message must be
sent;– “Directory” icon key: lets the user
choose a number from the directory
instead of direct number dialling (see
paragraph “Directory” for further de-
tails);
– “Store” icon key: (enabled if mes-
sage text is present) stores the mes-
sage for later delivery. – “Send” icon key: (enabled only if
phone number is present) sends the
message; the display shows “user in-
formation” – “Please wait …”. Infor-
mation about message delivery (suc-
cessful or not) is then displayed before
returning to screen in fig. 78.
87
CONNECT NAV+
fig. 82
F0G3077g
fig. 83
F0G3078g
Page 89 of 166
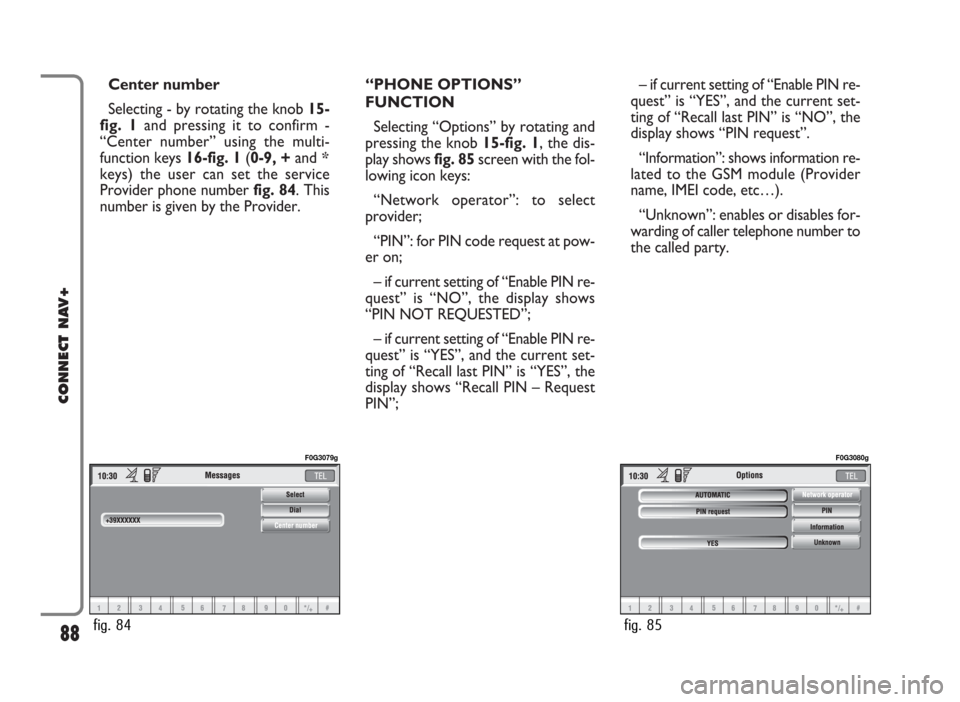
Center number
Selecting - by rotating the knob 15-
fig. 1and pressing it to confirm -
“Center number” using the multi-
function keys 16-fig. 1(0-9, +and *
keys) the user can set the service
Provider phone number fig. 84. This
number is given by the Provider.“PHONE OPTIONS”
FUNCTION
Selecting “Options” by rotating and
pressing the knob 15-fig. 1, the dis-
play shows fig. 85screen with the fol-
lowing icon keys:
“Network operator”: to select
provider;
“PIN”: for PIN code request at pow-
er on;
– if current setting of “Enable PIN re-
quest” is “NO”, the display shows
“PIN NOT REQUESTED”;
– if current setting of “Enable PIN re-
quest” is “YES”, and the current set-
ting of “Recall last PIN” is “YES”, the
display shows “Recall PIN – Request
PIN”;– if current setting of “Enable PIN re-
quest” is “YES”, and the current set-
ting of “Recall last PIN” is “NO”, the
display shows “PIN request”.
“Information”: shows information re-
lated to the GSM module (Provider
name, IMEI code, etc…).
“Unknown”: enables or disables for-
warding of caller telephone number to
the called party.
88
CONNECT NAV+
fig. 84
F0G3079g
fig. 85
F0G3080g
Page 90 of 166
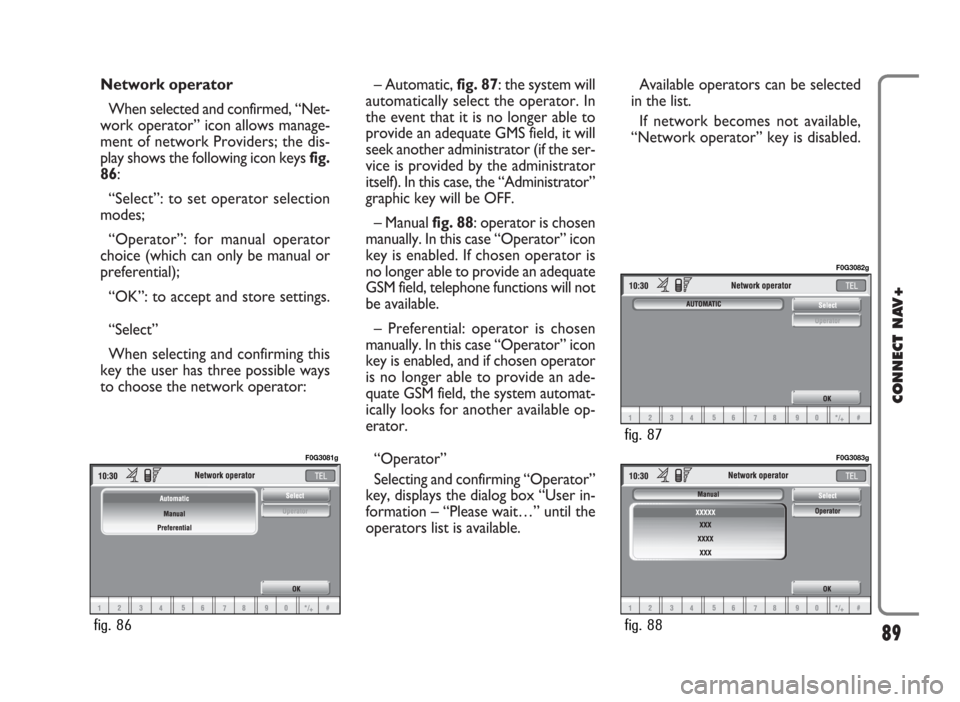
Network operator
When selected and confirmed, “Net-
work operator” icon allows manage-
ment of network Providers; the dis-
play shows the following icon keys fig.
86:
“Select”: to set operator selection
modes;
“Operator”: for manual operator
choice (which can only be manual or
preferential);
“OK”: to accept and store settings.
“Select”
When selecting and confirming this
key the user has three possible ways
to choose the network operator:– Automatic, fig. 87: the system will
automatically select the operator. In
the event that it is no longer able to
provide an adequate GMS field, it will
seek another administrator (if the ser-
vice is provided by the administrator
itself). In this case, the “Administrator”
graphic key will be OFF.
– Manual fig. 88: operator is chosen
manually. In this case “Operator” icon
key is enabled. If chosen operator is
no longer able to provide an adequate
GSM field, telephone functions will not
be available.
– Preferential: operator is chosen
manually. In this case “Operator” icon
key is enabled, and if chosen operator
is no longer able to provide an ade-
quate GSM field, the system automat-
ically looks for another available op-
erator.
“Operator”
Selecting and confirming “Operator”
key, displays the dialog box “User in-
formation – “Please wait…” until the
operators list is available. Available operators can be selected
in the list.
If network becomes not available,
“Network operator” key is disabled.
89
CONNECT NAV+
fig. 86
F0G3081g
fig. 88
F0G3083g
fig. 87
F0G3082g
Page 92 of 166
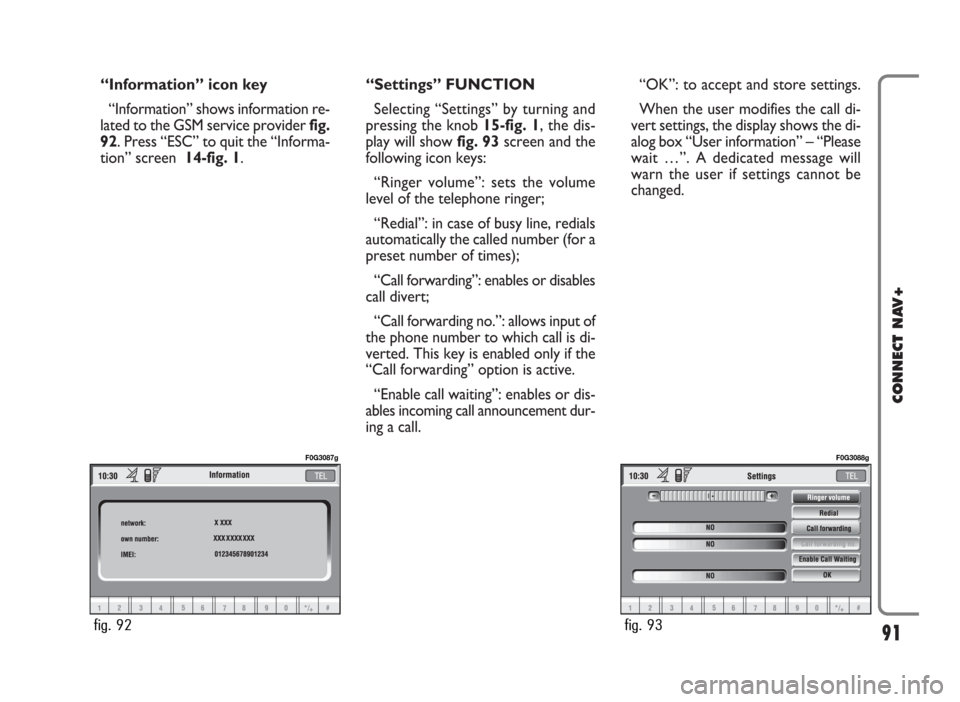
“Information” icon key
“Information” shows information re-
lated to the GSM service provider fig.
92. Press “ESC” to quit the “Informa-
tion” screen 14-fig. 1.“Settings” FUNCTION
Selecting “Settings” by turning and
pressing the knob 15-fig. 1, the dis-
play will showfig. 93screen and the
following icon keys:
“Ringer volume”: sets the volume
level of the telephone ringer;
“Redial”: in case of busy line, redials
automatically the called number (for a
preset number of times);
“Call forwarding”: enables or disables
call divert;
“Call forwarding no.”: allows input of
the phone number to which call is di-
verted. This key is enabled only if the
“Call forwarding” option is active.
“Enable call waiting”: enables or dis-
ables incoming call announcement dur-
ing a call.“OK”: to accept and store settings.
When the user modifies the call di-
vert settings, the display shows the di-
alog box “User information” – “Please
wait …”. A dedicated message will
warn the user if settings cannot be
changed.
91
CONNECT NAV+
fig. 92
F0G3087g
fig. 93
F0G3088g