2007 FIAT DOBLO ceiling
[x] Cancel search: ceilingPage 9 of 218

8GETTING TO KNOW YOUR VEHICLE
DUPLICATE KEYS
When additional keys are required,
go to your Fiat Dealershiptaking all
the keys in your possession and the
CODE card with you. The Fiat Deal-
ershipwill store the old and new keys
(up to eight) in the system. The Fiat
Dealershipmay ask you to demon-
strate that you own the vehicle.
The codes of any keys that are not
handed over when the new storage
procedure is carried out will be delet-
ed from the memory to prevent any
lost or stolen keys being used to start
the vehicle.
All the keys and the CODE card
must be handed over to the new own-
er when selling the vehicle.DOOR LOCK
REMOTE CONTROL
The remote control is built into the
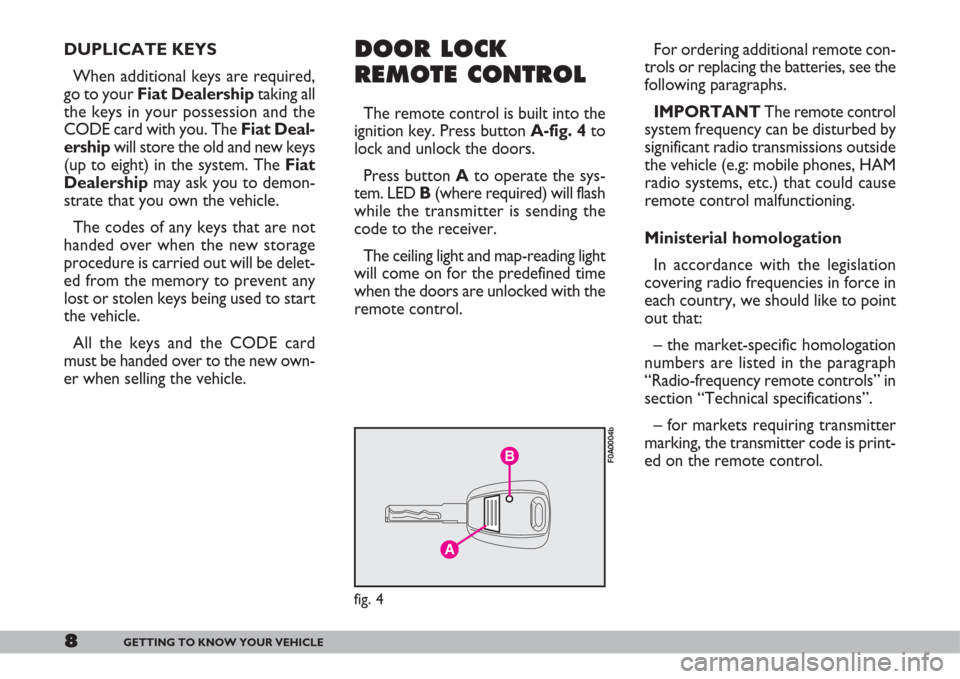
ignition key. Press button A-fig. 4to
lock and unlock the doors.
Press button Ato operate the sys-
tem. LED B(where required) will flash
while the transmitter is sending the
code to the receiver.
The ceiling light and map-reading light
will come on for the predefined time
when the doors are unlocked with the
remote control.For ordering additional remote con-
trols or replacing the batteries, see the
following paragraphs.
IMPORTANTThe remote control
system frequency can be disturbed by
significant radio transmissions outside
the vehicle (e.g: mobile phones, HAM
radio systems, etc.) that could cause
remote control malfunctioning.
Ministerial homologation
In accordance with the legislation
covering radio frequencies in force in
each country, we should like to point
out that:
– the market-specific homologation
numbers are listed in the paragraph
“Radio-frequency remote controls” in
section “Technical specifications”.
– for markets requiring transmitter
marking, the transmitter code is print-
ed on the remote control.
A
B
fig. 4
F0A0004b
Page 67 of 218

66GETTING TO KNOW YOUR VEHICLE
The rear window wiper will flick
three times after the lever is released.
“FOLLOW ME HOME”
function
This function allows the illumination
of the space in front of the vehicle.
Turning the function on
With the ignition key at STOP or
removed, pull the left-hand stalk to-
wards the steering wheel and operate
it within 2 minutes from when the en-
gine is turned off.
At each single movement of the stalk,
the staying on of the lights is extend-
ed by 30 seconds up to a maximumCEILING LIGHT
WITH MAP READING
LIGHTS
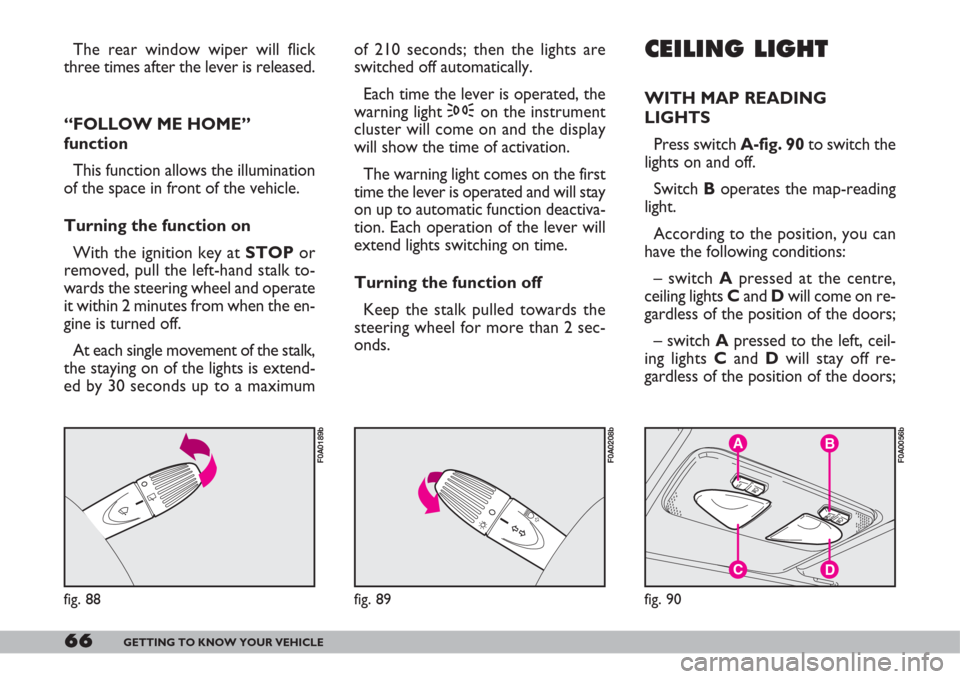
Press switch A-fig. 90to switch the
lights on and off.
Switch Boperates the map-reading
light.
According to the position, you can
have the following conditions:
– switch Apressed at the centre,
ceiling lights Cand Dwill come on re-
gardless of the position of the doors;
– switch Apressed to the left, ceil-
ing lights Cand Dwill stay off re-
gardless of the position of the doors;
',
fig. 88
F0A0189b
C
B
D
A
fig. 90
F0A0056b
6y1Δ
fig. 89
F0A0208b
of 210 seconds; then the lights are
switched off automatically.
Each time the lever is operated, the
warning light 3on the instrument
cluster will come on and the display
will show the time of activation.
The warning light comes on the first
time the lever is operated and will stay
on up to automatic function deactiva-
tion. Each operation of the lever will
extend lights switching on time.
Turning the function off
Keep the stalk pulled towards the
steering wheel for more than 2 sec-
onds.
Page 68 of 218

67GETTING TO KNOW YOUR VEHICLE
– switch Apressed to the right, ceil-
ing lights Cand Dwill stay on in what-
ever condition.
When the ceiling light is off, switch
Bturns on the following lights:
– map-reading light Cif pressed to
the left;
– map-reading light Dif pressed to
the right.
IMPORTANTMake sure that both
switches are in central position before
getting out of the vehicle. This is en-
sure that the ceiling lights go out when
the doors are closed preventing the
battery from running down.
Timing for getting into the
vehicle
The ceiling lights will come on as fol-
lows:
– for 15 seconds when the front
doors are unlocked;– for 7 seconds when a door is
closed (within the three minutes).
Timing will be stopped when the ig-
nition key is turned to MAR.
Timing for getting out of the
vehicle
The ceiling lights will come on as fol-
lows when the key is removed from
the ignition switch:
– for 3 minutes within two minutes
after stopping the engine;
– for 7 seconds when a door is
closed (within the three minutes).
Timing will be stopped when the
doors are locked.WITH TOGGLE LENS
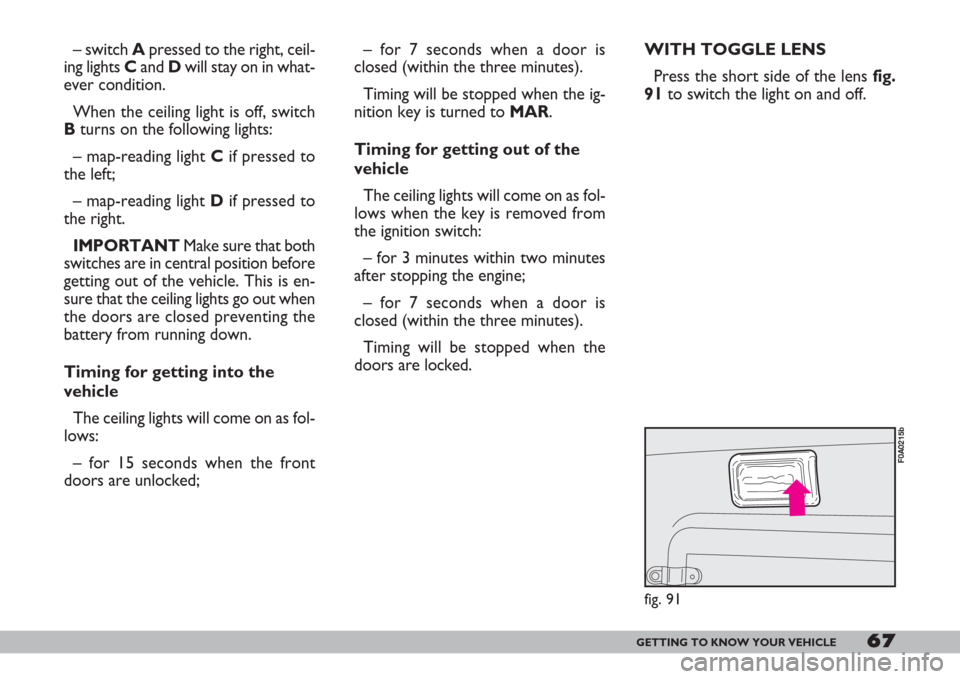
Press the short side of the lens fig.
91to switch the light on and off.
fig. 91
F0A0215b
Page 132 of 218

131IN AN EMERGENCY
TYPES OF BULBS
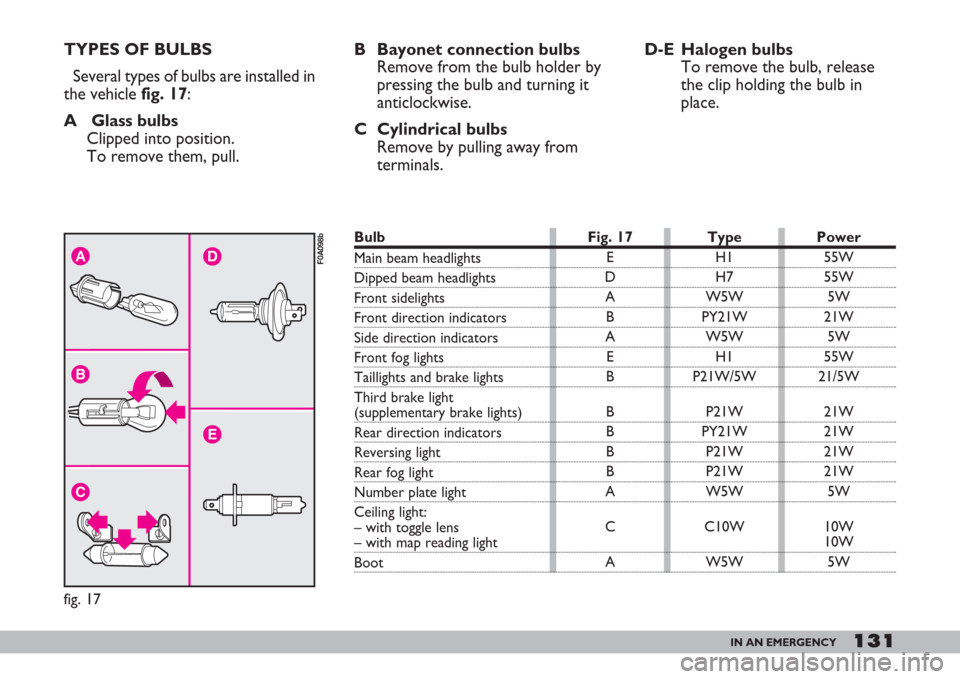
Several types of bulbs are installed in
the vehicle fig. 17:
A Glass bulbs
Clipped into position.
To remove them, pull.B Bayonet connection bulbs
Remove from the bulb holder by
pressing the bulb and turning it
anticlockwise.
C Cylindrical bulbs
Remove by pulling away from
terminals.D-E Halogen bulbs
To remove the bulb, release
the clip holding the bulb in
place.
A
B
C
E
D
fig. 17
F0A098b
Fig. 17
E
D
A
B
A
E
B
B
B
B
B
A
C
APower
55W
55W
5W
21W
5W
55W
21/5W
21W
21W
21W
21W
5W
10W
10W
5W Type
H1
H7
W5W
PY21W
W5W
H1
P21W/5W
P21W
PY21W
P21W
P21W
W5W
C10W
W5WBulb
Main beam headlights
Dipped beam headlights
Front sidelights
Front direction indicators
Side direction indicators
Front fog lights
Taillights and brake lights
Third brake light
(supplementary brake lights)
Rear direction indicators
Reversing light
Rear fog light
Number plate light
Ceiling light:
– with toggle lens
– with map reading light
Boot
Page 138 of 218

137IN AN EMERGENCY
CEILING LIGHTS
With toggling lens
To replace a bulb:
1)Remove the ceiling lightfig. 35by
releasing the clipped on lens frame in
the point shown by the arrow.
2)Open the container A-fig. 36and
replace the burnt-out bulb.With map reading lights
To replace a bulb:
1)Remove the ceiling lightA-fig. 37
by releasing the clipped on lens frame
in the point shown by the arrow.
2)Open the bulb container A-fig.
38.
3)Replace the burnt out bulb.BOOT LIGHT
To replace the bulb:
1)Remove the lens A-fig. 39as
shown by the arrow.
2)Open the bulb holder Band re-
move the bulb C(clipped in).
fig. 35
F0A0142b
A
fig. 36
F0A0200b
A
fig. 37
F0A0140b
A
fig. 38
F0A0172b
ABC
fig. 39
F0A0138b
Page 142 of 218

141IN AN EMERGENCY
FUSE SUMMARY TABLE
10
10
10
10
10
10
15
10
7.5
15
10
10
10
7.5
10
7.5
10
20
7.5
40
70
40
20
20
20
20
15
7.5
7.5 F14
F15
F12
F13
F42
F53
F30
F53
F51
F32
F42
F37
F53
F31
F37
F51
F37
F44
F50
F02 – MAXI FUSE
F01 – MAXI FUSE
F04 – MAXI FUSE
F48
F47
F38
F22
F11
F42
F18 42
42
41
41
41
41
42
41
41
41
41
41
41
41
41
41
41
41
41
42
42
42
41
41
41
42
42
41
42
Figure Fuse Ampere
Right-hand main beam
Left-hand main beam
Right-hand dipped beam
Left-hand dipped beam
Boot
Hazard lights
Front fog lights
Direction indicators
Dashboard instrument lights
Light system
Ceiling light
Instrument panel and warning lights (ignition switch powered)
Instrument panel and warning lights (battery powered)
Reversing light
Brake lights
Number plate light
Additional brake light (third stop light)
Cigar lighter
Air bag
Dashboard control unit power: optional functions
Dashboard control unit power: standard functions
ABS power (pump)
Right front power window
Left front power window
Door locking system
Ignition coils
Engine control system secondary loads
ABS control unit (ignition switch powered)
Engine control unit (+battery)
Page 166 of 218

When working on the
battery or near it, always
wear the
USEFUL ADVICE FOR
LENGTHENING THE LIFE OF
YOUR BATTERY
To avoid draining your battery and
lengthen its life, observe the follow-
ing indications:
– when you park the vehicle, ensure
the doors, tailgate and bonnet are
closed properly;If the vehicle is left inac-
tive for long periods at
cold, remove the battery
and store it in a warm place to
prevent freezing.
165VEHICLE MAINTENANCE
IMPORTANTA battery which is
kept at a charge of less than 50% for
any length of time will be damaged by
sulphation leading to a reduction in
cranking power and a higher risk of
the battery electrolyte freezing (this
may even occur at –10°C).
If the vehicle is inactive for a long pe-
riod of time, refer to the “Vehicle
storage” paragraph in section “Driving
your vehicle”.
If you want to add accessories after
buying the vehicle (alarm system, free-
hand phone kit, etc.) visit a Fiat Deal-
ership. They can suggest the most suit-
able accessories to get and check
whether the electric system can sup-
port the required load or whether a
larger capacity battery is required.
These devices will, in fact, run off the
battery even when the key is not in-
serted (vehicle parked) and can deploy
the battery. – the ceiling lights must be off. The
vehicle is however provided with an
automatic system for switching off in-
ternal lights;
– do not keep accessories (e.g. sound
system, hazard lights, etc.) switched on
for a long time when the engine is not
running;
– before performing any operation
on the electrical system, disconnect
the battery negative cable;
– battery terminals shall always be
perfectly tightened.
Page 209 of 218

208INDEX
I I
N N
D D
E E
X X
- recharging ................................ 144
- replacing ................................... 164
Bodywork
- maintenance ............................ 171
- version codes .......................... 176
Bodywork paint plate .................. 175
Bonnet ............................................ 85
Boot
- anchoring the load .................. 84
- extending .................................. 80
- opening and closing ................ 79
Boot light........................................ 134
Brake fluid level ............................ 160
Brake lights .................................... 134
Brakes
- fluid level ................................... 160
- service and emergency .......... 181
Bulb (replacement) ...................... 130
- bulb types.................................. 131
- general instructions ................ 130
Capacities ..................................... 200Catalytic converter
(oxidising) .................................... 104
Catalytic converter
(three way) .................................. 104
Ceiling light .................................... 66
- control ....................................... 67
- replacement.............................. 137
Cellular telephone setup ............ 99
Central side windows ................. 72
Checking the levels ...................... 154
Child lock
(device)......................................... 77
Cigar lighter ................................. 70
Clutch ............................................ 182
- fluid level .................................. 160
CO
2emissions at exhaust ......... 205
Containing running costs and
pollution ....................................... 110
Control buttons ........................... 68
Dashboard................................... 21
Demisting
- electric mirrors ....................... 61
- front side windows ................. 60
ABS .............................................. 89
Accessories purchased
by the owner .............................. 100
- installation of
electric/electronic devices .... 100
- radio transmitters and
cellular telephones .................. 100
Air filter
- replacement ............................ 162
Air recirculation ........................... 61
Air vents ......................................... 58
Airbags (front and side) .............. 91
- general warnings...................... 94
- passenger airbag manual
deactivation .............................. 93
Annual inspection schedule ....... 152
Ashtray
- front ........................................... 71
At the filling station ..................... 102
Battery
- fluid level (electrolyte) .......... 163
- jump starting ............................ 144