Page 85 of 146

84IN AN EMERGENCY
JUMP STARTING
If the battery is flat, you can use an-
other battery to start the engine. Its
capacity must be the same or slightly
greater than the flat battery (see the
chapter
TECHNICAL SPECIFICATIONS).
Proceed as follows:
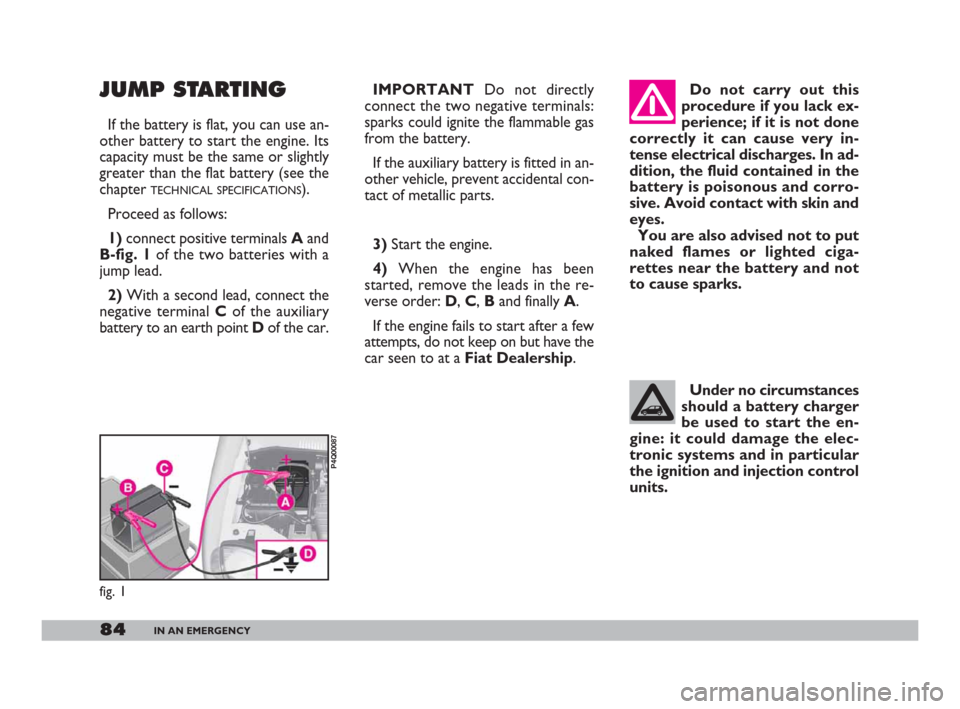
1)connect positive terminals Aand
B-fig. 1of the two batteries with a
jump lead.
2)With a second lead, connect the
negative terminal Cof the auxiliary
battery to an earth point Dof the car.IMPORTANTDo not directly
connect the two negative terminals:
sparks could ignite the flammable gas
from the battery.
If the auxiliary battery is fitted in an-
other vehicle, prevent accidental con-
tact of metallic parts.
3)Start the engine.
4)When the engine has been
started, remove the leads in the re-
verse order: D, C, Band finally A.
If the engine fails to start after a few
attempts, do not keep on but have the
car seen to at a Fiat Dealership. Do not carry out this
procedure if you lack ex-
perience; if it is not done
correctly it can cause very in-
tense electrical discharges. In ad-
dition, the fluid contained in the
battery is poisonous and corro-
sive. Avoid contact with skin and
eyes.
You are also advised not to put
naked flames or lighted ciga-
rettes near the battery and not
to cause sparks.
fig. 1
P4Q00087
Under no circumstances
should a battery charger
be used to start the en-
gine: it could damage the elec-
tronic systems and in particular
the ignition and injection control
units.
083-104 Seicento GB 22-11-2007 10:50 Pagina 84
Page 86 of 146

85IN AN EMERGENCY
BUMP STARTING IF A TYRE IS
PUNCTURED
General instructions
Observe the instructions on this and
the following pages to use the jack and
space-saver spare wheel correctly. The space-saver spare
wheel is vehicle-specific.
Never use the wheel on
other models. Never fit other
model spare wheels on your car.
If you change the type of wheels
(alloy rims instead of steel rims)
you will have to change the en-
tire set of fastening bolts with an-
other set of suitably sized bolts.
Only use the spare-saver wheel
for emergencies. Do not exceed
80 km/h with the spare wheel fit-
ted. When driving with a space-
saver spare wheel fitted, the dri-
ving performance of your car
may change. Avoid accelerating
or braking suddenly, steering
abruptly or fast cornering.
A space-saver spare wheel has a
maximum life of 3,000 km after
which is must be replaced with a
wheel of the same type. Do not bump start by
pushing, towing or coast-
ing downhill. This way of
starting could cause a rush of fuel
into the catalytic exhaust pipe
and damage it beyond repair.
Remember that until
the engine has started
the brake booster and
power steering systems will not
work and a greater effort will
therefore be required to press
the brake pedal or turn the
steering wheel.
Alert other drivers that
the car is stationary in
compliance with local
regulations: hazard warning
lights, warning triangle etc.
Any passengers on board should
leave the car, especially if it is
heavily laden. Passengers should
stay away from oncoming traffic
while the wheel is being changed.
If the wheel is being changed on
a steep or badly surfaced road,
place wedges or other suitable
material under the wheels to
stop the car.
083-104 Seicento GB 22-11-2007 10:50 Pagina 85
Page 90 of 146

89IN AN EMERGENCY
IMPORTANTFor cars equipped
with optional alloy wheels, a specific
spare wheel is required which differs
from that used on cars equipped with
steel rims. When fitting alloy rims to
replace steel rims at a later date, the
four original wheel bolts should be
changed with a new set of adequately
sized bolts and a specific spare wheel.
It is advised to keep the bolts and
the spare wheel, which would become
necessary if you should decide to re-
turn to the original type of wheels. IF A BULB BURNS
OUTOnly touch the metal
part when handling halo-
gen bulbs. If the transpar-
ent bulb is touched it reduces the
intensity of the light emitted and
can also reduce the life of the
bulb. If you touch the bulb acci-
dentally, rub it with a cloth
moistened with alcohol and leave
it to dry. Modifications or repairs
to the electrical system
carried out incorrectly
and without bearing the features
of the system in mind can cause
malfunctions with the risk of fire.
You should, where pos-
sible, have your bulbs
changed at a Fiat Dealer-
ship. Correct operation of the ex-
ternal light beams are essential
for safe driving and compliance
with legal requirements. Halogen bulbs contain
pressurised gas which, if
broken, may cause small
fragments of glass to be pro-
jected outwards.
083-104 Seicento GB 22-11-2007 10:50 Pagina 89
Page 91 of 146
90IN AN EMERGENCY
GENERAL INSTRUCTIONS
When a light is not working, check
that it has not fused before changing
the bulb.
For location of fuses, refer to
IF A
FUSE BLOWS
in this chapter.
Before replacing a bulb that does not
work, check that the contacts are not
oxidised.
Burnt-out bulbs must be replaced
with ones of the same type.
Always check the height of the head-
light beam after changing a bulb.
fig. 11
P4Q00160
IMPORTANTOn the inside sur-
face of the headlight there could ap-
pear a slight coat of fogging; this does
not show a defect, since it is a natural
occurrence due to low temperature
and to the degree of humidity in the
air; it will soon disappear as soon as
the lights are turned on. The presence
of drops inside the headlight shows
water seepage, refer to the Fiat
Dealership.
083-104 Seicento GB 22-11-2007 10:50 Pagina 90
Page 92 of 146
91IN AN EMERGENCY
TYPES OF BULBS fig. 11
Several types of bulbs are installed in
the car:
A. Glass bulbs Snapped into posi-
tion. Pull to remove.
B. Bayonet connection bulbs Re-
move from the bulb holder by press-
ing the bulb and rotating it anti-clock-
wise.
C. Cylindrical bulbs Remove by
pulling away from terminals.
D. Double filament halogen
bulbs To remove the bulb release the
clip holding the bulb in place.
E. Halogen bulb To remove the
bulb, release the clip holding the bulb
in place. BULB (fig. 11) TYPE W
MAIN BEAM
DIPPED BEAM
FRONT SIDE LIGHTS
FRONT DIRECTION INDICATORS
SIDE DIRECTION INDICATORS
REAR DIRECTION INDICATORS
BRAKE/TAILLIGHTS
REVERSE LIGHT
REAR FOGLIGHT
CEILING LAMP
NUMBER PLATE LIGHT
FRONT FOGLIGHT
ADDITIONAL BRAKE LIGHT (3rdbrake light)
D
D
A
B
A
B
B
B
B
C
B
E
AH4 60/55
H4 60/55
W5W 5
P21W 21
W5W 5
P21W 21
P21/5W 21/5
P21W 21
P21W 21
CW5 5
R5W 5
H3 55
W5W 5
083-104 Seicento GB 22-11-2007 10:50 Pagina 91
Page 93 of 146
92IN AN EMERGENCY
3)fit a new bulb, making the tabs
E-fig. 14 on the metal part coincide
with the specific housings on the
headlight dish;
4)refasten the clip, refit the rubber
guard and refit the connector.
IF AN EXTERIOR LIGHT BURNS OUT
MAIN BEAM AND DIPPED
BEAM HEADLIGHTS
To replace a halogen bulb:
1)take out the connector A-fig. 12
then the rubber protection B;
2)release the fastening clip C-fig. 13
and remove the bulb D;
fig. 12
P4Q01023
fig. 14
P4Q01025
Modifications or repairs
to the electrical system
carried out incorrectly
and without bearing the features
of the system in mind can cause
malfunctions with the risk of fire.
For bulb type and respective power,
see
IF A BULB BURNS OUT.
fig. 13
P4Q01024
083-104 Seicento GB 22-11-2007 10:50 Pagina 92
Page 94 of 146
93IN AN EMERGENCY
3)replace the bulb and refit the bulb
holder A.
Front direction indicators
To replace the 12V-21W bulb:
1) release the clip A-fig. 17, work-
ing in the direction of the arrow;
2)remove the lens unit B-fig. 18
from the front;
3)the bulb holder Cis connected to
the lens. Turn it slightly to remove;
4)remove the bulb D, pushing it in
slightly and turning it anti-clockwise at
the same time;5)after changing the bulb, refit the
bulb holder onto the lens;
6)replace the lens unit in its seating
inserting the tabs E-fig. 19in the
guides Fto the side of the light;
7)refasten the clip A-fig. 17. FRONT SIDE LIGHTS
To replace the 12V-5W bulb:
1)take out the bulb holder A-
fig. 15, turning slightly to release;
2)remove the bulb B-fig. 16;
fig. 16
P4Q01027
fig. 15
P4Q01026
fig. 17
P4Q01028
fig. 18
P4Q00108
fig. 19
P4Q00109
083-104 Seicento GB 22-11-2007 10:50 Pagina 93
Page 95 of 146
94IN AN EMERGENCY
SIDE DIRECTION
INDICATORS
To replace the 12V-5W bulb:
1)turn the lens A-fig. 20towards
the front of the car to position 2;2)remove the lens;
3)remove bulb B-fig. 21and change
it;
4)refit the lens and turn it to 1 to
lock it.
FRONT FOGLIGHTS
To replace the halogen bulb (type
H3, 12V-55W):
1)loosen the two screws A-fig. 22
securing the fog light to the bumper;
2)loosen the two screws B-fig. 23
and take out the rubber cover;3)release the clip C-fig. 24and re-
move the bulb D;
4)to refit, follow the above opera-
tions in reverse order.
fig. 20
P4Q00110
fig. 21
P4Q00110
fig. 22
P4Q00110
fig. 23
P4Q00110
fig. 24
P4Q00110
083-104 Seicento GB 22-11-2007 10:50 Pagina 94