2007 FIAT 600 battery
[x] Cancel search: batteryPage 79 of 146

78DRIVING YOUR CAR
For electrical connection, a 7 or 13
pole 12VDC coupling must be used
(CUNA/UNI and ISO/DIN standards).
Follow the instructions provided by
the manufacturer of the car and/or
the tow hitch.The electrical brake (where relevant)
or other devices (electrical winch,
etc.) must be powered directly from
the battery by means of a lead with a
cross-section area no smaller than
2.5 mm
2. In addition to the electrical
connections, only the power wire foran additional electrical brake and for
internal trailer lighting with a power
not exceeding 15W can be connected
to the car’s electrical system.
The coupling electrical connections
are shown in fig. 4.
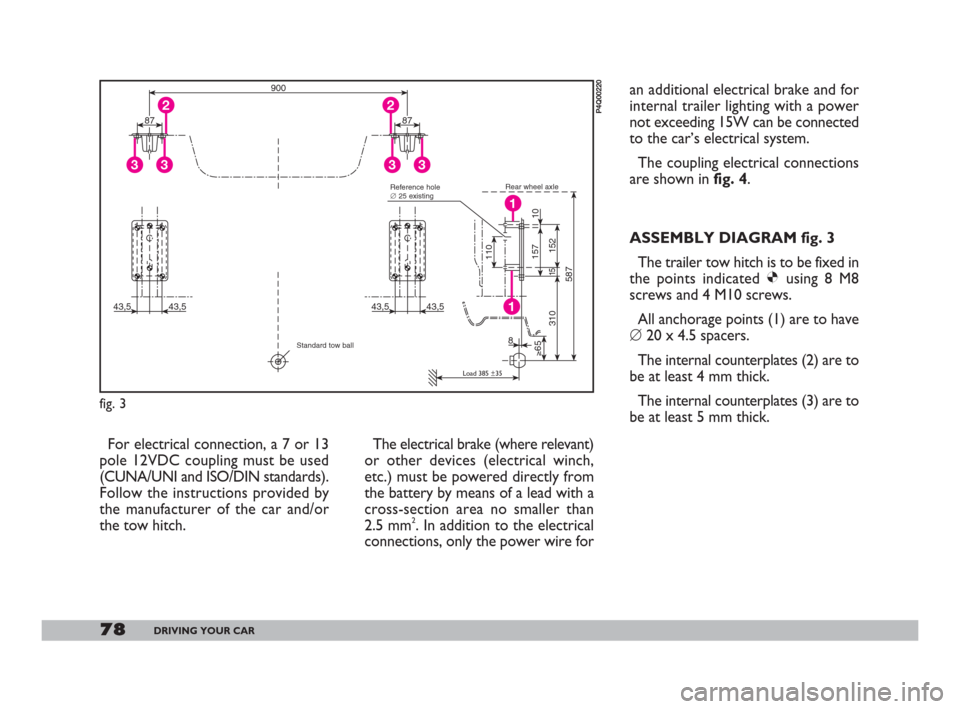
ASSEMBLY DIAGRAM fig. 3
The trailer tow hitch is to be fixed in
the points indicated Øusing 8 M8
screws and 4 M10 screws.
All anchorage points (1) are to have
�’20 x 4.5 spacers.
The internal counterplates (2) are to
be at least 4 mm thick.
The internal counterplates (3) are to
be at least 5 mm thick.
43,5 43,5
15
≥65
3108
152
587110
10 157
43,5 43,5
1
1
87
33
287
33
2
900
fig. 3
P4Q00220
Rear wheel axle
Load 385 ±35
Reference hole
�’25 existing
Standard tow ball
070-082 Seicento GB 22-11-2007 10:50 Pagina 78
Page 83 of 146

82DRIVING YOUR CAR
STORING THE CAR
The following precautions should be
taken if the car will not be used for
several months:
– Park the car in covered, dry and if
possible well-ventilated premises.
– Engage a gear.
– Make sure the handbrake is not
engaged.
– Remove the cables from the bat-
tery terminals (first remove the cable
to the negative terminal), and check
the battery charge. If the car is to be
stored for long periods the charge of
the battery should be checked every
month and recharged if it falls below
12.5V.– Clean and protect the shiny metal
parts using special compounds readily
available.
– Sprinkle talcum powder on the
rubber windscreen and rear window
wiper blades and lift them off the glass.
– Open the windows slightly.– Cover the car with a cloth or per-
forated plastic sheet. Do not use
sheets of non-perforated plastic as
they do not allow moisture on the car
body to evaporate.
– Inflate the tyres to + 0.5 bar above
the normal specified pressure and
check it at intervals.
– Do not drain the engine cooling
system.
070-082 Seicento GB 22-11-2007 10:50 Pagina 82
Page 85 of 146

84IN AN EMERGENCY
JUMP STARTING
If the battery is flat, you can use an-
other battery to start the engine. Its
capacity must be the same or slightly
greater than the flat battery (see the
chapter
TECHNICAL SPECIFICATIONS).
Proceed as follows:
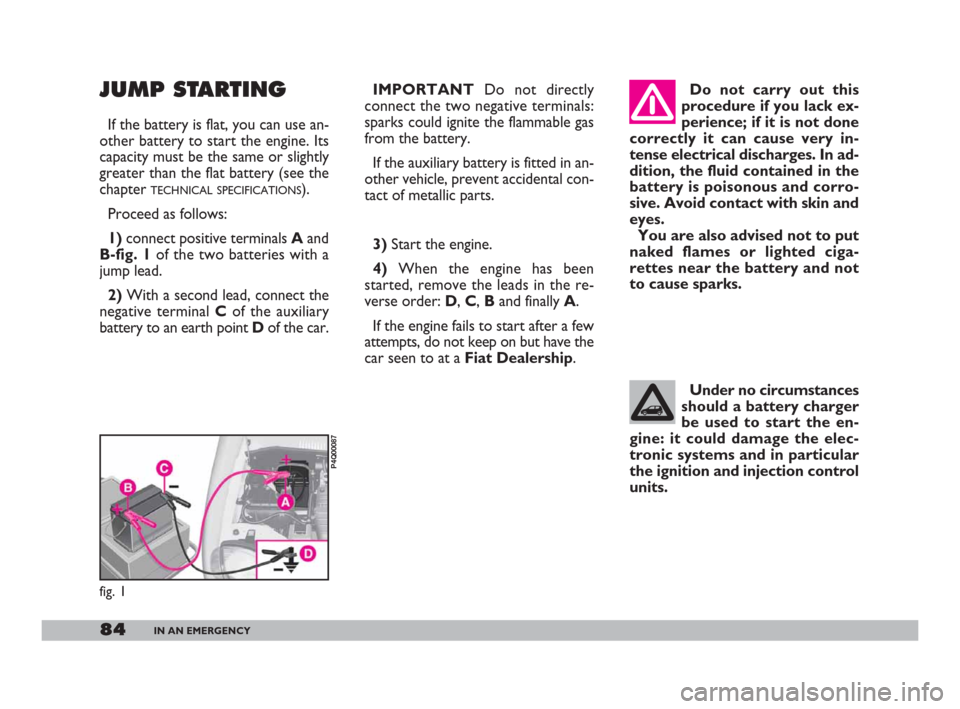
1)connect positive terminals Aand
B-fig. 1of the two batteries with a
jump lead.
2)With a second lead, connect the
negative terminal Cof the auxiliary
battery to an earth point Dof the car.IMPORTANTDo not directly
connect the two negative terminals:
sparks could ignite the flammable gas
from the battery.
If the auxiliary battery is fitted in an-
other vehicle, prevent accidental con-
tact of metallic parts.
3)Start the engine.
4)When the engine has been
started, remove the leads in the re-
verse order: D, C, Band finally A.
If the engine fails to start after a few
attempts, do not keep on but have the
car seen to at a Fiat Dealership. Do not carry out this
procedure if you lack ex-
perience; if it is not done
correctly it can cause very in-
tense electrical discharges. In ad-
dition, the fluid contained in the
battery is poisonous and corro-
sive. Avoid contact with skin and
eyes.
You are also advised not to put
naked flames or lighted ciga-
rettes near the battery and not
to cause sparks.
fig. 1
P4Q00087
Under no circumstances
should a battery charger
be used to start the en-
gine: it could damage the elec-
tronic systems and in particular
the ignition and injection control
units.
083-104 Seicento GB 22-11-2007 10:50 Pagina 84
Page 100 of 146

99IN AN EMERGENCY
An additional 7.5A fuse is located by
the side of the climate control system.
It can be reached from inside the pas-
senger compartment under the dash-
board.
Fuses in the engine
compartment
A fusebox is located on the left side
of the engine compartment behind the
battery. It contains four high amper-
age fuses A-fig. 40 (MAXI FUSES)
which act as additional fire protection
in preventing high intensity cables
from overheating the following :
A- 30A - injection control unit.
B- 40A - Ignition switch.
C- 30A - engine cooling fan.D- 60A -dashboard fusebox
power.
IMPORTANT Go directly to a
Fiat Dealershipto have any one of
these four fuses restored.
Other version-specific fuses are
arranged next to the four MAXI fuses.
They protect the following devices:
E - 30A - climate control sys-
tem.
F - 30A - optional power cir-
cuits.
G - 40A - electrical power
steering system.
H - 60A - ABSA fusebox B-fig. 41 containing other
three fuses is located in the engine
compartment on the right-hand side.
To reach the fuses, loosen the two
nuts A and remove the cover B.
Fuses fig. 42 protect:
1 - 7.5A -Fiat CODE and control
unit (+30)
2 - 15A -injection system auxiliary
units and climate control
system auxiliary units
3 - 7.5A -Fiat CODE and elec-
tronic injection control
unit (15/54)
fig. 40
P4Q01031
fig. 41
P4Q01032
fig. 42
P4Q01033
083-104 Seicento GB 22-11-2007 10:50 Pagina 99
Page 101 of 146

100IN AN EMERGENCY
System/Component Fuse no. Amperage Location
Front left-hand sidelight
Front right-hand sidelight
Left-hand taillight
Right-hand taillight
Left-hand dipped beam headlight
Right-hand dipped beam headlight
Left-hand main beam headlight
Right-hand main beam headlight
Left-hand brake light
Right-hand brake light
Additional brake light
(3rdbrake light)
Left-hand number plate light
Right-hand number plate light
Reversing light
Rear foglight
Hazard lights
Direction indicators
Front foglights
Ceiling light
Windscreen wiper/washer
Horn
Electric windows
Door locking system
Heated rear window
Cigar lighter
5 10A fig. 39
4 10A fig. 39
4 10A fig. 39
5 10A fig. 39
6 10A fig. 39
7 10A fig. 39
8 10A fig. 39
9 10A fig. 39
21 10A fig. 39
21 10A fig. 39
21 10A fig. 39
4 10A fig. 39
5 10A fig. 39
21 10A fig. 39
18 10A fig. 39
16 10A fig. 39
22 10A fig. 39
19 15A fig. 39
15 15A fig. 39
25 20A fig. 39
17 15A fig. 39
2 25A fig. 39
1 15A fig. 39
14 20A fig. 39
24 25A fig. 39
System/Component Fuse no. Amperage Location
6 10A fig. 39
22 10A fig. 39
9 10A fig. 39
13 20A fig. 39
20 20A fig. 39
15 15A fig. 39
11 20A fig. 39
23 10A fig. 39
3 10A fig. 39
1 7,5A fig. 42
1 7,5A fig. 42
E 30A fig. 40
C 30A fig. 40
24 25A fig. 39
3 7.5A fig. 42
3 7.5A fig. 42
F 30A fig. 40
2 15A fig. 42
2 15A fig. 42
B 40A fig. 40
12 7.5A fig. 39
15 15A fig. 39
10 10A fig. 39Headlight beam adjuster
Instrument panel (+15)
Main beam headlight warning light
Stalks: light control
Stalks: general
Sound system + battery
Sunroof
Airbag system
ABS (+15)
Fiat CODE system (+30)
Injection control unit (+30)
Climate control system
Engine cooler radiator fan
Passenger compartment fan
Electronic ignition
injection system (+15)
Fiat CODE system (+15)
Optional device power circuits
Electronic injection sensors
Climate control system auxiliary units
Ignition switch
Relay coil power
Instrument panel (+30)
Electrical power steering system
(+15)
083-104 Seicento GB 22-11-2007 10:50 Pagina 100
Page 102 of 146

101IN AN EMERGENCY
JUMP STARTING
See
JUMP STARTINGin this chapter.
IF THE BATTERY
IS FLAT
First of all, read the CAR MAINTE-
NANCEchapter for the steps to be
taken to avoid the battery running
down and to ensure it has a long life.
RECHARGING THE BATTERY
You are advised to recharge the bat-
tery slowly for a period of approxi-
mately 24 hours at a low amperage.
Charging for too long could damage
the battery.
Proceed as follows:
1)Disconnect the electric system
from the battery terminals.
IMPORTANTWhere relevant,
switch the electronic car alarm off
with the remote control.3)Turn on the charger.
4)When you have finished, turn the
charger off before disconnecting the
battery.
5)Reconnect the cables to the bat-
tery terminals. Make sure the polarity
is correct.
The liquid in the battery
is poisonous and corro-
sive. Do not let it touch
the skin or eyes. Recharging the
battery should be done in a well-
ventilated area away from naked
flames or possible sources of
sparks: explosion and fire risk. Do not attempt to
recharge a frozen bat-
tery. Thaw is first other-
wise it could explode. If the bat-
tery froze, make sure the inter-
nal elements are not broken
(short-circuit risk) and that the
casing is not cracked (risk of
spilling the poisonous and corro-
sive liquid).
Under no circumstances
should a battery charger
be used to start the en-
gine: it could damage the elec-
tronic systems and in particular
the ignition and injection control
units.
083-104 Seicento GB 22-11-2007 10:50 Pagina 101
Page 108 of 146

107CAR MAINTENANCE
thousands of kilometres
Check anti-evaporation system
Replace air cleaner cartridge
Top up fluids (engine coolant, brakes, windscreen washer, battery, etc.)
Check timing belt conditions
Replace timing belt (*)
Replace spark plugs
Check engine control systems via diagnostic socket
Check mechanical gearbox oil level
Change engine oil
Replace engine oil filter
Change brake fluid (or every two years) 20 40 60 80 100 120 140 160 180
●●
●●●●
●●●●●●●●●
●●
●
●●●●
●●●●
●●
●●●●●●●●●
●●●●●●●●●
●●●
(*) or every 3 years for demanding use (cold climates, prolonged idling in city traffic)
or every 5 years, regardless of distance
105-123 Seicento GB 22-11-2007 10:51 Pagina 107
Page 109 of 146

108CAR MAINTENANCE
ANNUAL INSPECTION SCHEDULE
– Inspect conditions of. engine, gear-
box, transmission, piping (exhaust -
fuel feed - brakes), rubber parts
(boots - sleeves - bushings - etc.),
brake and fuel line hoses.
– Check for bonnet and boot lock
cleanness, lever cleanness and lubri-
cation.
– Check battery charge status.
– Check conditions of various con-
trol belts.
– Check and top up fluid levels (en-
gine coolant, brakes, windscreen
washer, battery, etc.).
– Change engine oil.
– Replace engine oil filter.
– Replace pollen filter (where fitted). The following annual inspection
schedule is recommended for
cars travelling less than
20,000 km a year (e.g. approxi-
mately 10,000 km). The schedule
includes the following operations:
– Check tyre condition and wear
and adjust pressure, if required (in-
cluding spare wheel).
– Check operation of lights (head-
lights, direction indicators, hazard
lights, boot light, passenger compart-
ment ceiling light, glove compartment
light, instrument panel lights, etc.).
– Check windscreen wiper/washer
and adjust nozzles.
– Check position wear of wind-
screen/rear window wiper blades.
– Check front brake pad conditions
and wear.
ADDITIONAL
CHECKS
Every 1,000 kmor before long
trips, check and top up as necessary:
– engine coolant level, brake fluid
level, windscreen washer liquid level,
tyre pressure and conditions.
Every 3,000 kmcheck and top up
as necessary: engine oil level.
We recommend using FL Selenia
products which were specifically de-
signed and made for use in Fiat vehi-
cles (see
CAPACITIEStable in TECHNICAL
SPECIFICATIONS
).
105-123 Seicento GB 22-11-2007 10:51 Pagina 108