2007 DODGE CHARGER light
[x] Cancel search: lightPage 21 of 384

The panic alarm will stay on for 3 minutes unless you
turn it off by either pressing the PANIC button a second
time or drive the vehicle at a speed of 15 mph (24 km/h)
or greater.
NOTE:
•
The interior lights will turn off if you turn the ignition
switch to the ACC or ON position while the panic
alarm is activated. However, the exterior lights and
horn will remain on.
•You may need to be less than 23 feet (7 meters) from
the vehicle when using the transmitter to turn off the
panic alarm due to the radio frequency noises emitted
by the system.
Programming Additional Transmitters
Refer to SENTRY KEY “Customer Key Programming.”
(See page 14 for more information.)
If you do not have a programmed transmitter, contact
your dealer for details.
Battery Replacement
The recommended replacement battery is CR2032.
NOTE:Do not touch the battery terminals that are on
the back housing or the printed circuit board.
1. With the transmitter buttons facing downward, re-
move the small screw (if equipped).
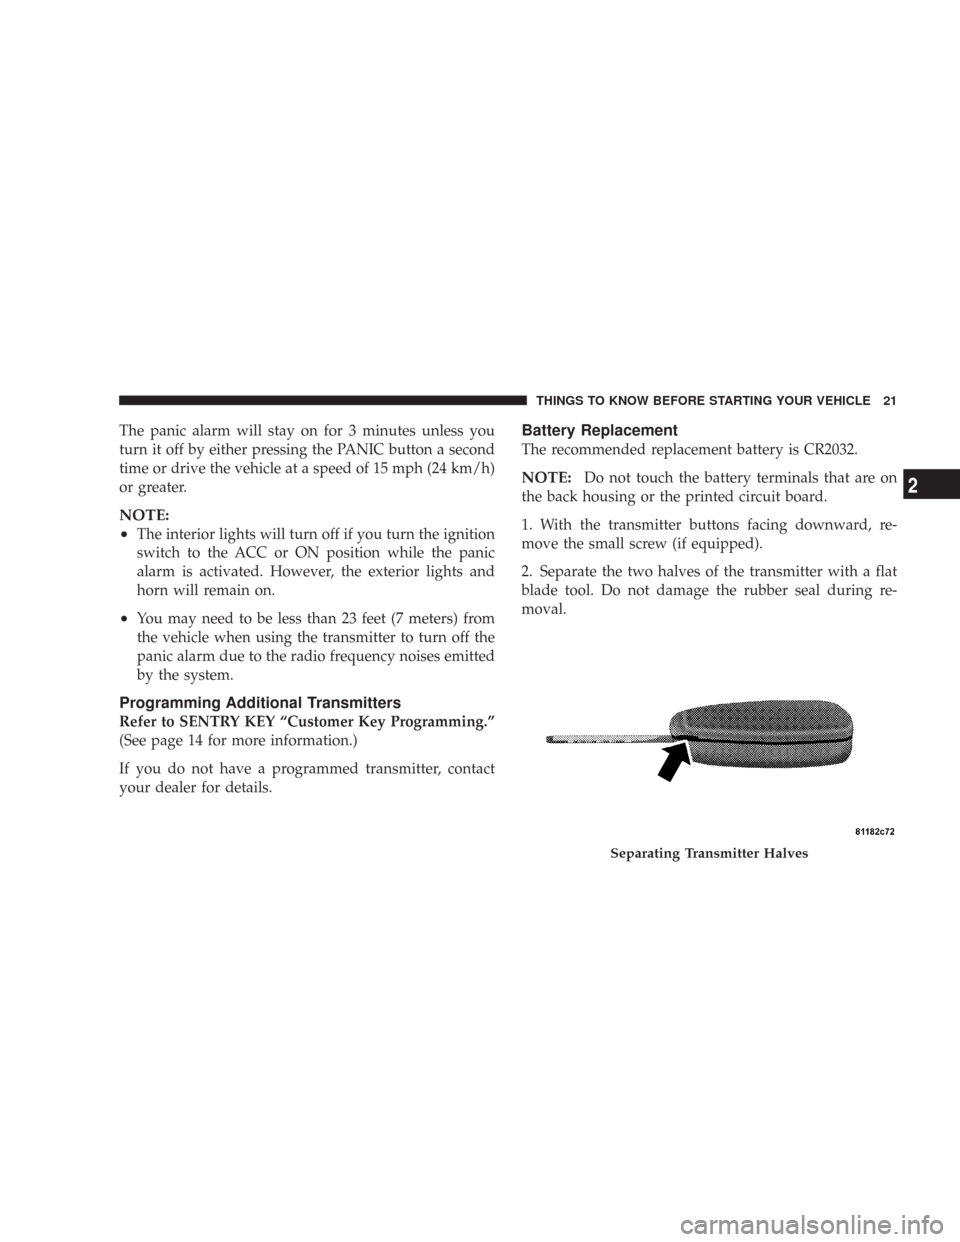
2. Separate the two halves of the transmitter with a flat
blade tool. Do not damage the rubber seal during re-
moval.
Separating Transmitter Halves
THINGS TO KNOW BEFORE STARTING YOUR VEHICLE 21
2
Page 30 of 384

To close the window part way, lift the window switch to
the first detent and release it when you want the window
to stop.
For vehicles not equipped with the Electronic Vehicle
Information Center (EVIC), the power window switches
will remain active for 10 minutes after the ignition switch
is turned off. Opening either front door will cancel this
feature.
For vehicles equipped with the EVIC, the power window
switches will remain active for up to 60 minutes after the
ignition switch is turned off. Opening either front door
will cancel this feature. The time is programmable
through. For details, refer to “Delay Power Off to Acces-
sories Until Exit,” under “Personal Settings (Customer
Programmable Features),” under “Electronic Vehicle In-
formation Center (EVIC)” in Section 4 of this manual.NOTE:
•
If the window runs into any obstacle during auto-
closure, it will reverse direction and then stop. Remove
the obstacle and use the window switch again to close
the window.
•Any impact due to rough road conditions may trigger
the auto reverse function unexpectedly during auto-
closure. If this happens, pull the switch lightly to the
first detent and hold to close window manually.
WARNING!
There is no anti-pinch protection when the window
is almost closed. Be sure to clear all objects from the
window before closing.
30 THINGS TO KNOW BEFORE STARTING YOUR VEHICLE
Page 39 of 384

Lap/Shoulder Belt Untwisting Procedure
Use the following procedure to untwist a twisted lap/
shoulder belt.
1. Position the latch plate as close as possible to the
anchor point.
2. At about 6 to 12 inches (15 to 30 cm) above the latch
plate, grasp and twist the belt webbing 180° to create a
fold that begins immediately above the latch plate.
3. Slide the latch plate upward over the folded webbing.
The folded webbing must enter the slot at the top of the
latch plate.
4. Continue to slide the latch plate up until it clears the
folded webbing.
Seat Belt Pretensioners
The seat belts for both front seating positions are
equipped with pretensioning devices that are designed to
remove any slack from the seat belts in the event of a
collision. These devices improve the performance of the
seat belt system by assuring that the belt is tight about the
occupant in a collision. Pretensioners work for all size
occupants, including those in child restraints.
NOTE:These devices are not a substitute for proper
seat belt placement by the occupant. The seat belt still
must be worn snugly and positioned properly.
The pretensioners are triggered by the Airbag Control
Module (refer to information on Airbags in this section).
Like the front airbags, the pretensioners are single use
items. After a collision that is severe enough to deploy
the airbags and pretensioners, both must be replaced.
Enhanced Seat Belt Reminder System (BeltAlert)
If the driver’s seat belt has not been buckled within 60
seconds of starting the vehicle and if the vehicle speed is
greater than 5 mph (8 km/h), the Enhanced Warning
System (BeltAlert) will alert the driver to buckle their seat
belt. The driver should also instruct all other occupants to
buckle their seat belts. Once the warning is triggered, the
Enhanced Warning System (BeltAlert) will continue to
chime and flash the Seat Belt Reminder Light for 96
seconds or until the driver’s seat belt is buckled. The
Enhanced Warning System (BeltAlert) will be reactivated
if the driver’s seat belt is unbuckled for more than 10
seconds and the vehicle speed is greater than 5 mph (8
km/h).
THINGS TO KNOW BEFORE STARTING YOUR VEHICLE 39
2
Page 40 of 384

BeltAlert Programming
The Enhanced Warning System (BeltAlert) can be en-
abled or disabled by your authorized dealer or by
performing the following steps:
NOTE:DaimlerChrysler does not recommend deacti-
vating the Enhanced Warning System (BeltAlert).
1. With all doors closed, and the ignition switch in any
position except ON or START, buckle the driver’s seat
belt.
2. Turn the ignition switch to the ON/ RUN position, but
do not start the engine. Wait for the Seat Belt Reminder
Light to turn off and then proceed to the next step.
NOTE:You must perform the following steps within 60
seconds of turning the ignition switch to the ON/ RUN
position.
3. Within 60 seconds of turning the ignition switch to the
ON/ RUN position, unbuckle and then re-buckle the
driver’s seat belt at least three times within 10 seconds,
ending with the seat belt buckled.
NOTE:Watch for the Seat Belt Reminder Light to turn
on while unbuckling the seat belt and turn off while
re-buckling the seat belt. It may be necessary to retract
the seat belt.
4. Turn the ignition switch to the LOCK position. A
single chime will sound to signify that you have success-
fully completed the programming.
The Enhanced Warning System (BeltAlert) can be reacti-
vated by repeating this procedure.
NOTE:When the Enhanced Warning System (BeltAlert)
is deactivated, the Seat Belt Reminder Light will continue
to illuminate as long as the driver’s seat belt is unbuck-
led.
Automatic Locking Mode — If Equipped
In this mode, the shoulder belt is automatically pre-
locked. However, the belt will still retract to remove slack
in the shoulder belt. Use The Automatic Locking Mode
any time a child safety seat is installed in a seating
position that has a seat belt with this feature. Seat belts
that have the Automatic Locking Mode feature have a
40 THINGS TO KNOW BEFORE STARTING YOUR VEHICLE
Page 43 of 384

WARNING!
•Do not put anything on or around the front airbag
covers or attempt to manually open them. You may
damage the airbags and you could be injured be-
cause the airbags are no longer functional. These
protective covers for the airbag cushions are de-
signed to open only when the airbags are inflating.
•If your vehicle is equipped with side curtain airbags,
do not stack luggage or other cargo up high enough
to block the location of the side curtain airbag. The
area where the side curtain airbag is located should
remain free from any obstructions.
•If your vehicle is equipped with side curtain airbags,
do not have any accessory items installed which will
alter the roof, including adding a sunroof to your
vehicle. Do not add roof racks that require perma-
nent attachments (bolts or screws) for installation on
the vehicle roof. Do not drill into the roof of the
vehicle for any reason.
•Do not drill, cut or tamper with the knee bolster in
any way.
•Do not mount any accessories to the knee bolster
such as alarm lights, stereos, citizens band radios etc.
NOTE:Do not use a clothing bar mounted to the coat
hooks in this vehicle. A clothing bar will impede the
proper performance of the curtain airbags.
Along with the seat belts, front airbags work with the
instrument panel knee bolsters to provide improved
protection for the driver and front passenger. Side Cur-
tain Airbags also work with seat belts to improve occu-
pant protection.
The seat belts are designed to protect you in many types
of collisions. The front airbags deploy in moderate to
severe frontal collisions.
If your vehicle is so equipped, the Side Curtain Airbag on
the crash side of the vehicle is triggered in moderate to
severe side collisions. However, even in collisions where
the airbags deploy, you need the seat belts to keep you in
the correct position for the airbags to protect you prop-
erly.
Here are some simple steps you can take to minimize
the risk of harm from a deploying airbag.
1. Children 12 years old and under should ride buckled
up in the rear seat.
THINGS TO KNOW BEFORE STARTING YOUR VEHICLE 43
2
Page 45 of 384

WARNING!
•Relying on the airbags alone could lead to more
severe injuries in a collision. The airbags work
with your seat belt to restrain you properly. In
some collisions, the airbags won’t deploy at all.
Always wear your seat belts even though you
have airbags.
•Being too close to the steering wheel or instru-
ment panel during airbag deployment could cause
serious injury. Airbags need room to inflate. Sit
back, comfortably extending your arms to reach
the steering wheel or instrument panel.
•If the vehicle has side curtain airbags, they also
need room to inflate. Do not lean against the door
or window. Sit upright in the center of the seat.
Air Bag System Components
The airbag system consists of the following:
•Airbag Control Module (ACM)
•Side Remote Acceleration Sensors (if equipped)
•Airbag Warning Light
•Driver Airbag
•Front Passenger Airbag
•Supplemental Side Curtain Airbags above Side Win-
dows (if equipped)
•Steering Wheel and Column
•Instrument Panel
•Interconnecting Wiring
•Seatbelt Reminder Light
•Knee Impact Bolsters
•Front Acceleration Sensors
•Driver and Front Passenger Seat Belt Pretensioners
How The Airbag System Works
•
TheAirbag Control Module (ACM)determines if a
frontal collision is severe enough to require the airbags
to inflate. The front airbag inflators are designed to
THINGS TO KNOW BEFORE STARTING YOUR VEHICLE 45
2
Page 46 of 384

provide different rates of airbag inflation from direc-
tion provided by the ACM. The ACM will not detect
roll over.
•The ACM also monitors the readiness of the electronic
parts of the system whenever the ignition switch is in
the START or ON positions. These include all of the
items listed above except the knee bolster, the instru-
ment panel, and the steering wheel and column. If the
key is in the LOCK position, in the ACC position, or
not in the ignition, the airbags are not on and will not
inflate.
•The ACM also turns on the Airbag Warning
Light in the instrument panel for 6 to 8
seconds as a self-check when the ignition is
first turned on. After the self-check, the
Airbag Warning Light will turn off. If the ACM detects
a malfunction in any part of the system, it turns on the
Airbag Warning Light either momentarily or continu-
ously. A single chime will sound if the light comes on
again after initial start up.
WARNING!
Ignoring the AIRBAG Warning Light in your instru-
ment panel could mean you won’t have the airbags
to protect you in a collision. If the light does not
come on, stays on after you start the vehicle, or if it
comes on as you drive, have the airbag system
checked right away.
•TheDriver and Front Passenger Airbag/Inflator
Unitsare located in the center of the steering wheel
and the passenger side of the instrument panel. When
the ACM detects a collision requiring the airbags, it
signals the inflator units. A large quantity of nontoxic
gas is generated to inflate the front airbags. Different
airbag inflation rates may be possible based on colli-
sion severity. The steering wheel hub trim cover, and
the upper passenger side of the instrument panel
separate and fold out of the way, as the bags inflate to
their full size. The bags fully inflate in about 50 - 70
milliseconds. This is about half of the time that it takes
to blink your eyes. The bags then quickly deflate while
helping to restrain the driver and front passenger. The
46 THINGS TO KNOW BEFORE STARTING YOUR VEHICLE
Page 48 of 384

However, if you haven’t healed significantly within a
few days, or if you have any blistering, see your doctor
immediately.
•As the airbags deflate, you may see some smoke-like
particles. The particles are a normal by-product of the
process that generates the nontoxic gas used for airbag
inflation. These airborne particles may irritate the skin,
eyes, nose, or throat. If you have skin or eye irritation,
rinse the area with cool water. For nose or throat
irritation, move to fresh air. If the irritation continues,
see your doctor. If these particles settle on your
clothing, follow the garment manufacturer’s instruc-
tions for cleaning.
•It is not advisable to drive your vehicle after the
airbags have been deployed. If you are involved in
another collision, the airbags will not be in place to
protect you.
WARNING!
Deployed airbags can’t protect you in another colli-
sion. Have the airbags replaced by an authorized
dealer as soon as possible.
Enhanced Accident Response Feature
If the airbags deploy after an impact and the electrical
system remains functional, vehicles equipped with
power door locks will unlock automatically. In addition,
approximately 5 seconds after the vehicle has stopped
moving, the interior lights will illuminate to aid visibility.
NOTE:The interior lights can only be deactivated if the
key is removed from the ignition switch or the vehicle is
driven.
48 THINGS TO KNOW BEFORE STARTING YOUR VEHICLE