Page 247 of 504
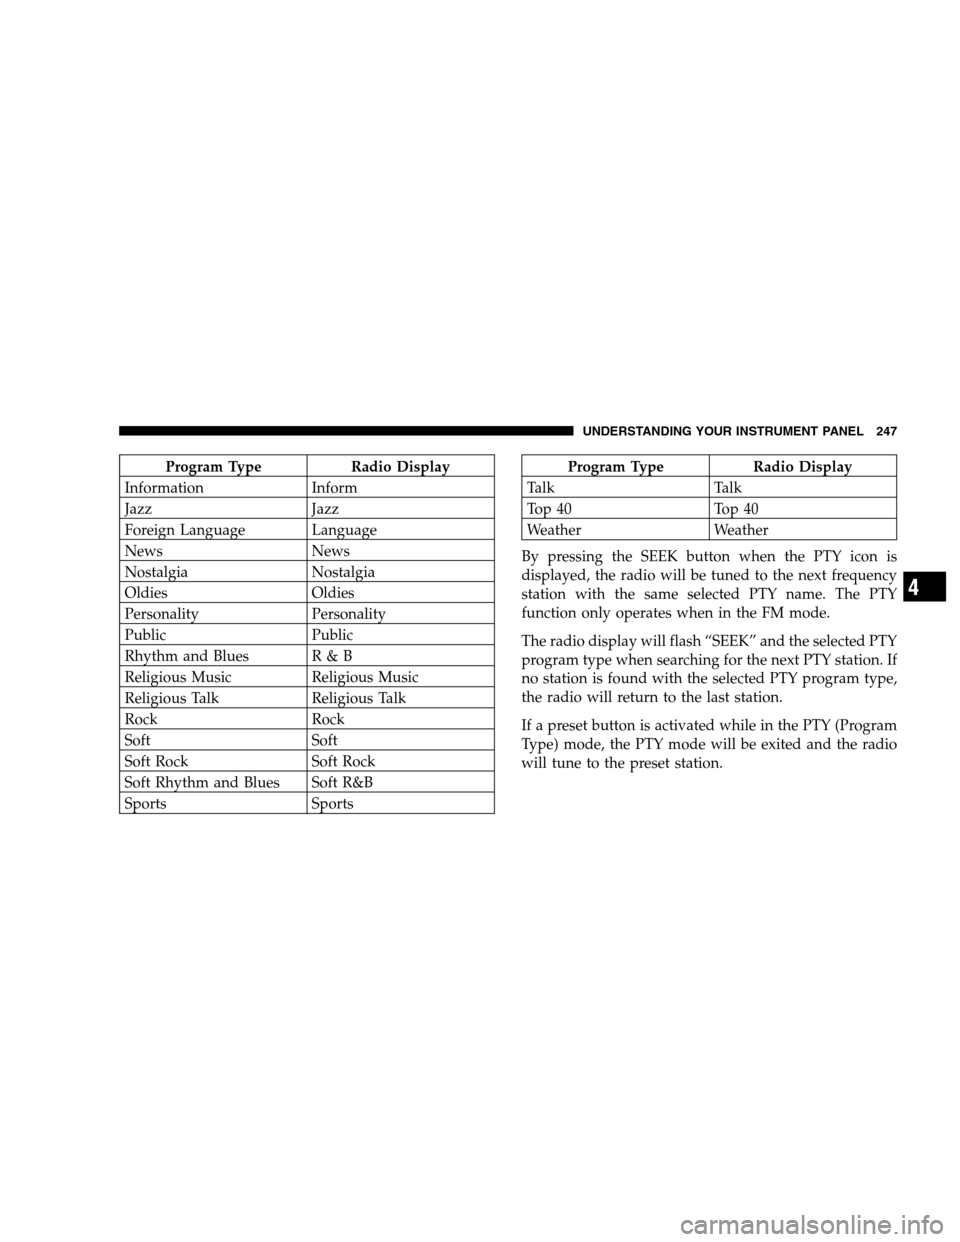
Program Type Radio Display
Information Inform
Jazz Jazz
Foreign Language Language
News News
Nostalgia Nostalgia
Oldies Oldies
Personality Personality
Public Public
Rhythm and Blues R & B
Religious Music Religious Music
Religious Talk Religious Talk
Rock Rock
Soft Soft
Soft Rock Soft Rock
Soft Rhythm and Blues Soft R&B
Sports SportsProgram Type Radio Display
Ta l k Ta l k
Top 40 Top 40
Weather Weather
By pressing the SEEK button when the PTY icon is
displayed, the radio will be tuned to the next frequency
station with the same selected PTY name. The PTY
function only operates when in the FM mode.
The radio display will flash “SEEK” and the selected PTY
program type when searching for the next PTY station. If
no station is found with the selected PTY program type,
the radio will return to the last station.
If a preset button is activated while in the PTY (Program
Type) mode, the PTY mode will be exited and the radio
will tune to the preset station.
UNDERSTANDING YOUR INSTRUMENT PANEL 247
4
Page 250 of 504

the radio will continue to tune until you release the
button. The frequency will be displayed and continu-
ously updated while the button is pressed.
To Set The Radio Push-Button Memory
When you are receiving a station that you wish to
commit to push-button memory, press the SET button.
SET 1 will show in the display window. Select the “1–5”
button you wish to lock onto this station and press and
release that button. If a button is not selected within 5
seconds after pressing the SET button, the station will
continue to play but will not be locked into push-button
memory.
You may add a second station to each push-button by
repeating the above procedure with this exception: Press
the SET button twice and SET 2 will show in the display
window. Each button can be set for SET 1 and SET 2 in
both AM and FM. This allows a total of 10 AM and 10 FM
stations to be locked into push-button memory. Thestations stored in SET 2 memory can be selected by
pressing the push-button twice. Every time a preset
button is used a corresponding button number will be
displayed.Audio
The audio button controls the BASS, TREBLE, BAL-
ANCE, and FADE.
Press the AUDIO button and BASS will be displayed.
Press the SEEK + or SEEK – to increase or decrease the
Bass tones.
Press the AUDIO button a second time and TREB will be
displayed. Press the SEEK + or SEEK – to increase or
decrease the Treble tones.
Press the AUDIO button a third time and BAL will be
displayed. Press the SEEK + or SEEK – to adjust the
sound level from the right or left side speakers.
250 UNDERSTANDING YOUR INSTRUMENT PANEL
Page 256 of 504

variety of destinations and routes.Refer to your “Navi-
gation User’s Manual” for detailed operating instruc-
tions.
NOTE:If your vehicle is not equipped with the CD
Changer option, you will not be able to use the Naviga-
tion system and the CD Player simultaneously. Always
remove the Navigation DVD before inserting another
disc.
Clock Setting Procedure
The GPS receiver used in this system is synchronized to
the time data being transmitted by the GPS satellite. The
satellites’ clock is Greenwich Mean Time (GMT). This is
the worldwide standard for time. This makes the sys-
tem’s clock very accurate once the appropriate time zone
and daylight savings information is set.
To manually set the clock, change the time zone, or
change daylight savings information, use a ball point penor similar object to press the hour (H) or minute (M)
buttons on the radio. TheSetupscreen appears.
Setting the Clock
1. Press the H button on the faceplate to change the hour
or the M button on the faceplate to change the minute.
The setting will increase each time you press the button.
Holding either button in will fast forward the setting.
2. If no changes are made within 5 seconds of accessing
theSetupscreen, the screen will time out and you will be
taken to the last mode.
NOTE:To reset the clock, select the appropriate time
zone and press ENTER. The clock will revert to the
accurate time based on the time zone you selected.
Changing Time Zone
1. Highlight “Clock Setup” and press ENTER.
256 UNDERSTANDING YOUR INSTRUMENT PANEL
Page 257 of 504

2. At theClock Setupscreen highlight the box next to
“Time Zone” and press ENTER.
3. Highlight the appropriate time zone for you location
and press ENTER to store your selection.
4. Select “Done” when finished.
NOTE:When you are traveling and enter a new time
zone, the clock must be reset manually for the new zone.
Changing Daylight Savings
1. Highlight the box next to “Time” and press ENTER.
2. SelectDaylight Savingswhen Daylight Savings Time
is in effect.
3. SelectStandardif Daylight Savings Time is not being
observed.
4. Press ENTER.
5. Select “Done” when finished.6. Select “Done” to exit from the clock setting mode.
6 DISC CD/DVD CHANGER (RDV) — IF EQUIPPED
The Rear Seat Audio/Video System allows passengers to
listen to a CD or DVD from the 6 disc CD/DVD changer
through wireless headphones, while the front seat pas-
sengers listen to either AM/FM, Cassette or CDs from the
radio speakers. A remote control is provided for func-
tions such as changing tracks or DVD functions, as well
as selecting discs loaded in the 6 disc CD/DVD changer
while listening to the Rear Audio/Video System.
The Rear Seat Audio/Video System may be available in a
base and premium version. The premium version in-
cludes a six disc changer, remote control and two sets of
wireless headphones. The base version includes a single
disc player and remote control.
UNDERSTANDING YOUR INSTRUMENT PANEL 257
4
Page 283 of 504

A/C Recirculation Programming
The recirculation control is programmed to cancel the
recirculation mode when the ignition key is turned OFF
and will reset to outside air mode when the ignition key
is turned ON. The frequent use of outside air will help
keep odors from building up within the air conditioner-
heater housing. It is recommended that the recirculation
mode be used as little as possible, especially in humid
climates.
For hot and dry climates, or people who are allergic to
pollen and find frequent use of the recirculation mode
necessary, the recirculation mode can be programmed to
not automatically reset to the outside mode by using the
following procedures:
•Turn the ignition switch to the OFF position.
•Set the mode control to “PANEL”.
•Depress and hold in the “Rear Wipe/Wash” button.
•Start the engine, and continue to hold in the “Rear
Wipe/Wash” button until the indicator light starts
flashing repeatedly.
•Press the recirculation button until the indicator light
remains lit.
•The selection will be stored when the ignition switch is
turned OFF or if the “Rear Wipe/Wash” button is
pressed.
If the recirculation indicator light is lit, the recirculation
mode will not reset when the engine is started. If the
recirculation indicator light is not lit, the recirculation
mode will reset to the outside air mode when the engine
is started. The programmed status can be changed back
and forth by following the above mentioned procedure.
UNDERSTANDING YOUR INSTRUMENT PANEL 283
4
Page 313 of 504

Reset Mode - Electronic Transmission
The transmission is monitored electronically for abnor-
mal conditions. If a condition is detected that could cause
damage, the transmission automatically shifts into sec-
ond gear. The transmission remains in second gear
despite the forward gear selected. Park (P), Reverse (R),
and Neutral (N) will continue to operate. This Reset
feature allows the vehicle to be driven to a dealer for
service without damaging the transmission.
In the event that the problem has been momentary, the
transmission can be reset to regain all forward gears.
•Stop the vehicle and shift into Park (P).
•Turn the key to OFF then restart the engine.
•Shift into the desired range and resume driving.
NOTE:Even if the transmission can be reset, it is
recommended that you visit a dealer at your earliestpossible convenience. Your dealer has diagnostic equip-
ment to determine if the problem could recur.
If the transmission cannot be reset, dealer service is
required.
Gear Ranges
DO NOT race the engine
when shifting from PARK
or NEUTRAL positions into
another gear range.
“P” Park
Supplements the parking brake by locking the transmis-
sion. The engine can be started in this range. Never
attempt to use PARK while vehicle is in motion.
Apply parking brake when leaving vehicle in this range.
Transmission Gear Ranges
STARTING AND OPERATING 313
5
Page 355 of 504
NOTE:
•Tighten the fuel filler cap until you hear a “clicking”
sound. This is an indication that the fuel filler cap is
properly tightened.
•If the gas cap is not tighten properly, the Malfunction
Indicator Light will come on. Be sure the gas cap is
tightened every time the vehicle is refueled.
WARNING!
A fire may result if gasoline is pumped into a
portable container that is inside of a vehicle. You
could be burned. Always place gas containers on the
ground while filling.
Loose Fuel Filler Cap Message
•
If the vehicle diagnostic system determines that the
fuel filler cap is loose, improperly installed, or dam-
aged, GASCAP will be displayed in the instrument
cluster odometer. Tighten the fuel filler cap properly
and press the odometer reset button to turn the
GASCAP message off.
•If the problem continues, the message will appear the
next time the vehicle is started. See Section 7 of this
manual for more information. Make sure that the fuel
filler cap is tightened each time the vehicle is refueled.
STARTING AND OPERATING 355
5
Page 412 of 504

cap until a�clicking�sound is heard. This is an indication
that the gas cap is properly tightened. Press the odometer
reset button to turn the message off. If the problem
persists, the message will appear the next time the
vehicle is started. This might indicate a damaged cap. If
the problem is detected twice in a row, the system will
turn on the Malfunction Indicator Light (MIL). Resolving
the problem will turn the MIL light off.
EMISSIONS INSPECTION AND MAINTENANCE
PROGRAMS
In some localities, it may be a legal requirement to pass
an inspection of your vehicle’s emissions control system.
Failure to pass could prevent vehicle registration.
For states, which have an I/M (Inspection and
Maintenance) requirement, this check verifies the
following: the MIL (Malfunction Indicator Lamp)is functioning and is not on when the engine is running,
and that the OBD (On Board Diagnostic) system is ready
for testing.
Normally, the OBD system will be ready. The OBD
system maynotbe ready if your vehicle was recently
serviced, if you recently had a dead battery, or a battery
replacement. If the OBD system should be determined
not ready for the I/M test, your vehicle may fail the test.
Your vehicle has a simple ignition key actuated test,
which you can use prior to going to the test station. To
check if your vehicle’s OBD system is ready, you must do
the following:
1. Insert your ignition key into the ignition switch.
2. Turn the ignition to the ON position, but do not crank
or start the engine.
3. If you crank or start the engine, you will have to start
this test over.
412 MAINTAINING YOUR VEHICLE