Page 184 of 504
The outlets include tethered caps labeled with a key or
battery symbol indicating the power source. The lower
instrument panel outlet is powered directly from the
battery, items plugged into this outlet may discharge the
battery and/or prevent engine starting.The lower outlet is protected by an automatic reset circuit
breaker. The automatic circuit breaker restores power
when the overload is removed. The circuit breaker also
supplies power to the outlet in the removable floor
console, when in the front position. Refer to section 3
“Removable Floor Console” in this manual.
NOTE:If desired, all of the power outlets can be
converted by your authorized dealer to provide power
with the ignition switch in the OFF position.
Rear Power Outlet
184 UNDERSTANDING THE FEATURES OF YOUR VEHICLE
Page 200 of 504
If the leveled vehicle is not moved for approximately 15
hours, the leveling system will bleed itself down. The
vehicle must be driven to reset the system.WARNING!
Do not install the load leveling system on vehicles
that are not equipped with Anti-Lock Brakes. Ve-
hicles without Anti-Lock Brakes (ABS) have a
height-sensing proportioning valve. Installing a lev-
eling system will render this system ineffective,
inappropriately reducing rear brake pressure, result-
ing in increased stopping distances. You could have
an accident.
200 UNDERSTANDING THE FEATURES OF YOUR VEHICLE
Page 211 of 504

when a system fault is detected. The flash cycle will
repeat every ten minutes or until the fault condition is
removed and reset.
CAUTION!
The Tire Pressure Monitoring System (TPMS) has
been optimized for the original equipment tires and
wheels. TPMS pressures and warning have been
established for the tire size equipped on your ve-
hicle. Undesirable system operation or sensor dam-
age may result when using replacement equipment
that is not of the same size, type, and / or style.
Aftermarket wheels can cause sensor damage. Do
not use tire sealant from a can, or balance beads if
your vehicle is equipped with a TPMS, as damage to
the sensors may result.
3. Low Fuel Light
When the fuel level reaches approximately 3.0
gallons (11.0 liters) this light will turn on and
remain on until fuel is added.
4. Turn Signal Indicators
The arrow will flash with the exterior turn signal
when the turn signal lever is operated.
If the vehicle electronics sense that the vehicle has
traveled about one mile with the turn signals on, a chime
will sound to alert you to turn the signals off. If either
indicator flashes at a rapid rate, check for a defective
outside light bulb.
5. Liftgate Ajar
This light turns on if the liftgate is not com-
pletely closed.
UNDERSTANDING YOUR INSTRUMENT PANEL 211
4
Page 218 of 504

This is to prevent overheating of the brake system and is
a normal condition. The system will remain disabled for
about 4 minutes until the brakes have cooled. The system
will automatically reactivate and turn off the TRAC and
the OFF indicators.
If your vehicle becomes stuck in mud, ice, or snow, turn
the Traction Control System OFF before attempting to
“rock” the vehicle free.
23. Odometer/Trip Odometer
The odometer shows the total distance the vehicle has
been driven.
U.S. federal regulations require that upon transfer of
vehicle ownership, the seller certify to the purchaser the
correct mileage that the vehicle has been driven. There-
fore, if the odometer reading is changed during repair or
replacement, be sure to keep a record of the reading
before and after the service so that the correct mileage can
be determined.The trip odometer shows individual trip mileage. To
switch from odometer to trip odometer, press the Trip
Odometer button.
Loose Fuel Filler Cap
If the vehicle diagnostic system determines that the fuel
filler cap is loose, improperly installed, or damaged,
GASCAP will be displayed in the instrument cluster
odometer. Tighten the fuel filler cap properly and press
the odometer reset button to turn the GASCAP message
off. If the problem continues, the message will appear the
next time the vehicle is started. See Section 7 of this
manual for more information.
24. Cruise Indicator
This display indicator shows that the Speed Control
System is ON.
218 UNDERSTANDING YOUR INSTRUMENT PANEL
Page 219 of 504

25. Trip Odometer Button
Press this button to change the display from odometer to
trip odometer. The word TRIP will appear when in the
trip odometer mode.
Push in and hold the button for two seconds to reset the
trip odometer to 0 miles or kilometers. The odometer
must be in trip mode to reset.
ELECTRONIC DIGITAL CLOCK
The clock and radio each use the display panel built into
the radio. A digital readout shows the time in hours and
minutes whenever the ignition switch is in the ON or
ACC position and the time button is pressed.
When the ignition switch is in the OFF position, or when
the radio frequency is being displayed, time keeping is
accurately maintained.
Clock Setting Procedure
1. Turn the ignition switch to the ON or ACC position
and press the time button. Using the tip of a ballpoint pen
or similar object, press either the hour (H) or minute (M)
buttons on the radio.
2. Press the H button to set hours or the M button to set
minutes. The time setting will increase each time you
press a button.
RADIO GENERAL INFORMATION
Radio Broadcast Signals
Your new radio will provide excellent reception under
most operating conditions. Like any system, however, car
radios have performance limitations, due to mobile op-
eration and natural phenomena, which might lead you to
believe your sound system is malfunctioning. To help
UNDERSTANDING YOUR INSTRUMENT PANEL 219
4
Page 223 of 504
Program Type Radio Display
Country Country
Information Inform
Jazz Jazz
Foreign Language Language
News News
Nostalgia Nostalgia
Oldies Oldies
Personality Personality
Public Public
Rhythm and Blues R & B
Religious Music Religious Music
Religious Talk Religious Talk
Rock Rock
Soft Soft
Soft Rock Soft Rock
Soft Rhythm and Blues Soft R&BProgram Type Radio Display
Sports Sports
Ta l k Ta l k
Top 40 Top 40
Weather Weather
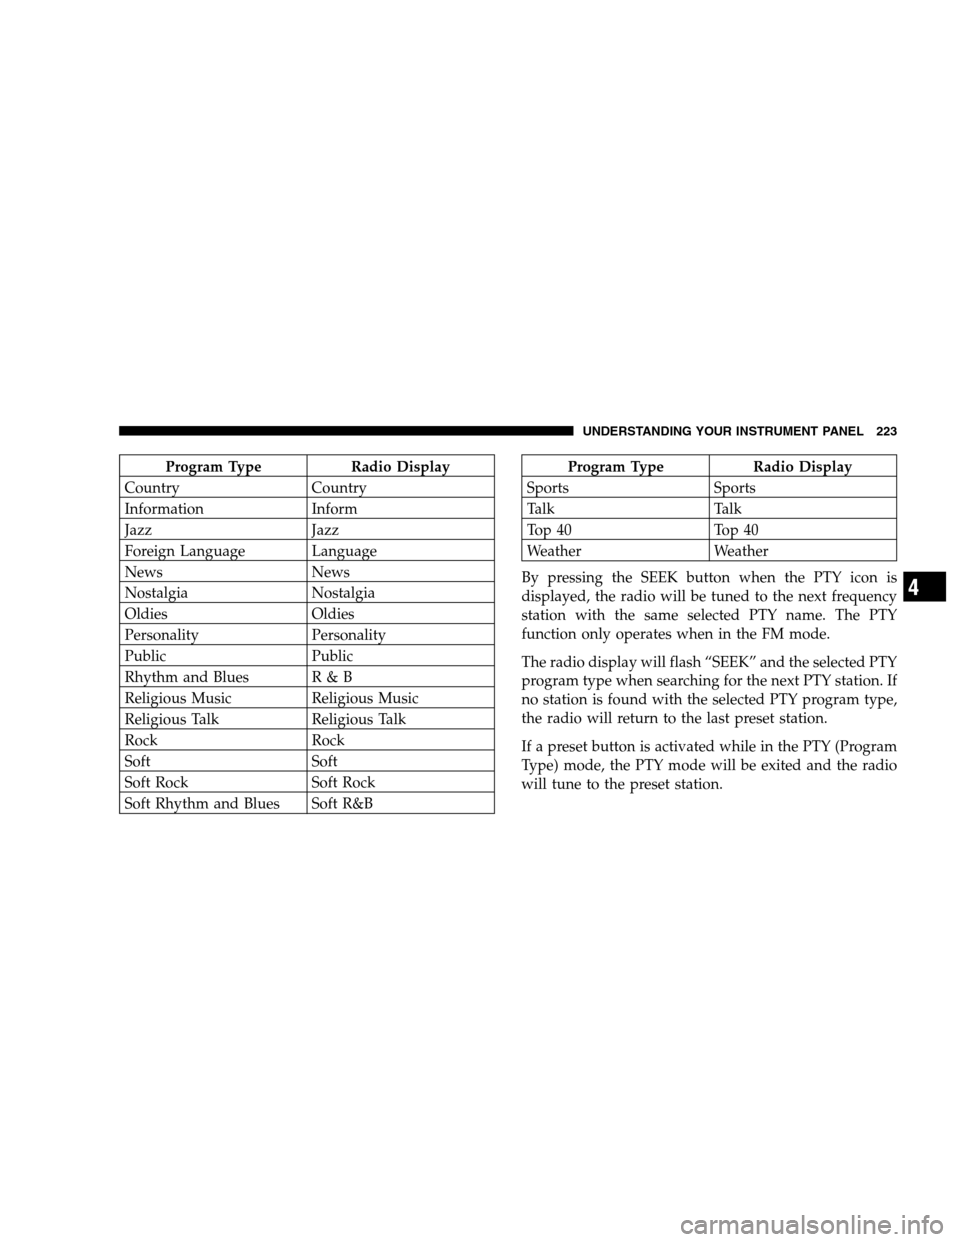
By pressing the SEEK button when the PTY icon is
displayed, the radio will be tuned to the next frequency
station with the same selected PTY name. The PTY
function only operates when in the FM mode.
The radio display will flash “SEEK” and the selected PTY
program type when searching for the next PTY station. If
no station is found with the selected PTY program type,
the radio will return to the last preset station.
If a preset button is activated while in the PTY (Program
Type) mode, the PTY mode will be exited and the radio
will tune to the preset station.
UNDERSTANDING YOUR INSTRUMENT PANEL 223
4
Page 233 of 504
Program Type Radio Display
Rock Rock
Soft Soft
Soft Rock Soft Rock
Soft Rhythm and Blues Soft R & B
Sports Sports
Ta l k Ta l k
Top 40 Top 40
Weather Weather
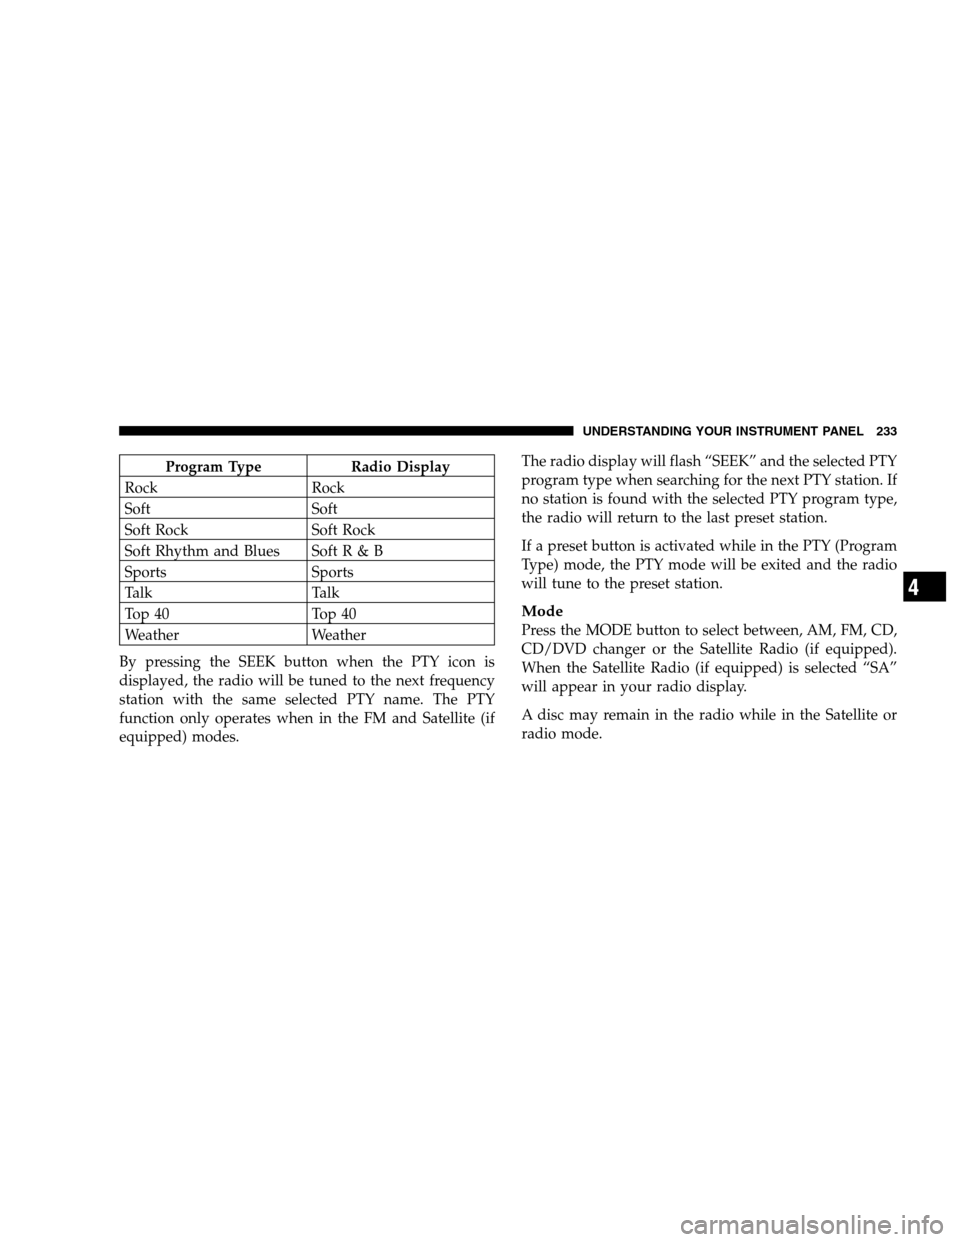
By pressing the SEEK button when the PTY icon is
displayed, the radio will be tuned to the next frequency
station with the same selected PTY name. The PTY
function only operates when in the FM and Satellite (if
equipped) modes.The radio display will flash “SEEK” and the selected PTY
program type when searching for the next PTY station. If
no station is found with the selected PTY program type,
the radio will return to the last preset station.
If a preset button is activated while in the PTY (Program
Type) mode, the PTY mode will be exited and the radio
will tune to the preset station.
Mode
Press the MODE button to select between, AM, FM, CD,
CD/DVD changer or the Satellite Radio (if equipped).
When the Satellite Radio (if equipped) is selected “SA”
will appear in your radio display.
A disc may remain in the radio while in the Satellite or
radio mode.
UNDERSTANDING YOUR INSTRUMENT PANEL 233
4
Page 243 of 504

To Set The Radio Push-Button Memory
When you are receiving a station that you wish to
commit to push-button memory, press the SET RND
button. SET 1 will show in the display window. Select the
“1–6” button you wish to lock onto this station and press
and release that button. If a button is not selected within
5 seconds after pressing the SET RND button, the station
will continue to play but will not be locked into push-
button memory.
You may add a second station to each push-button by
repeating the above procedure with this exception: Press
the SET button twice and SET 2 will show in the display
window. Each button can be set for SET 1 and SET 2 in
both AM and FM. This allows a total of 12 AM and 12 FM
stations to be locked into push-button memory. The
stations stored in SET 2 memory can be selected by
pressing the corresponding push-button twice. Every
time a preset button is used, a corresponding button
number will be displayed.
Audio
The audio button controls the BASS, TREBLE, BAL-
ANCE, and FADE.
Press the AUDIO button and BASS will be displayed.
Press the SEEK + or SEEK – to increase or decrease the
Bass tones.
Press the AUDIO button a second time and TREB will be
displayed. Press the SEEK + or SEEK – to increase or
decrease the Treble tones.
Press the AUDIO button a third time and BAL will be
displayed. Press the SEEK + or SEEK – to adjust the
sound level from the right or left side speakers.
Press the AUDIO button a fourth time and FADE will be
displayed. Press the SEEK + or SEEK – to adjust the
sound level between the front and rear speakers.
Press the AUDIO button again or wait 5 seconds to exit
setting tone, balance, and fade.
UNDERSTANDING YOUR INSTRUMENT PANEL 243
4