Page 355 of 464
. If a light or
bright colored dot is visible in the indicator (if equipped),
DO NOT jump-start the battery.
If the indicator (if equipped) is dark or sho")
Check the Battery Test Indicator (if equipped). If a light or
bright colored dot is visible in the indicator (if equipped),
DO NOT jump-start the battery.
If the indicator (if equipped) is dark or shows a green dot,
proceed as follows:
1. Wear eye protection and remove any metal jewelry
such as watch bands or bracelets that might make an
inadvertent electrical contact.
2. When boost is provided by a battery in another
vehicle, park that vehicle within booster cable reach and
without letting the vehicles touch. Set the parking brake,
place the automatic transmission in PARK and turn the
ignition switch to the OFF position for both vehicles.
3. Turn off the heater, radio and all unnecessary electrical
loads.4. Connect one end of a jumper cable to the positive
terminal of the discharged battery. Connect the other end
of the same cable to the positive terminal of the booster
battery.
WARNING!
Do not permit vehicles to touch each other as this
could establish a ground connection and personal
injury could result.
5. Connect the other cable, first to the negative terminal
of the booster battery andthen to the engine of the
vehicle with the discharged battery.Make sure you have
a good contact on the engine.
WHAT TO DO IN EMERGENCIES 355
6
Page 358 of 464

and rear wheels must be on the ground. If your vehicle
must be towed farther or at a higher rate of speed, it must
be transported on a flat bed truck.
All Transmissions
CAUTION!
•Do not attempt to tow this vehicle from the front
with sling type towing equipment. Damage to the
front fascia will result.
•Always use wheel lift equipment when towing
from the front. The only other approved method
of towing is with a flat bed truck.
•Do not tow the vehicle from the rear. Damage to
the rear sheet metal, liftgate and fascia will occur.
•Do not push or tow this vehicle with another
vehicle as damage to the bumper fascia and trans-
mission may result.
If it is necessary to use the accessories while being towed
(wipers, defrosters, etc.), the key must be in the ON
position, not the ACCESSORY position. Make certain the
transmission remains in NEUTRAL.
Without The Ignition Key
Special care must be taken when the vehicle is towed
with the ignition in the LOCK position. The only ap-
proved method of towing with out the ignition key is
with a flat bed truck. Proper towing equipment is neces-
sary to prevent damage to the vehicle.
TOWING THIS VEHICLE BEHIND ANOTHER
VEHICLE (Flat towing with all four wheels on the
ground)
Flat towing of vehicles equipped with an automatic
transmission, is only permitted within the limitations
described in this section.
358 WHAT TO DO IN EMERGENCIES
Page 362 of 464

▫Front & Rear Suspension Ball Joints........380
▫Steering Shaft Seal....................380
▫Steering Linkage......................380
▫Drive Shaft Universal Joints..............380
▫Body Lubrication.....................381
▫Windshield Wiper Blades................381
▫Windshield And Rear Window Washers.....382
▫Exhaust System......................382
▫Cooling System.......................383
▫Hoses And Vacuum/Vapor Harnesses.......388
▫Brakes.............................389
▫Master Cylinder — Brake Fluid Level Check . . 390
▫Fuel System Hoses....................391▫Automatic Transmission................392
▫All Wheel Drive (AWD) — If Equipped.....395
▫Front And Rear Wheel Bearings...........396
▫Appearance Care And Protection From
Corrosion...........................396
▫Cleaning The Center Console Cup Holders . . . 401
�Fuses (Integrated Power Module)...........402
�Vehicle Storage........................405
�Replacement Light Bulbs.................406
�Bulb Replacement......................406
▫Standard Quad Headlights...............406
▫High Intensity Discharge Headlights (HID) —
If Equipped.........................407
362 MAINTAINING YOUR VEHICLE
Page 366 of 464

ONBOARD DIAGNOSTIC SYSTEM — OBD II
Your vehicle is equipped with a sophisticated onboard
diagnostic system called OBD II. This system monitors
the performance of the emissions, engine, and automatic
transmission control systems. When these systems are
operating properly, your vehicle will provide excellent
performance and fuel economy, as well as engine emis-
sions well within current government regulations.
If any of these systems require service, the OBD II system
will turn on the “Malfunction Indicator Light.” It will
also store diagnostic codes and other information to
assist your service technician in making repairs. Al-
though your vehicle will usually be drivable and not
need towing, see your dealer for service as soon as
possible.CAUTION!
•Prolonged driving with the “Malfunction Indica-
tor Light” on could cause further damage to the
emission control system. It could also affect fuel
economy and driveability. The vehicle must be
serviced before any emissions tests can be per-
formed.
•If the “Malfunction Indicator Light” is flashing
while the engine is running, severe catalytic con-
verter damage and power loss will soon occur.
Immediate service is required.
Loose Fuel Filler Cap Message
After fuel is added, the vehicle diagnostic system can
determine if the fuel filler cap is loose, improperly
installed, or damaged. A loose fuel filler cap message will
be displayed in the instrument cluster. Tighten the gas
366 MAINTAINING YOUR VEHICLE
Page 392 of 464

Care should be taken in installing quick connect fittings
to insure they are properly installed and fully connected.
See your authorized dealer for service.
Automatic Transmission
The automatic transmission and differential assembly are
contained within a single housing.
All automatic transmissions are equipped with a conven-
tional filler tube and dipstick. If fluid is added, it should
be added through the dipstick hole in the case.
The dipstick is located just behind the radiator, lower
right side.
Selection of Lubricant
It is important that the proper lubricant is used in the
transmission to assure optimum transmission perfor-
mance. Use only manufacturers recommended transmis-
sion fluid, refer to Fluids, Lubricants and Genuine Partsfor correct fluid type. It is important that the transmission
fluid be maintained at the prescribed level using the
recommended fluid.
CAUTION!
Using a transmission fluid other than the manufac-
turers recommended fluid may cause deterioration
in transmission shift quality and/or torque converter
shudder. Using a transmission fluid other than the
manufacturers recommended fluid will result in
more frequent fluid and filter changes. Refer to
Fluids, Lubricants and Genuine Parts for correct
fluid type.
392 MAINTAINING YOUR VEHICLE
Page 393 of 464

Procedure For Checking Fluid Level
The fluid level in the automatic transmission should be
checked whenever the vehicle is serviced. Operation with
an improper fluid level will greatly reduce the life of the
transmission and of the fluid.
To properly check the automatic transmission fluid level,
the following procedure must be used:
1. The vehicle must be on level ground.
2. The engine should be running at curb idle speed for a
minimum of 60 seconds.3. Fully apply parking brake.
4. Place the gear selector momentarily in each gear
position ending with the lever in P (PARK). Wipe the area
around the dipstick clean to eliminate the possibility of
dirt entering the transmission.
5. Remove the dipstick and determine if the fluid is hot
or warm. Hot fluid is approximately 180°F (82°C), which
is the normal operating temperature after the vehicle has
been driven at least 15 miles (24 km). The fluid cannot be
comfortably held between the finger tips. Cold is when
the fluid is below 80°F (27°C).
6. Wipe the dipstick clean and reinsert until seated.
Remove dipstick and note reading.
a. If the fluid is hot, the reading should be in the
crosshatched area marked “HOT” (between the upper
two holes in the dipstick).
MAINTAINING YOUR VEHICLE 393
7
Page 394 of 464

b. If the fluid is cold, the fluid level should be between
the lower two holes in the area marked “COLD”.
If the fluid level indicates low, add sufficient fluid to
bring to the proper level.
CAUTION!
Do not overfill. Dirt and water in the transmission
can cause serious damage. To prevent dirt and water
from entering the transmission after checking or
replenishing fluid, make certain that the dipstick cap
is reseated properly.
Fluid and Filter Changes
Automatic transmission fluid should be changed on all
transmissions as follows:
Normal Usage — No change necessarySevere Usage (fluid and filter) — Refer to Maintenance
Schedule “B”
Severe Usage is defined as:
•Police, taxi, limousine, commercial type operation, or
trailer towing where the vehicle driven regularly for
more than 45 minutes of continuous operation.
NOTE:Refer to Section 8 of this manual for Mainte-
nance Schedules.
If the transmission is disassembled for any reason, the
fluid and filter should be changed.
Special Additives
Do not add any fluid additives to the transmission. The
only exception to this policy is the use of special dyes to
aid in detecting fluid leaks. The use of transmission
sealers should be avoided as they may adversely affect
seals.
394 MAINTAINING YOUR VEHICLE
Page 413 of 464
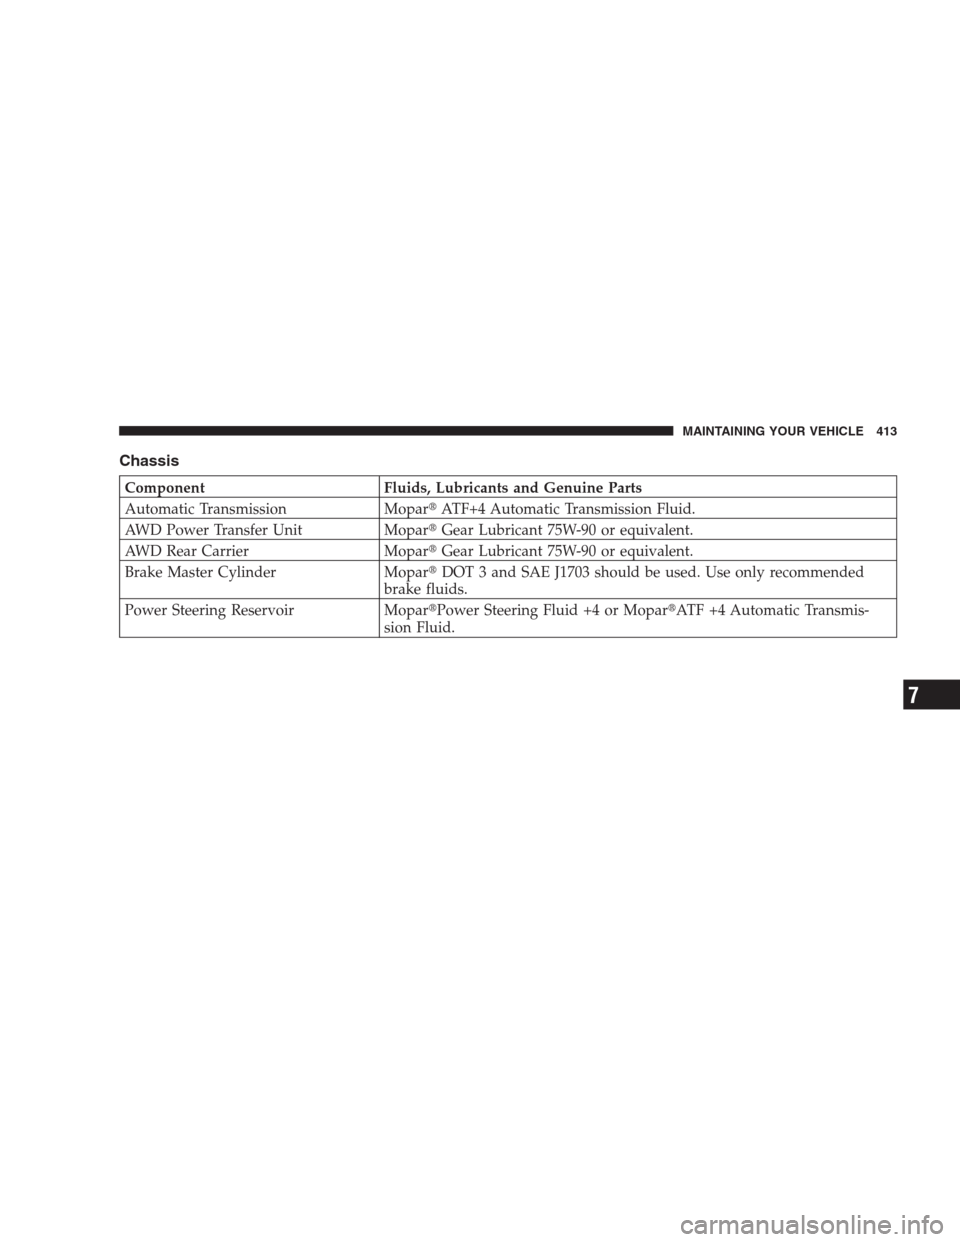
Chassis
Component Fluids, Lubricants and Genuine Parts
Automatic Transmission Mopar�ATF+4 Automatic Transmission Fluid.
AWD Power Transfer Unit Mopar�Gear Lubricant 75W-90 or equivalent.
AWD Rear Carrier Mopar�Gear Lubricant 75W-90 or equivalent.
Brake Master Cylinder Mopar�DOT 3 and SAE J1703 should be used. Use only recommended
brake fluids.
Power Steering Reservoir Mopar�Power Steering Fluid +4 or Mopar�ATF +4 Automatic Transmis-
sion Fluid.
MAINTAINING YOUR VEHICLE 413
7