Page 205 of 472

SCAN Button (CD Mode)
Press this button to play the first 10 seconds of each track.
To stop the scan function, press the button a second time.
EJECT Button (CD Mode)
Press this button and the disc will unload and
move to the entrance for easy removal. The
unit will switch to the last selected mode.
If you do not remove the disc within 15 seconds, it will be
reloaded. The radio mode will continue to appear.
TIME Button (CD Mode)
Press this button to change the display from elapsed CD
playing time to time of day. The time of day will display
for 5 seconds.
RW/FF (CD Mode)
Press and hold the FF (Fast Forward) and the CD player
will begin to fast forward until FF is released. The RW
(Reverse) button works in a similar manner.
RND/SET Button (Random Play Button) (CD
Mode)
Press this button while the CD is playing to activate
Random Play. This feature plays the selections on the
compact disc in random order to provide an interesting
change of pace.
Press the SEEK button to move to the next randomly
selected track.
Press and hold the FF button to fast forward through the
tracks. Release the FF button to stop the fast forward
feature. If the RW button is pressed, the current track will
reverse to the beginning of the track and begin playing.
Press the RND button a second time to stop Random
Play.
INSTRUMENT PANEL AND CONTROLS 205
4
Page 207 of 472
TIME Button (Auxiliary Mode)
Press this button to change the display from elapsed
playing time to time of day. The time of day will display
for 5 seconds.
RW/FF (Auxiliary Mode)
No function.
RND/SET Button (Auxiliary Mode)
No function.
Mode Button (Auxiliary Mode)
Press the mode button repeatedly to select between the
CD player and Satellite Radio (if equipped).
Operating Instructions - Hands Free Phone — If
Equipped
Refer to the “HANDS FREE PHONE (UConnect™)”
section of the Owner’s Manual.
Operating Instructions - Satellite Radio — If
Equipped
Refer to the “Satellite Radio” section of the Owner’s
Manual.
INSTRUMENT PANEL AND CONTROLS 207
4
Page 216 of 472

TIME Button (CD MODE for CD Audio Play)
Press this button to change the display from a large CD
playing time display to a small CD playing time display.
RW/FF (CD MODE for CD Audio Play)
Press and hold FF (Fast Forward) and the CD player will
begin to fast forward until FF is released or RW or
another CD button is pressed. The RW (Reverse) button
works in a similar manner.
TUNE Control (CD MODE for CD Audio Play)
Pressing the TUNE control allows the setting of the Tone,
Fade, and Balance. See Radio Mode.
AM/FM Button (CD MODE for CD Audio Play)
Switches the Radio to the Radio mode.
RND/PTY Button (Random Play Button) (CD
MODE for CD Audio Play)
Press this button while the CD is playing to activate
Random Play. This feature plays the selections on the
compact disc in random order to provide an interesting
change of pace.
Press the SEEK button to move to the next randomly
selected track.
Press and hold the FF button to fast forward through the
tracks. Release the FF button to stop the fast forward
feature.
Press the RND button a second time to stop Random
Play.
Buttons1-6(CDMODEforCDAudio Play)
Selects disc positions 1 - 6 for Play/Load/Eject.
216 INSTRUMENT PANEL AND CONTROLS
Page 222 of 472

SALES CODE REC — AM/FM/CD (6–DISC) RADIO
WITH NAVIGATION SYSTEM
Satellite Navigation Radio with CD Player with MP3
Capability (REC) - combines a Global-Positioning
System-based navigation system with an integrated color
screen to provide maps, turn identification, selectionmenus and instructions for selecting a variety of destina-
tions and routes, AM/FM stereo radio and six-disc CD
changer with MP3 capability.
Mapping information for navigation is supplied on a
DVD that is loaded into the unit. One map DVD covers
all of North America. Refer to your “Navigation User’s
Manual” for detailed operating instructions.
Operating Instructions — Satellite Radio (If
Equipped)
Refer to your “Navigation User’s Manual” for detailed
operating instructions.
REC Setting the Clock
GPS Clock
The GPS receiver used in this system is synchronized to
the time data being transmitted by the GPS satellites. The
satellites’ clock is Greenwich Mean Time (GMT). This is
REC Radio
222 INSTRUMENT PANEL AND CONTROLS
Page 223 of 472
the worldwide standard for time. This makes the sys-
tem’s clock very accurate once the appropriate time zone
and daylight savings information is set.
1. At theMain Menuscreen, highlight “Clock Setup”
and press ENTERORpress and hold for 3 seconds the
TIME button on the unit’s faceplate. TheClock Setup
screen appears.2. To show the GPS clock, select “Displayed Clock: GPS
Clock” and press ENTER.
3. To adjust the time zone, Select “Time Zone” and press
ENTER. Select the appropriate time zone and press
ENTER.
4. To turn daylight savings on or off, select “Daylight
Savings” and press ENTER. Select “On” or “Off” and
press ENTER.
5. Select DONE to exit from the clock setting mode. Press
ENTER to save your changes. If you press CANCEL or
NAV then your changes will not be saved.
INSTRUMENT PANEL AND CONTROLS 223
4
Page 224 of 472

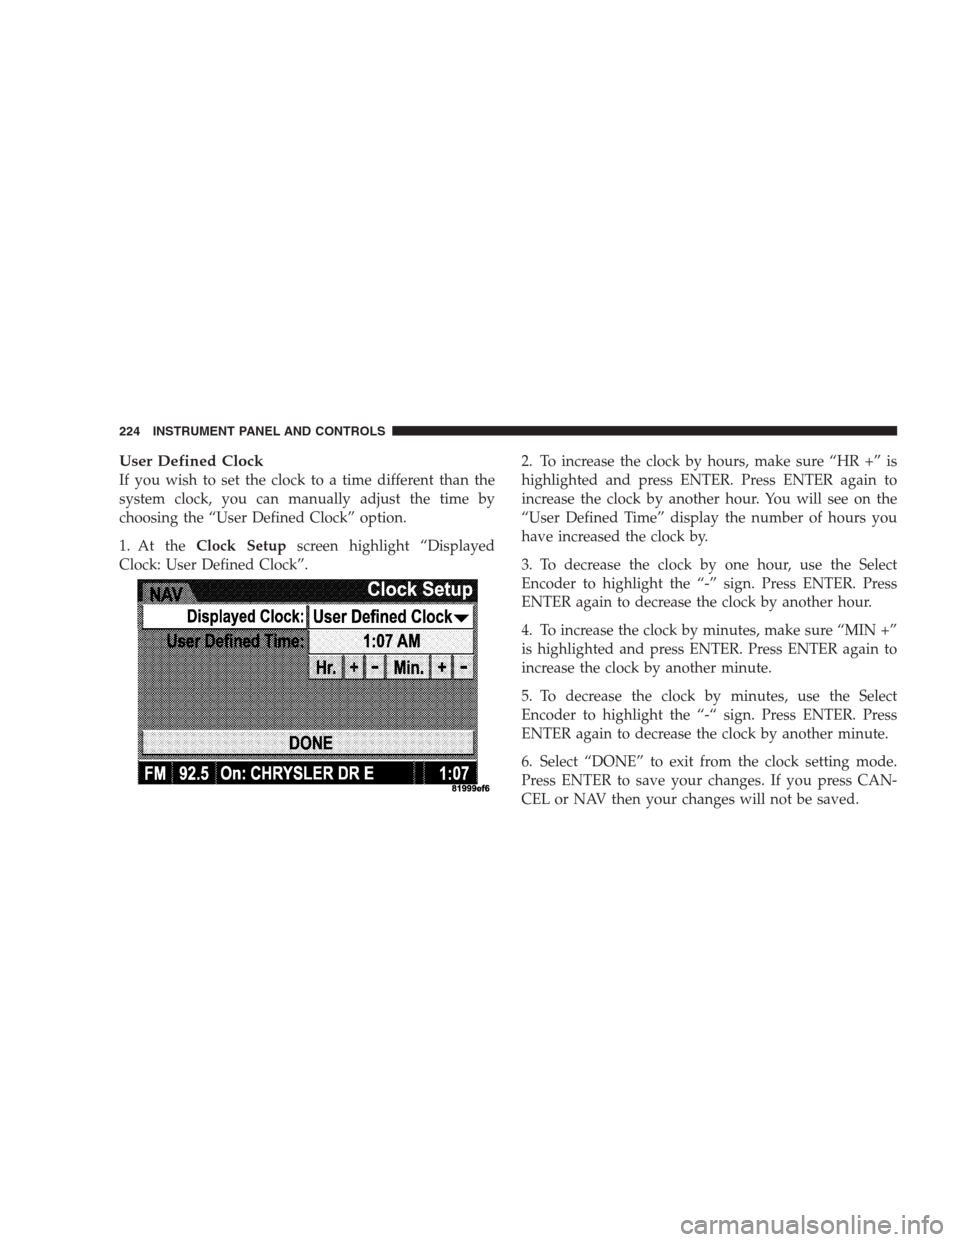
User Defined Clock
If you wish to set the clock to a time different than the
system clock, you can manually adjust the time by
choosing the “User Defined Clock” option.
1. At theClock Setupscreen highlight “Displayed
Clock: User Defined Clock”.2. To increase the clock by hours, make sure “HR +” is
highlighted and press ENTER. Press ENTER again to
increase the clock by another hour. You will see on the
“User Defined Time” display the number of hours you
have increased the clock by.
3. To decrease the clock by one hour, use the Select
Encoder to highlight the “-” sign. Press ENTER. Press
ENTER again to decrease the clock by another hour.
4. To increase the clock by minutes, make sure “MIN +”
is highlighted and press ENTER. Press ENTER again to
increase the clock by another minute.
5. To decrease the clock by minutes, use the Select
Encoder to highlight the “-“ sign. Press ENTER. Press
ENTER again to decrease the clock by another minute.
6. Select “DONE” to exit from the clock setting mode.
Press ENTER to save your changes. If you press CAN-
CEL or NAV then your changes will not be saved.
224 INSTRUMENT PANEL AND CONTROLS
Page 225 of 472
Audio Clock Display
Select this option to change the size of the clock on the
audio screens.
1. When you are at an audio screen, quickly press the
TIME button on the navigation faceplate.
2. In this example the large clock appears on the screen.3. To switch the clock to the small clock, quickly press
TIME again.
4. To toggle back to the large clock, simply press TIME.
INSTRUMENT PANEL AND CONTROLS 225
4
Page 228 of 472

Selecting Satellite Mode in REF, RAQ, and RAK
Radios
Selecting Satellite Mode — REF Radio
Press the MODE button repeatedly until the word�SAT�
appears in the display.
A CD may remain in the radio while in the Satellite radio
mode.
Selecting Satellite Mode — RAQ and RAK Radio
Press the MODE button repeatedly until the word�SAT�
appears in the display.
These radios will also display the current station name
and program type. For more information, such as song
title and artist press the MSG or INFO button.
A CD or tape may remain in the radio while in the
Satellite radio mode.
Selecting a Channel
Press and release the SEEK or TUNE knob to search for
the next channel. Press the top of the button to search up
and the bottom of the button to search down. Holding the
TUNE button causes the radio to bypass channels until
the button is released.
Press and release the SCAN button (if equipped) to
automatically change channels every 7 seconds. The
radio will pause on each channel for 7 seconds before
moving on to the next channel. The word�SCAN�will
appear in the display between each channel change. Press
the SCAN button a second time to stop the search.
NOTE:Channels that may contain objectionable content
can be blocked. Contact Sirius Customer Care at 888-539-
7474 to discuss options for channel blocking or unblock-
ing. Please have your ESN/SID information available.
228 INSTRUMENT PANEL AND CONTROLS