2007 CHEVROLET TRAIL BLAZER park assist
[x] Cancel search: park assistPage 144 of 574
Outside Curb View Assist Mirror
If the vehicle has this feature, the passenger’s
outside mirror will adjust to a preset tilt position
while the vehicle is in REVERSE (R) gear.
Curb view assist may be useful when you are
parallel parking. The mirror will return to normal
position when the vehicle is shifted out of
REVERSE (R) gear. Automatic mirror movement
in either direction will follow a short delay.
You may be able to turn this feature on or off
through the Driver Information Center (DIC).
SeeDIC Vehicle Customization on page 231.
Outside Convex Mirror
{CAUTION:
A convex mirror can make things (like
other vehicles) look farther away than
they really are. If you cut too sharply into
the right or left lane, you could hit a
vehicle. Check your inside mirror or
glance over your shoulder before
changing lanes.
The passenger’s outside mirror is convex.
A convex mirror’s surface is curved so more can
be seen from the driver’s seat.
144
Page 151 of 574
Read the instructions completely before attempting
to program the Universal Home Remote.
Because of the steps involved, it may be helpful
to have another person available to assist you
in the programming steps.
Keep the original hand-held transmitter for use in
other vehicles as well as for future Universal Home
Remote programming. It is also recommended that
upon the sale of the vehicle, the programmed
Universal Home Remote buttons should be erased
for security purposes. See “Erasing Universal
Home Remote Buttons” later in section.
When programming a garage door, it is advised to
park outside of the garage. Be sure that people
and objects are clear of the garage door or
gate operator you are programming.
It is recommended that a new battery be
installed in your hand-held transmitter for
quicker and more accurate transmission of the
radio-frequency signal.Programming the Universal Home
Remote System
Follow these steps to program up to three devices:
1. Press and hold down the two outside Universal
Home Remote buttons, releasing only when
the Universal Home Remote indicator light
begins to �ash, after 20 seconds. Do not hold
down the buttons for longer than 30 seconds
and do not repeat this step to program a
second and/or third hand-held transmitter to
the remaining two Universal Home Remote
buttons.
2. Hold the end of your hand-held transmitter
about 1 to 3 inches (3 to 8 cm) away from the
Universal Home Remote buttons while keeping
the indicator light in view.
3. At the same time, press and hold both the
desired Universal Home Remote button and
the hand-held transmitter button. Do not
release the buttons until Step 4 has been
completed.
Some entry gates and garage door openers
may require you to substitute Step 3 with
the procedure noted in “Gate Operator and
Canadian Programming” later in this section.
151
Page 155 of 574
Read the instructions completely before attempting
to program the transmitter. Because of the steps
involved, it may be helpful to have another person
available to assist you in programming the
transmitter.
Be sure to keep the original remote control
transmitter for use in other vehicles, as well as, for
future programming. You only need the original
remote control transmitter for Fixed Code
programming. It is also recommended that upon the
sale or lease termination of the vehicle, the
programmed buttons should be erased for security
purposes. See “Erasing Universal Home Remote
Buttons” later in this section.
When programming a garage door, it is advised to
park outside of the garage. Be sure that people and
objects are clear of the garage door or security
device you are programming.Programming Universal Home
Remote — Rolling Code
Most garage door openers sold after 1996 are
Rolling Code units.
Programming a garage door opener involves
time-sensitive actions, so read the entire procedure
before you begin. If you do not follow these
actions, the device will time out and you will have
to repeat the procedure.
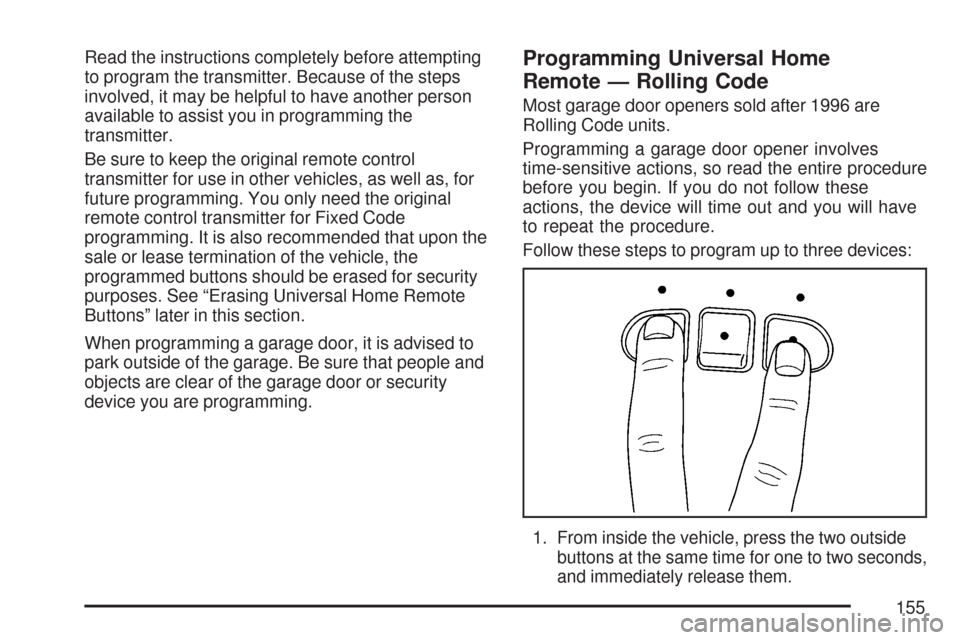
Follow these steps to program up to three devices:
1.From inside the vehicle, press the two outside
buttons at the same time for one to two seconds,
and immediately release them.
155
Page 236 of 574
Curb View
Press the customization button until CURB
VIEW: OFF appears in the display. To select
your preference for curb view, press the select
button while CURB VIEW: OFF is displayed on
the DIC. Pressing the select button will scroll
through the following choices:
CURB VIEW: OFF (default):The passenger’s
outside mirror will not be tilted down when
the vehicle is shifted into REVERSE (R).
CURB VIEW: PASSENGER:The passenger’s
outside mirror will be tilted down when the vehicle
is shifted into REVERSE (R).
When the vehicle is placed in PARK (P) or in any
forward gear, the mirror will return to the normal
driving position, following a short delay.
Choose one of the available options and press the
customization button while it is displayed on the
DIC to select it and move on to the next feature.
For more information on tilt mirror in reverse,
seeOutside Curb View Assist Mirror on page 144.
Alarm Warning
Press the customization button until ALARM
WARNING: BOTH appears in the display.
To select your preference for alarm warning,
press the select button while ALARM WARNING:
BOTH is displayed on the DIC. Pressing the select
button will scroll through the following choices:
ALARM WARNING: BOTH (default):
The headlamps will �ash and the horn will chirp
when the alarm is active.
ALARM WARNING: HORN:The horn will chirp
when the alarm is active.
ALARM WARNING: LAMPS:The headlamps will
�ash when the alarm is active.
ALARM WARNING: OFF:There will be no alarm
warning on activation.
Choose one of the available options and press the
customization button while your choice is displayed
on the DIC to select it and move on to the next
feature. For more information on alarm warning
type, seeContent Theft-Deterrent on page 108.
236
Page 475 of 574
{CAUTION:
Changing a tire can be dangerous. The
vehicle can slip off the jack and roll over
or fall on you or other people. You and
they could be badly injured or even killed.
Find a level place to change your tire.
To help prevent the vehicle from moving:
1. Set the parking brake �rmly.
2. Put the shift lever in PARK (P).
3. If you have a four-wheel-drive vehicle,
be sure the transfer case is in a drive
gear — not in NEUTRAL.
4. Turn off the engine and do not restart
while the vehicle is raised.
5. Do not allow passengers to remain in
the vehicle.
6. Put the wheel blocks at the front and
rear of the tire farthest away from the
one being changed. That would be
the tire on the other side, at the
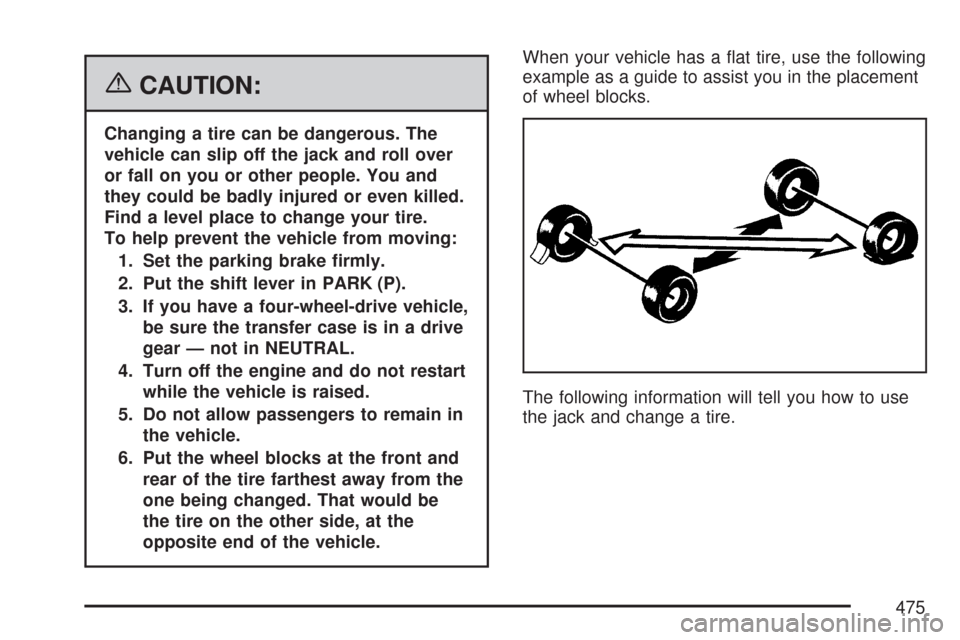
opposite end of the vehicle.When your vehicle has a �at tire, use the following
example as a guide to assist you in the placement
of wheel blocks.
The following information will tell you how to use
the jack and change a tire.
475
Page 568 of 574
Mirrors (cont.)
Outside Power Mirrors............................. 143
MP3 ............................................................ 274
MyGMLink.com............................................ 541
N
Navigation System, Privacy......................... 557
Navigation/Radio System, see Navigation
Manual..................................................... 284
New Vehicle Break-In.................................. 111
Normal Maintenance Replacement Parts..... 532
O
Odometer.................................................... 200
Odometer, Trip............................................ 200
Off-Road Driving.......................................... 323
Off-Road Recovery...................................... 320
Oil
Change Engine Oil Light.......................... 216
Engine..................................................... 402
Pressure Gage......................................... 215
Oil, Engine Oil Life System......................... 408
Older Children, Restraints............................. 41
Online Owner Center................................... 541
OnStar, Privacy........................................... 557OnStar
®System, see OnStar®Manual........ 145
Operation, Universal Home
Remote System..............................150, 154
Other Warning Devices................................ 172
Outlet Adjustment........................................ 195
Outlets
Accessory Power..................................... 186
Outside
Convex Mirror.......................................... 144
Curb View Assist Mirror........................... 144
Heated Mirrors......................................... 145
Manual Mirrors......................................... 143
Power Mirrors.......................................... 143
Overhead Console....................................... 161
Owner Checks and Services....................... 525
Owners, Canadian.......................................... 3
P
Paint, Damage............................................ 499
Park (P)
Shifting Into............................................. 127
Shifting Out of......................................... 129
Parking
Brake....................................................... 126
Over Things That Burn............................ 129
Passenger Airbag Status Indicator............... 203
568
Page 570 of 574
Rear Windshield Washer/Wiper.................... 176
Rearview Mirror, Automatic Dimming
with Compass.......................................... 138
Rearview Mirror, Automatic Dimming with
Compass and Temperature Display.......... 140
Rearview Mirror, Automatic Dimming with
OnStar
®and Compass............................. 133
Rearview Mirror, Automatic Dimming with
OnStar
®, Compass and Temperature
Display..................................................... 135
Rearview Mirror with OnStar
®...................... 132
Rearview Mirrors......................................... 132
Reclining Seatbacks...................................... 14
Recommended Fluids and Lubricants.......... 529
Recovery Hooks.......................................... 355
Recreational Vehicle Towing........................ 362
Reduced Engine Power Light...................... 217
Remote Keyless Entry (RKE) System............ 95
Remote Keyless Entry (RKE) System,
Operation................................................... 96
Removing the Flat Tire and Installing
the Spare Tire.......................................... 479
Removing the Spare Tire and Tools............ 476
Replacement Bulbs..................................... 444
Reporting Safety Defects
Canadian Government............................. 553
General Motors........................................ 553Reporting Safety Defects (cont.)
United States Government....................... 552
Restraint System Check
Checking the Restraint Systems................. 88
Replacing Restraint System Parts
After a Crash......................................... 89
Retained Accessory Power (RAP)................ 113
Right Front Passenger Position, Safety
Belts.......................................................... 34
Roadside
Assistance Program................................. 544
Rocking Your Vehicle to Get it Out.............. 354
Routing, Engine Drive Belt.......................... 533
Running the Engine While Parked............... 131
S
Safety Belt
Passenger Reminder Light....................... 202
Pretensioners............................................. 40
Reminder Light........................................ 201
Safety Belts
Care of.................................................... 495
Driver Position........................................... 25
How to Wear Safety Belts Properly............ 25
Questions and Answers About
Safety Belts............................................ 24
Rear Safety Belt Comfort Guides............... 37
570