Page 550 of 684
Taillamps (Chassis Cab Models)
A. Backup Lamp
B. Stoplamp/Taillamp/Turn Signal Lamp
To replace one of these bulbs, do the following:
1. Remove the four screws.
2. Lift the lens off the lamp assembly.
3. Turn the old bulb counterclockwise and pull
the old bulb straight out from the socket.
4. Install a new bulb into the socket, turn it
clockwise, and press it in until it is tight.
5. Reinstall the lens and the four screws.
License Plate Lamp
To replace one of these bulbs, do the following:
1. Reach under the rear bumper for the bulb
socket.
2. Turn the bulb socket counterclockwise and
pull the bulb socket out of the connector.
3. Pull the old bulb from the bulb socket, keeping
the bulb straight as you pull it out.
4. Install the new bulb.
5. Reverse Steps 1 through 3 to reinstall the
bulb socket.
550
Page 583 of 684
A. Wing Nut
Retaining
Tool Kit
B. Tool KitC. Wheel Blocks
D. Jack
E. KnobFor regular cab models, the equipment you will
need is behind the passenger’s seat. For extended
and crew cab models, the equipment is on the
shelf behind the passenger’s side second
row seat.
1. If there is a cover, move the seats forward
and turn the wing nut on the cover
counterclockwise to remove it. For crew cab
models, pull up the second row seat with
the loop at the base of the seat cushion to
access the tools.
2. Turn the knob on the jack counterclockwise to
lower the jack head to release the jack from
its holder.
3. Remove the wheel blocks and the wheel
block retainer by turning the wing nut
counterclockwise.
4. Remove the wing nut used to retain the
storage bag and tools by turning it
counterclockwise.
You will use the jack handle extensions and the
wheel wrench to remove the underbody-mounted
spare tire.
Extended Cab
583
Page 585 of 684
3. Insert the hoist end
(open end) (F) of the
extension through
the hole (G) in
the rear bumper.
Be sure the hoist end of the extension (F)
connects to the hoist shaft (E). The ribbed
square end of the extension is used to lower
the spare tire.
4. Turn the wheel wrench (H) counterclockwise
to lower the spare tire to the ground. Continue
to turn the wheel wrench until the spare tire
can be pulled out from under the vehicle.
If the spare tire does not lower to the ground,
the secondary latch is engaged causing
the tire not to lower. SeeSecondary Latch
System on page 592.5. Use the wheel
wrench hook which
allows you to
pull the hoist cable
towards you to
assist in reaching
the spare tire.
6. Tilt the retainer (D)
at the end of the
cable (C) when the
tire has been
lowered, so it can
be pulled up through
the wheel opening.
7. Put the spare tire near the �at tire.
585
Page 586 of 684
Removing the Flat Tire and
Installing the Spare Tire
Use the following pictures and instructions to
remove the �at tire and raise the vehicle.
The tools you will be using include the jack (A),
the wheel blocks (B), the jack handle (C), the jack
handle extensions (D), and the wheel wrench (E).1. If your vehicle has
wheel nut caps,
loosen them
by turning the wheel
wrench
counterclockwise.
If the vehicle has a center cap with wheel nut
caps, the wheel nut caps are designed to
stay with the center cap after they are
loosened. Remove the entire center cap.
586
Page 587 of 684
If the wheel has a smooth center cap, place
the chisel end of the wheel wrench in the
slot on the wheel, and gently pry it out.2. Use the wheel wrench and turn it
counterclockwise to loosen the wheel nuts. Do
not remove the wheel nuts yet.
587
Page 590 of 684
4. Turn the wheel wrench clockwise to raise the
vehicle. Raise the vehicle far enough off the
ground so there is enough room for the spare
tire to �t under the wheel well.
5. Remove all the
wheel nuts and take
off the �at tire.
{CAUTION:
Rust or dirt on the wheel, or on the parts
to which it is fastened, can make the
wheel nuts become loose after time. The
CAUTION: (Continued)
CAUTION: (Continued)
wheel could come off and cause an
accident. When changing a wheel, remove
any rust or dirt from the places where the
wheel attaches to the vehicle. In an
emergency, a cloth or a paper towel can
be used to do this; but be sure to use a
scraper or wire brush later, if needed, to
get all the rust or dirt off.
6. Remove any rust or
dirt from the wheel
bolts, mounting
surfaces, and spare
wheel.
7. Install the spare tire.
590
Page 591 of 684

{CAUTION:
Never use oil or grease on studs or nuts.
Because the nuts might come loose. The
vehicle’s wheel could fall off, causing a
serious accident.
8. Put the wheel nuts back on with the rounded
end of the nuts toward the wheel.
9. Tighten each wheel nut by hand. Then use
the wheel wrench to tighten the nuts until the
wheel is held against the hub.
10. Turn the wheel wrench counterclockwise to
lower the vehicle. Lower the jack completely.
{CAUTION:
Incorrect wheel nuts or improperly
tightened wheel nuts can cause the wheel
to come loose and even come off. This
could lead to an accident. Be sure to use
the correct wheel nuts. If you have to
replace them, be sure to get new GM
original equipment wheel nuts. Stop
somewhere as soon as you can and have
the nuts tightened with a torque wrench to
the proper torque speci�cation. See
Capacities and Specifications on page 620
for wheel nut torque speci�cation.
Notice:Improperly tightened wheel nuts can
lead to brake pulsation and rotor damage. To
avoid expensive brake repairs, evenly tighten
the wheel nuts in the proper sequence and to
the proper torque speci�cation. SeeCapacities
and Specifications on page 620for the wheel
nut torque speci�cation.
591
Page 592 of 684

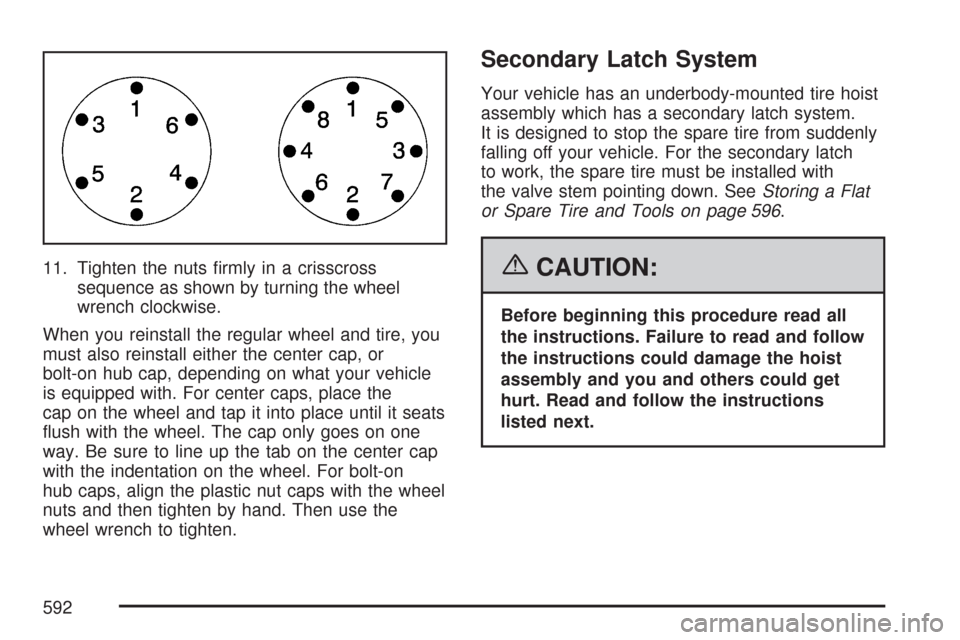
11. Tighten the nuts �rmly in a crisscross
sequence as shown by turning the wheel
wrench clockwise.
When you reinstall the regular wheel and tire, you
must also reinstall either the center cap, or
bolt-on hub cap, depending on what your vehicle
is equipped with. For center caps, place the
cap on the wheel and tap it into place until it seats
�ush with the wheel. The cap only goes on one
way. Be sure to line up the tab on the center cap
with the indentation on the wheel. For bolt-on
hub caps, align the plastic nut caps with the wheel
nuts and then tighten by hand. Then use the
wheel wrench to tighten.
Secondary Latch System
Your vehicle has an underbody-mounted tire hoist
assembly which has a secondary latch system.
It is designed to stop the spare tire from suddenly
falling off your vehicle. For the secondary latch
to work, the spare tire must be installed with
the valve stem pointing down. SeeStoring a Flat
or Spare Tire and Tools on page 596.
{CAUTION:
Before beginning this procedure read all
the instructions. Failure to read and follow
the instructions could damage the hoist
assembly and you and others could get
hurt. Read and follow the instructions
listed next.
592