2007 CHEVROLET SILVERADO ECO mode
[x] Cancel search: ECO modePage 276 of 684
OUTPUT shows the power output to the trailer
anytime a trailer with electric brakes is connected.
Output is displayed in 0 to 10 bars. Dashes
may appear in the OUTPUT display. See
“Integrated Trailer Brake Control System” under
Towing a Trailer on page 447for more information.
Engine Hours
Press the vehicle information button until ENGINE
HOURS displays. This display shows the total
number of hours the engine has run.
Relearn Tire Positions
If your vehicle has a Tire Pressure Monitor (TPM)
system, after rotating the tires or after replacing
a tire or sensor, the system must re-learn the tire
positions. To re-learn the tire positions, see
Tire Pressure Monitor System on page 563. See
Tire Inspection and Rotation on page 568andDIC
Warnings and Messages on page 281for more
information.
Relearn Remote Key
This display allows you to match Remote Keyless
Entry (RKE) transmitters to your vehicle. To match
an RKE transmitter to your vehicle, do the following:
1. Press the vehicle information button until
PRESS
VTO RELEARN REMOTE KEY
displays.
2. Press the set/reset button until REMOTE KEY
LEARNING ACTIVE is displayed.
3. Press and hold the lock and unlock buttons
on the �rst transmitter at the same time for
about 15 seconds.
On vehicles with memory recall seats, the �rst
transmitter learned will match driver 1 and
the second will match driver 2.
A chime will sound indicating that the
transmitter is matched.
4. To match additional transmitters at this time,
repeat Step 3.
Each vehicle can have a maximum of eight
transmitters matched to it.
5. To exit the programming mode, you must
cycle the key to LOCK.
276
Page 280 of 684
Relearn Remote Key
To access this display, the vehicle must be in
PARK (P). This display allows you to match
Remote Keyless Entry (RKE) transmitters to your
vehicle. To match an RKE transmitter to your
vehicle, do the following:
1. Press the trip odometer reset stem until
RELEARN REMOTE KEY displays.
2. Press and hold the trip odometer reset stem
for three seconds.
The message REMOTE KEY LEARNING
ACTIVE will display.
3. Press and hold the lock and unlock buttons
on the �rst transmitter at the same time for
about 15 seconds.
On vehicles with memory recall seats, the �rst
transmitter learned will match driver 1 and
the second will match driver 2.
A chime will sound indicating that the
transmitter is matched.
4. To match additional transmitters at this time,
repeat Step 3.
Each vehicle can have a maximum of eight
transmitters matched to it.
5. To exit the programming mode, you must
cycle the key to LOCK.
Language
This display allows you to select the language in
which the DIC messages will appear. To select
a language, do the following:
1. Press the trip odometer reset stem until
ODOMETER displays.
2. While in the ODOMETER display, press and
hold the trip odometer reset stem for three
seconds until the currently set language
displays.
3. Continue to press and hold the trip odometer
reset stem to scroll through all of the available
languages.
The available languages are ENGLISH
(default), FRANCAIS (French), ESPANOL
(Spanish), and NO CHANGE.
4. Once the desired language is displayed,
release the trip odometer reset stem to
set your choice.
280
Page 306 of 684
AM-FM Radio
Playing the Radio
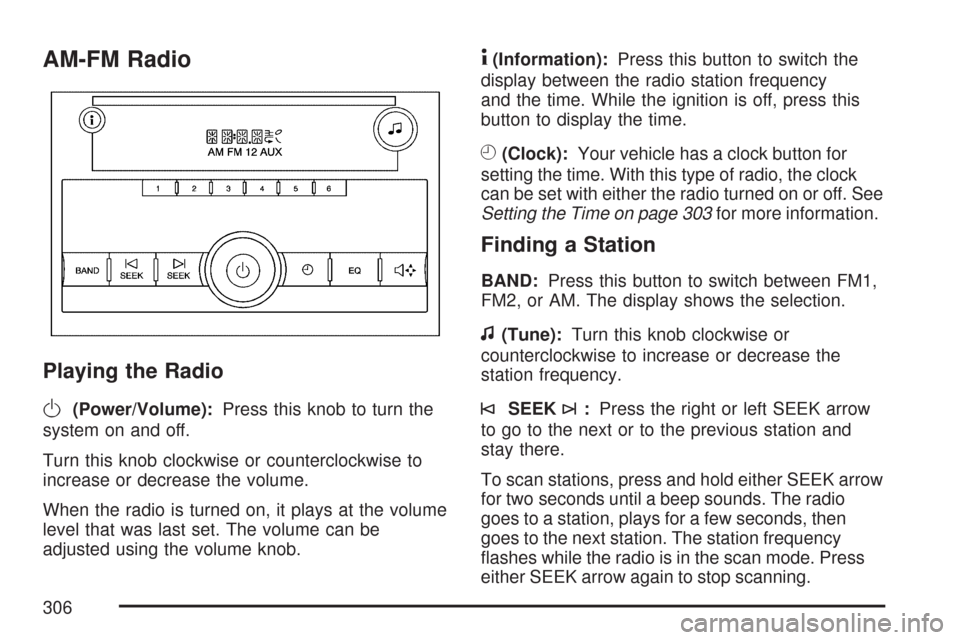
O
(Power/Volume):Press this knob to turn the
system on and off.
Turn this knob clockwise or counterclockwise to
increase or decrease the volume.
When the radio is turned on, it plays at the volume
level that was last set. The volume can be
adjusted using the volume knob.
4(Information):Press this button to switch the
display between the radio station frequency
and the time. While the ignition is off, press this
button to display the time.
H(Clock):Your vehicle has a clock button for
setting the time. With this type of radio, the clock
can be set with either the radio turned on or off. See
Setting the Time on page 303for more information.
Finding a Station
BAND:Press this button to switch between FM1,
FM2, or AM. The display shows the selection.
f(Tune):Turn this knob clockwise or
counterclockwise to increase or decrease the
station frequency.
©SEEK¨:Press the right or left SEEK arrow
to go to the next or to the previous station and
stay there.
To scan stations, press and hold either SEEK arrow
for two seconds until a beep sounds. The radio
goes to a station, plays for a few seconds, then
goes to the next station. The station frequency
�ashes while the radio is in the scan mode. Press
either SEEK arrow again to stop scanning.
306
Page 307 of 684
The radio seeks and scans stations only with a
strong signal that are in the selected band.
To scan presets within the current selected band,
press and hold either seek arrow for four seconds
until a double beep sounds. The radio goes to a
stored preset, plays for a few seconds if a strong
signal is present, then goes to the next stored
preset. The station frequency �ashes while the
radio is in the scan mode.
Setting Preset Stations
Up to 18 stations (six FM1, six FM2, and six AM),
can be programmed on the six numbered
pushbuttons, by performing the following steps:
1. Turn the radio on.
2. Press BAND to select FM1, FM2, or AM.
3. Tune in the desired station.
4. Press and hold one of the six numbered
pushbuttons for three seconds until a beep
sounds. Whenever that pushbutton is pressed
and released, the station that was set, returns.
5. Repeat the Steps 2-4 for each pushbutton.
Setting the Tone (Bass/Treble)
Bass/Treble:To adjust the bass or treble, press
the tune knob or the EQ button until the desired
tone control label displays. Turn the tune
knob clockwise or counterclockwise to increase or
decrease the setting. The display shows the
current bass or treble level. If a station’s frequency
is weak, or if there is static, decrease the treble.
Adjusting the Speakers (Balance/Fade)
`
(Balance/Fade):To adjust the balance or
fade, press this button or the tune knob until the
desired speaker control label displays. Turn
the tune knob clockwise or counterclockwise to
adjust the setting.
The setting can also be adjusted by pressing the
seek arrows.
Radio Messages
Loc (Locked):This message displays while the
THEFTLOCK®system has locked up the radio.
Take the vehicle to your dealer for service.
If any error occurs repeatedly or if an error cannot
be corrected, contact your dealer.
307
Page 308 of 684
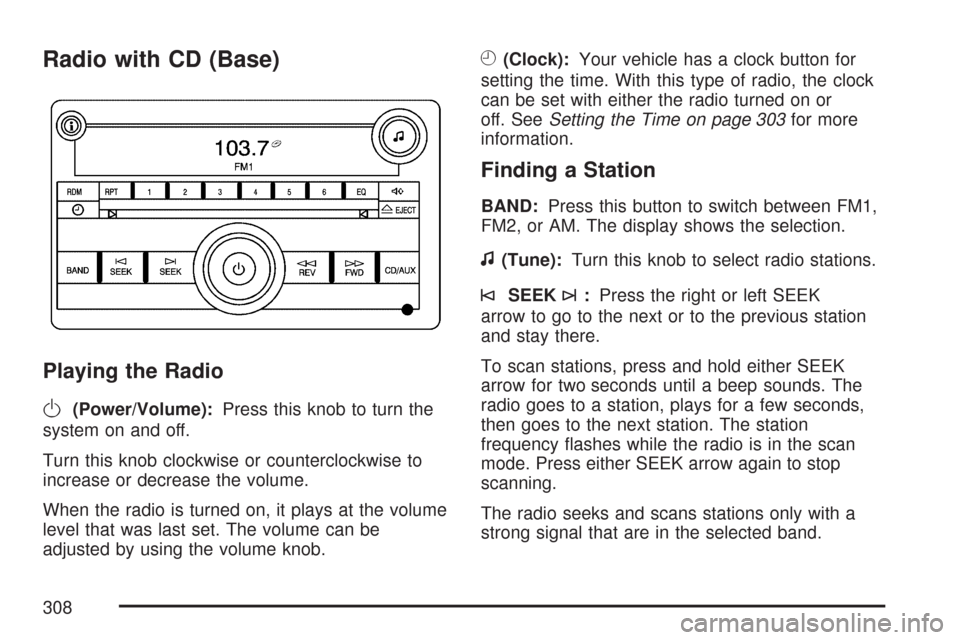
Radio with CD (Base)
Playing the Radio
O
(Power/Volume):Press this knob to turn the
system on and off.
Turn this knob clockwise or counterclockwise to
increase or decrease the volume.
When the radio is turned on, it plays at the volume
level that was last set. The volume can be
adjusted by using the volume knob.
H(Clock):Your vehicle has a clock button for
setting the time. With this type of radio, the clock
can be set with either the radio turned on or
off. SeeSetting the Time on page 303for more
information.
Finding a Station
BAND:Press this button to switch between FM1,
FM2, or AM. The display shows the selection.
f(Tune):Turn this knob to select radio stations.
©SEEK¨:Press the right or left SEEK
arrow to go to the next or to the previous station
and stay there.
To scan stations, press and hold either SEEK
arrow for two seconds until a beep sounds. The
radio goes to a station, plays for a few seconds,
then goes to the next station. The station
frequency �ashes while the radio is in the scan
mode. Press either SEEK arrow again to stop
scanning.
The radio seeks and scans stations only with a
strong signal that are in the selected band.
308
Page 309 of 684
To scan presets within the current selected band,
press and hold either seek arrow for four seconds
until a double beep sounds. The radio goes to
a stored preset, plays for a few seconds if a strong
signal is present, then goes to the next stored
preset. The station frequency �ashes while
the radio is in the scan mode.
4(Information):Press this button to switch the
display between the radio station frequency
and the time. While the ignition is off, press this
button to display the time.
Setting Preset Stations
Up to 18 stations (six FM1, six FM2, and six AM),
can be programmed on the six numbered
pushbuttons, by performing the following steps:
1. Turn the radio on.
2. Press BAND to select FM1, FM2, or AM.
3. Tune in the desired station.
4. Press and hold one of the six numbered
pushbuttons for three seconds until a beep
sounds. Whenever that pushbutton is pressed
and released, the station that was set, returns.
5. Repeat the Steps 2 through 4 for each
pushbutton.
Setting the Tone (Bass/Treble)
BASS/TREB (Bass/Treble):To adjust the bass
or treble, press the tune knob button or the
EQ pushbutton until the desired tone control label
displays. Turn the tune knob clockwise or
counterclockwise to increase or decrease the
setting. The display shows the current bass
or treble level. If a station’s frequency is weak, or
if there is static, decrease the treble.
Unique BASS/TREB settings can be saved for
each source.
Adjusting the Speakers (Balance/Fade)
`
BAL/FADE (Balance/Fade):To adjust the
balance or fade, press this button or the tune knob
until the desired speaker control label displays.
Turn the tune knob clockwise or counterclockwise
to adjust the setting. The setting can also be
adjusted by pressing either the SEEK, FWD
(forward), or REV (reverse) buttons.
309
Page 318 of 684
Adjusting the Speakers (Balance/Fade)
BAL/FADE (Balance/Fade):To adjust balance
or fade, press the tune knob until the speaker
control labels display. Continue pressing to
highlight the desired label, or press the pushbutton
positioned under the desired label. Turn the
tune knob clockwise or counterclockwise to adjust
the highlighted setting. The highlighted setting
can also be adjusted by pressing either the SEEK,
FWD (forward), or REV (reverse) button until
the desired levels are obtained.
To quickly adjust balance or fade to the middle
position, press the pushbutton positioned under the
BAL or FADE label for more than two seconds.
A beep sounds and the level adjusts to the middle
position.
To quickly adjust all speaker and tone controls to
the middle position, press the tune knob for
more than two seconds until a beep sounds.
Finding a Category (CAT) Station
CAT (Category):The CAT button is used to �nd
XM™ stations when the radio is in the XM™
mode. To �nd XM™ channels within a desired
category, perform the following:
1. Press the BAND button until the XM™
frequency is displayed. Press the CAT button
to display the category labels on the radio
display. Continue pressing the CAT button
until the desired category name displays.
2. Press either of the two buttons below the
desired category label to immediately tune
to the �rst XM™ station associated with that
category.
3. Turn the tune knob, press the buttons below
the right or left arrows displayed, or press the
right or left SEEK buttons to go to the next
or previous XM™ station within the selected
category.
4. To exit the category search mode, press the
FAV button or BAND button to display your
favorites again.
318
Page 335 of 684
Playing a DVD
DVD/CD AUX (Auxiliary):Press this button to
cycle through DVD, CD, or Auxiliary when listening
to the radio. The DVD/CD text label and a
message showing track or chapter number
displays when a disc is in either slot. Press this
button again and the system automatically
searches for an auxiliary input device, such as a
portable audio player. If a portable audio player is
not connected, “No Aux Input Device” displays.
If a disc is in both the DVD slot and the CD slot the
DVD/CD AUX button cycles between the two
sources and not indicate “No Aux Input Device”. If
a front auxiliary device is connected, the
DVD/CD AUX button cycles through all available
options, such as: DVD slot, CD slot, Front
Auxiliary, and Rear Auxiliary (if available). See
“Using the Auxiliary Input Jack(s)” later in
this section, or “Audio/Video (A/V) Jacks” under,
Rear Seat Entertainment System on page 357
for more information.
O(Power):Press this knob to turn the radio on or
off. Turn this knob clockwise or counterclockwise to
increase or decrease the volume. Press and hold
the knob for more than two seconds to turn off the
entire radio and Rear Seat Entertainment (RSE)
system and to start the parental control feature.
Parental control prevents the rear seat occupant
from operating the Rear Seat Audio (RSA) system
or remote control.
A lock symbol appears next to the clock display.
The parental control feature remains on until this
button is pressed and held for more than
two seconds again, or until the driver turns the
ignition off and exits the vehicle.
f(Tune):Turn this knob to change tracks on a
CD or DVD, to manually tune a radio station, or to
change clock or date settings, while in the clock
or date setting mode. See the information
given earlier in this section speci�c to the radio,
CD, and the DVD. Also, see “Setting the Time” in
the index, for setting the clock and date.
335