2007 CHEVROLET MALIBU display
[x] Cancel search: displayPage 140 of 510
Compass Variance
Compass variance is the difference between
earth’s magnetic north and true geographic north.
If the mirror is not adjusted for compass
variance, the compass could give false readings.
The mirror is set in zone eight upon leaving
the factory. It will be necessary to adjust the
compass to compensate for compass variance
if the vehicle is driven outside zone eight. Under
certain circumstances, such as a long distance,
cross-country trip, it will be necessary to adjust
the compass variance.
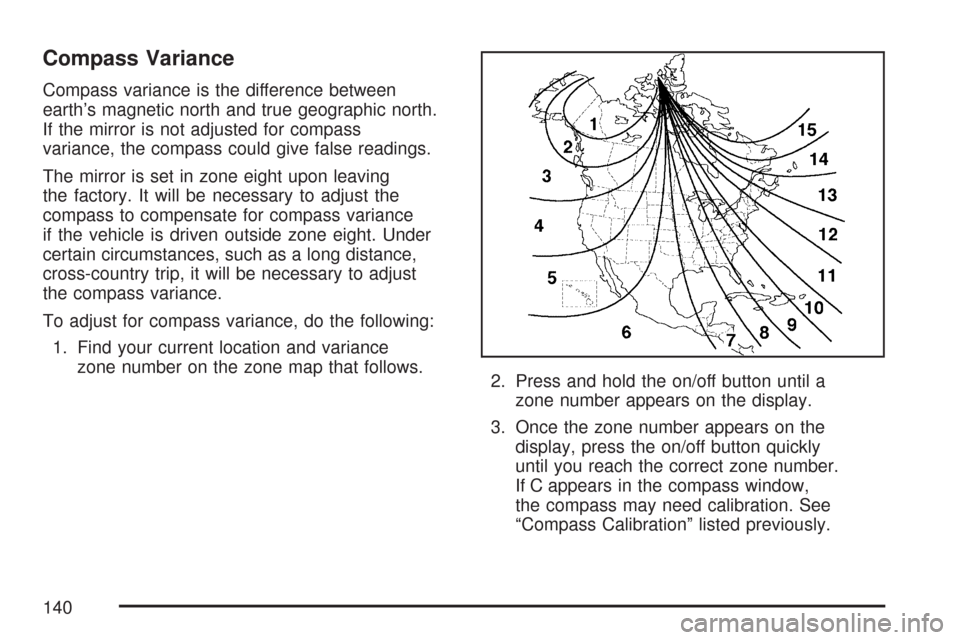
To adjust for compass variance, do the following:
1. Find your current location and variance
zone number on the zone map that follows.
2. Press and hold the on/off button until a
zone number appears on the display.
3. Once the zone number appears on the
display, press the on/off button quickly
until you reach the correct zone number.
If C appears in the compass window,
the compass may need calibration. See
“Compass Calibration” listed previously.
140
Page 141 of 510
Automatic Dimming Rearview Mirror
with Compass
Your vehicle may have an automatic dimming
rearview mirror with a compass. This feature
enables the mirror to sense nighttime glare
from vehicle headlamps from behind and
automatically dim to reduce the glare to a
safe level. The automatic dimming feature
turns on each time the vehicle is started.
O(On/Off):This is the on/off button for the
automatic dimming feature.
Automatic Dimming Mirror Operation
The automatic dimming mirror function is turned
on automatically each time the ignition is started.
To operate the automatic dimming mirror, do
the following:
1. Make sure the green indicator light, located
to the left of the on/off button, is on. If it’s
not, press the on/off button until the green
light comes on, indicating that the mirror is
in automatic dimming mode.2. Turn off the automatic dimming mirror function
by pressing the on/off button until the green
indicator light turns off.
Compass Operation
Y
:This is the on/off button for the compass
feature.
Press this button once to turn the compass on
or off.
When the ignition and the compass feature are
on, the compass will show two character boxes
for a few seconds. After a few seconds, the mirror
will display the current compass direction.
Compass Calibration
If after a few seconds the display does not show
a compass direction, (N for North for example),
there may be a strong magnetic �eld interfering
with the compass. Such interference may be
caused by a magnetic antenna mount, note pad
holder, or similar object. If the letter C or CAL
appears in the compass window, the compass
may need to be reset or calibrated.
141
Page 142 of 510
To calibrate the compass, do the following:
Make sure CAL is displayed in the display.
If CAL is not displayed, press and hold the
compass button until CAL is displayed.
Drive the vehicle in circles at 5 mph (8 km/h)
or less until the display reads a direction.
Compass Variance
Compass variance is the difference between
earth’s magnetic north and true geographic north.
If the mirror is not adjusted for compass
variance, the compass could give false readings.
The mirror is set in zone eight upon leaving
the factory. It will be necessary to adjust the
compass to compensate for compass variance
if the vehicle is driven outside zone eight. Under
certain circumstances, such as a long distance,
cross-country trip, it will be necessary to adjust
the compass variance.
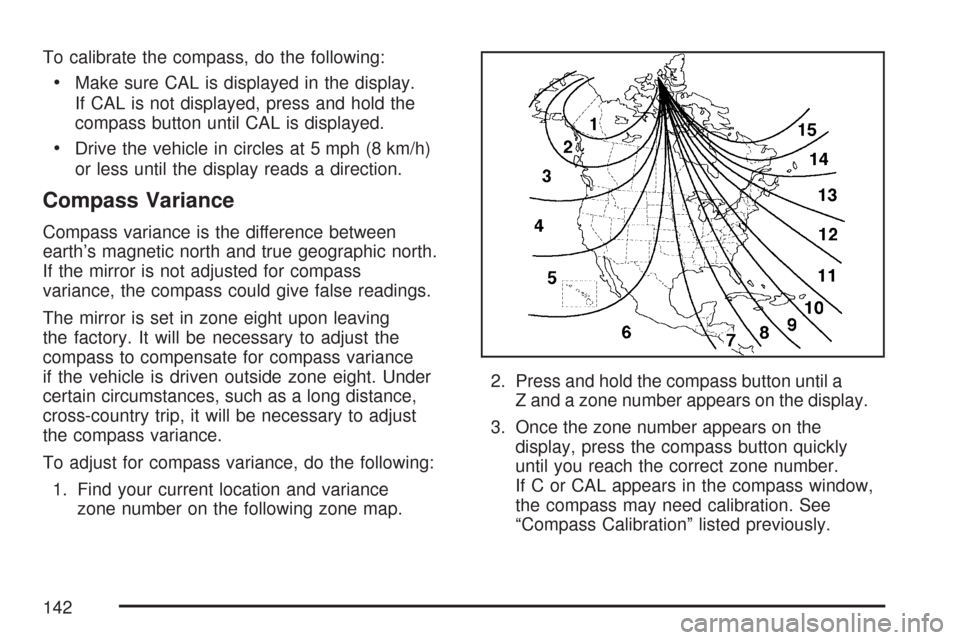
To adjust for compass variance, do the following:
1. Find your current location and variance
zone number on the following zone map.2. Press and hold the compass button until a
Z and a zone number appears on the display.
3. Once the zone number appears on the
display, press the compass button quickly
until you reach the correct zone number.
If C or CAL appears in the compass window,
the compass may need calibration. See
“Compass Calibration” listed previously.
142
Page 166 of 510
Traction Control System (TCS)
Warning Light........................................ 209
Traction Control System Active Light......... 209
Enhanced Traction System Warning Light.... 210
Enhanced Traction System Active Light....... 210
Engine Coolant Temperature
Warning Light........................................ 211
Engine Coolant Temperature Gage............ 211
Malfunction Indicator Lamp........................ 212
Oil Pressure Light..................................... 215
Security Light............................................ 216
Cruise Control Light.................................. 216
Highbeam On Light................................... 216
Fuel Gage................................................. 217
Driver Information Center (DIC).................. 218
DIC Operation and Displays...................... 218
DIC Warnings and Messages.................... 222
DIC Vehicle Personalization....................... 225
Audio System(s)......................................... 228
Setting the Time for Radios without
Radio Data Systems (RDS).................... 229
Setting the Time for Radios with
Radio Data Systems (RDS).................... 230Radio with CD (Base Level)...................... 230
Radio with CD (Uplevel)............................ 236
Radio with Six-Disc CD............................. 246
XM Radio Messages................................. 259
Rear Seat Entertainment System............... 261
Rear Seat Audio (RSA)
(Without Entertainment System)............. 278
Rear Seat Audio (RSA)
(With Entertainment System).................. 280
Theft-Deterrent Feature............................. 281
Audio Steering Wheel Controls
(Three Spoke)........................................ 282
Audio Steering Wheel Controls
(Four Spoke).......................................... 283
Radio Reception........................................ 284
Care of Your CDs and DVDs.................... 285
Care of the CD and DVD Player............... 285
Fixed Mast Antenna (MAXX Only)............. 285
Backglass Antenna (Sedan Only).............. 286
XM™ Satellite Radio Antenna System....... 286
Section 3 Instrument Panel
166
Page 185 of 510

Entry/Exit Lighting
When you open any door, the lamps inside of
your vehicle will go on. These lamps will fade
out 20 seconds after the last door is closed,
or when the ignition is turned on after all doors
have been closed. These lamps will also go
on when you press the trunk release button,
the unlock button or the panic button on the
remote keyless entry transmitter.
The lamps inside of your vehicle will turn on
for about 10 seconds after your key is removed
from the ignition to provide an illuminated exit.
Parade Dimming
Parade dimming is a separate lighting mode
of operation that is activated if the park lamps
are turned on during the day. Usually when
the park lamps are turned on during the day,
the display’s illumination and LEDs become lower
and the backlighting is activated. To avoid this
condition, backlighting is turned off, and the
displays and LEDs are set to a high predetermined
intensity when daylight conditions are detected
to enhance the display’s visibility during daytime.
Front Reading Lamps
Push the lens to turn the reading lamps on and
off. The reading lamps will turn on when the door
is open if the dome lamp is in the door position.
The reading lamps will also turn on with the
dome lamp switch in the on position. The lamps
will not turn on if the door is open and the
dome lamp is in the off position.
Rear Reading Lamps
The vehicle’s dome lamp may have two reading
lamps. The reading lamps turn on and off by
pushing on the lens.
Trunk Lamp
The trunk lamp comes on when you open
your trunk.
185
Page 192 of 510
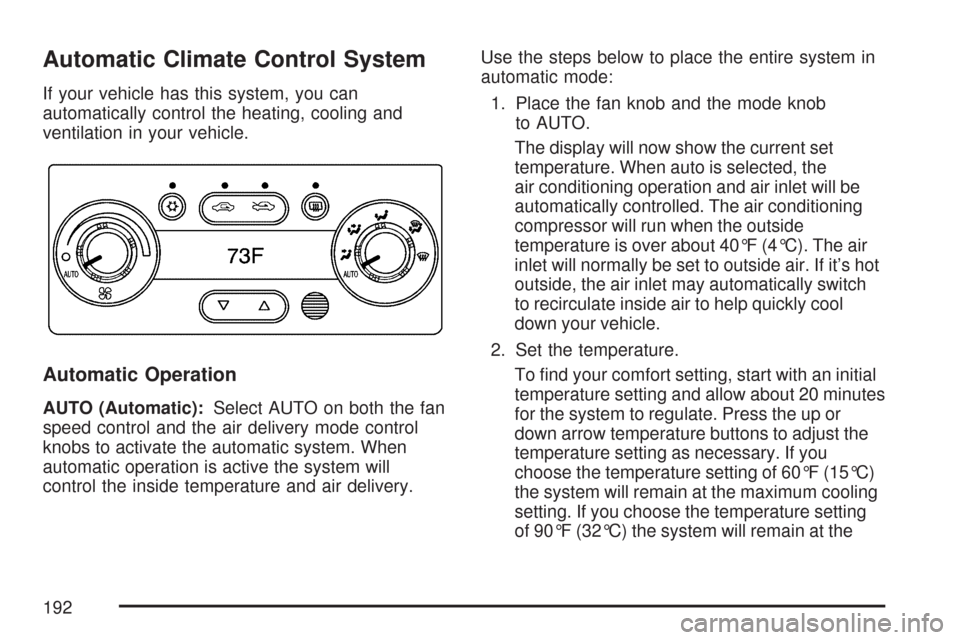
Automatic Climate Control System
If your vehicle has this system, you can
automatically control the heating, cooling and
ventilation in your vehicle.
Automatic Operation
AUTO (Automatic):Select AUTO on both the fan
speed control and the air delivery mode control
knobs to activate the automatic system. When
automatic operation is active the system will
control the inside temperature and air delivery.Use the steps below to place the entire system in
automatic mode:
1. Place the fan knob and the mode knob
to AUTO.
The display will now show the current set
temperature. When auto is selected, the
air conditioning operation and air inlet will be
automatically controlled. The air conditioning
compressor will run when the outside
temperature is over about 40°F (4°C). The air
inlet will normally be set to outside air. If it’s hot
outside, the air inlet may automatically switch
to recirculate inside air to help quickly cool
down your vehicle.
2. Set the temperature.
To �nd your comfort setting, start with an initial
temperature setting and allow about 20 minutes
for the system to regulate. Press the up or
down arrow temperature buttons to adjust the
temperature setting as necessary. If you
choose the temperature setting of 60°F (15°C)
the system will remain at the maximum cooling
setting. If you choose the temperature setting
of 90°F (32°C) the system will remain at the
192
Page 193 of 510
maximum heat setting. Choosing either
maximum setting will not cause the vehicle
to heat or cool any faster.
Be careful not to cover the sensor located
on the top of the instrument panel near
the windshield. This sensor regulates air
temperature based on sun load, and also
turns on your headlamps.
Also be careful not to cover the sensor grille
on the lower right side of the climate
control faceplate. This senses the inside
vehicle temperature needed for proper
regulation.
To avoid blowing cold air at start-up in
cold weather, the system will delay turning
on the fan until warm air is available.
The length of delay depends on the engine
coolant temperature. Turning the fan knob
will override this delay and change the fan
to a selected speed.
If your vehicle has the remote start feature,
the climate control display will initially
show “AS” in place of the temperature to
indicate the remote start has been activated.The system will automatically regulate the
temperature according to the following:
If inside air temperature is below 72°F (22°C),
the system will automatically adjust to the
following settings: highest fan speed, defrost
mode, recirculation, and the full heat position.
If inside air temperature is above 79°F (26°C)
the system will automatically adjust to the
following settings: highest fan speed, panel
mode, recirculation, and full cold position.
If inside air temperature is between 72°F (22°C)
and 79°F (26°C), the system will adjust
automatically to the following settings: medium
fan speed, panel mode, recirculation, and the
full cold position.
The climate control will change back to manual
operation by turning on the vehicle with the key.
SeeRemote Keyless Entry (RKE) System
Operation on page 97.
The heater works best if you keep the
windows closed while using it.
193
Page 200 of 510
Speedometer and Odometer
The speedometer lets you see your speed in
both miles per hour (mph) and kilometers
per hour (km/h).
The odometer shows how far your vehicle
has been driven, in either miles (used in the
United States) or kilometers (used in Canada).
Your vehicle has a tamper resistant odometer.
The digital odometer will read 999,999 if someone
tries to turn it back.
If your vehicle needs a new odometer installed,
it must be set to the mileage total of the old
odometer. If that is not possible, then it must
be set at zero and a label must be put on
the driver’s door to show the old mileage
reading when the new odometer was installed.
Trip Odometer
The trip odometer can tell you how far you have
driven since you last reset it.
The trip odometer is accessed and reset through the
Driver Information Center (DIC). SeeDIC Operation
and Displays on page 218for more information.
200