2007 CHEVROLET MALIBU battery
[x] Cancel search: batteryPage 147 of 510
How OnStar®Service Works
In order to provide you with OnStar®services,
your vehicle’s OnStar®system has the capability
of recording and transmitting vehicle information.
This information is automatically sent to an
OnStar
®Call Center at the time of an OnStar®
button press, Emergency button press or if
your airbags or AACN system deploys. The vehicle
information usually includes your GPS location
and, in the event of a crash, additional information
regarding the accident that your vehicle has
been involved in (e.g. the direction from which
your vehicle was hit). When you use the Virtual
Advisor feature of OnStar
®Hands-Free Calling,
your vehicle also sends OnStar®your GPS
location so that we can provide you with
location-based services.
OnStar
®service cannot work unless your vehicle
is in a place where OnStar®has an agreement
with a wireless service provider for service in
that area. OnStar
®service also cannot work unless
you are in a place where the wireless service
provider OnStar
®has hired for that area has
coverage, network capacity and reception when
the service is needed, and technology that iscompatible with the OnStar
®service. Not all
services are available everywhere, particularly
in remote or enclosed areas, or at all times.
OnStar
®service that involves location information
about your vehicle cannot work unless GPS
satellite signals are unobstructed and available in
that place as well.
Your vehicle must have a working electrical
system (including adequate battery power) for the
OnStar
®equipment to operate. There are other
problems OnStar®cannot control that may prevent
OnStar®from providing OnStar®service to you
at any particular time or place. Some examples are
damage to important parts of your vehicle in an
accident, hills, tall buildings, tunnels, weather
or wireless phone network congestion.
Your Responsibility
You may need to increase the volume of your
radio to hear the OnStar®advisor. If the light next
to the OnStar®buttons is red, this means that
your system is not functioning properly and should
be checked by your dealer/retailer. If the light
appears clear (no light is appearing), your OnStar
®
subscription has expired. You can always press
the OnStar®button to con�rm that your OnStar®
equipment is active.
147
Page 150 of 510
Read the instructions completely before attempting
to program the Universal Home Remote.
Because of the steps involved, it may be helpful
to have another person available to assist you
in the programming steps.
Keep the original hand-held transmitter for use in
other vehicles as well as for future Universal Home
Remote programming. It is also recommended
that upon the sale of the vehicle, the programmed
Universal Home Remote buttons should be erased
for security purposes. See “Erasing Universal
Home Remote Buttons” later in section.
When programming a garage door, it is advised
to park outside of the garage. Be sure that people
and objects are clear of the garage door or
gate operator you are programming.
It is recommended that a new battery be installed in
your hand-held transmitter for quicker and more
accurate transmission of the radio-frequency signal.Programming the Universal Home
Remote System
Follow these steps to program up to three devices:
1. Press and hold down the two outside
Universal Home Remote buttons, releasing
only when the Universal Home Remote
indicator light begins to �ash, after
20 seconds. Do not hold down the buttons
for longer than 30 seconds and do not
repeat this step to program a second and/or
third hand-held transmitter to the remaining
two Universal Home Remote buttons.
2. Hold the end of your hand-held transmitter
about 1 to 3 inches (3 to 8 cm) away from
the Universal Home Remote buttons
while keeping the indicator light in view.
3. At the same time, press and hold both the
desired Universal Home Remote button and
the hand-held transmitter button. Do not
release the buttons until Step 4 has been
completed.
Some entry gates and garage door openers
may require you to substitute Step 3 with
the procedure noted in “Gate Operator and
Canadian Programming” later in this section.
150
Page 157 of 510
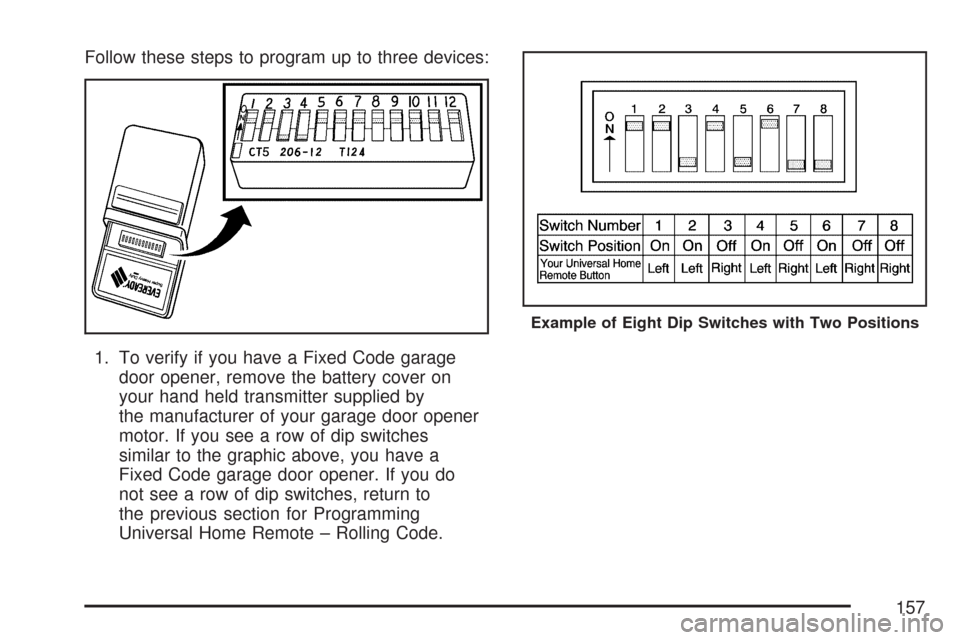
Follow these steps to program up to three devices:
1. To verify if you have a Fixed Code garage
door opener, remove the battery cover on
your hand held transmitter supplied by
the manufacturer of your garage door opener
motor. If you see a row of dip switches
similar to the graphic above, you have a
Fixed Code garage door opener. If you do
not see a row of dip switches, return to
the previous section for Programming
Universal Home Remote – Rolling Code.
Example of Eight Dip Switches with Two Positions
157
Page 165 of 510
Instrument Panel Overview........................ 168
Hazard Warning Flashers.......................... 170
Other Warning Devices............................. 170
Horn.......................................................... 170
Tilt and Telescopic Steering Wheel............ 170
Turn Signal/Multifunction Lever.................. 171
Turn and Lane-Change Signals................. 172
Headlamp High/Low-Beam Changer.......... 172
Flash-to-Pass............................................ 173
Windshield Wipers..................................... 173
Windshield Washer.................................... 174
Rear Window Wiper/Washer
(MAXX Model)....................................... 175
Cruise Control........................................... 176
Exterior Lamps.......................................... 179
Headlamps on Reminder........................... 181
Headlamps Off in PARK (P)...................... 181
Delayed Headlamps.................................. 182
Daytime Running Lamps (DRL)................. 182
Automatic Headlamp System..................... 183
Fog Lamps................................................ 184
Instrument Panel Brightness...................... 184
Dome Lamp.............................................. 184
Entry/Exit Lighting...................................... 185Parade Dimming........................................ 185
Front Reading Lamps................................ 185
Rear Reading Lamps................................ 185
Trunk Lamp............................................... 185
Cargo Lamp.............................................. 186
Battery Run-Down Protection..................... 186
Accessory Power Outlet(s)........................ 186
Cigarette Lighter........................................ 187
Climate Controls......................................... 188
Climate Control System............................. 188
Automatic Climate Control System............. 192
Outlet Adjustment...................................... 197
Warning Lights, Gages, and Indicators..... 198
Instrument Panel Cluster........................... 198
Speedometer and Odometer...................... 200
Trip Odometer........................................... 200
Tachometer............................................... 201
Safety Belt Reminder Light........................ 201
Passenger Safety Belt Reminder Light....... 202
Airbag Readiness Light............................. 202
Passenger Airbag Status Indicator............. 203
Charging System Light.............................. 206
Brake System Warning Light..................... 206
Anti-Lock Brake System Warning Light...... 208
Section 3 Instrument Panel
165
Page 186 of 510
Cargo Lamp
If your vehicle is the MAXX model, it has a cargo
lamp. The cargo lamp comes on when the liftgate is
opened. If you want to leave the liftgate open you
can turn off the cargo lamp by pushing on the lens.
Battery Run-Down Protection
Your vehicle has a battery run-down protection
feature designed to protect your vehicle’s battery.
When any interior lamp (trunk, reading, or visor
vanity) is left on while the ignition is turned off,
the battery run-down protection system will
automatically shut the lamp(s) off after 20 minutes.
This will avoid draining the battery.
To reactivate the interior lamps, do one of the
following:
Turn on the ignition.
Turn the exterior lamp control off and then on.
Open a door.
Press any remote keyless entry transmitter
button (if equipped).
Press the remote trunk release button.
Press the power door lock switch.The battery run-down feature will also be activated
when any door on the vehicle is left open and
the ignition is in OFF.
Accessory Power Outlet(s)
With accessory power outlets you can plug in
auxiliary electrical equipment such as a cellular
telephone.
For vehicles with Traction Control system, the
accessory power outlets are located on the front
of the center console storage area and also
inside the console storage compartment. The
compartment has notches that allow power cords
to be routed outside of the console while the
lid is closed. On vehicles without Traction Control,
both outlets are located on the front of the
center console storage area. There is also an
outlet in the rear cargo area of the MAXX.
Notice:Leaving electrical equipment on
for extended periods will drain the battery.
Always turn off electrical equipment when
not in use and do not plug in equipment
that exceeds the maximum amperage rating.
186
Page 206 of 510
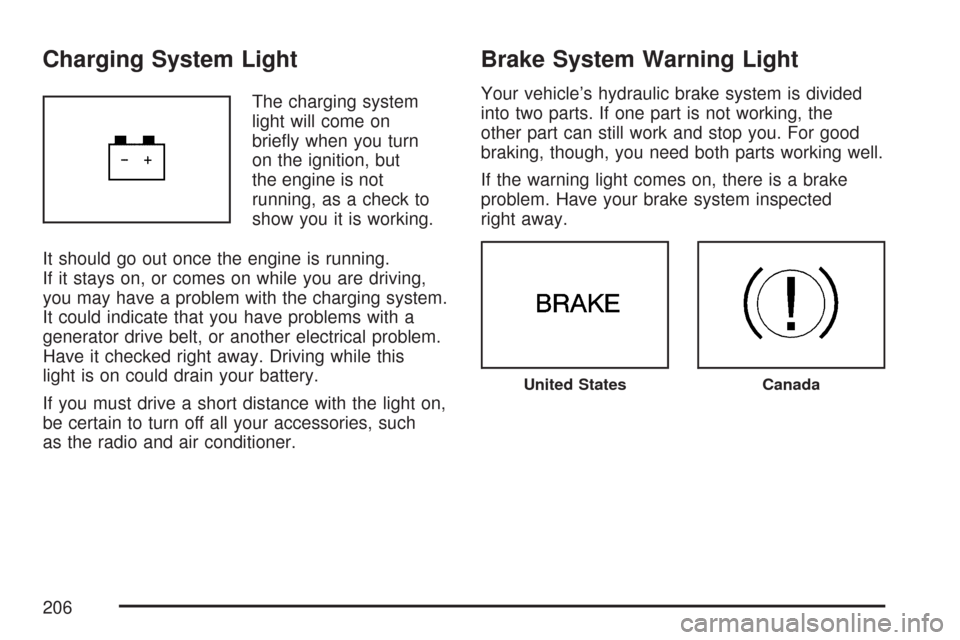
Charging System Light
The charging system
light will come on
brie�y when you turn
on the ignition, but
the engine is not
running, as a check to
show you it is working.
It should go out once the engine is running.
If it stays on, or comes on while you are driving,
you may have a problem with the charging system.
It could indicate that you have problems with a
generator drive belt, or another electrical problem.
Have it checked right away. Driving while this
light is on could drain your battery.
If you must drive a short distance with the light on,
be certain to turn off all your accessories, such
as the radio and air conditioner.
Brake System Warning Light
Your vehicle’s hydraulic brake system is divided
into two parts. If one part is not working, the
other part can still work and stop you. For good
braking, though, you need both parts working well.
If the warning light comes on, there is a brake
problem. Have your brake system inspected
right away.
United StatesCanada
206
Page 214 of 510
Did you just drive through a deep puddle of water?
If so, your electrical system may be wet. The
condition will usually be corrected when the
electrical system dries out. A few driving trips
should turn the light off.
Have you recently changed brands of fuel?
If so, be sure to fuel your vehicle with quality fuel.
SeeGasoline Octane on page 346. Poor fuel
quality will cause your engine not to run as
efficiently as designed. You may notice this as
stalling after start-up, stalling when you put
the vehicle into gear, mis�ring, hesitation on
acceleration, or stumbling on acceleration.
(These conditions may go away once the engine
is warmed up.) This will be detected by the
system and cause the light to turn on.
If you experience one or more of these conditions,
change the fuel brand you use. It will require
at least one full tank of the proper fuel to turn
the light off.
If none of the above steps have made the light
turn off, your dealer can check the vehicle.
Your dealer has the proper test equipment and
diagnostic tools to �x any mechanical or electrical
problems that may have developed.Emissions Inspection and
Maintenance Programs
Some state/provincial and local governments have
or may begin programs to inspect the emission
control equipment on your vehicle. Failure to pass
this inspection could prevent you from getting a
vehicle registration.
Here are some things you need to know to help
your vehicle pass an inspection:
Your vehicle will not pass this inspection if the
check engine light is on or not working properly.
Your vehicle will not pass this inspection if
the OBD (on-board diagnostic) system determines
that critical emission control systems have not
been completely diagnosed by the system.
The vehicle would be considered not ready for
inspection. This can happen if you have recently
replaced your battery or if your battery has
run down. The diagnostic system is designed
to evaluate critical emission control systems
during normal driving. This may take several
days of routine driving. If you have done this and
your vehicle still does not pass the inspection
for lack of OBD system readiness, your dealer
can prepare the vehicle for inspection.
214
Page 220 of 510
AV (Average) SPEED:Press the information
button until AV SPEED is displayed. This shows
the vehicle’s average speed in miles per hour (mph)
or kilometers per hour (km/h).
Press and hold the enter button while AV SPEED
is displayed to reset the average vehicle speed.
OIL LIFE:Press the information button until
OIL LIFE is displayed. The engine oil life system
shows an estimate of the oil’s remaining useful life.
It shows 100% when the system is reset after
an oil change. It will alert you to change the oil on
a schedule consistent with your driving conditions.
Always reset the engine oil life system after
an oil change. SeeEngine Oil Life System
on page 362.
In addition to the engine oil life system monitoring
the oil life, additional maintenance is recommended
in the Maintenance Schedule in this manual.
SeeScheduled Maintenance on page 460and
Engine Oil on page 359.Personalization
MENU:Press this button while the ignition is ON
to scroll through each of the personalization options
in the following order. To avoid excessive drain on
the battery, it is recommended that the headlamps
are turned off. If the vehicle is moving faster than
2 mph (3 km/h), the personalization menu options
are not available, except for the UNITS option.
All of the personalization options may not be
available on your vehicle. Only the options
available display on the DIC.
Oil Life Reset
Units Selection (English/Metric)
Remote Start Capability
Horn Chirp During Remote Keyless
Entry Locking
Horn Chirp During Remote Keyless
Entry Unlocking
220