2007 CHEVROLET IMPALA ignition
[x] Cancel search: ignitionPage 208 of 460
TRUNK OPEN
This message displays when the trunk is not
closed completely. Make sure that the trunk is
closed completely. SeeTrunk on page 102.
TURN SIGNAL ON
This message displays as a reminder to turn off
the turn signal if you drive your vehicle for
more than about 0.75 mile (1.2 km) with a turn
signal on. SeeTurn Signal/Multifunction Lever on
page 153.
This message displays and a chime sounds only
when the ignition is in RUN. The message will
not disappear until the turn signal is manually
turned off, or a turn is completed.
WASHER FLUID LOW ADD FLUID
This message displays when the windshield
washer �uid is low. Fill the windshield washer
reservoir as soon as possible. SeeEngine
Compartment Overview on page 306for the
location of the windshield washer reservoir. Also,
seeWindshield Washer Fluid on page 333for
more information.
DIC Vehicle Customization
Your vehicle has customization capabilities
that allow you to program certain features to
one preferred setting. Customization features
can only be programmed to one setting on
the vehicle and cannot be programmed to a
preferred setting for two different drivers.
All of the customization options may not be
available on your vehicle. Only the options
available will be displayed on your DIC.
The default settings for the customization features
were set when your vehicle left the factory, but
may have been changed from their default
state since then.
The customization preferences are automatically
recalled.
To change customization preferences, use the
following procedure.
208
Page 209 of 460

Entering the Feature Settings Menu
1. Turn the ignition on and place the vehicle in
PARK (P).
To avoid excessive drain on the battery, it is
recommended that the headlamps are
turned off.
2. Press the customization button to enter the
feature settings menu.
If the menu is not available, FEATURE
SETTINGS AVAILABLE IN PARK will display.
Before entering the menu, make sure the
vehicle is in PARK (P).
Feature Settings Menu Items
The following are customization features that allow
you to program settings to the vehicle:
DISPLAY IN ENGLISH
This feature will only display if a language other
than English has been set. This feature allows you
to change the language in which the DIC
messages appear to English.Press the customization button until the
PRESS
VTO DISPLAY IN ENGLISH screen
appears on the DIC display. Press the set/reset
button to display all DIC messages in English.
DISPLAY LANGUAGE
This feature allows you to select the language in
which the DIC messages will appear.
Press the customization button until the DISPLAY
LANGUAGE screen appears on the DIC display.
Press the set/reset button to access the settings
for this feature. Then press the customization
button to scroll through the following choices:
ENGLISH (default):All messages will appear in
English.
FRANCAIS:All messages will appear in French.
ESPANOL:All messages will appear in
Spanish.
NO CHANGE:No change will be made to this
feature. The current setting will remain.
Select one of the available choices and press the
set/reset button while it is displayed on the
DIC to select it.
209
Page 210 of 460
AUTO DOOR UNLOCK
This feature allows you to select whether or not
to turn off the automatic door unlocking feature.
It also allows you to select which doors and
when the doors will automatically unlock.
SeeProgrammable Automatic Door Unlock
on page 100for more information.
Press the customization button until AUTO DOOR
UNLOCK appears on the DIC display. Press
the set/reset button to access the settings for this
feature. Then press the customization button
to scroll through the following choices:
OFF:None of the doors will automatically unlock.
DRIVER AT KEY OUT:Only the driver’s door
will unlock when the key is taken out of the
ignition.
DRIVER IN PARK:Only the driver’s door will
unlock when the vehicle is shifted into PARK (P).
ALL AT KEY OUT:All of the doors will unlock
when the key is taken out of the ignition.
ALL IN PARK (default):All of the doors will
unlock when the vehicle is shifted into PARK (P).NO CHANGE:No change will be made to this
feature. The current setting will remain.
Select one of the available choices and press the
set/reset button while it is displayed on the
DIC to select it.
REMOTE DOOR LOCK
This feature allows you to select the type of
feedback you will receive when locking the vehicle
with the Remote Keyless Entry (RKE) transmitter.
You will not receive feedback when locking
the vehicle with the RKE transmitter if any of the
doors are open. SeeRemote Keyless Entry (RKE)
System Operation on page 91for more
information.
Press the customization button until REMOTE
DOOR LOCK appears on the DIC display. Press
the set/reset button to access the settings for
this feature. Then press the customization button
to scroll through the following choices:
HORN & LIGHTS OFF:There will be no feedback
when you press the lock button on the RKE
transmitter.
210
Page 216 of 460
Set up your audio system by presetting your
favorite radio stations, setting the tone, and
adjusting the speakers. Then, when driving
conditions permit, you can tune to your favorite
radio stations using the presets and steering
wheel controls if the vehicle has them.
Notice:Before adding any sound equipment to
your vehicle, such as an audio system, CD
player, CB radio, mobile telephone, or two-way
radio, make sure that it can be added by
checking with your dealer/retailer. Also, check
federal rules covering mobile radio and
telephone units. If sound equipment can be
added, it is very important to do it properly.
Added sound equipment may interfere with the
operation of your vehicle’s engine, radio, or
other systems, and even damage them. Your
vehicle’s systems may interfere with the
operation of sound equipment that has
been added.
Your vehicle has a feature called Retained
Accessory Power (RAP). With RAP, the audio
system can be played even after the ignition
is turned off. SeeRetained Accessory Power
(RAP) on page 113for more information.Setting the Time
Without Date Display
AM/FM Base Radio with a Single CD
Player
This type of radio has aH(clock) button for
setting the time. You can set the time by following
these steps:
1. Press the
Hbutton until the hour begins
�ashing on display. Press this button a
second time and the minutes begin �ashing
on display.
2. While either the hour or the minutes are
�ashing, turn the
f(tune) knob, located
on the upper right side of the radio, clockwise
or counterclockwise to increase or decrease
the time. Instead of using the tune knob,
you can also press the SEEK arrows,
\FWD (forward), orsREV (reverse)
buttons to adjust the time.
216
Page 219 of 460
Radio with CD (Base)
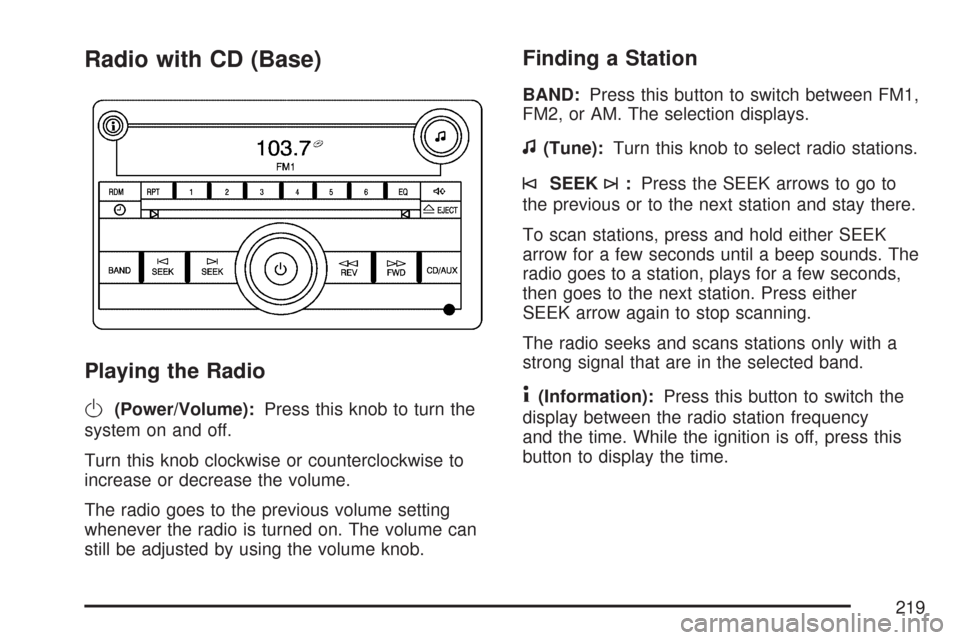
Playing the Radio
O
(Power/Volume):Press this knob to turn the
system on and off.
Turn this knob clockwise or counterclockwise to
increase or decrease the volume.
The radio goes to the previous volume setting
whenever the radio is turned on. The volume can
still be adjusted by using the volume knob.
Finding a Station
BAND:Press this button to switch between FM1,
FM2, or AM. The selection displays.
f(Tune):Turn this knob to select radio stations.
©SEEK¨:Press the SEEK arrows to go to
the previous or to the next station and stay there.
To scan stations, press and hold either SEEK
arrow for a few seconds until a beep sounds. The
radio goes to a station, plays for a few seconds,
then goes to the next station. Press either
SEEK arrow again to stop scanning.
The radio seeks and scans stations only with a
strong signal that are in the selected band.
4(Information):Press this button to switch the
display between the radio station frequency
and the time. While the ignition is off, press this
button to display the time.
219
Page 221 of 460
Loc (Locked):This message displays while the
THEFTLOCK®system has locked up the radio.
Take the vehicle to your dealer/retailer for service.
If any error occurs repeatedly or if an error
cannot be corrected, contact your dealer/retailer.
Playing a CD (Single CD Player)
Insert a CD partway into the slot, label side up.
The player pulls it in and the CD should begin
playing.
If the ignition or radio is turned off with a CD in the
player, it stays in the player. When the ignition or
radio is turned on, the CD starts playing where it
stopped, if it was the last selected audio source.
When a CD is inserted, the CD symbol displays.
As each new track starts to play, the track number
displays.
The CD player can play the smaller 3 inch (8 cm)
single CDs with an adapter ring. Full-size CDs and
the smaller CDs are loaded in the same manner.
If playing a CD-R, the sound quality can be reduced
due to CD-R quality, the method of recording, the
quality of the music that has been recorded, and the
way the CD-R has been handled.There can be an increase in skipping, difficulty in
�nding tracks, and/or difficulty in loading and
ejecting. If these problems occur, check the bottom
surface of the CD. If the surface of the CD is
damaged, such as cracked, broken, or scratched,
the CD does not play properly. If the surface of the
CD is soiled, seeCare of Your CDs on page 245for
more information.
If there is no apparent damage, try a known
good CD.
Notice:If a label is added to a CD, or more
than one CD is inserted into the slot at a time,
or an attempt is made to play scratched or
damaged CDs, the CD player could be
damaged. While using the CD player, use only
CDs in good condition without any label,
load one CD at a time, and keep the CD player
and the loading slot free of foreign materials,
liquids, and debris.
Do not add any label to a CD, it could get caught
in the CD player. If a CD is recorded on a
personal computer and a description label is
needed, try labeling the top of the recorded CD
with a marking pen.
221
Page 223 of 460
4(Information):Press this button to switch the
display between the track number, elapsed time of
the track, and the time. When the ignition is off,
press this button to display the time.
BAND:Press this button to listen to the radio
while a CD is playing. The CD remains inside the
radio for future listening.
CD/AUX (CD/Auxiliary):Press this button to play
a CD while listening to the radio. The CD icon
and track number displays while a CD is in
the player. Press this button again and the system
automatically searches for an auxiliary input
device such as a portable audio player.CD Messages
CHECK DISC:If an error message displays
and/or the CD ejects, it could be for one of the
following reasons:
It is very hot. When the temperature returns to
normal, the CD should play.
You are driving on a very rough road.
When the road becomes smoother, the CD
should play.
The CD is dirty, scratched, wet, or
upside down.
The air is very humid. If so, wait about an
hour and try again.
There could have been a problem while
burning the CD-R.
The label could be caught in the CD player.
If the CD is not playing correctly, for any
other reason, try a known good CD.
If any error occurs repeatedly or if an error cannot
be corrected, contact your dealer/retailer. If the
radio displays an error message, write it down and
provide it to your dealer/retailer while reporting
the problem.
223
Page 231 of 460

Playing a CD(s) (Six-Disc CD Player)
LOAD^:Press this button to load CDs into the
CD player. This CD player holds up to six CDs.
To insert one CD, do the following:
1. Press and release the LOAD button.
2. Wait for the message to insert the disc.
3. Load a CD. Insert the CD partway into
the slot, label side up. The player pulls the
CD in.
To insert multiple CDs, do the following:
1. Press and hold the load button for
two seconds. A beep sounds and Load All
Discs displays.
2. Follow the displayed instruction on when to
insert the discs. The CD player takes up to
six CDs.
3. Press the LOAD button again to cancel
loading more CDs.If the ignition or radio is turned off, with a CD in the
player, it stays in the player. When the ignition or
radio is turned on, the CD starts playing where it
stopped, if it was the last selected audio source.
When a CD is inserted, the CD symbol displays on
the CD. As each new track starts to play, the
track number displays.
The CD player can play the smaller 3 inch (8 cm)
single CDs with an adapter ring. Full-size CDs
and the smaller CDs are loaded in the same
manner.
If playing a CD-R or CD-RW, the sound quality can
be reduced due to CD-R or CD-RW quality, the
method of recording, the quality of the music that
has been recorded, and the way the CD-R or
CD-RW has been handled. There can be an
increase in skipping, difficulty in �nding tracks,
and/or difficulty in loading and ejecting. If these
problems occur, check the bottom surface of the
CD. If the surface of the CD is damaged, such as
cracked, broken, or scratched, the CD does not
play properly. If the surface of the CD is soiled,
seeCare of Your CDs on page 245for more
information.
231