2007 CHEVROLET EXPRESS four wheel drive
[x] Cancel search: four wheel drivePage 131 of 440

Fast Idle System
Fast Idle System with Switch
If the vehicle has this feature it is available only with
cruise control. The manual fast idle switch is operated
using the cruise control buttons located on the left
hand side of the steering wheel.
This system can be used to increase engine idle speed
whenever the following conditions are met:
•The park brake is set.
•The brake pedal is not pressed.
•The vehicle must not be moving and the accelerator
must not be pressed.
To control the fast idle:
•To Enable the Fast idle, press and release the
Cruise Control On/Off button and ensure that
the LED is lit.
•For the preset Fast Idle, press and release the
cruise set switch. This will set the preset fast
idle speed.
•For the variable fast idle, press and hold the
accelerator at the desired RPM, then press
and release the cruise control cruise set switch to
set the desired idle speed.When the fast idle is active the Driver Information
Center (DIC) will display “FAST IDLE ON.”
One of the following actions will turn off the fast idle:
•Pressing the brake.
•Selecting the Cancel button.
•Releasing the Parking Brake.
•The transmission shifter is moved out of P (Park) or
N (Neutral).
•Selecting the cruise control on/off button when it
was previously on.
Engine Coolant Heater
If the vehicle has the DURAMAX Diesel engine, see the
DURAMAX Diesel manual for more information.
The engine coolant heater can provide easier starting
and better fuel economy during engine warm-up in cold
weather conditions at or below 0°F (−18°C). Vehicles
with an engine coolant heater should be plugged
in at least four hours before starting. An internal
thermostat in the plug-end of the cord may exist which
will prevent engine coolant heater operation at
temperatures above 0°F (−18°C).
3-25
Page 141 of 440

Turn the tow/haul mode on and off by pressing the
button, located to the right of the steering wheel on the
instrument panel. When tow/haul is on, a light on
the instrument panel cluster will come on.
SeeTow/Haul Mode Light on page 4-35for more
information.
Also see “Tow Haul Mode” underTowing a Trailer on
page 5-30for more information.
Grade Braking (Six Speed Automatic
Transmission)
The Grade Braking shift modes can be activated by
pressing the tow/haul button on the dash. While
in Range Selection Mode, Grade Braking is deactivated
allowing the driver to select a desired range of gears.
Grade Braking is only active while the Tow/Haul Mode is
selected and you are not in the Range Selection
Mode. See “Tow/Haul Mode listed previously and
Automatic Transmission Operation (Six Speed Automatic
Transmission) on page 3-27orAutomatic Transmission
Operation (Four Speed Automatic Transmission) on
page 3-32for more information on the Range Selection
Mode. Grade Braking assists in maintaining desired
vehicle speeds when driving on downhill grades
by automatically shifting to lower gears when the driver
desires to slow the vehicle by applying the brake.
This reduces wear on the braking system and increases
control of the vehicle.
Also seeTowing a Trailer on page 5-30for more
information.
3-35
Page 236 of 440

Locking Rear Axle
Vehicles with a locking rear axle can give more traction
on snow, mud, ice, sand or gravel. It works like a
standard axle most of the time, but when traction is low,
this feature will allow the rear wheel with the most
traction to move the vehicle.
All-Wheel Drive (AWD) System
If the vehicle has this feature, engine power is sent to
all four wheels when extra traction is needed. This is like
four-wheel drive, but there is no separate lever or
switch to engage or disengage the front axle. It is fully
automatic, and adjusts itself as needed for road
conditions.
Steering
Power Steering
If power steering assist is lost because the engine stops
or the system is not functioning, the vehicle can be
steered but it will take more effort.
Steering Tips
It is important to take curves at a reasonable speed.
Traction in a curve depends on the condition of the tires
and the road surface, the angle at which the curve is
banked, and vehicle speed. While in a curve, speed is
the one factor that can be controlled.
If there is a need to reduce speed, do it before entering
the curve, while the front wheels are straight.
Try to adjust the speed so you can drive through the
curve. Maintain a reasonable, steady speed. Wait
to accelerate until out of the curve, and then accelerate
gently into the straightaway.
5-8
Page 255 of 440

Here are some important things to consider before
recreational vehicle towing:
•What is the towing capacity of the towing vehicle?
Be sure to read the tow vehicle manufacturer’s
recommendations.
•What is the distance that will be travelled? Some
vehicles have restrictions on how far and how
long they can tow.
•Is the proper towing equipment going to be used?
See your dealer/retailer or trailering professional
for additional advice and equipment
recommendations.
•Is the vehicle ready to be towed? Just as preparing
the vehicle for a long trip, make sure the vehicle is
prepared to be towed. SeeBefore Leaving on a
Long Trip on page 5-14.
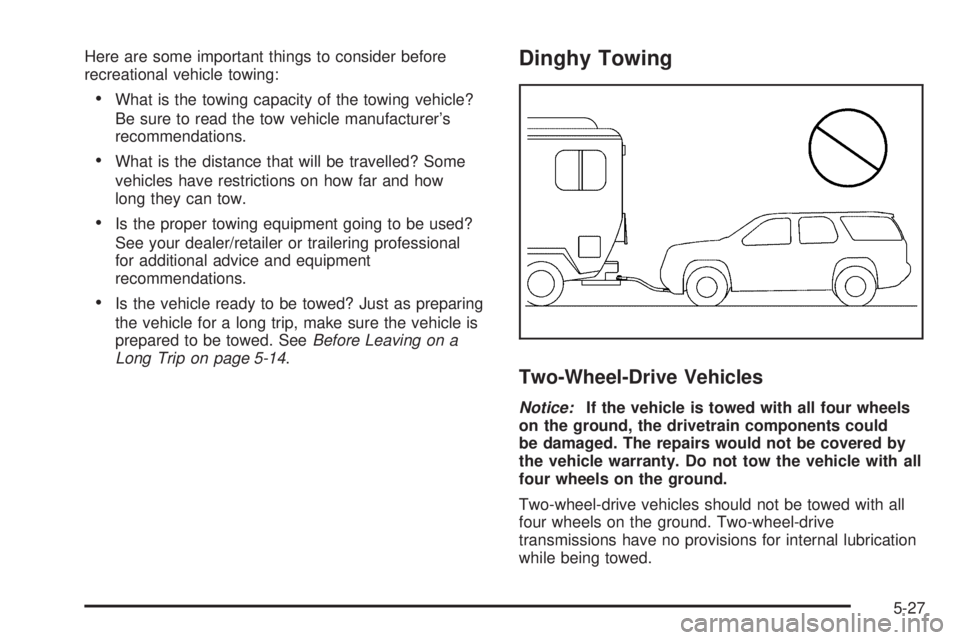
Dinghy Towing
Two-Wheel-Drive Vehicles
Notice:If the vehicle is towed with all four wheels
on the ground, the drivetrain components could
be damaged. The repairs would not be covered by
the vehicle warranty. Do not tow the vehicle with all
four wheels on the ground.
Two-wheel-drive vehicles should not be towed with all
four wheels on the ground. Two-wheel-drive
transmissions have no provisions for internal lubrication
while being towed.
5-27
Page 256 of 440

All-Wheel-Drive Vehicles
The vehicle was not designed to be towed with all four
wheels on the ground. To properly tow these vehicles,
they should be placed on a platform trailer with all
four wheels off the ground.
Notice:Towing an all-wheel-drive vehicle with all
four wheels on the ground, or even with only two of
its wheels on the ground, will damage drivetrain
components. Do not tow an all-wheel-drive vehicle
with any of its wheels on the ground.
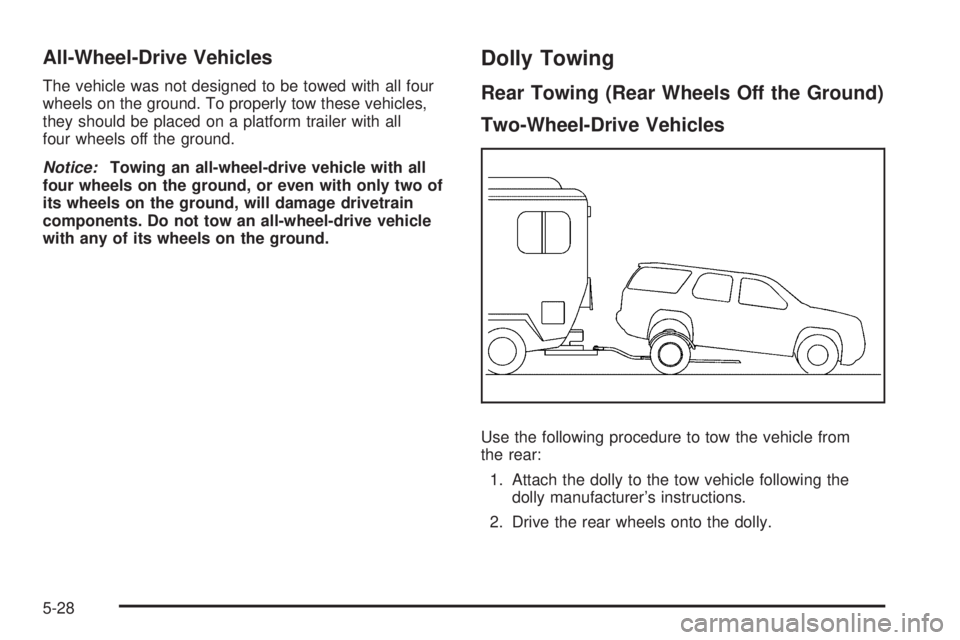
Dolly Towing
Rear Towing (Rear Wheels Off the Ground)
Two-Wheel-Drive Vehicles
Use the following procedure to tow the vehicle from
the rear:
1. Attach the dolly to the tow vehicle following the
dolly manufacturer’s instructions.
2. Drive the rear wheels onto the dolly.
5-28
Page 257 of 440

3. Firmly set the parking brake. SeeParking Brake on
page 3-36for more information.
4. Put the transmission in P (Park).
5. Secure the vehicle to the dolly following the
manufacturer’s instructions.
6. Use an adequate clamping device designed for
towing to ensure that the front wheels are locked
into the straight position.
7. Turn the ignition to LOCK/OFF.
If the tow vehicle will not be started or driven for six
weeks or more, remove the battery cable from
the negative terminal (post) of the battery to prevent
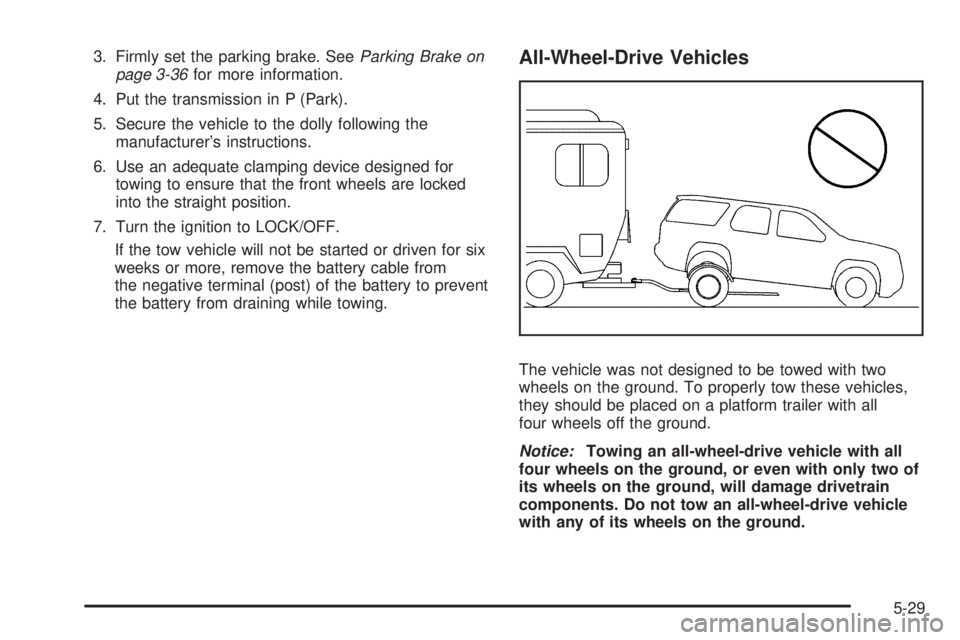
the battery from draining while towing.All-Wheel-Drive Vehicles
The vehicle was not designed to be towed with two
wheels on the ground. To properly tow these vehicles,
they should be placed on a platform trailer with all
four wheels off the ground.
Notice:Towing an all-wheel-drive vehicle with all
four wheels on the ground, or even with only two of
its wheels on the ground, will damage drivetrain
components. Do not tow an all-wheel-drive vehicle
with any of its wheels on the ground.
5-29
Page 344 of 440

TPMS Sensor Matching Process
Each TPMS sensor has a unique identification code.
Any time you rotate your vehicle’s tires or replace one
or more of the TPMS sensors, the identification codes
will need to be matched to the new tire/wheel position.
The sensors are matched to the tire/wheel positions in
the following order: driver side front tire, passenger side
front tire, passenger side rear tire, and driver side rear tire
using a TPMS diagnostic tool. See your dealer/retailer for
service.
The TPMS sensors can also be matched to each
tire/wheel position by increasing or decreasing the
tire’s air pressure. If increasing the tire’s air pressure,
do not exceed the maximum inflation pressure indicated
on the tire’s sidewall.
To decrease air-pressure out of a tire you can use the
pointed end of the valve cap, a pencil-style air pressure
gage, or a key.
You have two minutes to match the first tire/wheel
position, and five minutes overall to match all four
tire/wheel positions. If it takes longer than two minutes, to
match the first tire and wheel, or more than five minutes
to match all four tire and wheel positions the matching
process stops and you need to start over.The TPMS sensor matching process is outlined below:
1. Set the parking brake.
2. Turn the ignition switch to ON/RUN with the
engine off.
3. Press the Remote Keyless Entry (RKE) transmitter’s
LOCK and UNLOCK buttons at the same time
for approximately five seconds. The horn sounds
twice to signal the receiver is in relearn mode and
TIRE LEARNING ACTIVE message displays on the
DIC screen.
If your vehicle does not have RKE, press the Driver
Information Center (DIC) vehicle information button
until the PRESS
VTO RELEARN TIRE POSITIONS
message displays. The horn sounds twice to signal
the receiver is in relearn mode and TIRE LEARNING
ACTIVE message displays on the DIC screen.
If your vehicle does not have RKE or DIC buttons,
press the trip odometer reset stem located on the
instrument panel cluster until the PRESS
VTO
RELEARN TIRE POSITIONS message displays.
The horn sounds twice to signal the receiver is in
relearn mode and TIRE LEARNING ACTIVE
message displays on the DIC screen.
6-74
Page 345 of 440

4. Start with the driver side front tire.
5. Remove the valve cap from the valve cap stem.
Activate the TPMS sensor by increasing or
decreasing the tire’s air pressure for five seconds,
or until a horn chirp sounds. The horn chirp, which
may take up to 30 seconds to sound, confirms that
the sensor identification code has been matched to
this tire and wheel position.
6. Proceed to the passenger side front tire, and repeat
the procedure in Step 5.
7. Proceed to the passenger side rear tire, and repeat
the procedure in Step 5.
8. Proceed to the driver side rear tire, and repeat the
procedure in Step 5. The horn sounds two times to
indicate the sensor identification code has been
matched to the driver side rear tire, and that the
TPMS sensor matching process is no longer active.
The TIRE LEARNING ACTIVE message on the DIC
display screen goes off.
9. Turn the ignition switch to LOCK/OFF.
10. Set all four tires to the recommended air pressure
level as indicated on the Tire and Loading
Information label.
11. Put the valve caps back on the valve stems.Tire Inspection and Rotation
Inspect tires regularly for signs of wear or damage.
Also inspect the spare tire. For more information
on tire inspection, seeWhen It Is Time for
New Tires on page 6-78.
Tires should be rotated every 5,000 to 8,000 miles
(8 000 to 13 000 km). SeeScheduled Maintenance
on page 7-3.
The purpose of a regular tire rotation is to achieve
a uniform wear for all tires on the vehicle. This will
ensure that the vehicle continues to perform most
like it did when the tires were new. The first rotation
is the most important. SeeScheduled Maintenance
on page 7-3.
Any time you notice unusual wear, rotate the tires
as soon as possible and check wheel alignment.
Also check for damaged tires or wheels. SeeWhen
It Is Time for New Tires on page 6-78andWheel
Replacement on page 6-82.
6-75