Page 333 of 488

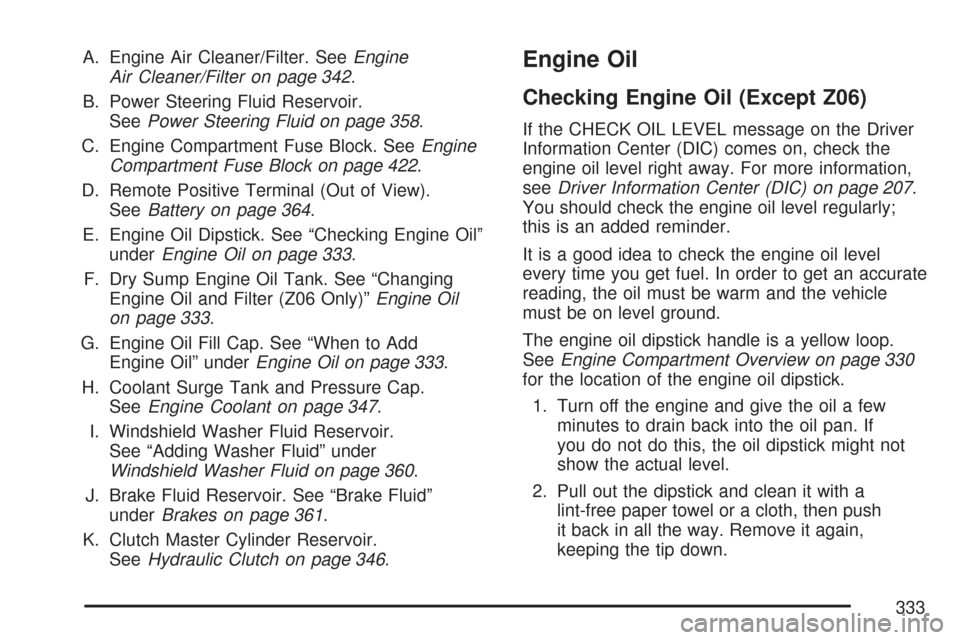
A. Engine Air Cleaner/Filter. SeeEngine
Air Cleaner/Filter on page 342.
B. Power Steering Fluid Reservoir.
SeePower Steering Fluid on page 358.
C. Engine Compartment Fuse Block. SeeEngine
Compartment Fuse Block on page 422.
D. Remote Positive Terminal (Out of View).
SeeBattery on page 364.
E. Engine Oil Dipstick. See “Checking Engine Oil”
underEngine Oil on page 333.
F. Dry Sump Engine Oil Tank. See “Changing
Engine Oil and Filter (Z06 Only)”Engine Oil
on page 333.
G. Engine Oil Fill Cap. See “When to Add
Engine Oil” underEngine Oil on page 333.
H. Coolant Surge Tank and Pressure Cap.
SeeEngine Coolant on page 347.
I. Windshield Washer Fluid Reservoir.
See “Adding Washer Fluid” under
Windshield Washer Fluid on page 360.
J. Brake Fluid Reservoir. See “Brake Fluid”
underBrakes on page 361.
K. Clutch Master Cylinder Reservoir.
SeeHydraulic Clutch on page 346.Engine Oil
Checking Engine Oil (Except Z06)
If the CHECK OIL LEVEL message on the Driver
Information Center (DIC) comes on, check the
engine oil level right away. For more information,
seeDriver Information Center (DIC) on page 207.
You should check the engine oil level regularly;
this is an added reminder.
It is a good idea to check the engine oil level
every time you get fuel. In order to get an accurate
reading, the oil must be warm and the vehicle
must be on level ground.
The engine oil dipstick handle is a yellow loop.
SeeEngine Compartment Overview on page 330
for the location of the engine oil dipstick.
1. Turn off the engine and give the oil a few
minutes to drain back into the oil pan. If
you do not do this, the oil dipstick might not
show the actual level.
2. Pull out the dipstick and clean it with a
lint-free paper towel or a cloth, then push
it back in all the way. Remove it again,
keeping the tip down.
333
Page 356 of 488
{CAUTION:
You can be burned if you spill coolant
on hot engine parts. Coolant contains
ethylene glycol and it will burn if the
engine parts are hot enough. Do not
spill coolant on a hot engine.
1. You can remove the coolant surge tank
pressure cap when the cooling system,
including the coolant surge tank pressure
cap and upper radiator hose, is no longer hot.
Turn the pressure cap slowly counterclockwise
about one-quarter turn and then stop.
If you hear a hiss, wait for that to stop.
A hiss means there is still some pressure left.
2. Then keep turning the pressure cap slowly,
and remove it.
356
Page 366 of 488

Notice:If you leave your radio or other
accessories on during the jump starting
procedure, they could be damaged. The
repairs would not be covered by your
warranty. Always turn off your radio and
other accessories when jump starting
your vehicle.
3. Turn off the ignition on both vehicles. Unplug
unnecessary accessories plugged into the
cigarette lighter or the accessory power outlet.
Turn off the radio and all lamps that are not
needed. This will avoid sparks and help save
both batteries. And it could save the radio!
4. Open the hoods and locate the positive (+) and
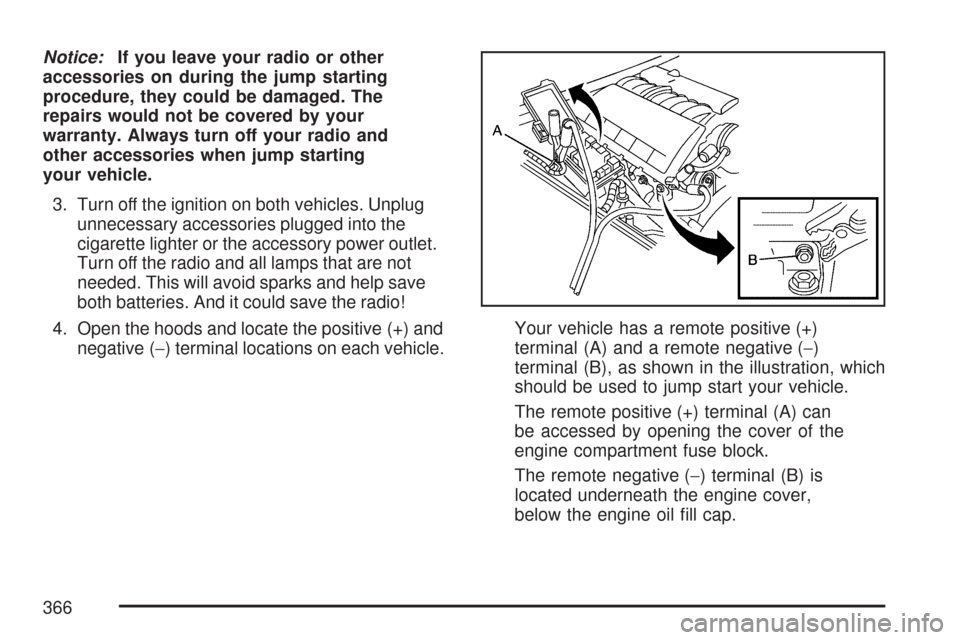
negative (−) terminal locations on each vehicle.Your vehicle has a remote positive (+)
terminal (A) and a remote negative (−)
terminal (B), as shown in the illustration, which
should be used to jump start your vehicle.
The remote positive (+) terminal (A) can
be accessed by opening the cover of the
engine compartment fuse block.
The remote negative (−) terminal (B) is
located underneath the engine cover,
below the engine oil �ll cap.
366
Page 367 of 488

SeeEngine Compartment Overview on
page 330for the location of the engine
compartment fuse block and engine oil �ll cap.
You will not need to access the battery for
jump starting. The remote terminals are
for that purpose.
{CAUTION:
An electric fan can start up even when the
engine is not running and can injure you.
Keep hands, clothing and tools away from
any underhood electric fan.
{CAUTION:
Using a match near a battery can cause
battery gas to explode. People have
been hurt doing this, and some have
been blinded. Use a �ashlight if you
need more light.
CAUTION: (Continued)
CAUTION: (Continued)
Be sure the battery has enough water.
You do not need to add water to the
battery installed in your new vehicle.
But if a battery has �ller caps, be sure the
right amount of �uid is there. If it is low,
add water to take care of that �rst. If you
do not, explosive gas could be present.
Battery �uid contains acid that can
burn you. Do not get it on you. If you
accidentally get it in your eyes or on
your skin, �ush the place with water
and get medical help immediately.
{CAUTION:
Fans or other moving engine parts can
injure you badly. Keep your hands away
from moving parts once the engine is
running.
367
Page 369 of 488

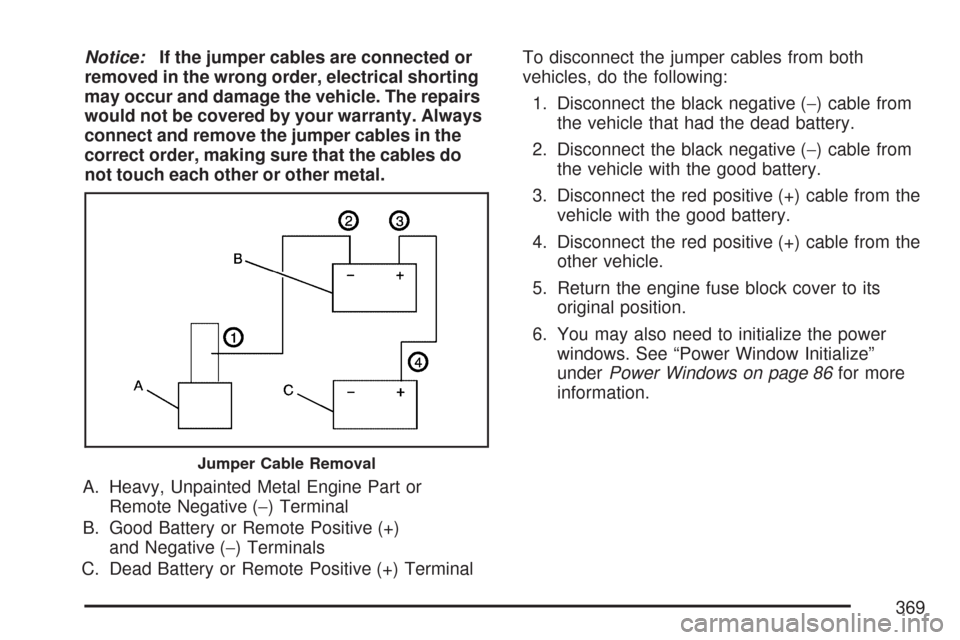
Notice:If the jumper cables are connected or
removed in the wrong order, electrical shorting
may occur and damage the vehicle. The repairs
would not be covered by your warranty. Always
connect and remove the jumper cables in the
correct order, making sure that the cables do
not touch each other or other metal.
A. Heavy, Unpainted Metal Engine Part or
Remote Negative (−) Terminal
B. Good Battery or Remote Positive (+)
and Negative (−) Terminals
C. Dead Battery or Remote Positive (+) TerminalTo disconnect the jumper cables from both
vehicles, do the following:
1. Disconnect the black negative (−) cable from
the vehicle that had the dead battery.
2. Disconnect the black negative (−) cable from
the vehicle with the good battery.
3. Disconnect the red positive (+) cable from the
vehicle with the good battery.
4. Disconnect the red positive (+) cable from the
other vehicle.
5. Return the engine fuse block cover to its
original position.
6. You may also need to initialize the power
windows. See “Power Window Initialize”
underPower Windows on page 86for more
information.
Jumper Cable Removal
369
Page 373 of 488
To replace a high-beam or front parking/turn
signal/DRL bulb, do the following:
1. Turn the wheel to allow access to the
wheel well.
2. Access the high-beam or front parking/turn
signal bulbs by removing the access panel.
To do this, remove the three outer fasteners
and move the cover back.3. Remove the outer cover to expose the
high-beam headlamp bulb socket once
the access cover has been removed.
4. Remove the
headlamp bulb
by releasing
the outer tabs
from the socket.
5. Remove the front parking/turn signal bulb by
turning the bulb socket counterclockwise.
6. Replace the high-beam headlamp bulb with
a new bulb and reattach to the bulb socket.
Replace the front parking/turn signal bulb
by turning the bulb socket clockwise.
7. Reverse the Steps 2 through 4 to reinstall.
373
Page 374 of 488
Taillamps, Turn Signal, and
Stoplamps
To replace a stoplamp, taillamp/turn signal bulb,
do the following:
1. Remove the screw from the top of the lamp
assembly.
2. Tilt out the lamp assembly.
3. Turn the bulb socket one-quarter turn
counterclockwise and pull it out.4. Pull the bulb straight out to remove it from
the socket.
5. Push the new bulb in the bulb socket until
it snaps into place.
6. Reinstall the lamp assembly by �rst lining
up the tabs on the bottom of the lamp
assembly with the tabs in the vehicle,
then slide it in.
7. Replace the screw at the top of the
lamp assembly.
Replacement Bulbs
Exterior Lamp Bulb Number
Front Parking/
Turn Signal/Daytime
Running Lamp (DRL)5702KA
Headlamp, High-Beam Lamp H9
Sidemarker Lamp W3W
Stoplamp/Taillamp/
Turn Signal Lamp3057KX
For replacement bulbs not listed here,
contact your dealer.
374
Page 376 of 488
A. Blade Assembly
B. Arm Assembly
C. Locking TabD. Blade Pivot
E. Hook Slot
F. Arm Hook
3. Press down on the blade assembly pivot
locking tab (C). Pull down on the blade
assembly (A) to release it from the wiper
arm hook (F).4. Remove the insert from the blade
assembly (A). The insert has two notches
at one end that are locked by the bottom
claws of the blade assembly. At the notch
end, pull the insert from the blade assembly.
To install the new wiper insert:
1. Slide the insert (D), notched end last, into the
end with the two blade claws (A). Slide the
insert all the way through the blade claws at
the opposite end (B). Plastic caps (C) will
be forced off as the insert is fully installed.
376