2007 CHEVROLET COLORADO tire
[x] Cancel search: tirePage 2 of 496

Service and Appearance Care
.................. 321
Service
................................................. 324
Fuel
...................................................... 326
Checking Things Under the Hood
......... 331
Rear Axle
............................................. 368
Four-Wheel Drive
.................................. 368
Front Axle
............................................ 369
Bulb Replacement
................................ 370
Windshield Wiper Blade
Replacement
..................................... 375
Tires
..................................................... 377
Appearance Care
.................................. 422Vehicle Identication
............................. 432
Electrical System
.................................. 432
Capacities and Specications
................ 437
Maintenance Schedule
.............................. 439
Maintenance Schedule
.......................... 440
Customer Assistance Information
............. 459
Customer Assistance and Information
..... 460
Reporting Safety Defects
...................... 475
Vehicle Data Recording and Privacy
..... 478
Index
.......................................................... 481
2
Page 10 of 496

Power Seats
If the vehicle has power
seats, the controls used
to operate them are
located on the outboard
side of the seats.
To adjust the seat, do any of the following:
Move the seat forward or rearward by sliding
the horizontal control forward or rearward.
Raise or lower the front part of the seat
cushion by moving the front of the horizontal
control up or down.
Raise or lower the rear part of the seat
cushion by moving the rear of the horizontal
control up or down.
Raise or lower the entire seat by moving the
entire horizontal control up or down.
Use the vertical control to recline the seatback.
See “Power Reclining Seatbacks” under
Reclining Seatbacks on page 12for more
information.
Manual Lumbar
If your vehicle has
this feature, there is
a knob located on
the outboard side
of the driver’s seat.
Turn the top of the knob toward the front of the
vehicle to increase lumbar support. Turn the
top of the knob toward the rear of the vehicle to
decrease lumbar support.
10
Page 17 of 496

Rear Seats
Rear Seat Operation (Extended Cab)
If your vehicle has
an extended cab,
there may be forward
folding seats in the
rear area.
To fold the rear seat cushion(s) from the stored
position to the sitting position, pull the front of
the seat cushion down completely.
The rear seat storage compartments must be
closed before folding the seat down. See
Rear Storage Area on page 154.To store the seat, do the following:
Notice:Folding a rear seat with the safety
belts still fastened may cause damage to the
seat or the safety belts. Always unbuckle
the safety belts and return them to their normal
stowed position before folding a rear seat.
1. Secure the safety belt buckle to the inboard side
of the seat with the hook and loop fastener (A),
so that it does not move when not in use.
2. Push the entire seat up until it is ush with the
trim panel.
17
Page 111 of 496
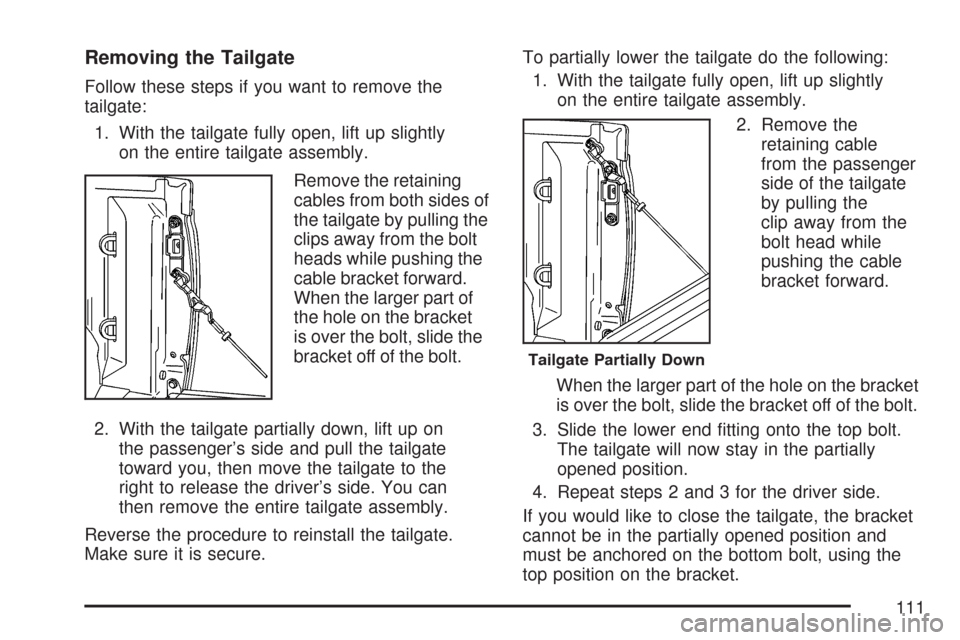
Removing the Tailgate
Follow these steps if you want to remove the
tailgate:
1. With the tailgate fully open, lift up slightly
on the entire tailgate assembly.
Remove the retaining
cables from both sides of
the tailgate by pulling the
clips away from the bolt
heads while pushing the
cable bracket forward.
When the larger part of
the hole on the bracket
is over the bolt, slide the
bracket off of the bolt.
2. With the tailgate partially down, lift up on
the passenger’s side and pull the tailgate
toward you, then move the tailgate to the
right to release the driver’s side. You can
then remove the entire tailgate assembly.
Reverse the procedure to reinstall the tailgate.
Make sure it is secure.To partially lower the tailgate do the following:
1. With the tailgate fully open, lift up slightly
on the entire tailgate assembly.
2. Remove the
retaining cable
from the passenger
side of the tailgate
by pulling the
clip away from the
bolt head while
pushing the cable
bracket forward.
When the larger part of the hole on the bracket
is over the bolt, slide the bracket off of the bolt.
3. Slide the lower end tting onto the top bolt.
The tailgate will now stay in the partially
opened position.
4. Repeat steps 2 and 3 for the driver side.
If you would like to close the tailgate, the bracket
cannot be in the partially opened position and
must be anchored on the bottom bolt, using the
top position on the bracket.
Tailgate Partially Down
111
Page 126 of 496

DRIVE (D):This position is for normal driving.
If provides the best fuel economy for your vehicle.
If you need more power for passing, and you are:
Going less than about 35 mph (55 km/h), push
your accelerator pedal about halfway down.
Going about 35 mph (55 km/h) or more, push
the accelerator all the way down.
You will shift down to the next gear and have
more power.
Downshifting the transmission in slippery road
conditions could result in skidding, see “Skidding”
underLoss of Control on page 259.
THIRD (3):This position is also used for normal
driving. However, it reduces vehicle speed
more than DRIVE (D) without using your brakes.
You might choose THIRD (3) instead of DRIVE (D)
when driving on hilly, winding roads, when
towing a trailer, so there is less shifting between
gears and when going down a steep hill.
SECOND (2):This position reduces vehicle speed
even more than THIRD (3) without using your
brakes. You can use SECOND (2) on hills. It can
help control your speed as you go down steep
mountain roads, but then you would also want to
use your brakes off and on.FIRST (1):This position reduces vehicle speed
even more than SECOND (2) without using
your brakes. You can use it on very steep hills, or
in deep snow or mud. If the shift lever is put in
FIRST (1) while the vehicle is moving forward, the
transmission will not shift into rst gear until the
vehicle is going slowly enough.
Notice:Spinning the tires or holding the
vehicle in one place on a hill using only
the accelerator pedal may damage the
transmission. The repair will not be covered by
your warranty. If you are stuck, do not spin
the tires. When stopping on a hill, use the
brakes to hold the vehicle in place.
Manual Transmission Operation
This is your
shift pattern.
126
Page 129 of 496

Four-Wheel Drive
If your vehicle has four-wheel drive, you can send
your engine’s driving power to all four wheels for
extra traction. To get the best performance out of
four-wheel drive, you must be familiar with its
operation. Read the part that follows before using
four-wheel drive. You should use two-wheel-drive
high for most normal driving conditions.
Notice:Driving on clean, dry pavement in
four-wheel drive for an extended period of
time can cause premature wear on your
vehicle’s powertrain. Do not drive on clean,
dry pavement in Four-Wheel Drive for
extended periods of time.
Notice:If your vehicle has four-wheel drive
and the compact spare tire is installed on
your vehicle, do not drive in four-wheel drive
until you can have your at tire repaired and/or
replaced. You could damage your vehicle,
and the repair costs would not be covered
by your warranty. Never use four-wheel drive
when the compact spare tire is installed
on your vehicle.The transfer case buttons are located to the right
of the steering wheel on the instrument panel.
Recommended Transfer Case Settings
Driving ConditionsTransfer Case Settings
2m4m4nN
Normal YES
Severe YES
Extreme YES
Vehicle in Tow* YES
*SeeRecreational Vehicle Towing on page 300
orTowing Your Vehicle on page 299for further
information.
129
Page 158 of 496

Brake System Warning Light..................... 189
Anti-Lock Brake System Warning Light...... 190
Engine Coolant Temperature Gage............ 191
Tire Pressure Light.................................... 191
Malfunction Indicator Lamp........................ 192
Oil Pressure Light..................................... 195
Security Light............................................ 196
Cruise Control Light.................................. 196
Highbeam On Light................................... 196
Daytime Running Lamps (DRL)
Indicator Light........................................ 197
Fuel Gage................................................. 197
Driver Information Center (DIC).................. 198
DIC Controls and Displays........................ 198
DIC Warnings and Messages.................... 202Audio System(s)......................................... 206
Setting the Time........................................ 208
AM-FM Radio............................................ 209
Radio with CD (MP3)................................ 212
Radio with Six-Disc CD............................. 222
Using an MP3........................................... 234
XM Radio Messages................................. 240
Theft-Deterrent Feature............................. 242
Radio Reception........................................ 242
Care of Your CDs..................................... 243
Care of the CD Player.............................. 243
Fixed Mast Antenna.................................. 244
XM™ Satellite Radio Antenna System....... 244
Chime Level Adjustment............................ 244
Section 3 Instrument Panel
158
Page 167 of 496
+ (Resume/Accelerate):Move the lever to this
position to make the vehicle accelerate or resume
to a previously set speed.
rT(Set):Press this button to set the speed.
With cruise control, the vehicle can maintain
a speed of about 25 mph (40 km/h) or more
without keeping your foot on the accelerator.
This can really help on long trips. Cruise
control does not work at speeds below about
25 mph (40 km/h).
Cruise control will not work if the parking brake
is set, or if the master cylinder brake uid level
is low.
If the brakes are applied, the cruise control
will shut off.
{CAUTION:
Cruise control can be dangerous where
you cannot drive safely at a steady speed.
So, do not use your cruise control on
winding roads or in heavy traffic.
Cruise control can be dangerous on
slippery roads. On such roads, fast
changes in tire traction can cause
excessive wheel slip, and you could lose
control. Do not use cruise control on
slippery roads.
If your vehicle has the Traction Control System
(TCS) and it begins to limit wheel spin while
the cruise control is on, the cruise control will
automatically disengage. SeeTraction Control
System (TCS) on page 253. When road conditions
allow you to safely use it again, you can turn
cruise control back on.
167