Page 297 of 436
4. With the coolant surge tank pressure cap off,
start the engine and let it run until you can
feel the upper radiator hose getting hot. Watch
out for the engine cooling fan.
By this time, the coolant level inside the
coolant surge tank may be lower. If the level
is lower than the Maximum mark, add
more of the proper mixture to the coolant
surge tank until the level reaches the mark.
5. Then replace the pressure cap. Be sure the
pressure cap is hand-tight and fully seated.
See your dealer, if necessary.Power Steering Fluid
When to Check Power Steering Fluid
The power steering fluid reservoir is located toward
the front of the engine compartment on the driver’s
side of the vehicle. SeeEngine Compartment
Overview on page 276for reservoir location.
It is not necessary to regularly check power
steering fluid unless you suspect there is a leak in
the system or you hear an unusual noise. A
fluid loss in this system could indicate a problem.
Have the system inspected and repaired.
297
Page 317 of 436
License Plate Lamp
To replace one of these bulbs, do the following:
1. Remove the two screws holding each of the
license plate lamps.
2. Turn and pull the license plate lamp toward
you through the opening.
3. Turn the bulb socket counterclockwise and
pull the bulb straight out of the socket.
4. Install the new bulb.
5. Reverse Steps 1 through 3 to reinstall the
license plate lamp.
Replacement Bulbs
Exterior Lamp Bulb Number
Back-Up 94535571
Center High-Mounted
Stoplamp (CHMSL)94535587
Headlamps 94535548
Front Parking/Turn
Signal (Hatchback)94535574
Front Parking/Turn
Signal (Sedan)94535574
Side Turn Signal (Hatchback) 94535587
Side Turn Signal (Sedan) 94535587
Stoplamp/Taillamps 94535574
Turn Signal Lamps 94535572
For replacement bulbs not listed here, contact
your dealer/retailer.
317
Page 328 of 436
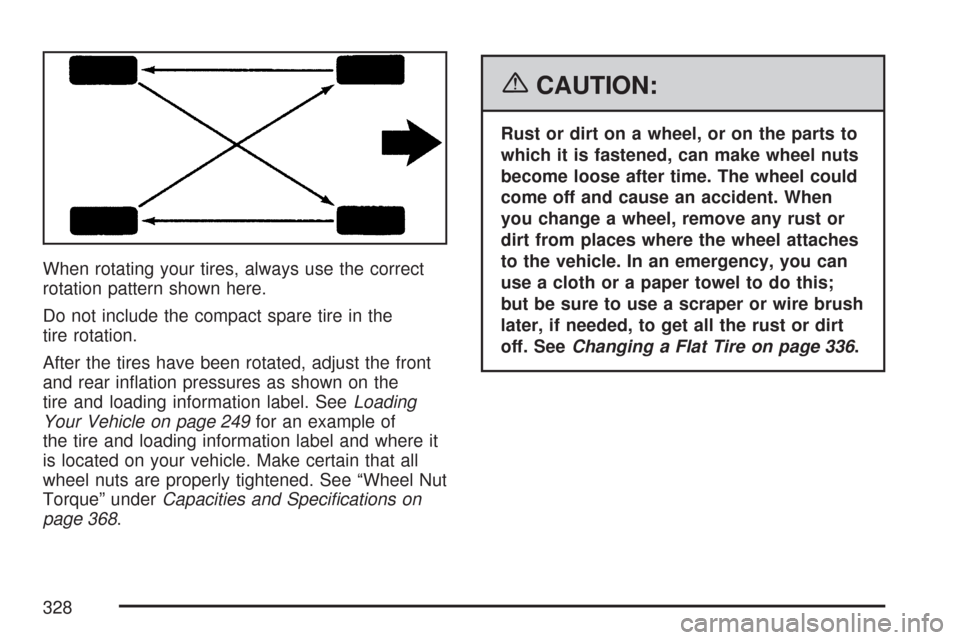
When rotating your tires, always use the correct
rotation pattern shown here.
Do not include the compact spare tire in the
tire rotation.
After the tires have been rotated, adjust the front
and rear inflation pressures as shown on the
tire and loading information label. SeeLoading
Your Vehicle on page 249for an example of
the tire and loading information label and where it
is located on your vehicle. Make certain that all
wheel nuts are properly tightened. See “Wheel Nut
Torque” underCapacities and Specifications on
page 368.
{CAUTION:
Rust or dirt on a wheel, or on the parts to
which it is fastened, can make wheel nuts
become loose after time. The wheel could
come off and cause an accident. When
you change a wheel, remove any rust or
dirt from places where the wheel attaches
to the vehicle. In an emergency, you can
use a cloth or a paper towel to do this;
but be sure to use a scraper or wire brush
later, if needed, to get all the rust or dirt
off. SeeChanging a Flat Tire on page 336.
328
Page 335 of 436
Tire Chains
Notice:Use tire chains only where legal and
only when you must. Use only SAE Class “S”
type chains that are the proper size for your
tires. Install them on the front tires and tighten
them as tightly as possible with the ends
securely fastened. Drive slowly and follow the
chain manufacturer’s instructions. If you can
hear the chains contacting your vehicle, stop
and retighten them. If the contact continues,
slow down until it stops. Driving too fast or
spinning the wheels with chains on will damage
your vehicle.
If a Tire Goes Flat
It is unusual for a tire to blowout while you are
driving, especially if you maintain your vehicle’s
tires properly. If air goes out of a tire, it is
much more likely to leak out slowly. But if you
should ever have a blowout, here are a few tips
about what to expect and what to do:
If a front tire fails, the flat tire will create a drag that
pulls the vehicle toward that side. Take your foot off
the accelerator pedal and grip the steering wheel
firmly. Steer to maintain lane position, and then
gently brake to a stop well out of the traffic lane.A rear blowout, particularly on a curve, acts much
like a skid and may require the same correction
you would use in a skid. In any rear blowout
remove your foot from the accelerator pedal. Get
the vehicle under control by steering the way
you want the vehicle to go. It may be very bumpy
and noisy, but you can still steer. Gently brake
to a stop, well off the road if possible.
{CAUTION:
Lifting a vehicle and getting under it to do
maintenance or repairs is dangerous
without the appropriate safety equipment
and training. The jack provided with your
vehicle is designed only for changing a
�at tire. If it is used for anything else, you
or others could be badly injured or killed
if the vehicle slips off the jack. Use the
jack provided with your vehicle only for
changing a �at tire.
If a tire goes flat, the next part shows how to use the
jacking equipment to change a flat tire safely.
335
Page 342 of 436
{CAUTION:
Rust or dirt on the wheel, or on the parts
to which it is fastened, can make the
wheel nuts become loose after time. The
wheel could come off and cause an
accident. When changing a wheel, remove
any rust or dirt from the places where the
wheel attaches to the vehicle. In an
emergency, a cloth or a paper towel can
be used to do this; but be sure to use a
scraper or wire brush later, if needed, to
get all the rust or dirt off.12. Remove any rust or
dirt from the wheel
bolts, mounting
surfaces and
spare wheel.
13. Place the compact spare tire on the
wheel-mounting surface.
{CAUTION:
Never use oil or grease on studs or nuts.
Because the nuts might come loose. The
vehicle’s wheel could fall off, causing a
serious accident.
342
Page 343 of 436
14. Install the wheel nuts with the rounded end of
the nuts toward the wheel. Tighten each nut
by hand clockwise until the wheel is held
against the hub.
15. Lower the vehicle by turning the wheel
wrench counterclockwise. Lower the jack
completely.
{CAUTION:
Incorrect wheel nuts or improperly
tightened wheel nuts can cause the wheel
to come loose and even come off. This
could lead to an accident. Be sure to
use the correct wheel nuts. If you have
to replace them, be sure to get new
GM original equipment wheel nuts. Stop
somewhere as soon as you can and have
the nuts tightened with a torque wrench to
the proper torque speci�cation. See
Capacities and Specifications on page 368
for wheel nut torque speci�cation.Notice:Improperly tightened wheel nuts can
lead to brake pulsation and rotor damage.
To avoid expensive brake repairs, evenly
tighten the wheel nuts in the proper sequence
and to the proper torque speci�cation. See
Capacities and Specifications on page 368for
the wheel nut torque speci�cation.
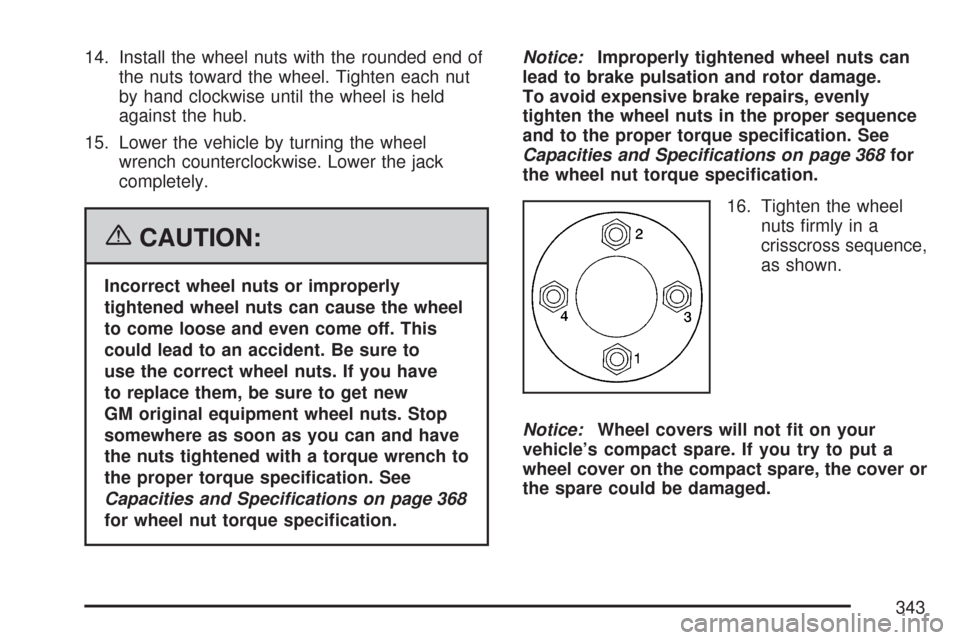
16. Tighten the wheel
nuts firmly in a
crisscross sequence,
as shown.
Notice:Wheel covers will not �t on your
vehicle’s compact spare. If you try to put a
wheel cover on the compact spare, the cover or
the spare could be damaged.
343
Page 346 of 436
Dust may be removed from small buttons and
knobs using a small brush with soft bristles.
Your dealer has a product for cleaning your
vehicle’s glass. Should it become necessary, you
can also obtain a product from your dealer to
remove odors from your vehicle’s upholstery.
Do not clean your vehicle using the following
cleaners or techniques:
•Never use a knife or any other sharp object to
remove a soil from any interior surface.
•Never use a stiff brush. It can cause damage
to your vehicle’s interior surfaces.
•Never apply heavy pressure or rub
aggressively with a cleaning cloth. Use of
heavy pressure can damage your interior
and does not improve the effectiveness of
soil removal.
•Use only mild, neutral-pH soaps. Avoid laundry
detergents or dishwashing soaps with
degreasers. Using too much soap will leave a
residue that leaves streaks and attracts dirt.
For liquid cleaners, about 20 drops per
gallon (3.78 L) of water is a good guide.
•Do not heavily saturate your upholstery while
cleaning.
•Damage to your vehicle’s interior may result
from the use of many organic solvents such as
naptha, alcohol, etc.
Fabric/Carpet
Use a vacuum cleaner with a soft brush
attachment frequently to remove dust and loose
dirt. A canister vacuum with a beater bar in
the nozzle may only be used on floor carpet and
carpeted floor mats. For soils, always try to remove
them first with plain water or club soda. Before
cleaning, gently remove as much of the soil
as possible using one of the following techniques:
•For liquids: gently blot the remaining soil with a
paper towel. Allow the soil to absorb into the
paper towel until no more can be removed.
•For solid dry soils: remove as much as possible
and then vacuum.
346
Page 347 of 436
To clean, use the following instructions:
1. Saturate a lint-free, clean white cloth with
water or club soda.
2. Wring the cloth to remove excess moisture.
3. Start on the outside edge of the soil and gently
rub toward the center. Continue cleaning,
using a clean area of the cloth each time it
becomes soiled.
4. Continue to gently rub the soiled area until the
cleaning cloth remains clean.
5. If the soil is not completely removed, use a
mild soap solution and repeat the cleaning
process that was used with plain water.
If any of the soil remains, a commercial fabric
cleaner or spot lifter may be necessary. When a
commercial upholstery cleaner or spot lifter is to be
used, test a small hidden area for colorfastness
first. If the locally cleaned area gives any
impression that a ring formation may result, clean
the entire surface.
After the cleaning process has been completed, a
paper towel can be used to blot excess moisture
from the fabric or carpet.Leather
A soft cloth dampened with water may be used to
remove dust. If a more thorough cleaning is
necessary, a soft cloth dampened with a mild soap
solution can be used. Allow the leather to dry
naturally. Do not use heat to dry. Never use steam
to clean leather. Never use spot lifters or spot
removers on leather. Many commercial leather
cleaners and coatings that are sold to preserve
and protect leather may permanently change
the appearance and feel of your leather and are
not recommended. Do not use silicone or
wax-based products, or those containing organic
solvents to clean your vehicle’s interior because
they can alter the appearance by increasing
the gloss in a non-uniform manner. Never use
shoe polish on your leather.
347