2007 CHEVROLET AVALANCHE tailgate
[x] Cancel search: tailgatePage 279 of 618

DISPLAY LANGUAGE
This feature allows you to select the language in
which the DIC messages will appear.
Press the customization button until the
DISPLAY LANGUAGE screen appears on the
DIC display. Press the set/reset button once
to access the settings for this feature. Then press
the customization button to scroll through the
following settings:
ENGLISH (default):All messages will appear
in English.
FRANCAIS (French):All messages will appear
in French.
ESPANOL (Spanish):All messages will appear
in Spanish.
NO CHANGE:No change will be made to this
feature. The current setting will remain.
Choose one of the available settings and press
the set/reset button while it is displayed on the
DIC to select it.
You can also change the language by pressing
the trip odometer reset stem. See “Language”
under DIC Operation and Displays (Without DIC
Buttons) earlier in this section for more information.
AUTO DOOR LOCK
This feature allows you to select when the vehicle’s
doors will automatically lock. SeeProgrammable
Automatic Door Locks on page 103for more
information.
Press the customization button until AUTO DOOR
LOCK appears on the DIC display. Press the
set/reset button once to access the settings for this
feature. Then press the customization button to
scroll through the following settings:
SHIFT OUT OF PARK (default):The doors,
including the tailgate, will automatically lock when
the vehicle is shifted out of PARK (P).
AT VEHICLE SPEED:The doors, including
the tailgate, will automatically lock when the
vehicle speed is above 8 mph (13 km/h) for
three seconds.
NO CHANGE:No change will be made to this
feature. The current setting will remain.
Choose one of the available settings and press
the set/reset button while it is displayed on the
DIC to select it.
279
Page 280 of 618

AUTO DOOR UNLOCK
This feature allows you to select whether or not
to turn off the automatic door unlocking feature.
It also allows you to select which doors and
when the doors will automatically unlock. See
Programmable Automatic Door Locks on page 103
for more information.
Press the customization button until AUTO DOOR
UNLOCK appears on the DIC display. Press
the set/reset button once to access the settings
for this feature. Then press the customization
button to scroll through the following settings:
OFF:None of the doors will automatically unlock.
DRIVER AT KEY OUT:Only the driver’s door
will unlock when the key is taken out of the
ignition.
DRIVER IN PARK:Only the driver’s door will
unlock when the vehicle is shifted into PARK (P).ALL AT KEY OUT:All of the doors, including the
tailgate, will unlock when the key is taken out
of the ignition.
ALL IN PARK (default):All of the doors, including
the tailgate, will unlock when the vehicle is
shifted into PARK (P).
NO CHANGE:No change will be made to this
feature. The current setting will remain.
Choose one of the available settings and press
the set/reset button while it is displayed on the
DIC to select it.
REMOTE DOOR LOCK
This feature allows you to select the type of
feedback you will receive when locking the vehicle
with the Remote Keyless Entry (RKE) transmitter.
You will not receive feedback when locking
the vehicle with the RKE transmitter if the doors
are open. SeeRemote Keyless Entry (RKE)
System Operation on page 95for more
information.
280
Page 282 of 618

DELAY DOOR LOCK
This feature allows you to select whether or not
the locking of the vehicle’s doors and tailgate
will be delayed. When locking the doors and
tailgate with the power door lock switch or the
Remote Keyless Entry (RKE) transmitter and
a door or the tailgate is open, this feature will delay
locking the doors and tailgate until �ve seconds
after the last door is closed. You will hear
three chimes to signal that the delayed locking
feature is in use. The key must be out of the
ignition for this feature to work. You can
temporarily override delayed locking by pressing
the power door lock switch or the RKE transmitter
a second time. SeeDelayed Locking on
page 103for more information.
Press the customization button until DELAY
DOOR LOCK appears on the DIC display. Press
the set/reset button once to access the settings
for this feature. Then press the customization
button to scroll through the following settings:
OFF:There will be no delayed locking of
the vehicle’s doors.
ON (default):The doors will not lock until
�ve seconds after the last door or the tailgate
is closed.NO CHANGE:No change will be made to this
feature. The current setting will remain.
Choose one of the available settings and press
the set/reset button while it is displayed on the
DIC to select it.
EXIT LIGHTING
If it is dark enough outside, this feature allows
you to select the amount of time you want
the exterior lamps to remain on. This happens
after the key is turned from RUN to LOCK.
Press the customization button until EXIT
LIGHTING appears on the DIC display. Press the
set/reset button once to access the settings for
this feature. Then press the customization button
to scroll through the following settings:
OFF:The exterior lamps will not turn on.
30 SECONDS (default):The exterior lamps will
stay on for 30 seconds.
1 MINUTE:The exterior lamps will stay on for
one minute.
2 MINUTES:The exterior lamps will stay on for
two minutes.
282
Page 488 of 618

Bulb Replacement
For the proper type of replacement bulbs, see
Replacement Bulbs on page 490.
For any bulb changing procedure not listed in this
section, contact your dealer.
Halogen Bulbs
{CAUTION:
Halogen bulbs have pressurized gas
inside and can burst if you drop or
scratch the bulb. You or others could be
injured. Be sure to read and follow the
instructions on the bulb package.
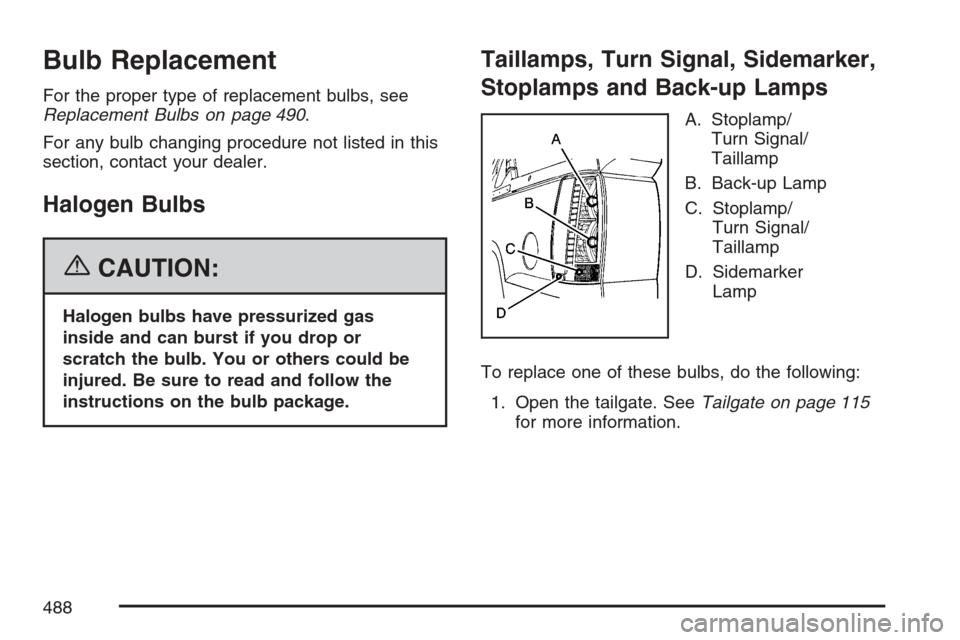
Taillamps, Turn Signal, Sidemarker,
Stoplamps and Back-up Lamps
A. Stoplamp/
Turn Signal/
Taillamp
B. Back-up Lamp
C. Stoplamp/
Turn Signal/
Taillamp
D. Sidemarker
Lamp
To replace one of these bulbs, do the following:
1. Open the tailgate. SeeTailgate on page 115
for more information.
488
Page 569 of 618

(f)Lubricate all key lock cylinders, hood latch
assembly, secondary latch, pivots, spring anchor,
release pawl, midgate hinges, side storage
box door hinges, tailgate hinges, tailgate linkage,
outer tailgate handle pivot points, latch bolt,
fuel door hinge, locks, and folding seat hardware.
More frequent lubrication may be required
when exposed to a corrosive environment.
Applying silicone grease on weatherstrips with a
clean cloth will make them last longer, seal better,
and not stick or squeak.
(g)Check vent hose at transfer case for kinks and
proper installation.
(h)Change automatic transmission �uid and �lter
if the vehicle is mainly driven under one or
more of these conditions:
�In heavy city traffic where the outside
temperature regularly reaches 90°F (32°C)
or higher.
�In hilly or mountainous terrain.
�When doing frequent trailer towing.
�Uses such as found in taxi, police, or
delivery service.(i)Drain, �ush, and re�ll cooling system. This
service can be complex; you should have
your dealer perform this service. See Engine
Coolant on page 457 for what to use. Inspect
hoses. Clean radiator, condenser, pressure cap,
and �ller neck. Pressure test the cooling
system and pressure cap.
(j)A �uid loss in any vehicle system could indicate
a problem. Have the system inspected and
repaired and the �uid level checked. Add �uid if
needed.
(k)Inspect system. Check all fuel and vapor lines
and hoses for proper hook-up, routing, and
condition. Check that the purge valve works
properly, if equipped. Replace as needed.
(l)If you drive regularly under dusty conditions,
inspect the �lter at each engine oil change.
(m)Visually inspect belt for fraying, excessive
cracks, or obvious damage. Replace belt if
necessary.
569
Page 575 of 618

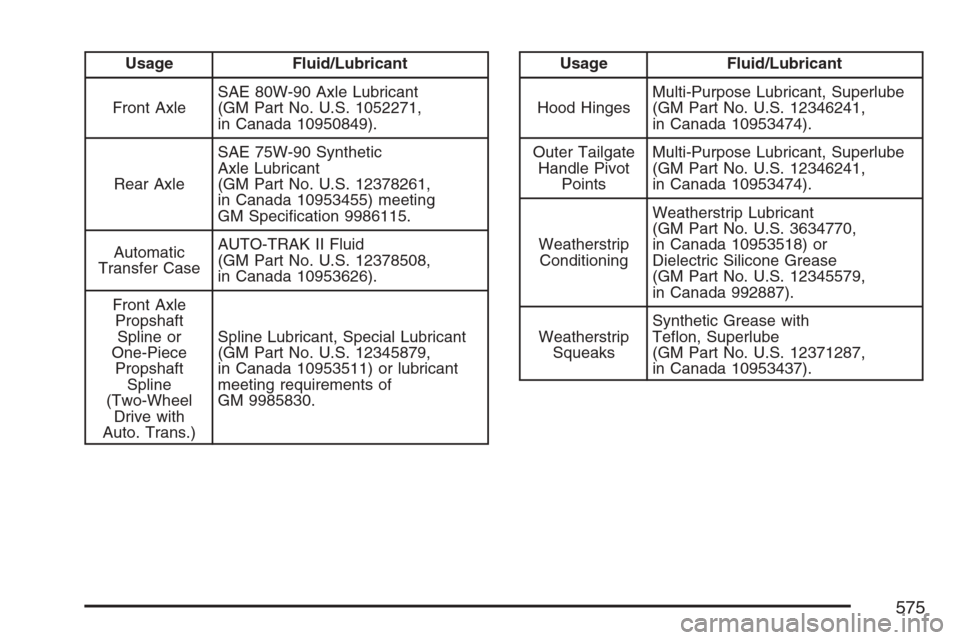
Usage Fluid/Lubricant
Front AxleSAE 80W-90 Axle Lubricant
(GM Part No. U.S. 1052271,
in Canada 10950849).
Rear AxleSAE 75W-90 Synthetic
Axle Lubricant
(GM Part No. U.S. 12378261,
in Canada 10953455) meeting
GM Speci�cation 9986115.
Automatic
Transfer CaseAUTO-TRAK II Fluid
(GM Part No. U.S. 12378508,
in Canada 10953626).
Front Axle
Propshaft
Spline or
One-Piece
Propshaft
Spline
(Two-Wheel
Drive with
Auto. Trans.)Spline Lubricant, Special Lubricant
(GM Part No. U.S. 12345879,
in Canada 10953511) or lubricant
meeting requirements of
GM 9985830.Usage Fluid/Lubricant
Hood HingesMulti-Purpose Lubricant, Superlube
(GM Part No. U.S. 12346241,
in Canada 10953474).
Outer Tailgate
Handle Pivot
PointsMulti-Purpose Lubricant, Superlube
(GM Part No. U.S. 12346241,
in Canada 10953474).
Weatherstrip
ConditioningWeatherstrip Lubricant
(GM Part No. U.S. 3634770,
in Canada 10953518) or
Dielectric Silicone Grease
(GM Part No. U.S. 12345579,
in Canada 992887).
Weatherstrip
SqueaksSynthetic Grease with
Te�on, Superlube
(GM Part No. U.S. 12371287,
in Canada 10953437).
575
Page 616 of 618

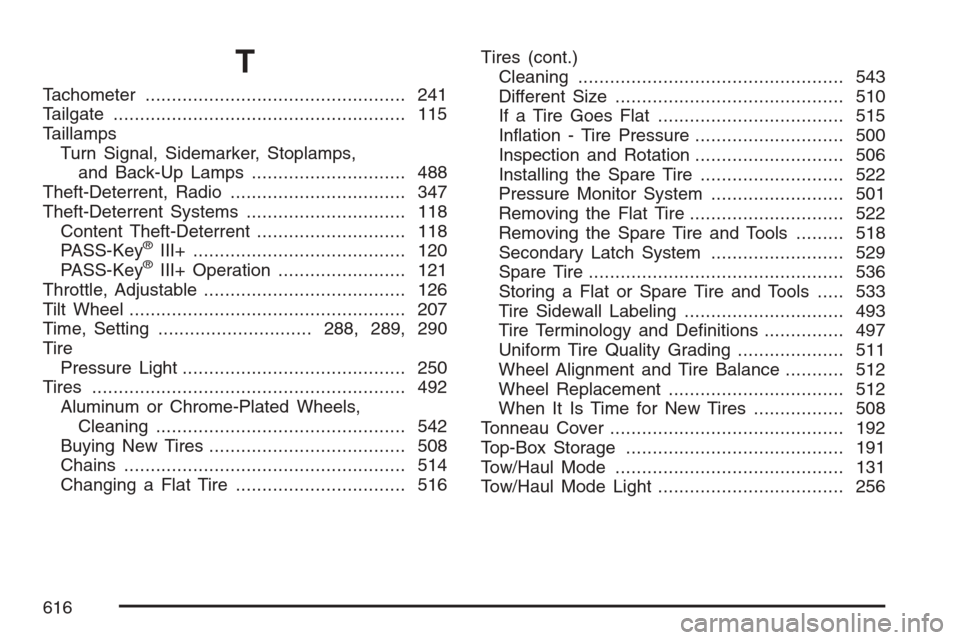
T
Tachometer................................................. 241
Tailgate....................................................... 115
Taillamps
Turn Signal, Sidemarker, Stoplamps,
and Back-Up Lamps............................. 488
Theft-Deterrent, Radio................................. 347
Theft-Deterrent Systems.............................. 118
Content Theft-Deterrent............................ 118
PASS-Key
®III+........................................ 120
PASS-Key®III+ Operation........................ 121
Throttle, Adjustable...................................... 126
Tilt Wheel.................................................... 207
Time, Setting.............................288, 289, 290
Tire
Pressure Light.......................................... 250
Tires........................................................... 492
Aluminum or Chrome-Plated Wheels,
Cleaning............................................... 542
Buying New Tires..................................... 508
Chains..................................................... 514
Changing a Flat Tire................................ 516Tires (cont.)
Cleaning.................................................. 543
Different Size........................................... 510
If a Tire Goes Flat................................... 515
In�ation - Tire Pressure............................ 500
Inspection and Rotation............................ 506
Installing the Spare Tire........................... 522
Pressure Monitor System ......................... 501
Removing the Flat Tire............................. 522
Removing the Spare Tire and Tools......... 518
Secondary Latch System ......................... 529
Spare Tire................................................ 536
Storing a Flat or Spare Tire and Tools..... 533
Tire Sidewall Labeling.............................. 493
Tire Terminology and De�nitions............... 497
Uniform Tire Quality Grading.................... 511
Wheel Alignment and Tire Balance........... 512
Wheel Replacement................................. 512
When It Is Time for New Tires................. 508
Tonneau Cover............................................ 192
Top-Box Storage......................................... 191
Tow/Haul Mode........................................... 131
Tow/Haul Mode Light................................... 256
616