Page 477 of 618

2. Get the vehicles close enough so the jumper
cables can reach, but be sure the vehicles are
not touching each other. If they are, it could
cause a ground connection you do not
want. You would not be able to start your
vehicle, and the bad grounding could damage
the electrical systems.
To avoid the possibility of the vehicles rolling,
set the parking brake �rmly on both vehicles
involved in the jump start procedure. Put
the automatic transmission in PARK (P) or a
manual transmission in NEUTRAL before
setting the parking brake. If you have a
four-wheel-drive vehicle, be sure the transfer
case is in a drive gear, not in NEUTRAL.
Notice:If you leave your radio or other
accessories on during the jump starting
procedure, they could be damaged.
The repairs would not be covered by
your warranty. Always turn off your radio
and other accessories when jump starting
your vehicle.3. Turn off the ignition on both vehicles.
Unplug unnecessary accessories plugged
into the cigarette lighter or the accessory
power outlets. Turn off the radio and all the
lamps that are not needed. This will avoid
sparks and help save both batteries.
And it could save the radio!
4. Open the hood on the other vehicle and locate
the positive (+) and negative (−) terminal
locations on that vehicle.
Your vehicle has a remote positive (+) jump
starting terminal and a remote negative (−)
jump starting terminal. You should always use
these remote terminals instead of the terminals
on the battery.
The remote positive (+) terminal, if equipped, is
located under a red plastic cover at the positive
battery post. To uncover the remote positive (+)
terminal, open the red plastic cover.
477
Page 478 of 618
The remote negative (−) terminal is a stud located
on the right front of the engine, where the
negative battery cable attaches.
SeeEngine Compartment Overview on page 444
for more information on the location of the
remote positive (+) and remote negative (−)
terminals.
{CAUTION:
An electric fan can start up even when the
engine is not running and can injure you.
Keep hands, clothing and tools away from
any underhood electric fan.
{CAUTION:
Using a match near a battery can cause
battery gas to explode. People have
been hurt doing this, and some have
been blinded. Use a �ashlight if you need
more light.
Be sure the battery has enough water.
You do not need to add water to the
battery installed in your new vehicle.
CAUTION: (Continued)
478
Page 485 of 618

What to Use
Refer to the Maintenance Schedule to determine
what kind of lubricant to use. SeeRecommended
Fluids and Lubricants on page 574.
Headlamp Aiming
The vehicle has a visual optical headlamp aiming
system. The aim of the headlamps have been
preset at the factory and should need no further
adjustment.
However, if the vehicle is damaged in an accident,
the aim of the headlamps may be affected and
adjustment may be necessary.
If oncoming vehicles �ash their high beams at
you, this may mean the vertical aim of your
headlamps needs to be adjusted.
It is recommended that the vehicle is taken to
your dealer/retailer/retailer for service if the
headlamps need to be adjusted. It is possible
however, to re-aim the headlamps as described
in the following procedure.The vehicle should be properly prepared as
follows:
The vehicle should be placed so the headlamps
are 25 ft. (7.6 m) from a light colored wall.
The vehicle must have all four tires on a level
surface which is level all the way to the wall.
The vehicle should be placed so it is
perpendicular to the wall.
The vehicle should not have any snow, ice,
or mud on it.
The vehicle should be fully assembled and all
other work stopped while headlamp aiming is
being performed.
The vehicle should be normally loaded
with a full tank of fuel and one person or
160 lbs (75 kg) sitting on the driver’s seat.
Tires should be properly in�ated.
The spare tire is in its proper location in the
vehicle.
Headlamp aiming is done with the vehicle’s
low-beam headlamps. The high-beam headlamps
will be correctly aimed if the low-beam headlamps
are aimed properly.
485
Page 487 of 618
6. Turn on the low-beam headlamps and place a
piece of cardboard or equivalent in front of the
headlamp not being adjusted. This allows
only the beam of light from the headlamp
being adjusted to be seen on the �at surface.
7. Locate the vertical headlamp aiming screws,
which are under the hood near each headlamp
assembly.
The adjustment screw can be turned with
a E8 Torx
®socket.8. Turn the vertical aiming screw until the
headlamp beam is aimed to the horizontal tape
line. Turn it clockwise or counterclockwise to
raise or lower the angle of the beam.
9. Make sure that the light from the headlamp is
positioned at the bottom edge of the horizontal
tape line. The lamp on the left (A) shows
the correct headlamp aim. The lamp on the
right (B) shows the incorrect headlamp aim.
10. Repeat Steps 7 through 9 for the opposite
headlamp.
487
Page 494 of 618
(E) Tire Ply Material:The type of cord and
number of plies in the sidewall and under
the tread.
(F) Uniform Tire Quality Grading (UTQG):
Tire manufacturers are required to grade
tires based on three performance factors:
treadwear, traction, and temperature resistance.
For more information, seeUniform Tire Quality
Grading on page 511.
(G) Maximum Cold In�ation Load Limit:
Maximum load that can be carried and the
maximum pressure needed to support that load.
For information on recommended tire pressure
seeIn�ation - Tire Pressure on page 500
andLoading Your Vehicle on page 402.
(A) Tire Size:The tire size code is a combination
of letters and numbers used to de�ne a particular
tire’s width, height, aspect ratio, construction
type, and service description. See the “Tire Size”
illustration later in this section for more detail.
Light Truck (LT-Metric) Tire
494
Page 496 of 618

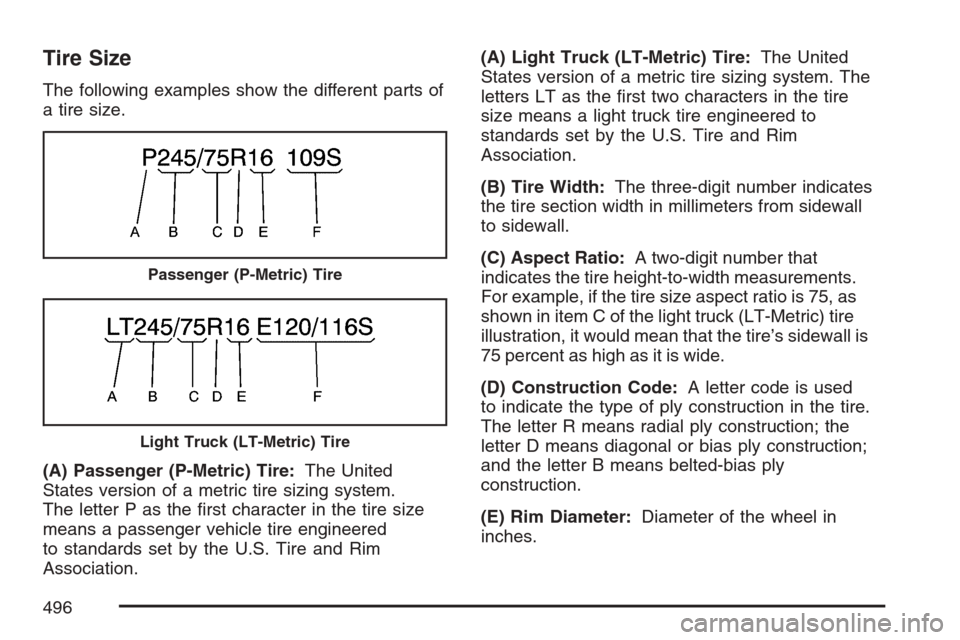
Tire Size
The following examples show the different parts of
a tire size.
(A) Passenger (P-Metric) Tire:The United
States version of a metric tire sizing system.
The letter P as the �rst character in the tire size
means a passenger vehicle tire engineered
to standards set by the U.S. Tire and Rim
Association.(A) Light Truck (LT-Metric) Tire:The United
States version of a metric tire sizing system. The
letters LT as the �rst two characters in the tire
size means a light truck tire engineered to
standards set by the U.S. Tire and Rim
Association.
(B) Tire Width:The three-digit number indicates
the tire section width in millimeters from sidewall
to sidewall.
(C) Aspect Ratio:A two-digit number that
indicates the tire height-to-width measurements.
For example, if the tire size aspect ratio is 75, as
shown in item C of the light truck (LT-Metric) tire
illustration, it would mean that the tire’s sidewall is
75 percent as high as it is wide.
(D) Construction Code:A letter code is used
to indicate the type of ply construction in the tire.
The letter R means radial ply construction; the
letter D means diagonal or bias ply construction;
and the letter B means belted-bias ply
construction.
(E) Rim Diameter:Diameter of the wheel in
inches.
Passenger (P-Metric) Tire
Light Truck (LT-Metric) Tire
496
Page 498 of 618

GVWR:Gross Vehicle Weight Rating. See
Loading Your Vehicle on page 402.
GAWR FRT:Gross Axle Weight Rating for the
front axle. SeeLoading Your Vehicle on page 402.
GAWR RR:Gross Axle Weight Rating for the
rear axle. SeeLoading Your Vehicle on page 402.
Intended Outboard Sidewall:The side of an
asymmetrical tire, that must always face outward
when mounted on a vehicle.
Kilopascal (kPa):The metric unit for air pressure.
Light Truck (LT-Metric) Tire:A tire used on
light duty trucks and some multipurpose passenger
vehicles.
Load Index:An assigned number ranging from
1 to 279 that corresponds to the load carrying
capacity of a tire.
Maximum In�ation Pressure:The maximum
air pressure to which a cold tire may be in�ated.
The maximum air pressure is molded onto the
sidewall.Maximum Load Rating:The load rating for a tire
at the maximum permissible in�ation pressure
for that tire.
Maximum Loaded Vehicle Weight:The sum of
curb weight, accessory weight, vehicle capacity
weight, and production options weight.
Normal Occupant Weight:The number of
occupants a vehicle is designed to seat multiplied
by 150 lbs (68 kg). SeeLoading Your Vehicle
on page 402.
Occupant Distribution:Designated seating
positions.
Outward Facing Sidewall:The side of an
asymmetrical tire that has a particular side that
faces outward when mounted on a vehicle.
The side of the tire that contains a whitewall, bears
white lettering, or bears manufacturer, brand,
and/or model name molding that is higher
or deeper than the same moldings on the other
sidewall of the tire.
Passenger (P-Metric) Tire:A tire used on
passenger cars and some light duty trucks and
multipurpose vehicles.
498
Page 502 of 618

When a low tire pressure condition is detected,
the TPMS will illuminate the low tire pressure
warning symbol located on the instrument panel
cluster. If your vehicle has the DIC feature, a
message to check the pressure in a speci�c tire
will also appear on the DIC display. The low
tire pressure warning symbol on the instrument
panel cluster and the CHECK TIRE PRESSURE
warning message on the DIC display will appear at
each ignition cycle until the tires are in�ated to
the correct in�ation pressure. For additional
information and details about the DIC operation
and displays seeDIC Operation and Displays
(With DIC Buttons) on page 258orDIC Operation
and Displays (Without DIC Buttons) on page 264
andDIC Warnings and Messages on page 267.
You may notice, during cooler weather conditions,
that the tire pressure monitor light, located on
the instrument panel cluster, and the CHECK TIRE
PRESSURE message will appear when the
vehicle is �rst started and then turn off as you
start to drive the vehicle. This could be an early
indicator that the tire pressures are getting low and
need to be in�ated to the proper pressure.Each tire, including the spare (if provided), should
be checked monthly when cold and in�ated to
the in�ation pressure recommended by the
vehicle manufacturer on the vehicle placard or tire
in�ation pressure label. (If your vehicle has tires
of a different size than the size indicated on
the vehicle placard or tire in�ation pressure label,
you should determine the proper tire in�ation
pressure for those tires.)
As an added safety
feature, your vehicle
has been equipped
with a tire pressure
monitoring system
(TPMS) that illuminates
a low tire pressure
telltale when one
or more of your tires
is signi�cantly
under-in�ated.
502