Page 242 of 512

Alpha-Numeric Keypad
Letters of the alphabet, symbols, punctuation, and
numbers, when available to you, will be displayed
on the navigation screen as an alpha or numeric
keypad. The alpha keypad will be displayed when
the system needs you to input a city or street
name. You can also touch Char at the bottom of
the alpha keypad to access the numeric keypad
when inputting a house address, punctuation mark,
or other character. Touch A - Z to return to the
alpha keypad.
All characters are touch-sensitive screen buttons.
Touch a character to select it.
Select the space symbol to enter a space between
characters or the words of a name.
V:Select the backspace symbol if you have
selected an incorrect character.
To make your name selections easier, the system
will only allow you to select a character which
can follow the last one entered. For example, if
you enter Z, you would not be allowed to follow it
with T. The system will highlight the available
characters and darken the unavailable characters.If you are unsuccessful when inputting a name, it
may need to be selected differently. It is also
possible that the map DVD database may
not contain that information or the correct search
area has not been selected. SeeDatabase
Coverage Explanations on page 284for more
information.
Touch Sensitive Buttons
Touch-sensitive buttons, or screen buttons, are
located on the screen. When you have
successfully selected a screen button, a beep will
be heard. These buttons will be highlighted
when a feature is available and dim when they are
unavailable. There are some toggle screen
buttons that will be light blue when active and dark
blue when inactive.
242
Page 247 of 512

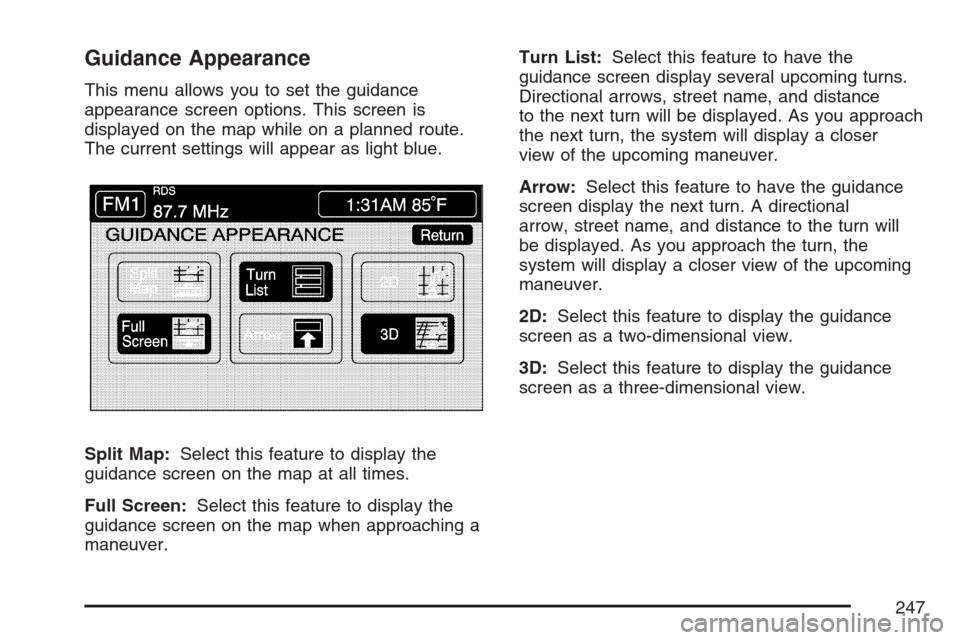
Guidance Appearance
This menu allows you to set the guidance
appearance screen options. This screen is
displayed on the map while on a planned route.
The current settings will appear as light blue.
Split Map:Select this feature to display the
guidance screen on the map at all times.
Full Screen:Select this feature to display the
guidance screen on the map when approaching a
maneuver.Turn List:Select this feature to have the
guidance screen display several upcoming turns.
Directional arrows, street name, and distance
to the next turn will be displayed. As you approach
the next turn, the system will display a closer
view of the upcoming maneuver.
Arrow:Select this feature to have the guidance
screen display the next turn. A directional
arrow, street name, and distance to the turn will
be displayed. As you approach the turn, the
system will display a closer view of the upcoming
maneuver.
2D:Select this feature to display the guidance
screen as a two-dimensional view.
3D:Select this feature to display the guidance
screen as a three-dimensional view.
247
Page 248 of 512
Map Appearance
This menu allows you to set the map appearance
screen options. The current setting will appear
as light blue.
2D:Select this feature to display the map as a
two-dimensional view.
3D:Select this feature to display the map as a
three-dimensional view.Set 3D Viewing Angle:This feature allows you
to adjust the 3D viewing angle. To do so, do
the following:
1. Touch 3D on the MAP APPEARANCE menu.
2. Touch Set 3D Viewing Angle.
The map screen with the 3D viewing angle
bar will be displayed.
3. Touch the up or down arrows to set the
viewing angle.
4. Touch Return to save your settings and to exit
this menu or touch Reset to restore the
viewing angle to the default setting.
248
Page 288 of 512

GPS TIME:The current GPS time will be
displayed to the right of this screen button. Touch
GPS TIME to set the navigation system time to
match current GPS time. If the seconds for
the present minute are greater than thirty when
GPS TIME is selected, the clock will round
up to the next minute.
Daylight Saving Time:Touch this screen button
to increase the time setting by one hour. Then
touch GPS TIME to save the new setting. If
the screen button is light blue, the daylight savings
time feature is on. If the button is dark blue, the
daylight savings time feature is off.
TIME ZONE:The selected time zone will appear
to the right of this screen button. Touch this
screen button to toggle between time zones and
select the desired one. The time of the selected
zone will be displayed to the right of the GPS TIME
screen button. To set the clock to the new
setting, touch GPS TIME.
If the system is not receiving GPS information,
you can still set the time manually as described
above but the GPS time and Daylight Saving Time
features will not be available.
Touch Return to go back to the previous menu.Screen Adjust Menu
The following options are available from
this menu:
K(Contrast):Touch the plus (+) or minus (−)
signs to adjust the contrast of the screen.
You will see the screen change. Touch SET to
con�rm the setting.
!(Brightness):Touch the plus (+) or minus (−)
signs to adjust the brightness of the screen.
You will see the screen change. Touch SET to
con�rm the setting.
288