Page 49 of 132

Reference
At a glance
Controls
Driving tips
Mobility
47
To accelerate using the lever
Press the lever, arrow1, until the desired speed
is reached.
The vehicle accelerates without pressure on
the accelerator pedal. The system stores and
maintains the speed.
To decrease speed
Pull the lever repeatedly, arrow2, until the
desired speed is reached.
Functions are the same as with increasing
speed or accelerating, except the speed is
decreased.
Deactivating cruise control
Tap the lever upwards or downwards, arrow4.
In addition, the system is automatically deacti-
vated:
>When you brake the vehicle
>When you engage the clutch or shift to idle
in cars with manual transmission
>When you select the automatic transmis-
sion's neutral position N
>When you drive faster or slower than the set
speed for a longer period of time, e.g. by
pressing the accelerator pedal
>When the DSC comes on
You can recall the speed last stored.
To recall the stored speed
Briefly press the button, arrow 3. The speed last
stored is achieved again and maintained.
The stored speed is deleted as soon as the igni-
tion is switched off.
Page 50 of 132

Everything under control
48
Everything under control
Odometer
1Odometer
2Trip odometer
3Resetting trip odometer
4Outside temperature or computer dis-
plays
*
Trip odometer
Resetting trip odometer:
While the ignition is switched on, press button 3
in the instrument cluster until the trip odometer
is set to zero.
Outside temperature display, clock*
Setting the clock, refer to page50.
Outside temperature warning
If the outside temperature drops to approx.
377/+36, the computer automatically
switches to the outside temperature display.
A signal also sounds and the display flashes for
a short time. There is an increased risk of black
ice.
After an outside temperature warning has
been issued, the computer switches back
to its previous screen. You can have this acti-
vated/deactivated.<
Black ice can also form at temperatures
above 377/+36. You should therefore
drive carefully on bridges and shaded roads, for
example, otherwise there is an increased risk of
an accident.<
When the vehicle is parked
If you still want to view the time and odometer
reading briefly after the ignition has been
switched off or the key has been removed:
Press button 3 in the instrument cluster.
Tachometer
Never allow the engine to operate with the nee-
dle in the red overspeed sector of the gauge.
To protect the engine, the fuel supply is inter-
rupted when speed reaches this sector.
Fuel gauge
Fuel tank capacity: approx. 14.5 US gallons/
55 liters. You can find information on refueling
on page82.
If the tilt of the vehicle varies for a longer period,
when you are driving in mountainous areas, for
example, the indicator may fluctuate slightly.
Page 51 of 132

Reference
At a glance
Controls
Driving tips
Mobility
49
Reserve
Once the fuel level has fallen to the reserve
zone of approx. 2.1 US gallons/8 liters, indicator
lamp 1 lights up continuously.
Do not drive until the fuel tank is empty
and refill it well in advance. Otherwise the
engine may not operate properly and damage
could result.<
When you switch on the ignition, the indicator
lamp comes on briefly to indicate an operational
check.
Engine coolant temperature
gauge
Blue
The engine is still cold. Drive at moderate
engine and vehicle speeds.
Between the blue and red zones
Normal operating range. The needle may rise as
far as the edge of the red sector during normal
operation.
Red
When you switch on the ignition, warning
lamp1 comes on briefly to indicate an opera-
tional check.
Comes on while driving:
The engine has overheated. Stop and switch
the engine off immediately and allow it to cool
down.
For checking the coolant level, refer to page94.
Service interval display
The remaining driving distance in miles/km until
the next scheduled service is displayed briefly
immediately after you start the engine or switch
on the ignition.
The words OILSERVICE or INSPECTION indi-
cate the type of service due next. The computer
bases its calculations of the remaining driving
distance on the preceding driving style.
A flashing message and a minus sign in front of
the number mean that the service interval has
already been exceeded by the number of miles/
kilometers shown on the display. Please sched-
ule an appointment with your BMW center or a
workshop that works according to BMW repair
procedures with correspondingly trained per-
sonnel.
The extent of service work required can
be read out from the remote control by
your BMW Service Advisor.<
Clock
If you wish to have a permanent time display,
you can have it appear in the car radio display,
refer to the Owner's Manual for Radio.
You can set the time and the time display in the
car radio as follows.
Page 52 of 132

Everything under control
50
Setting the clock
1.Press button 2 for several seconds until the
hours are displayed and the colon flashes.
2.Press button1 repeatedly until the required
hour is set.
3.Press button2 to switch to the minutes dis-
play.
4.Press button1 repeatedly until the required
minutes are set.
5.Press button2 to confirm the time.
The set time of day is transferred to the car
radio display or appears in the instrument clus-
ter display.
Computer*
To view the information on the instrument clus-
ter display, press the onboard computer button
BC in the turn signal lever.
Each time you tap the onboard computer but-
ton, the following information is shown in the
specified order:
>Time
>Outside temperature
>Average fuel consumption
>Cruising range>Average speed
With the ignition key in position 1 or higher, the
respective last active setting is displayed.
If you wish, you can have all the following
information displayed in another unit of
measure.<
Setting the time format
You can have the clock displayed in 12h or 24h
mode:
While the time display is active, press the
onboard computer button BC in the turn signal
lever until the display changes.
Changing unit of measure: °F/°C
While the outside temperature display is active,
press the onboard computer button BC in the
turn signal lever until the display changes.
Average fuel consumption
The average fuel consumption is calculated for
the time for which the engine has been running.
To reset the average fuel consumption display:
Press the onboard computer button BC in the
turn signal lever for approx. 2 seconds.
Cruising range
The computer bases its calculations of the
cruising range on the preceding driving style
and on the amount of fuel remaining in the tank.
B e s u r e t o r e f u e l a s s o o n a s p o s s i b l e o n c e
your cruising range falls below 30 miles/
50 km, otherwise engine functions are not
ensured and damage can occur.<
Average speed
The average speed is calculated for the time for
which the engine has been running.
To reset the average speed display:
Press the onboard computer button BC in the
turn signal lever for approx. 2 seconds.
Page 53 of 132

Reference
At a glance
Controls
Driving tips
Mobility
51
Technology for driving comfort and safety
Driving stability control
systems
Your BMW is equipped with a s eries of systems
that help maintain driving stability even in
adverse driving situations.
Antilock Brake System ABS
ABS keeps the wheels from locking during
braking. Steering stability is maintained even
during full brake applications. In this way, active
safety is enhanced.
ABS is operational each time the engine is
started. Braking safely, refer to page75.
Electronic brake-force distribution
The system controls brake-force application at
the rear wheels in order to obtain increased sta-
bility in the vehicle's braking response.
Dynamic Brake Control DBC
When you apply the brakes rapidly, this system
automatically produces the maximum braking
force boost and thus helps to achieve the short-
est possible braking distance during full brak-
ing. At the same time, the benefits of the ABS
are also exploited.
As long as you want full braking to continue, do
not reduce pressure on the brake.
Dynamic Stability Control DSC
DSC prevents slip at the drive wheels while
starting off and accelerating the vehicle. DSC
also recognizes unstable vehicle conditions,
such as fishtailing or nose-diving. In these
cases, and subject to physical limits, DSC helps
to keep the vehicle on a steady course by
reducing engine speed and by applying brakes
at individual wheels.
The laws of physics cannot be repealed
even with DSC. It will always be the
driver's responsibility to drive in a manner that
matches road conditions. Therefore, do not limit the additional safety margin by practicing
risky driving.<
Deactivating DSC
Press the button for at least 3 seconds; the indi-
cator lamp for DSC lights up in the instrument
cluster. Dynamic Traction Control DTC and
DSC have been deactivated simultaneously. No
more interventions to increase stability and for-
ward momentum are carried out.
To enhance vehicle stability, reactivate DSC as
soon as possible.
Activating DSC
Press the button again; the indicator lamp goes
out in the instrument cluster.
Checking
The indicator lamp flashes:
DSC controls the drive forces and
brake forces.
The indicator lamp is lit:
DSC has been deactivated completely.
Dynamic Traction Control DTC
DTC is a variant of the DSC in which forward
momentum is optimized for special road condi-
tions, e.g. snow-covered roads that have not
yet been cleared. The system ensures maxi-
mum forward momentum, but driving stability is
limited. Therefore, drive carefully in accordance
with conditions.
Page 54 of 132

Technology for driving comfort and safety
52 In the following exceptional circumstances, it
may be effective to activate the DTC for a short
period:
>When driving on snow-covered grades, in
slush or on uncleared, snow-covered roads
>When rocking the vehicle or starting off in
deep snow or on loose surfaces
>When driving with snow chains
Activating DTC
Press the button briefly; the DTC indicator lamp
lights up in the instrument cluster.
Checking
Deactivating DTC
Press the button again; the DTC indicator lamp
in the instrument cluster goes out.
Malfunction in the driving stability
control systems
Have the system checked as soon as possible.Drive cautiously, think well ahead and
avoid full brake applications, otherwise
unstable driving conditions could result.<
The vehicle remains operational. Have the sys-
tem checked as soon as possible.
Drive cautiously and think well ahead,
otherwise unstable driving conditions
could result.<
Drive-off assistant
The drive-off assistant enables you to drive off
smoothly on uphill gradients. It is not necessary
to use the parking brake for this.
1.Hold the car in place by depressing the
brake.
2.Release the brake and drive off without
delay.
The drive-off assistant holds the car in
place for approx. 2 seconds after the
brake is released. Depending on vehicle load,
the car may roll backwards a little during this
time span. Drive off without delay after releas-
ing the brake. Otherwise, the drive-off assistant
will no longer hold the car in place after approx.
2 seconds and the car will start to roll back-
wards.< The indicator lamp flashes:
DTC controls the drive forces and
brake forces.
The indicator lamp is lit:
DTC has been activated.
The warning lamp for the brake system
lights up in red, together with the yel-
low indicator lamps for ABS and DSC:
The driving stability control systems
have failed.
Canadian models display these warn-
ing lamps.
The DSC warning lamp lights up
together with the yellow warning lamp
for the brake system:
DSC, including DTC and DBC, are
malfunctioning.
Canadian models display these warn-
ing lamps.
Page 55 of 132

Reference
At a glance
Controls
Driving tips
Mobility
53
Malfunction
The warning lamp for the brake system
lights up in yellow. The drive-off assis-
tant has failed. The car will not be held
in place after the brake is released. Have the
system checked as soon as possible.
Flat Tire Monitor FTM*
The concept
The Flat Tire Monitor monitors tire pressures
while the car is being driven. The system
reports any significant loss of pressure in one
tire in relation to another.
In the event of tire pressure loss, the rolling
radius of the tire changes, thereby affecting the
rotational speed of the wheels. This change is
detected, and a flat tire warning is issued to the
driver.
System requirements
To ensure a reliable flat tire warning, the system
must be initialized with the correct tire inflation
pressures.
The system must be reinitialized each
time a tire inflation pressure has been cor-
rected or a wheel or tire has been changed.<
System limitations
The Flat Tire Monitor is unable to warn
the driver of sudden, severe tire damage
caused by external factors, nor can it identify
the gradual loss of pressure that will inevitably
occur in all four tires over a lengthy period of
time.<
The system could issue a false warning or func-
tion in a delayed manner in the following situa-
tions:
>System was not initialized
>Driving on a snow-covered or slippery road
surface
>Performance-oriented driving: slip at the
drive wheels, high levels of lateral accelera-
tion
>Driving with snow chains attached
Initializing the system
The initialization is completed while you
are driving, and can be interrupted at any
time. Initialization is continued automatically
when you continue driving.
When driving with snow chains, do not initialize
the system.<
1.Start the engine immediately before pulling
away, but do not drive off yet.
2.Press the button until the yellow indicator
lamp in the instrument cluster lights up for a
few seconds.
3.Drive off.
Initialization is completed during the drive,
without any feedback issued.
Flat tire warning
The warning lamp in the instrument
cluster lights up in red. A signal also
sounds. There is a flat tire or a signifi-
cant loss of tire pressure.
1.Cautiously reduce speed to 50 mph/
80 km/h or lower. Avoid strong braking and
steering maneuvers. Do not exceed a maxi-
mum speed of 50 mph/80 km/h.
If the car is not equipped with Run-
Flat Tires, refer to page88, the stan-
dard equipment by design, do not continue
driving. Otherwise a severe accident could
result after a tire puncture.<
2.At the next opportunity, check the air pres-
sure in all four tires.
If the inflation pressure is correct in all
four tires, it is possible that the Flat
Tire Monitor was not initialized. In this case,
initialize the system.<
Page 56 of 132

Technology for driving comfort and safety
54 3.In the event of complete tire pressure loss,
0 psi/0 kilopascal, you can estimate the
possible distance for continued driving on
the basis of the following guidelines:
>With a light load:
1 person without luggage:
approx. 155 miles/250 km
>With a medium load:
1 person, cargo bay full,
or
2 persons without luggage:
approx. 90 miles/150 km
>With a full load:
2 persons, cargo bay full:
approx. 30 miles/50 km
Drive cautiously. Do not exceed a speed
of 50 mph/80 km/h. Driving characteris-
tics change if there is a loss of tire pressure.
This includes reduced tracking stability in brak-
ing, extended braking distance and altered nat-
ural steering characteristics.
If unusual vibration or loud noises occur during
the journey, this may be an indication that the
damaged tire has finally failed. Reduce your
speed and pull over to the side of the road at the
earliest opportunity. Otherwise, parts of the tire
could come loose and cause an accident. Do
not continue driving. Contact a BMW center.<
Tire Pressure Monitor TPM*
The concept
TPM monitors the tire inflation pressure in all
four mounted tires. The system reports if infla-
tion pressure has dropped significantly in one
or more of the tires.
System requirements
To ensure a reliable flat tire warning, the system
must have been reset while tire inflation pres-
sures were correct.
Always use tires with TPM electronics to
ensure that the system operates properly.The system must be reset each time a tire
inflation pressure has been corrected or a
wheel or tire has been changed.<
System limitations
TPM cannot report sudden serious tire
damage due to external causes.<
The system will not operate correctly if it was
not reset, e.g. it may report a flat tire even if the
tire inflation pressures are correct.
The system is inactive and cannot indicate a flat
tire if a wheel without TPM electronics is
mounted or if other systems or devices that use
the same radio frequency temporarily interfere
with the TPM system.
Resetting the system
The system must be reset each time a tire
inflation pressure has been corrected or a
wheel or tire has been changed.<
1.Start the engine but do not drive off yet.
2.Press the button until the yellow warning
lamp in the instrument cluster lights up for a
few seconds.
3.Drive off.
After several minutes of driving, the current
inflation pressures in the tires are adopted
as the target values to be monitored. The
resetting procedure is completed automat-
ically without further notice during the trip,
which can be interrupted at any time.
Resetting is continued automatically when
you continue driving.
 1
1 2
2 3
3 4
4 5
5 6
6 7
7 8
8 9
9 10
10 11
11 12
12 13
13 14
14 15
15 16
16 17
17 18
18 19
19 20
20 21
21 22
22 23
23 24
24 25
25 26
26 27
27 28
28 29
29 30
30 31
31 32
32 33
33 34
34 35
35 36
36 37
37 38
38 39
39 40
40 41
41 42
42 43
43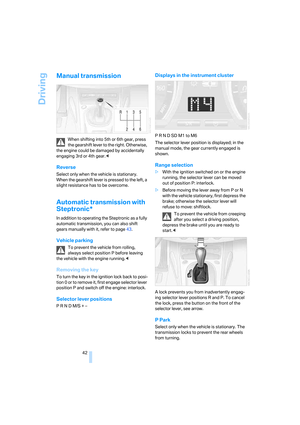 44
44 45
45 46
46 47
47 48
48 49
49 50
50 51
51 52
52 53
53 54
54 55
55 56
56 57
57 58
58 59
59 60
60 61
61 62
62 63
63 64
64 65
65 66
66 67
67 68
68 69
69 70
70 71
71 72
72 73
73 74
74 75
75 76
76 77
77 78
78 79
79 80
80 81
81 82
82 83
83 84
84 85
85 86
86 87
87 88
88 89
89 90
90 91
91 92
92 93
93 94
94 95
95 96
96 97
97 98
98 99
99 100
100 101
101 102
102 103
103 104
104 105
105 106
106 107
107 108
108 109
109 110
110 111
111 112
112 113
113 114
114 115
115 116
116 117
117 118
118 119
119 120
120 121
121 122
122 123
123 124
124 125
125 126
126 127
127 128
128 129
129 130
130 131
131