Ignition switch and
steering lockKeysYou receive one master key and
one spare key.
Ignition switch and steering lock,
tank filler cap lock and seat lock
are all operated with the same
key.Switching on ignitionTurn the key to position1.
Side light and all function cir-
cuits switched on.
Engine can be started.Pre-ride check is performed.
( 47)
with OE BMW Motorrad ABS:
Turn the key to position1.
ABS self-diagnosis is
performed in addition to
the checks outlined above.
( 48)
Switching off ignitionTurn the key to position2.
Lights switched off.
Handlebars not locked.
Key can be removed.
Locking handlebarsTurn the handlebars all the way
to the left
Turn the key to position3,
while moving the handlebars
slightly.
Ignition, lights and all function
circuits switched off.
Handlebars locked.
Key can be removed.Multifunction displaySelecting readingsSwitch on the ignition.
428zOperation
Use the ignition key to turn
seat lock1counter-clockwise
and hold it in this position.
Lift seat2at the rear and re-
lease the key.
Remove the seat.Place the seat, upholstered
side down, on a clean surface.
Installing seat
If too much pressure is ap-
plied in the forward direc-
tion, there is a danger that the
motorcycle will be pushed off its
stand.
Always make sure that the
motorcycle is stable and firmly
supported.
Push seat2forward into
mount3.
Firmly press down on the seat
at the rear.The seat engages with an aud-
ible click.
Check that the seat is secure.
442zOperation
NotesThe Maintenance chapter de-
scribes straightforward proced-
ures for checking and replacing
certain wear parts.
Special tightening torques are lis-
ted as applicable. The tightening
torques for the threaded fasten-
ers on your motorcycle are listed
in the section entitled "Technical
data".
You will find information on more
extensive maintenance and re-
pair work in the Repair Manual
on DVD/CD-ROM (RepROM) for
your motorcycle, which is avail-
able from your authorised BMW
Motorrad dealer.
Some of the work calls for spe-
cial tools and a thorough know-
ledge of motorcycles. If you
are in doubt consult a specialist
workshop, preferably your author-
ised BMW Motorrad dealer.
ToolkitStandard on-board toolkit1 Fuse puller
Replacing fuses
2 Open-ended spanner, w/f
8/10
Adjusting chain tension
3 Open-ended spanner, w/f
19
Adjusting mirror arm
4 Open-ended spanner, w/f
19
Adjusting mirror arm5 Screwdriver handle
Holder for screwdriver blade9
6 3 mm Allen key
Replacing headlight bulb
7 4 mm Allen key
Removing and installing body
panels
8 6 mm Allen key
Adjusting headlight beam throw
9 Screwdriver blade
Star-head and flat-tip blade
Adjusting rear suspension
damping
864zMaintenance
10 Screwdriver, small
Replacing turn indicator bulbsOn-board toolkit service
kitYour authorised BMW Motor-
rad dealer can provide the on-
board toolkit service kit that you
will need if you are considering
undertaking more extensive work.
You will find information on un-
dertaking work of this nature in
the Repair Manual on the CD or
DVD also obtainable from your
authorised BMW Motorrad deal-
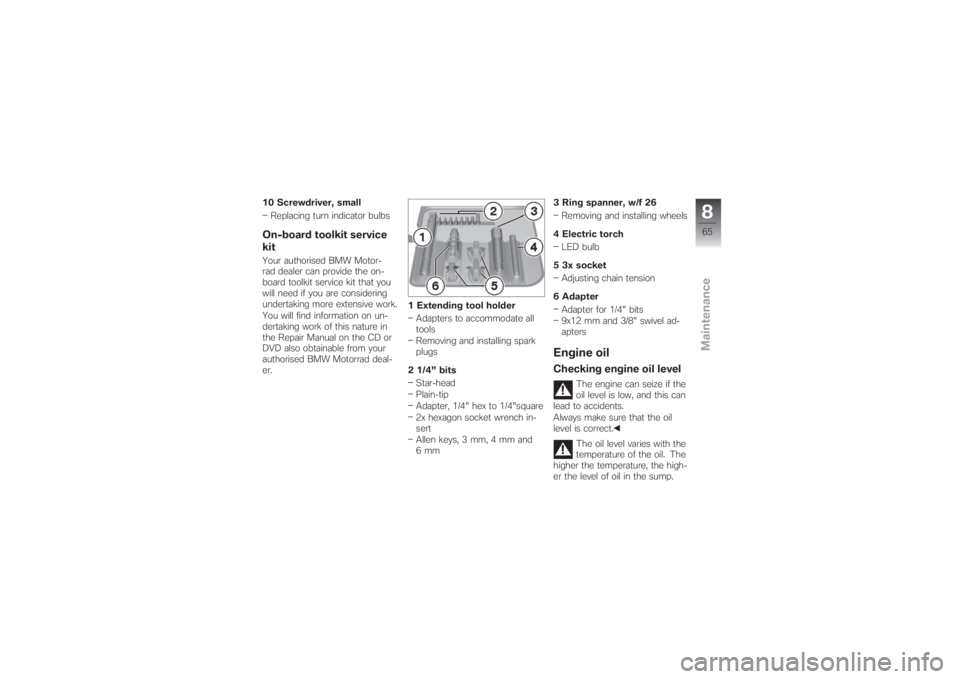
er.1 Extending tool holder
Adapters to accommodate all
tools
Removing and installing spark
plugs
2 1/4" bits
Star-head
Plain-tip
Adapter, 1/4" hex to 1/4"square
2x hexagon socket wrench in-
sert
Allen keys, 3 mm, 4 mm and
6mm3 Ring spanner, w/f 26
Removing and installing wheels
4 Electric torch
LED bulb
5 3x socket
Adjusting chain tension
6 Adapter
Adapter for 1/4" bits
9x12 mm and 3/8" swivel ad-
apters
Engine oilChecking engine oil level
The engine can seize if the
oil level is low, and this can
lead to accidents.
Always make sure that the oil
level is correct.
The oil level varies with the
temperature of the oil. The
higher the temperature, the high-
er the level of oil in the sump.
865zMaintenance
Ignition
Switching on and off, 28
Ignition switch, 27
Instrument cluster
Overview, 17
J
Jump starting, 95
K
Keys, 28
L
Laying up, 106
Lights
High-beam headlight, 31
Low-beam headlight, 31
Side light, 31
Low-beam headlight, 18
Luggage
Correct loading, 61
M
Maintenance, 123
Notes, 64Mirrors
Adjusting, 33
Motorcycle
Care, 103
Laying up, 106
Overview, 11, 13
Parking, 51
Restoring to use, 106
Multifunction display
See display, 17
N
Number-plate carrier
Removing and installing, 100
O
Odometer and tripmeters, 20
Resetting, 17, 29
Off-roading
Notes, 49
P
Pneumatic pump, 34
Removing and installing, 34
Power socket, 11, 60
Pre-ride check, 47R
Rear-wheel drive
Technical data, 113
Refuelling, 52
Restoring to use, 106
Rider's Manual
Stowage, 14
Running gear
Technical data, 113
Running in, 48
S
Safety instructions, 44
Seat
Lock, 13
Removing and installing, 41
Service, 122
Service Card, 122
Side light, 18
Spark plugs
Technical data, 117
Speedometer, 20
Standards, 7
Starter, 16
Starting, 46
12133zIndex