2007 BMW 760LI SEDAN radio controls
[x] Cancel search: radio controlsPage 41 of 253
Controls
39Reference
At a glance
Driving tips
Communications
Navigation
Entertainment
Mobility
Unlocking the luggage compartment
lid separately
Press the button on the outside of the luggage
compartment lid, refer to page35. This corre-
sponds to pressing the button.
If a remote control accidentally left in the
luggage compartment is detected in the
locked vehicle, then the luggage compartment
lid opens again.<
Radio ready state
By briefly pressing the Start/Stop button, you
switch on the radio ready state, refer to
page57.
When doing so, do not depress the brake
pedal; otherwise, the engine will start.<
Starting the engine
You can start the engine or switch on the igni-
tion, as long as a remote control is in the pas-
senger compartment. The remote does not
have to be inserted into the ignition lock, refer to
page57.
Before driving into a car wash
1.Insert remote control into ignition lock.
2.Shift transmission into position N.
3.Switch engine off.
4.Leave the remote control in the ignition
lock.
The vehicle can roll.
Malfunction
Local radio waves can disrupt the function of
Comfort Access. Should the remote control fail
to operate due to interference of this kind, you
can respond by using the buttons on the remote
control or by using a key to unlock or lock your
vehicle at one of the doors. To start the engine
after this, insert the remote control into the igni-
tion lock.
Changing battery
The remote control for Comfort Access con-
tains a battery that must be replaced when it
becomes discharged.
1.Remove the integrated key from the remote
control, refer to page30.
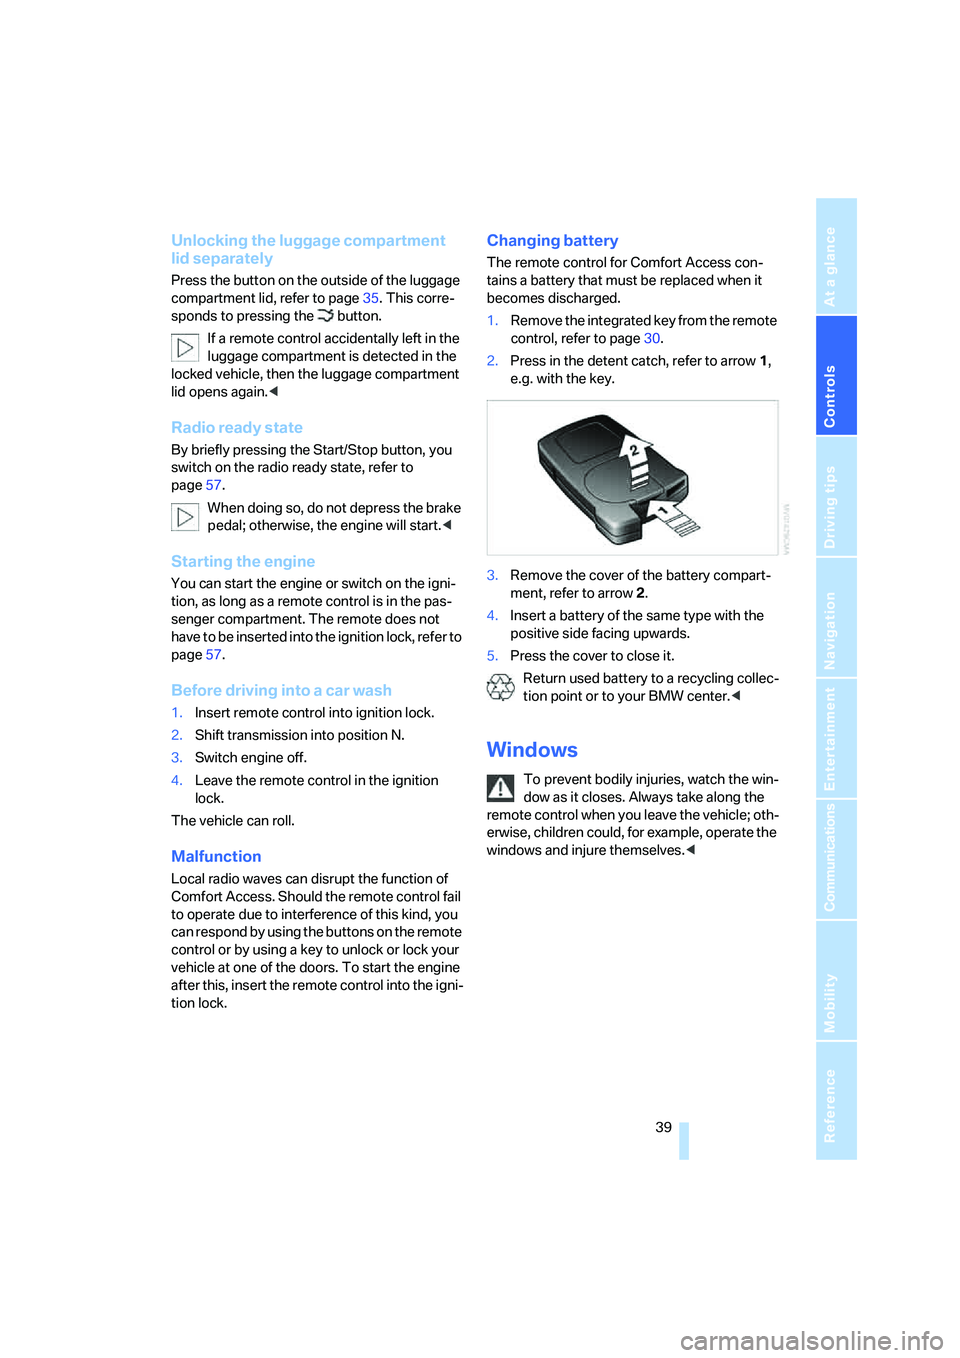
2.Press in the detent catch, refer to arrow1,
e.g. with the key.
3.Remove the cover of the battery compart-
ment, refer to arrow2.
4.Insert a battery of the same type with the
positive side facing upwards.
5.Press the cover to close it.
Return used battery to a recycling collec-
tion point or to your BMW center.<
Windows
To prevent bodily injuries, watch the win-
dow as it closes. Always take along the
remote control when you leave the vehicle; oth-
erwise, children could, for example, operate the
windows and injure themselves.<
Page 43 of 253
Controls
41Reference
At a glance
Driving tips
Communications
Navigation
Entertainment
Mobility
Press the safety switch when children
ride in the rear; otherwise, unsupervised
closing of the windows could lead to injuries.<
In order to deactivate the function again,
you must insert the remote control into
the ignition lock or, with Comfort Access, you
must switch into radio ready state.<
Glass sunroof, electric*
To prevent bodily injuries, watch the
glass sunroof as it closes.
Always take along the remote control when you
leave the vehicle; otherwise, children could, for
example, operate the roof and injure them-
selves.<
Raising
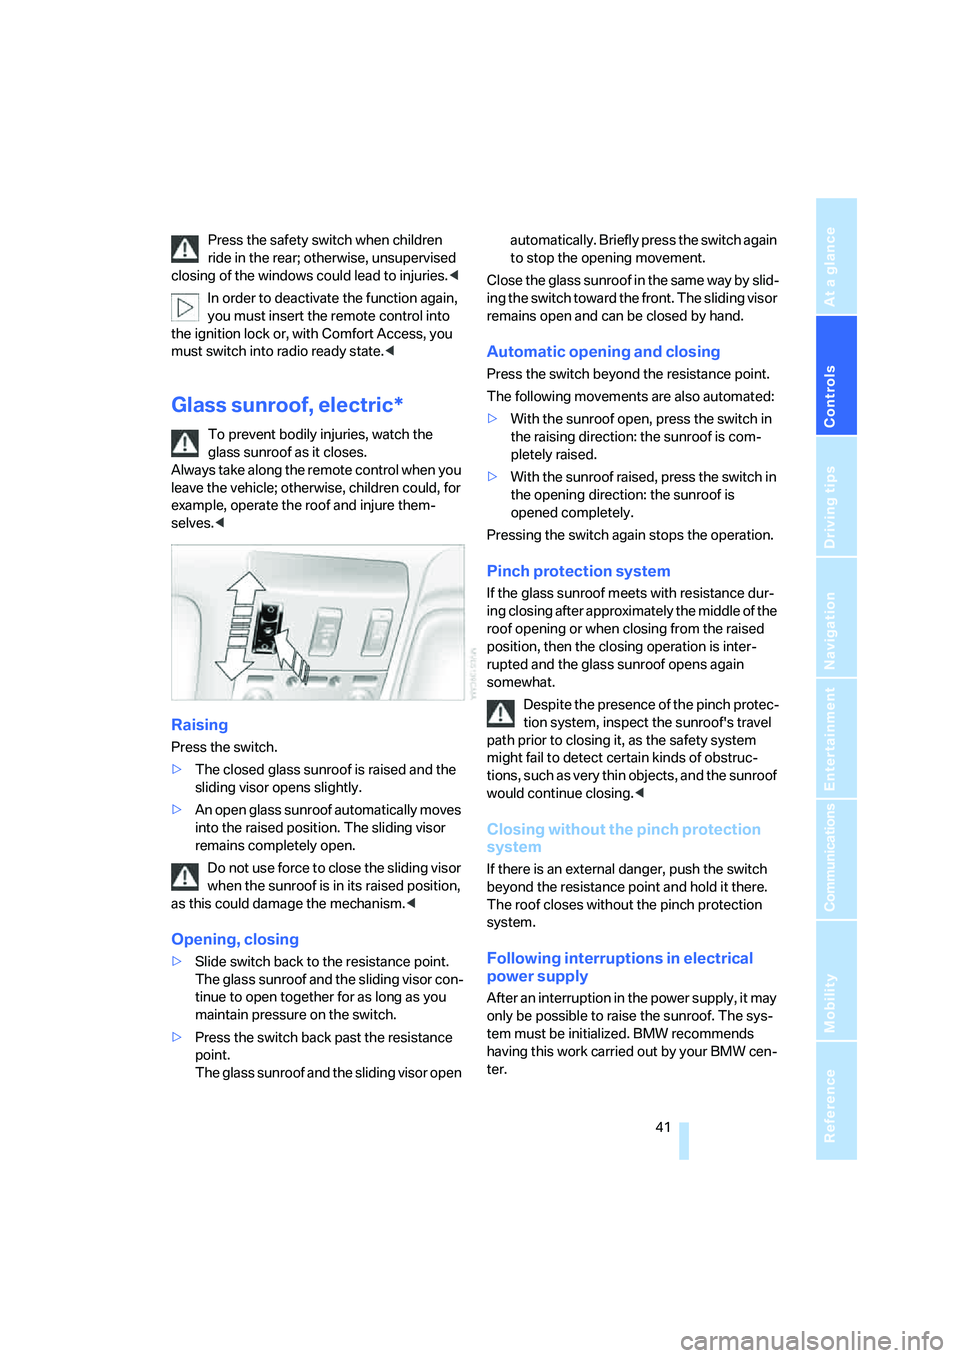
Press the switch.
>The closed glass sunroof is raised and the
sliding visor opens slightly.
>An open glass sunroof automatically moves
into the raised position. The sliding visor
remains completely open.
Do not use force to close the sliding visor
when the sunroof is in its raised position,
as this could damage the mechanism.<
Opening, closing
>Slide switch back to the resistance point.
The glass sunroof and the sliding visor con-
tinue to open together for as long as you
maintain pressure on the switch.
>Press the switch back past the resistance
point.
The glass sunroof and the sliding visor open automatically. Briefly press the switch again
to stop the opening movement.
Close the glass sunroof in the same way by slid-
ing the switch toward the front. The sliding visor
remains open and can be closed by hand.
Automatic opening and closing
Press the switch beyond the resistance point.
The following movements are also automated:
>With the sunroof open, press the switch in
the raising direction: the sunroof is com-
pletely raised.
>With the sunroof raised, press the switch in
the opening direction: the sunroof is
opened completely.
Pressing the switch again stops the operation.
Pinch protection system
If the glass sunroof meets with resistance dur-
ing closing after approximately the middle of the
roof opening or when closing from the raised
position, then the closing operation is inter-
rupted and the glass sunroof opens again
somewhat.
Despite the presence of the pinch protec-
tion system, inspect the sunroof's travel
path prior to closing it, as the safety system
might fail to detect certain kinds of obstruc-
tions, such as very thin objects, and the sunroof
would continue closing.<
Closing without the pinch protection
system
If there is an external danger, push the switch
beyond the resistance point and hold it there.
The roof closes without the pinch protection
system.
Following interruptions in electrical
power supply
After an interruption in the power supply, it may
only be possible to raise the sunroof. The sys-
tem must be initialized. BMW recommends
having this work carried out by your BMW cen-
ter.
Page 55 of 253
Controls
53Reference
At a glance
Driving tips
Communications
Navigation
Entertainment
Mobility
>"Short info"
Display of the help and supplementary texts
of the active menu for approx. 10 seconds,
refer to page21.
The " button" can also be programmed with
the following functions:
>"AUTO P"
Activation/deactivation, refer to page59.
>"NIGHT VISION"
BMW Night Vision activation and deactiva-
tion, refer to page98.
Rear seat screen
*:
>"Mode"
You can choose between the output
sources radio, CD player, and CD changer.
It is necessary for one of these sources to
have been activated.
>"FM" and "AM"
Switching between the FM and AM wave-
bands, also refer to page152.
Operating function
Press the button on the steering wheel or the
button next to the controller.
If you program the button on the steering
wheel with "AUTO P", you can conve-
niently activate and deactivate Automatic Hold
with the button, e.g. during parking.
Details on Automatic Hold are provided starting
on page59.<
The setting of the button on the steering wheel
is stored for the remote control currently in use.
Page 59 of 253
Controls
57Reference
At a glance
Driving tips
Communications
Navigation
Entertainment
Mobility
Driving
Ignition lock
Insert the remote control all the way into the
ignition lock. Radio ready state is switched on.
Individual electrical devices are ready for use.
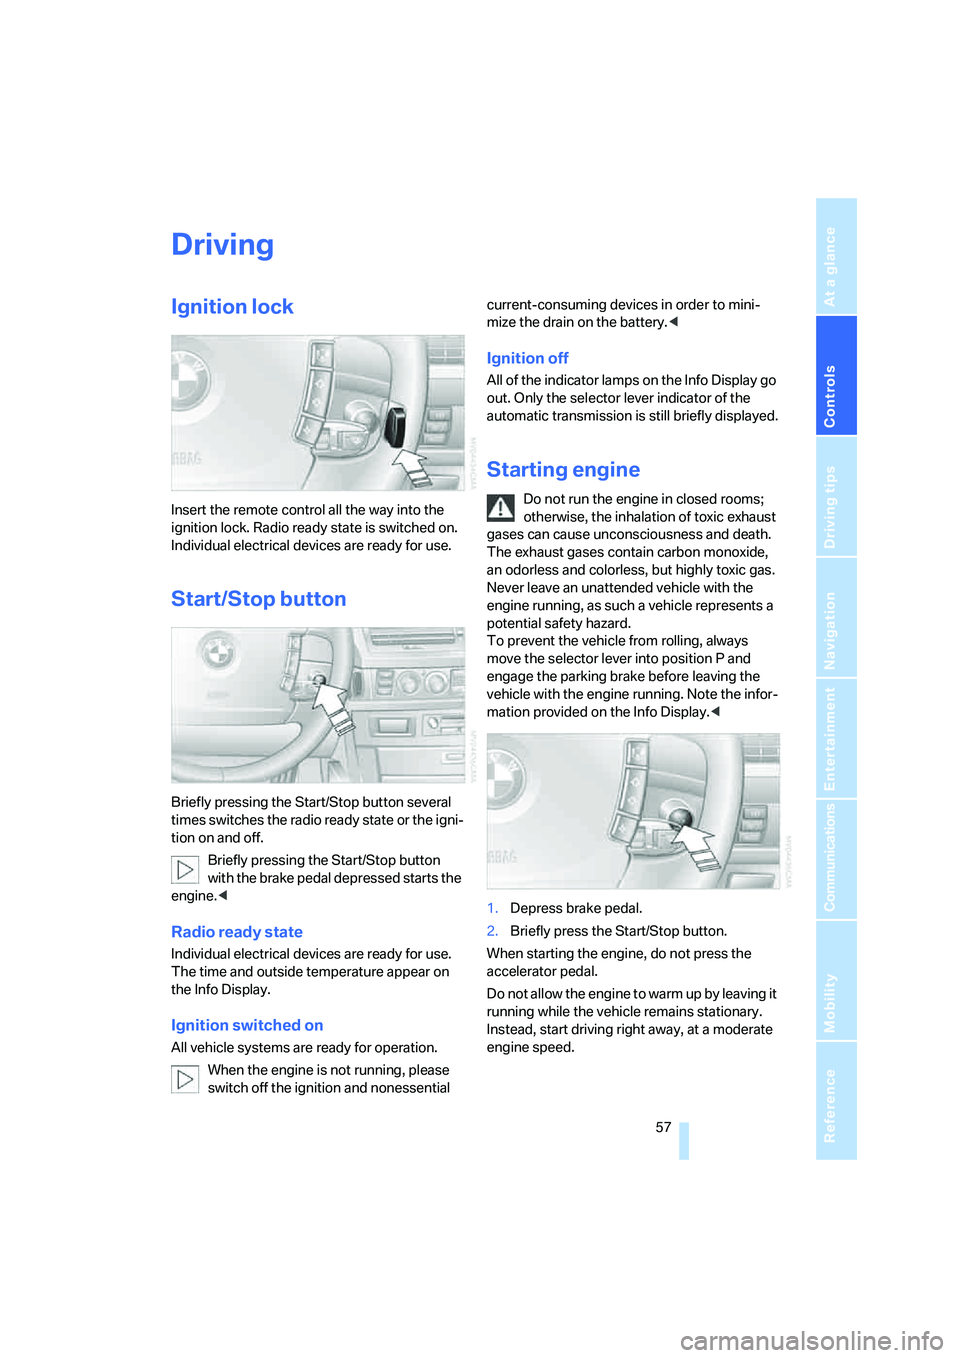
Start/Stop button
Briefly pressing the Start/Stop button several
times switches the radio ready state or the igni-
tion on and off.
Briefly pressing the Start/Stop button
with the brake pedal depressed starts the
engine.<
Radio ready state
Individual electrical devices are ready for use.
The time and outside temperature appear on
the Info Display.
Ignition switched on
All vehicle systems are ready for operation.
When the engine is not running, please
switch off the ignition and nonessential current-consuming devices in order to mini-
mize the drain on the battery.<
Ignition off
All of the indicator lamps on the Info Display go
out. Only the selector lever indicator of the
automatic transmission is still briefly displayed.
Starting engine
Do not run the engine in closed rooms;
otherwise, the inhalation of toxic exhaust
gases can cause unconsciousness and death.
The exhaust gases contain carbon monoxide,
an odorless and colorless, but highly toxic gas.
Never leave an unattended vehicle with the
engine running, as such a vehicle represents a
potential safety hazard.
To prevent the vehicle from rolling, always
move the selector lever into position P and
engage the parking brake before leaving the
vehicle with the engine running. Note the infor-
mation provided on the Info Display.<
1.Depress brake pedal.
2.Briefly press the Start/Stop button.
When starting the engine, do not press the
accelerator pedal.
Do not allow the engine to warm up by leaving it
running while the vehicle remains stationary.
Instead, start driving right away, at a moderate
engine speed.
Page 77 of 253
Controls
75Reference
At a glance
Driving tips
Communications
Navigation
Entertainment
Mobility
Everything under control
Odometer, outside temperature display, clock
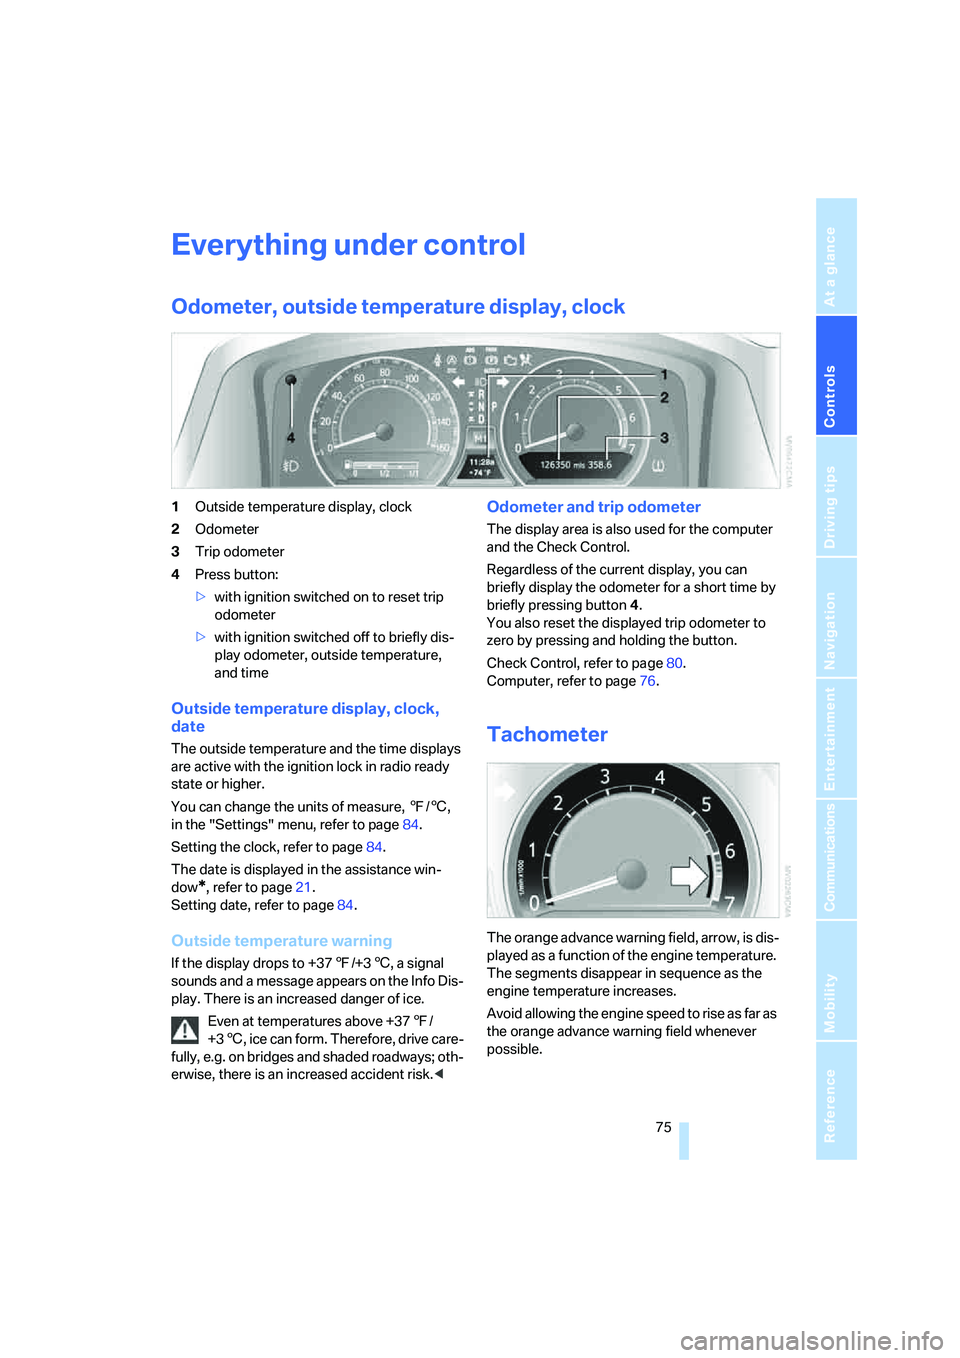
1Outside temperature display, clock
2Odometer
3Trip odometer
4Press button:
>with ignition switched on to reset trip
odometer
>with ignition switched off to briefly dis-
play odometer, outside temperature,
and time
Outside temperature display, clock,
date
The outside temperature and the time displays
are active with the ignition lock in radio ready
state or higher.
You can change the units of measure, 7/6,
in the "Settings" menu, refer to page84.
Setting the clock, refer to page84.
The date is displayed in the assistance win-
dow
*, refer to page21.
Setting date, refer to page84.
Outside temperature warning
If the display drops to +377/+36, a signal
sounds and a message appears on the Info Dis-
play. There is an increased danger of ice.
Even at temperatures above +377/
+36, ice can form. Therefore, drive care-
fully, e.g. on bridges and shaded roadways; oth-
erwise, there is an increased accident risk.<
Odometer and trip odometer
The display area is also used for the computer
and the Check Control.
Regardless of the current display, you can
briefly display the odometer for a short time by
briefly pressing button4.
You also reset the displayed trip odometer to
zero by pressing and holding the button.
Check Control, refer to page80.
Computer, refer to page76.
Tachometer
The orange advance warning field, arrow, is dis-
played as a function of the engine temperature.
The segments disappear in sequence as the
engine temperature increases.
Avoid allowing the engine speed to rise as far as
the orange advance warning field whenever
possible.
Page 109 of 253
Controls
107Reference
At a glance
Driving tips
Communications
Navigation
Entertainment
Mobility
The interior temperature, air volume, and air
distribution can be set starting from the radio
ready state.
Switching cooling function on and off
manually
When activated, the air conditioner
mode cools and dehumidifies the
incoming air, reheating it as
required, depending on the temperature set-
ting. Depending on the weather, the windshield
may fog over briefly when the engine is started.
The cooling function is switched on automati-
cally with the AUTO program. The passenger
compartment can only be cooled with the
engine running.
Rear window defroster
The rear window defroster
switches off automatically after a
while.
Front ventilation
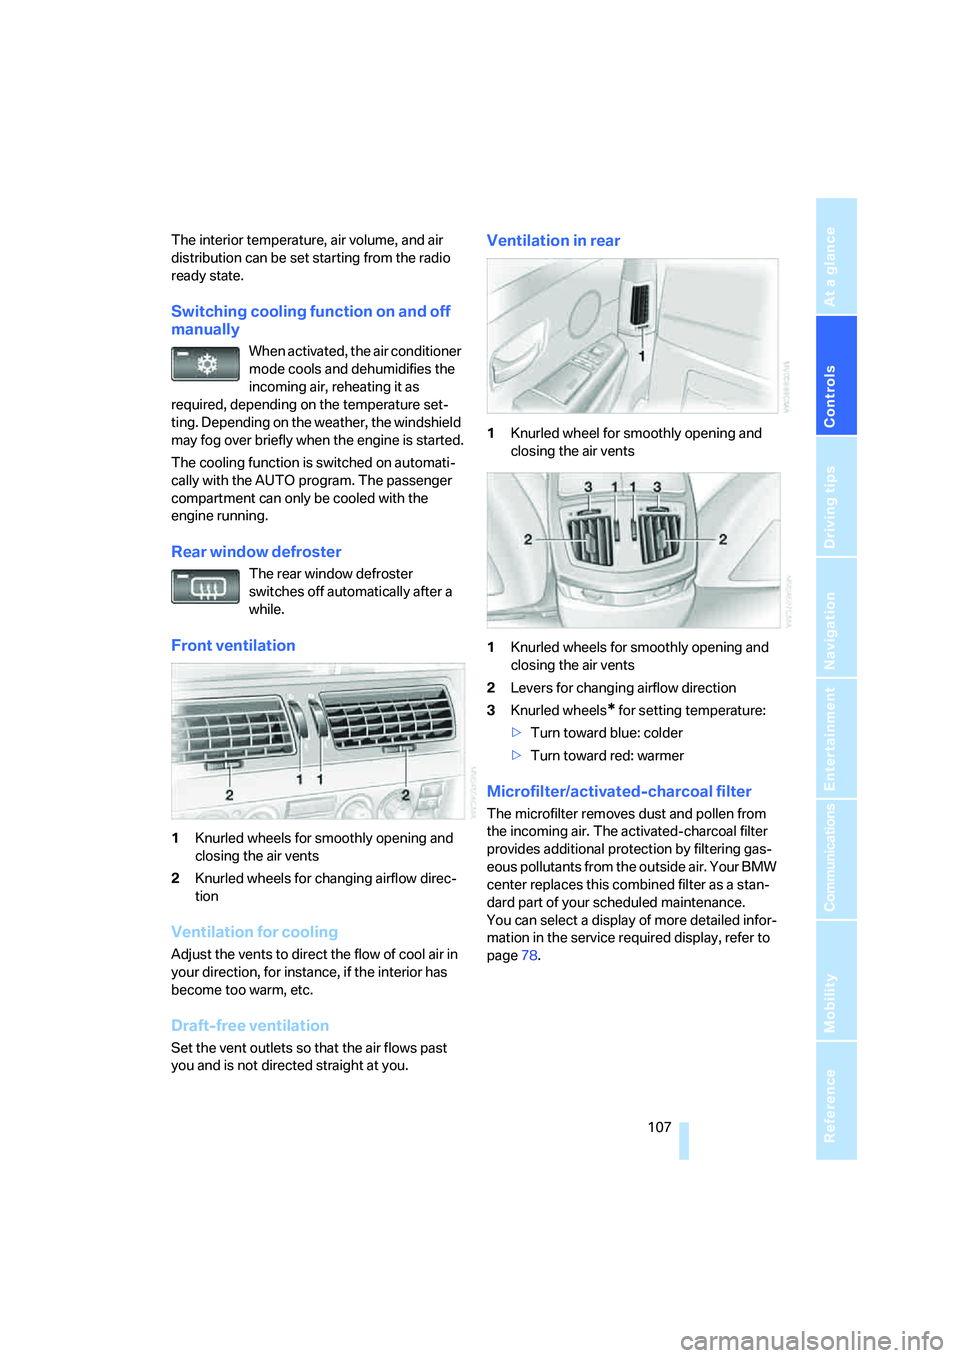
1Knurled wheels for smoothly opening and
closing the air vents
2Knurled wheels for changing airflow direc-
tion
Ventilation for cooling
Adjust the vents to direct the flow of cool air in
your direction, for instance, if the interior has
become too warm, etc.
Draft-free ventilation
Set the vent outlets so that the air flows past
you and is not directed straight at you.
Ventilation in rear
1Knurled wheel for smoothly opening and
closing the air vents
1Knurled wheels for smoothly opening and
closing the air vents
2Levers for changing airflow direction
3Knurled wheels
* for setting temperature:
>Turn toward blue: colder
>Turn toward red: warmer
Microfilter/activated-charcoal filter
The microfilter removes dust and pollen from
the incoming air. The activated-charcoal filter
provides additional protection by filtering gas-
eous pollutants from the outside air. Your BMW
center replaces this combined filter as a stan-
dard part of your scheduled maintenance.
You can select a display of more detailed infor-
mation in the service required display, refer to
page78.
Page 154 of 253
On/off and settings
152
On/off and settings
The following audio and video sources share
the same controls and adjustment options.
>Radio
>CD player
*
>CD changer*
>DVD changer*
The CD changer can play CDs with com-
pressed audio files, such as MP3s.<
Controls
The audio and video sources can be operated
using:
>Buttons on the CD player
>iDrive
>Buttons on steering wheel, refer to page11
Buttons on the CD player
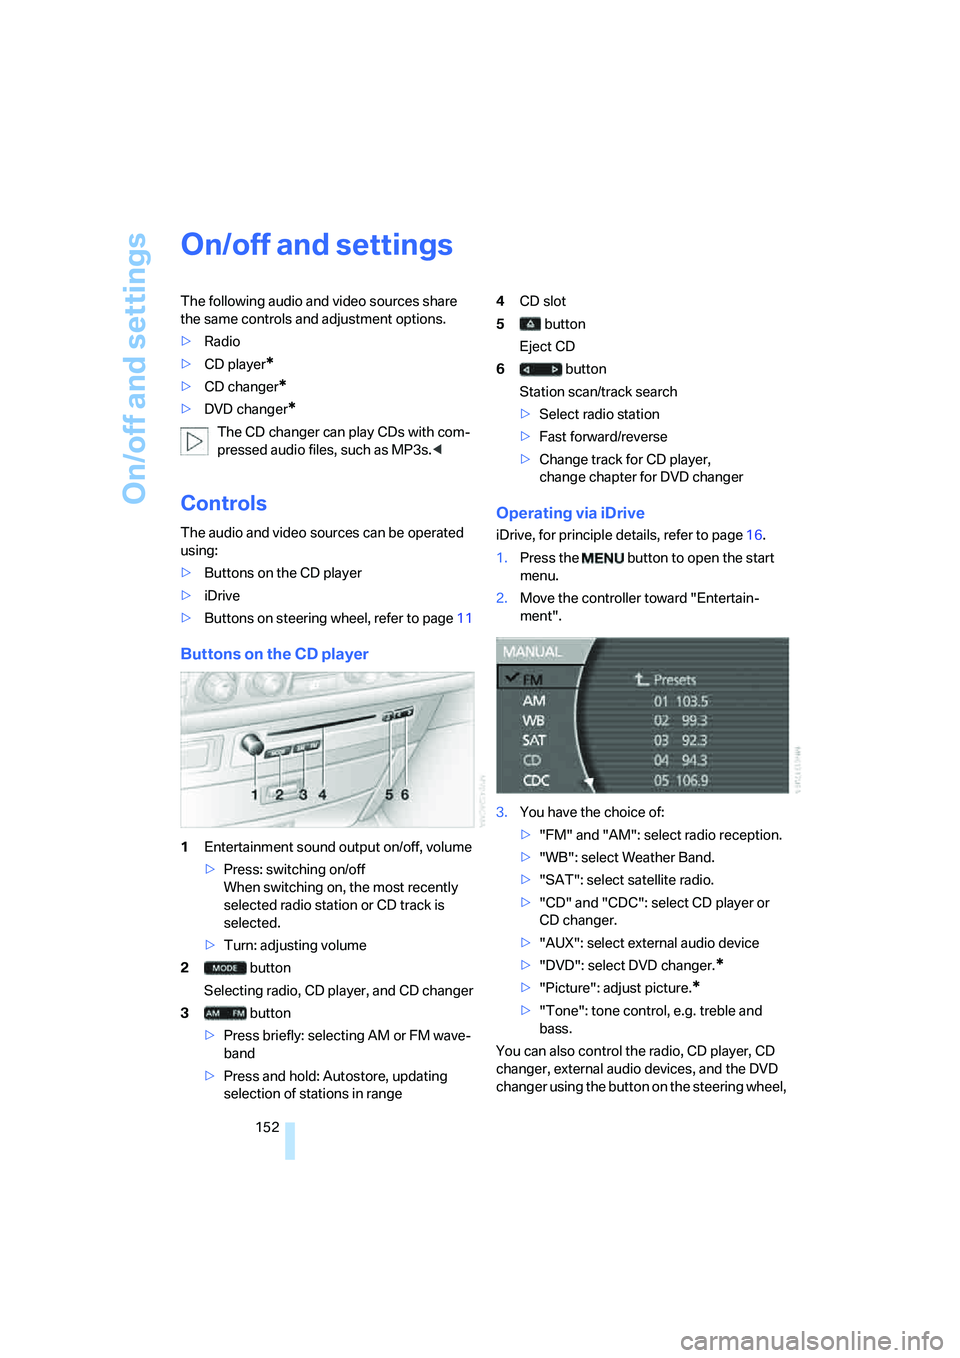
1Entertainment sound output on/off, volume
>Press: switching on/off
When switching on, the most recently
selected radio station or CD track is
selected.
>Turn: adjusting volume
2 button
Selecting radio, CD player, and CD changer
3 button
>Press briefly: selecting AM or FM wave-
band
>Press and hold: Autostore, updating
selection of stations in range4CD slot
5 button
Eject CD
6 button
Station scan/track search
>Select radio station
>Fast forward/reverse
>Change track for CD player,
change chapter for DVD changer
Operating via iDrive
iDrive, for principle details, refer to page16.
1.Press the button to open the start
menu.
2.Move the controller toward "Entertain-
ment".
3.You have the choice of:
>"FM" and "AM": select radio reception.
>"WB": select Weather Band.
>"SAT": select satellite radio.
>"CD" and "CDC": select CD player or
CD changer.
>"AUX": select external audio device
>"DVD": select DVD changer.
*
>"Picture": adjust picture.*
>"Tone": tone control, e.g. treble and
bass.
You can also control the radio, CD player, CD
changer, external audio devices, and the DVD
changer using the button on the steering wheel,
Page 155 of 253
Navigation
Entertainment
Driving tips
153Reference
At a glance
Controls
Communications
Mobility
refer to page11, and via the voice command
system
*, refer to page24.
Switching on/off
In order to switch the Entertainment sound out-
put on/off: press the knob.
The system selects the most recently used
audio or video source, radio, CD, external audio
device, or DVD.
Using the voice command system:
Using with ignition off
The audio and video functions remain available
for use for a period of approx. 30 minutes after
you switch off the ignition.
Switch the sound output back on to enjoy this
function.
Adjusting volume
Turn the knob to the desired volume level.
The sound system automatically reverts
to its mute mode whenever you initiate or
accept a phone call.
Tone control
You can change various tone settings, e.g. tre-
ble and bass or the speed-dependent volume
control. The tone settings are set globally for all
of the audio sources.
Speakers, headsets in the rear, and external
audio devices can be adjusted separately. The
sound settings of the headphones are made on
the rear seat screen with the headphones con-
nected. Only treble, bass and balance can be
adjusted.
The setting is stored for the remote control cur-
rently in use.
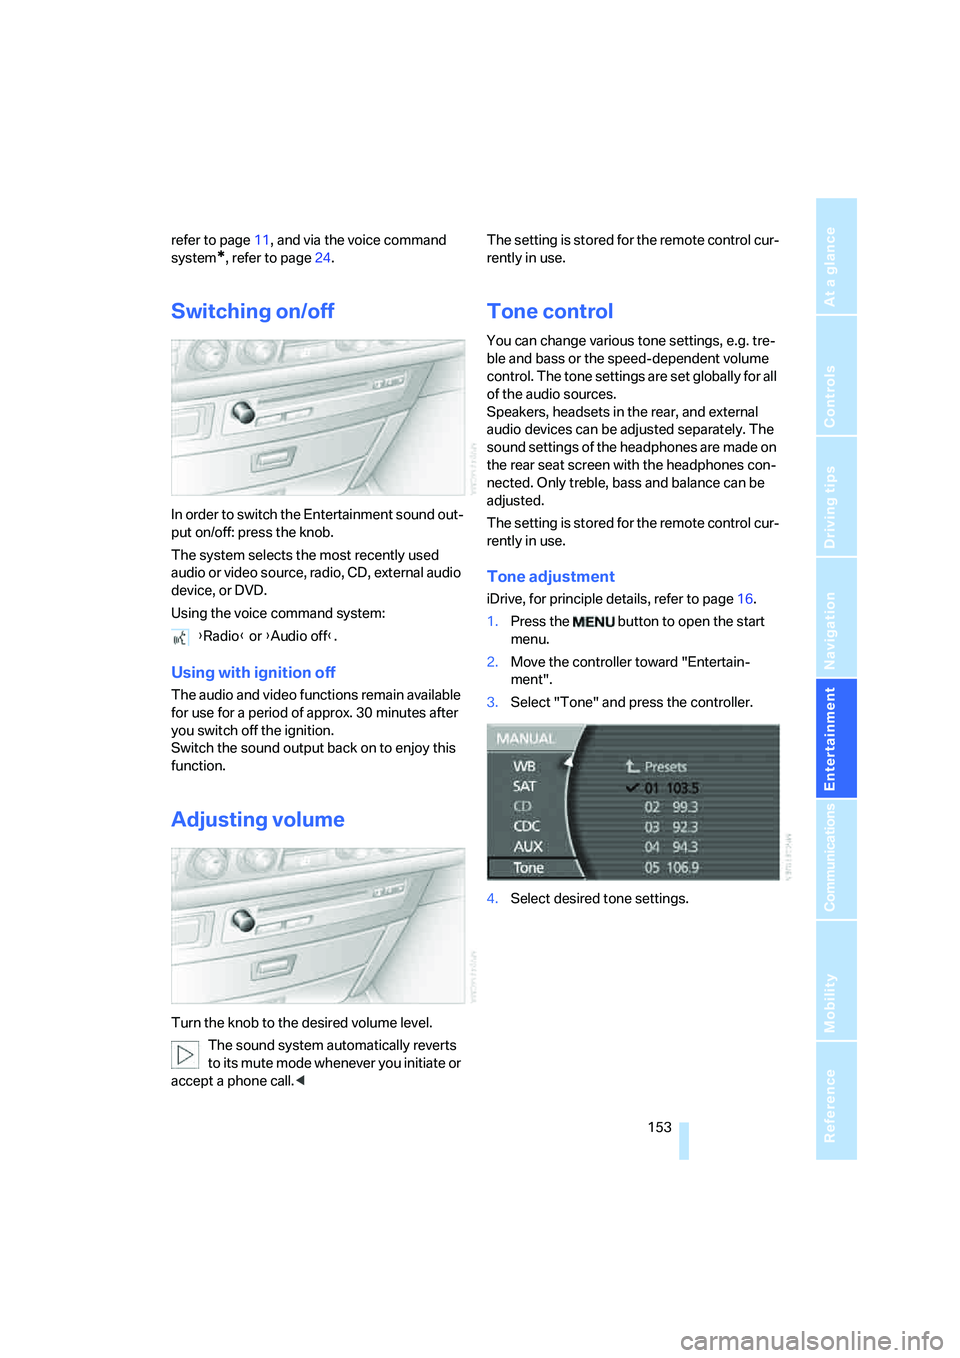
Tone adjustment
iDrive, for principle details, refer to page16.
1.Press the button to open the start
menu.
2.Move the controller toward "Entertain-
ment".
3.Select "Tone" and press the controller.
4.Select desired tone settings. {Radio} or {Audio off}.