Page 57 of 254

Controls
55Reference
At a glance
Driving tips
Communications
Navigation
Entertainment
Mobility
Unlocking safety belt
1.Open the belt buckle.
2.Remove the child restraint system.
3.Allow the belt webbing to be pulled in com-
pletely.
LATCH child restraint fixing
system*
LATCH: Lower Anchor and Tethers for CHil-
dren.
For installation and use of LATCH child
restraint systems, follow the operating
and safety instructions of the system manufac-
turer.<
If the vehicle is equipped with power seats in
the rear, return these to their standard positions
before using LATCH child restraint systems,
refer to page45.
Before installing the LATCH child's seat, pull
the belt away from the region of the child
restraint fixing system.
Make sure that the LATCH anchors have
properly engaged and that the child
restraint system is resting snugly against the
backrest.<
Rear seats
The anchor points for the LATCH anchors are
provided at the locations indicated by the
arrows, in the gap between the bottom seat
cushion and backrest.
Installation guide
The installation guide makes it easier to install
the LATCH child restraint systems and at the
same time protects the surface of the seats.
The installation guide is available at your
BMW center. Always follow all instruc-
tions for operation and use provided by the
manufacturer in the installation guide.<
Firmly press the installation guide into the gap
between the upholstery on seat cushion and
backrest, continuing until the two funnel-
shaped guides snap into place in the LATCH
child restraint fixing system in the seat.
Pull the installation guide to remove.
Child restraint system with tether strap
The attachment points for the top tethers
are only intended for attachment of child
restraint systems; other uses can damage the
attachment points.<
There are three additional attachment points for
child restraint systems with a tether strap, refer
to arrows.
Page 58 of 254

Transporting children safely
56
Routing of the tether strap
Make sure that the tether strap is not
routed over sharp edges and does not
twist on its way to the attachment point; other-
wise, the belt can fail to properly secure the
child restraint system in the event of an acci-
dent.<
1Direction of travel
2Head restraint
3Tether strap hook
4Attachment point
5Rear shelf
6Backrest
7Tether strap of child restraint system
Fold upward before using the mounting points.
1.Pull the head restraint upward.
2.Guide the tether strap between the sup-
ports of the head restraint.
3.Attach the tether strap hook to the attach-
ment point.
4.Slide the head restraint into the bottom
position.
5.Pull tether strap tight.
During trips
If the vehicle is equipped with rear side
airbags, make sure that children riding in
the rear do not lean out of the child's seat
toward the door panels. Otherwise, injuries can
occur if the side airbags are triggered.<
Child-safety locks for rear doors
Slide down the safety levers on the rear doors:
The door can now be opened from the outside
only.
Safety switch for power windows and
rear seats
If the vehicle is equipped with power seats in
the rear, return these to their standard adjust-
ment setting before using a child restraint fixing
system, refer to page45.
When children are riding in the back, press the
safety switch for the power windows, refer to
page40.
This switch also disables the power rear seat
adjustment.
Incorrect or unsupervised adjustment of
the power seats in the rear could lead to
bodily injury or damage to the child restraint
system.<
Page 59 of 254

Controls
57Reference
At a glance
Driving tips
Communications
Navigation
Entertainment
Mobility
Driving
Ignition lock
Insert the remote control all the way into the
ignition lock. Radio ready state is switched on.
Individual electrical devices are ready for use.
Start/Stop button
Briefly pressing the Start/Stop button several
times switches the radio ready state or the igni-
tion on and off.
Briefly pressing the Start/Stop button
with the brake pedal depressed starts the
engine.<
Radio ready state
Individual electrical devices are ready for use.
The time and outside temperature appear on
the Info Display.
Ignition switched on
All vehicle systems are ready for operation.
When the engine is not running, please
switch off the ignition and nonessential current-consuming devices in order to mini-
mize the drain on the battery.<
Ignition off
All of the indicator lamps on the Info Display go
out. Only the selector lever indicator of the
automatic transmission is still briefly displayed.
Starting engine
Do not run the engine in closed rooms;
otherwise, the inhalation of toxic exhaust
gases can cause unconsciousness and death.
The exhaust gases contain carbon monoxide,
an odorless and colorless, but highly toxic gas.
Never leave an unattended vehicle with the
engine running, as such a vehicle represents a
potential safety hazard.
To prevent the vehicle from rolling, always
move the selector lever into position P and
engage the parking brake before leaving the
vehicle with the engine running.<
Avoid frequent starts in rapid succession
or repeated starting attempts in which the
engine does not start. Otherwise, the fuel is
either left unspent or is insufficiently burned
and there is a risk of overheating and damaging
the catalytic converter.<
1.Depress brake pedal.
2.Briefly press the Start/Stop button.
When starting the engine, do not press the
accelerator pedal.
Page 60 of 254

Driving
58 Do not allow the engine to warm up by leaving it
running while the vehicle remains stationary.
Instead, start driving right away, at a moderate
engine speed.
Switching off engine
When leaving the vehicle, always take the
remote control with you.<
With the vehicle stationary, briefly press the
Start/Stop button. Radio ready state is switched
on.
The transmission automatically shifts to posi-
tion P: interlock.
Before driving into a car wash
To permit the vehicle to roll, take the following
steps:
1.With Comfort Access: insert remote control
into ignition lock.
2.Shift transmission into position N.
3.Switch engine off.
4.Leave the remote control in the ignition
lock.
The transmission will shift into position P:
>automatically after approx. 30 minutes
>if you remove the remote control from the
ignition lock
Pay attention to the messages on the Info Dis-
play.
Removing remote control from ignition
lock
Press in the remote control briefly; it pops part-
way out. This procedure will also switch off the
ignition if it is on.
Comfort function
To switch off the engine when the vehicle is sta-
tionary, press the Start/Stop button for longer
than approx. 2 seconds. The remote control
pops partway out.
Parking brake
The concept
Your BMW is equipped with an electromechan-
ical parking brake.
The parking brake is primarily intended to pre-
vent the vehicle from rolling while parked.
You can use the parking brake in two ways:
>Manually, by briefly pressing the button
>Automatically, by activating the Automatic
Hold mode, refer to page59
An electrohydraulic mechanism then engages
the parking brake to prevent the rear wheels
from turning whenever you switch off the
engine.
When the engine is running, parking brake
engagement is controlled by the brake sys-
tem's hydraulic circuits, which act on the disc
brakes in the front and rear wheels.
Brake pedal feel
The hydraulic brake system can produce a
slightly different braking feel. Engagement may
also be accompanied by activation noise – this
is normal.
Manual engagement
Briefly press the button, the word PARK
appears on the Info Display.
When the parking brake is engaged, the indica-
tor lamp on the Info Display lights up red,
refer to page12.
The remote control does not have to be
inserted into the ignition lock for the parking
brake to be set.
Page 61 of 254

Controls
59Reference
At a glance
Driving tips
Communications
Navigation
Entertainment
Mobility
It is only possible to disengage the parking
brake with the ignition on.
If exceptional circumstances should make it
necessary to engage the parking brake while
the vehicle is in motion, maintain pressure on
the button.
The indicator lamp on the Info Display lights up
in red, a chime sounds, and the brake lamps
light up.
The vehicle continues to brake forcefully for as
long as you maintain pressure on the button.
When you brake the vehicle almost to a stop,
i.e., down to a speed of approximately 2 mph/
3 km/h or below, the parking brake remains
engaged.
Manual release
Briefly press the button with the ignition
switched on.
The indicator lamp on the Info Display goes
out.
As long as the remote control is inserted
into the ignition lock, you can also release
the parking brake after the engine has been
switched off. This function is useful, for exam-
ple, in automatic car washes, refer to
page123<
When leaving the vehicle, always bring
the remote control with you; this precau-
tion prevents children from disengaging the
parking brake, for example.<
Automatic Hold
You can activate the system after starting the
engine; it then remains operational until the
next time the engine is switched off.
This feature provides additional assistance dur-
ing vehicle operation by automatically engaging
and releasing the parking brake during stops at
traffic lights, in stop-and-go traffic, etc. The
vehicle is automatically held in place so as to
suppress the tendency to creep when the
transmission is in drive.
It also prevents the vehicle from rolling back-
ward during uphill starts.
The parking brake engages automatically when
you stop the vehicle and switch off the engine.You can activate or deactivate Automatic Hold
via the "Settings" menu in iDrive.
Activation/deactivation
iDrive, for principle details, refer to page16.
1.Press the button to open the start
menu.
2.Move the controller toward "Settings".
3.Select "Vehicle" and press the controller.
4.Select "AUTO P". Press the controller to
activate/deactivate the desired function.
>Automatic Hold is activated.
The green AUTO P status message on the
Info Display indicates that the system is
ready for operation.
>Automatic Hold is deactivated.
The green AUTO P status message disap-
pears from the Info Display.
You can program the programmable but-
ton on the steering wheel with the Auto-
matic Hold function, refer to page52. This gives
you the option of being able to quickly activate
or deactivate Automatic Hold without distract-
ing your attention from the road.<
Driving
The parking brake engages automatically when
the vehicle comes to a stop.
The indicator lamp on Info Display lights up
green.
To start off again, simply press the accelerator
pedal. The parking brake is released automati-
cally; the indicator lamp goes out.
Do not drive through an automatic car
wash with the Automatic Hold on and the
engine running. Otherwise, the system will
Page 62 of 254

Driving
60 engage the parking brake the moment the vehi-
cle comes to a stop.<
Parking
The parking brake engages automatically when
you stop the vehicle and switch off the engine.
The indicator lamp changes from green to
red.
You can also release the parking brake
manually after the engine is switched off,
as long as the remote control is in the ignition
lock, refer to page59. You can use this function,
for example, in a car wash.
Automatic Hold is deactivated.<
When leaving the vehicle, release the
remote control from the detent in the igni-
tion lock; this precaution prevents children from
disengaging the parking brake etc.<
For your safety
Automatic Hold is automatically deactivated
when:
>the engine is switched off
>the system detects that the driver's seat is
not occupied while the engine is running
>the hood is opened while the engine is run-
ning
>the luggage compartment is opened while
the engine is running and the transmission
is in reverse
>and when the parking brake is used to brake
the vehicle to a stop during driving
The indicator lamp changes from green to
red, and the indication AUTO P on the Info Dis-
play disappears.
Before starting off again, briefly press the but-
ton to disengage the parking brake manually,
refer to page59, or reactivate Automatic Hold,
refer to page59.
Before leaving the vehicle with the engine
running, always move the automatic
transmission's selector lever to position P and
make sure that the parking brake is engaged.
The vehicle could start to roll if you fail to take
these precautions.
vated whenever the system detects any
tendency for the wheels to spin in response to
slippery road surfaces.
Pay attention to the messages on the Info Dis-
play. For additional information, refer to Check
Control on page80.<
Releasing parking brake manually
In the event of an electrical power loss or elec-
trical malfunction, you can release the parking
brake manually.
Before manually releasing the parking
brake and each time you park the vehicle
without engaging the parking brake, make sure
that the automatic transmission is in position P,
refer to page62. Be sure to pay attention to the
information on the Info Display.
If circumstances should force you to park on a
steeply inclined road surface, it is essential to
take additional precautions against inadvertent
rolling, e.g. by using the chock, refer to
page216. Otherwise, there is the danger of the
vehicle rolling, depending on the incline.<
If it becomes necessary to also unlock the
transmission lock of the automatic transmis-
sion, follow this sequence:
1.If necessary, start by releasing the parking
brake manually.
2.Then release the automatic transmission's
transmission lock manually, refer to
page64.
Jump starting and tow starting information,
refer to section starting on page220.
Page 63 of 254

Controls
61Reference
At a glance
Driving tips
Communications
Navigation
Entertainment
Mobility
What you will need
1Screwdriver handle
2Unlocking tool
310 mm open-end wrench
You will find the required tools in the onboard
tool kit mounted on the inside of the luggage
compartment lid, refer to page213.
Insert the release tool into the screwdriver han-
dle as shown in the illustration.
Releasing
1.Remove the floor mat and the cover above
the spare tire.
2.With the attached screwdriver handle,
insert the release tool into the opening,
arrow1.
3.Fit the open-end wrench onto the hexago-
nal section of the release tool.
Insert the release tool counter to the spring
force until the stop is reached, press and
rotate in the arrow direction2 until it notice-
ably engages and meets a perceptible
resistance.
4.Without releasing, continue to turn counter
to the mechanical resistance of the drive
unit in the arrow direction 2 until you can feel a significant increase in the force of the
resistance.
To prevent possible damage to the
rear brakes, always make sure that
the parking brake is completely released
before driving the vehicle.<
5.Return the tools to their places.
6.Return the spare tire cover and the floor mat
to their original locations.
Have a malfunction corrected only by a
BMW center or a repair shop that works in
accordance with BMW guidelines and uses
appropriately trained personnel. Only techni-
cians can return the parking brake to normal
operational status after it has been released
manually in response to a malfunction.<
Following manual release, the actual sta-
tus of the parking brake may deviate from
that displayed by the indicator lamp.<
Reinitializing after a power supply
interruption
The parking brake can only be used again
if it was manually released due to an inter-
ruption in the supply of electrical power. Other-
wise, the function of the parking brake is not
guaranteed and there is a danger of the vehicle
rolling despite the parking brake being
engaged.<
Once the electrical power supply has been
restored, you can again use the parking brake:
With the ignition on and the vehicle
stationary, briefly press the button
three times at intervals of approx.
5 seconds. This executes the fol-
lowing initialization sequence:
>Initializing the disengaged setting.
>Engaging: the system registers the new
status and the brake setting is initialized.
The indicator lamp on Info Display lights
up green.
>Releasing: the parking brake is ready for
operation.
The indicator lamp on the Info Display
goes out.
Page 64 of 254

Driving
62
Automatic transmission with
Steptronic
In addition to fully automatic operation, you can
also shift manually using the buttons on the
steering wheel, refer to page63.
Transmission range selection
P R N D
Displays on Info Display
P R N D S or M1 to M6
The transmission range is indicated, and in the
manual mode, the gear currently engaged.
Selecting transmission range
>Only engage transmission positions D, R,
or N when the engine is running: interlock.
>With the vehicle stationary, depress the
brake pedal before shifting out of P or N;
otherwise, the shift command will not be
executed: shiftlock.
To prevent the vehicle from creeping
after you select a driving position,
maintain pressure on the brake pedal until
you are ready to start off. Activate Auto-
matic Hold to suppress the tendency to
creep, refer to page59.
Display.
Selecting D, R or N
Lightly pull selector lever and engage desired
position:
>N Neutral:
To resistance point, arrowsN.
>D Drive:
Downward past resistance point, arrowD.
>R Reverse:
Upward past resistance point, arrowR.
The selector lever immediately returns to the
center position when released.
Selecting P
Press button P.
P Park
Select only when the vehicle is stationary. The
rear wheels are locked.
Transmission automatically shifts into P
as soon as you switch off the engine
unless N is selected and the remote control is in
the ignition lock, refer to page58.<
 1
1 2
2 3
3 4
4 5
5 6
6 7
7 8
8 9
9 10
10 11
11 12
12 13
13 14
14 15
15 16
16 17
17 18
18 19
19 20
20 21
21 22
22 23
23 24
24 25
25 26
26 27
27 28
28 29
29 30
30 31
31 32
32 33
33 34
34 35
35 36
36 37
37 38
38 39
39 40
40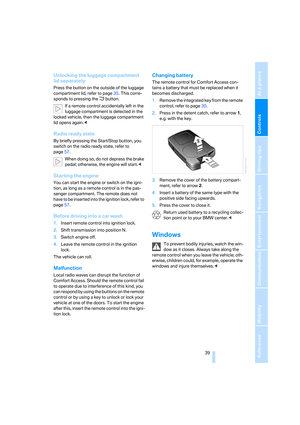 41
41 42
42 43
43 44
44 45
45 46
46 47
47 48
48 49
49 50
50 51
51 52
52 53
53 54
54 55
55 56
56 57
57 58
58 59
59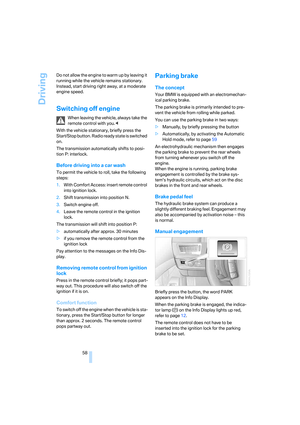 60
60 61
61 62
62 63
63 64
64 65
65 66
66 67
67 68
68 69
69 70
70 71
71 72
72 73
73 74
74 75
75 76
76 77
77 78
78 79
79 80
80 81
81 82
82 83
83 84
84 85
85 86
86 87
87 88
88 89
89 90
90 91
91 92
92 93
93 94
94 95
95 96
96 97
97 98
98 99
99 100
100 101
101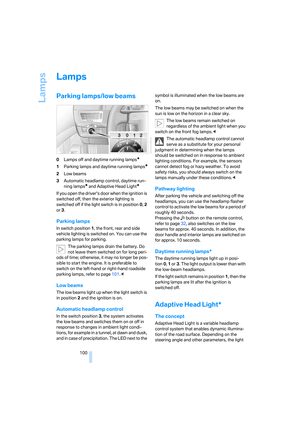 102
102 103
103 104
104 105
105 106
106 107
107 108
108 109
109 110
110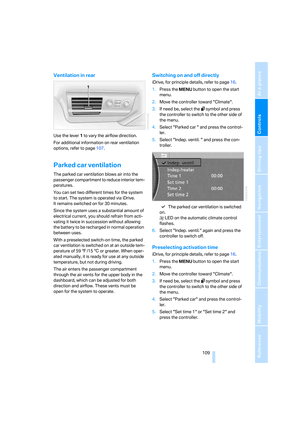 111
111 112
112 113
113 114
114 115
115 116
116 117
117 118
118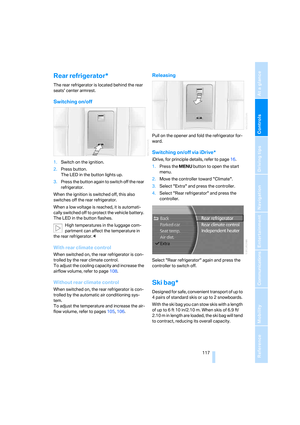 119
119 120
120 121
121 122
122 123
123 124
124 125
125 126
126 127
127 128
128 129
129 130
130 131
131 132
132 133
133 134
134 135
135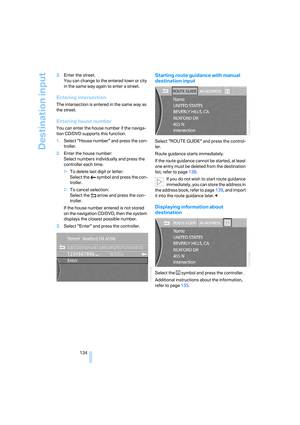 136
136 137
137 138
138 139
139 140
140 141
141 142
142 143
143 144
144 145
145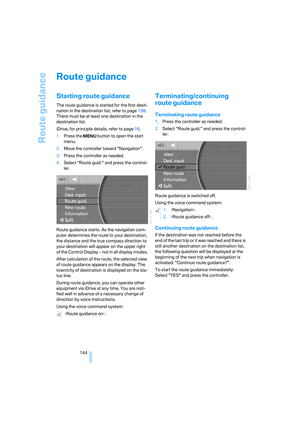 146
146 147
147 148
148 149
149 150
150 151
151 152
152 153
153 154
154 155
155 156
156 157
157 158
158 159
159 160
160 161
161 162
162 163
163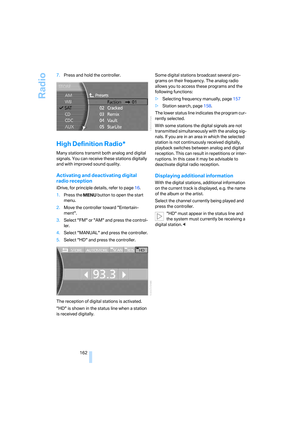 164
164 165
165 166
166 167
167 168
168 169
169 170
170 171
171 172
172 173
173 174
174 175
175 176
176 177
177 178
178 179
179 180
180 181
181 182
182 183
183 184
184 185
185 186
186 187
187 188
188 189
189 190
190 191
191 192
192 193
193 194
194 195
195 196
196 197
197 198
198 199
199 200
200 201
201 202
202 203
203 204
204 205
205 206
206 207
207 208
208 209
209 210
210 211
211 212
212 213
213 214
214 215
215 216
216 217
217 218
218 219
219 220
220 221
221 222
222 223
223 224
224 225
225 226
226 227
227 228
228 229
229 230
230 231
231 232
232 233
233 234
234 235
235 236
236 237
237 238
238 239
239 240
240 241
241 242
242 243
243 244
244 245
245 246
246 247
247 248
248 249
249 250
250 251
251 252
252 253
253