2007 BMW 650I COUPE&CONVERTIBLE window
[x] Cancel search: windowPage 47 of 256
Controls
45Reference
At a glance
Driving tips
Communications
Navigation
Entertainment
Mobility
tion indicated by the arrow until the rear
window is completely open.
Closing
Perform the following work steps with the
assistance of a second person and with
the doors open, otherwise injury and damage to
the convertible top can occur.<
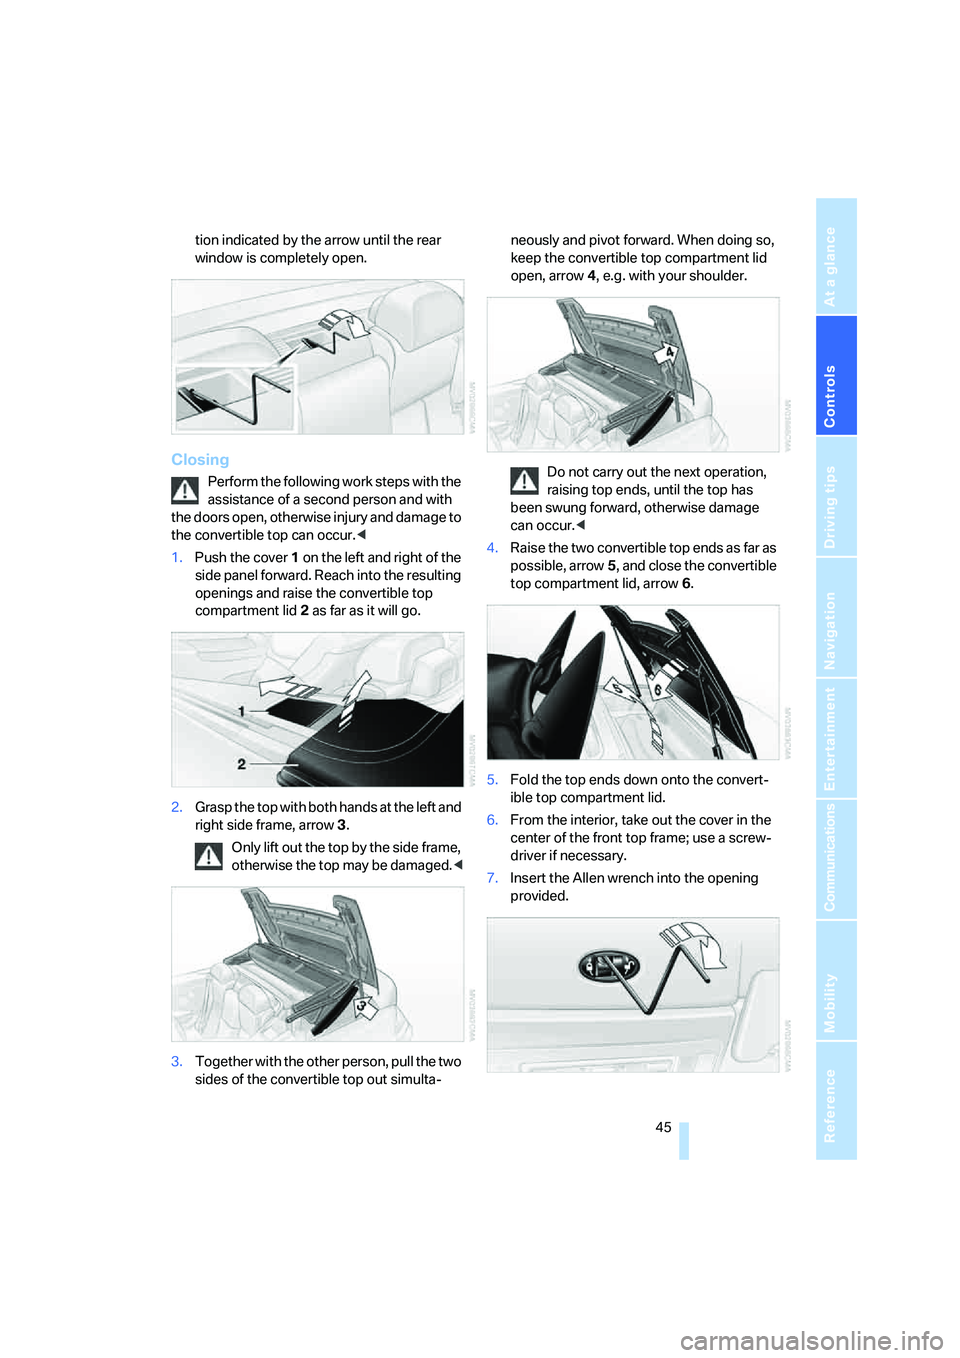
1.Push the cover 1 on the left and right of the
side panel forward. Reach into the resulting
openings and raise the convertible top
compartment lid2 as far as it will go.
2.Grasp the top with both hands at the left and
right side frame, arrow3.
Only lift out the top by the side frame,
otherwise the top may be damaged.<
3.Together with the other person, pull the two
sides of the convertible top out simulta-neously and pivot forward. When doing so,
keep the convertible top compartment lid
open, arrow4, e.g. with your shoulder.
Do not carry out the next operation,
raising top ends, until the top has
been swung forward, otherwise damage
can occur.<
4.Raise the two convertible top ends as far as
possible, arrow5, and close the convertible
top compartment lid, arrow6.
5.Fold the top ends down onto the convert-
ible top compartment lid.
6.From the interior, take out the cover in the
center of the front top frame; use a screw-
driver if necessary.
7.Insert the Allen wrench into the opening
provided.
Page 48 of 256
Opening and closing
46 8.From the outside, both persons pull the
front frame of the convertible top down-
ward, as simultaneously as possible on the
two sides.
9.Turn the Allen wrench in the direction of the
arrow until the front convertible top frame is
locked to the windshield frame.
The rear convertible top ends are automati-
cally pressed onto the convertible top com-
partment lid and close tightly with tension.
10.If necessary, close the rear window again
manually in the same way as above.
Wind deflector*
The wind deflector keeps the air movement in
the passenger compartment to a minimum
when the convertible top is open, thus enabling
pleasant driving even at higher speeds.
The wind deflector is stowed in a protective
sleeve in the luggage compartment. Short
instructions for use are also provided on the
protective sleeve.
Before installing
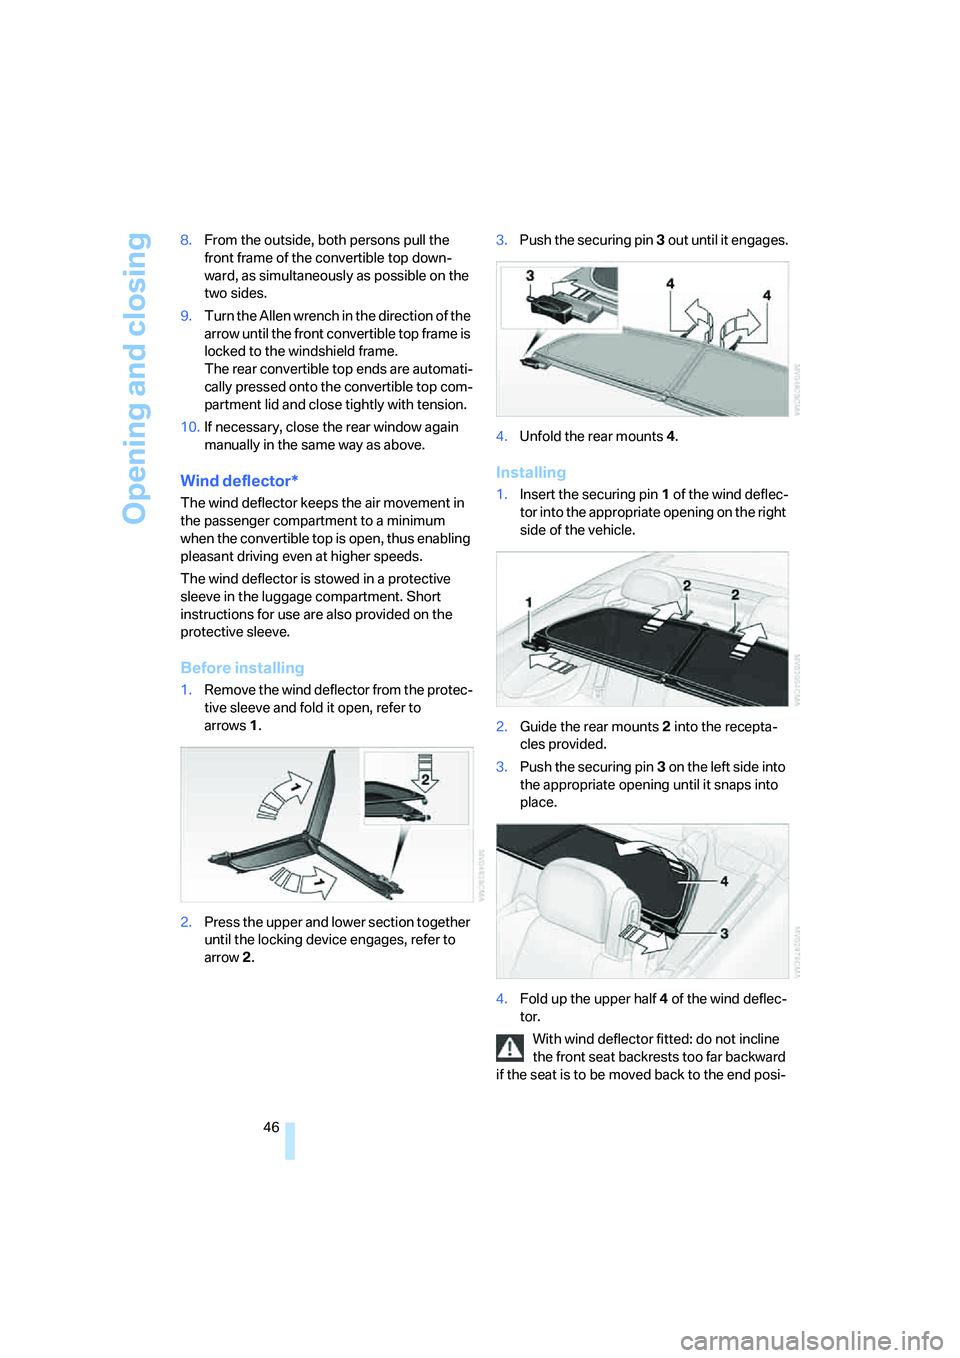
1.Remove the wind deflector from the protec-
tive sleeve and fold it open, refer to
arrows1.
2.Press the upper and lower section together
until the locking device engages, refer to
arrow2.3.Push the securing pin3 out until it engages.
4.Unfold the rear mounts4.
Installing
1.Insert the securing pin 1 of the wind deflec-
tor into the appropriate opening on the right
side of the vehicle.
2.Guide the rear mounts2 into the recepta-
cles provided.
3.Push the securing pin3 on the left side into
the appropriate opening until it snaps into
place.
4.Fold up the upper half4 of the wind deflec-
tor.
With wind deflector fitted: do not incline
the front seat backrests too far backward
if the seat is to be moved back to the end posi-
Page 80 of 256
Everything under control
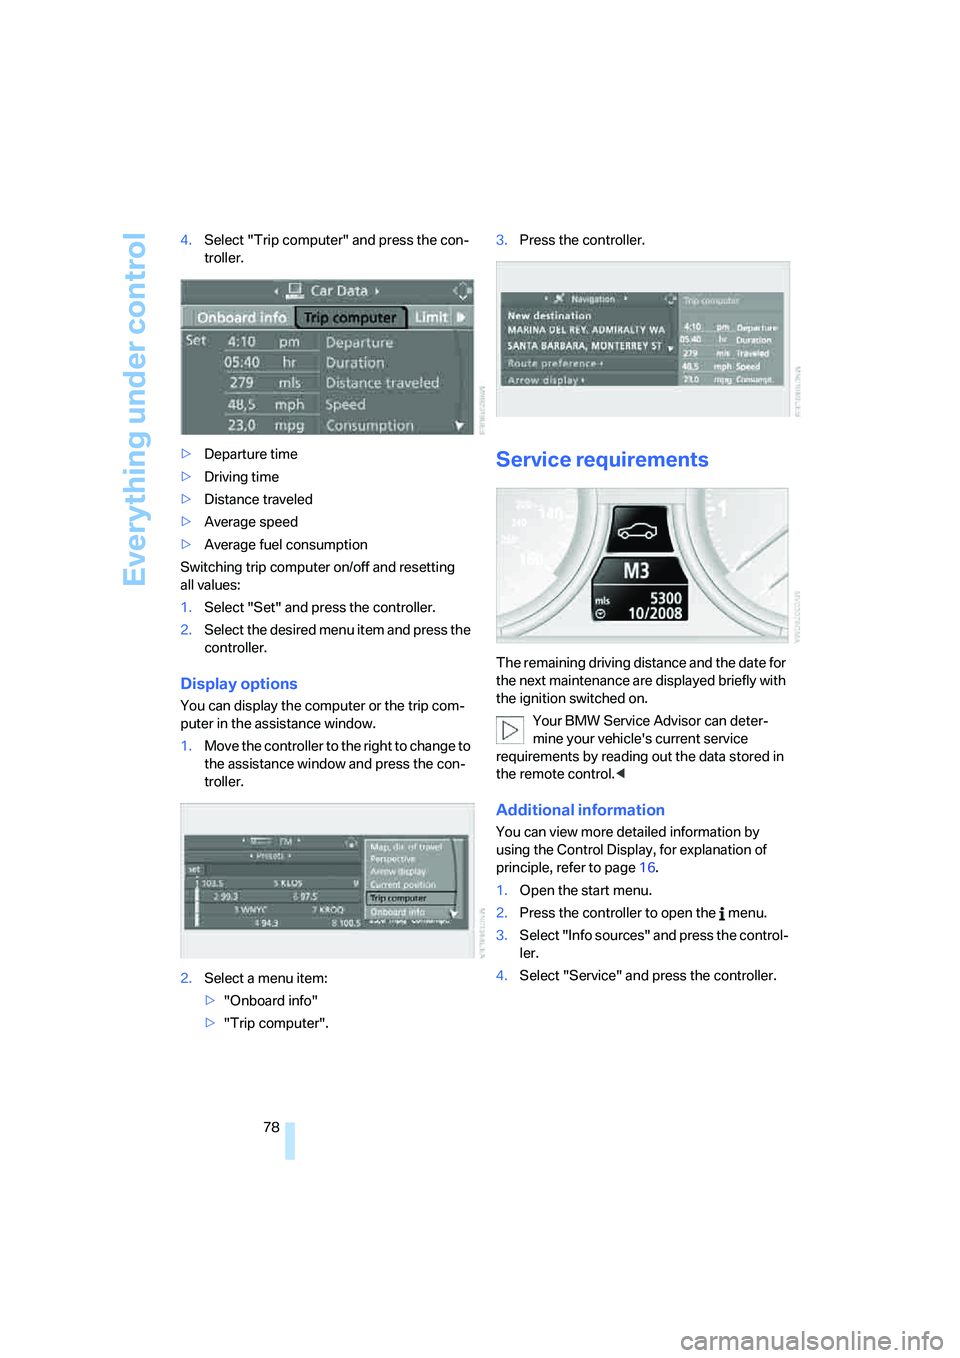
78 4.Select "Trip computer" and press the con-
troller.
>Departure time
>Driving time
>Distance traveled
>Average speed
>Average fuel consumption
Switching trip computer on/off and resetting
all values:
1.Select "Set" and press the controller.
2.Select the desired menu item and press the
controller.
Display options
You can display the computer or the trip com-
puter in the assistance window.
1.Move the controller to the right to change to
the assistance window and press the con-
troller.
2.Select a menu item:
>"Onboard info"
>"Trip computer".3.Press the controller.
Service requirements
The remaining driving distance and the date for
the next maintenance are displayed briefly with
the ignition switched on.
Your BMW Service Advisor can deter-
mine your vehicle's current service
requirements by reading out the data stored in
the remote control.<
Additional information
You can view more detailed information by
using the Control Display, for explanation of
principle, refer to page16.
1.Open the start menu.
2.Press the controller to open the menu.
3.Select "Info sources" and press the control-
ler.
4.Select "Service" and press the controller.
Page 103 of 256
Controls
101Reference
At a glance
Driving tips
Communications
Navigation
Entertainment
Mobility
an object of interest ahead, be prepared to slow
down or stop, blow the horn, or take other
appropriate action.
System limits
The system is designed to supplement but not
replace forward vision through the windshield.
The driver is responsible for safe driving at
night. BMW Night Vision is not designed to be
used as a continuous viewing window for driv-
ing at night.
No system, no matter how sophisticated, can
operate without limitations. BMW Night Vision
operation is subject to physical and environ-
mental limitations that will reduce the ability of
the system to detect and display a clear thermal
image. Some of the situations in which these
limitations can occur are:
>on steep hilltops or depressions and in tight
curves
>in tunnels, as the contrast is inherently low
>when the camera lens is dirty
>in dense fog, heavy rain or snowfall
>when displaying very hot objects such as
transformers, car exhausts etc.
>when the image briefly freezes during nor-
mal system adjustment.
BMW Night Vision's potential benefits
can be limited by the driving style of the
driver, the size and relative temperature of the
detected objects, dirt or contamination on the
camera lens, adverse weather like snow, rain or
fog, and other factors not mentioned here. It will
always be the driver's responsibility to drive at a
speed and in a manner that recognizes potential
hazards and adjust accordingly.BMW Night Vision is not a substitute or replace-
ment for driver responsibility or for accommo-
dating the visibility conditions and the traffic sit-
uation. The forward view illuminated by the
headlamps must always be the basis for making
safe driving decisions, otherwise a safety risk
will result.<
Activating BMW Night Vision
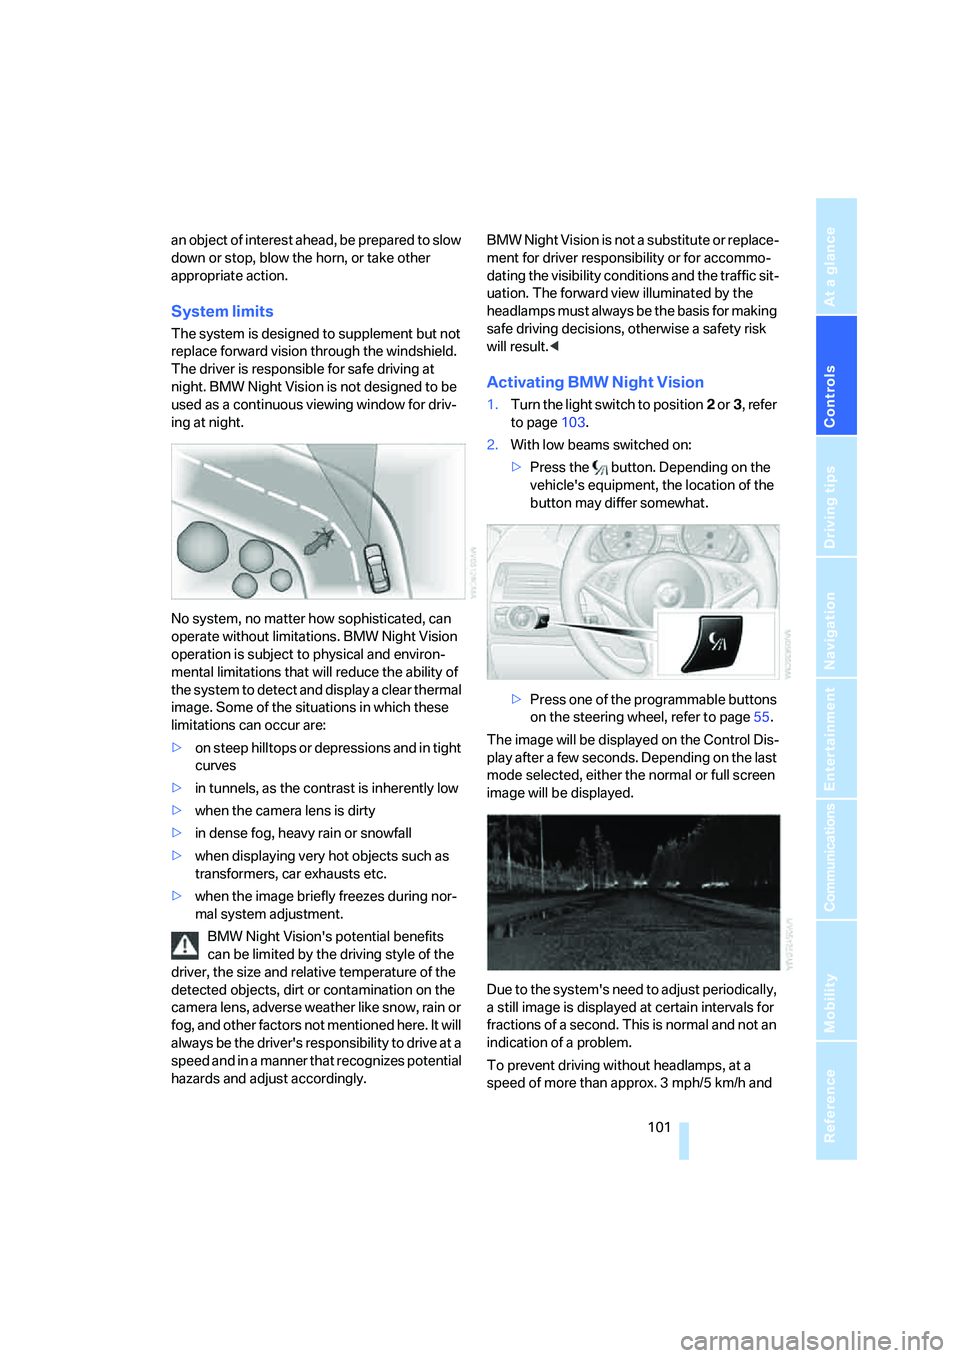
1.Turn the light switch to position2 or3, refer
to page103.
2.With low beams switched on:
>Press the button. Depending on the
vehicle's equipment, the location of the
button may differ somewhat.
>Press one of the programmable buttons
on the steering wheel, refer to page55.
The image will be displayed on the Control Dis-
play after a few seconds. Depending on the last
mode selected, either the normal or full screen
image will be displayed.
Due to the system's need to adjust periodically,
a still image is displayed at certain intervals for
fractions of a second. This is normal and not an
indication of a problem.
To prevent driving without headlamps, at a
speed of more than approx. 3 mph/5 km/h and
Page 109 of 256
Controls
107Reference
At a glance
Driving tips
Communications
Navigation
Entertainment
Mobility
Climate
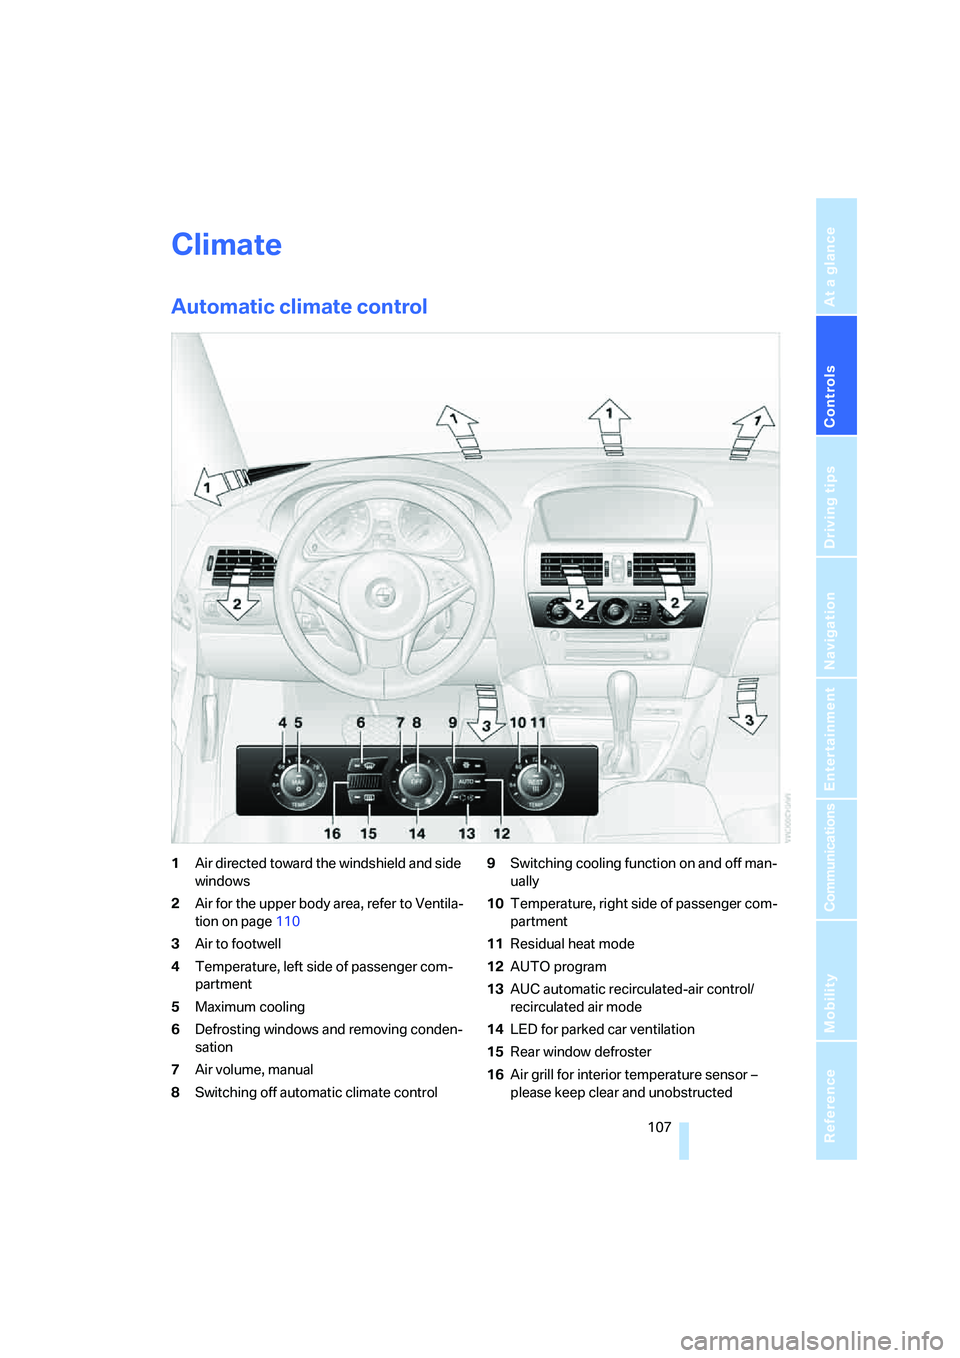
Automatic climate control
1Air directed toward the windshield and side
windows
2Air for the upper body area, refer to Ventila-
tion on page110
3Air to footwell
4Temperature, left side of passenger com-
partment
5Maximum cooling
6Defrosting windows and removing conden-
sation
7Air volume, manual
8Switching off automatic climate control9Switching cooling function on and off man-
ually
10Temperature, right side of passenger com-
partment
11Residual heat mode
12AUTO program
13AUC automatic recirculated-air control/
recirculated air mode
14LED for parked car ventilation
15Rear window defroster
16Air grill for interior temperature sensor –
please keep clear and unobstructed
Page 110 of 256
Climate
108 The current setting for air distribution is dis-
played on the Control Display.
A congenial climate
The AUTO program offers the optimum air dis-
tribution and air volume for virtually all condi-
tions, refer to AUTO program below. Now you
only need to select an interior temperature that
you find pleasant.
The following sections contain more detailed
information on the available setting options.
Most settings are stored for the remote control
currently in use, also refer to Personal Profile
settings on page29.
AUTO program
The AUTO program handles the
adjustment of air distribution to the
windshield and side windows, in
the direction of the upper body, and in the foot-
well, as well as the adjustment of the air volume.
It also adapts your instructions for the tempera-
ture to outside influences throughout the year.
The cooling is switched on automatically with
the AUTO program. At the same time, a con-
densation sensor controls the program in such
a way that window condensation is prevented
as much as possible.
Intensity of AUTO program
To meet your individual needs, you can
increase or decrease the intensity of the auto-
matic climate control.
iDrive, for explanation of principle, refer to
page16.
1.Press the button.
This opens the start menu.
2.Move the controller to the left to open
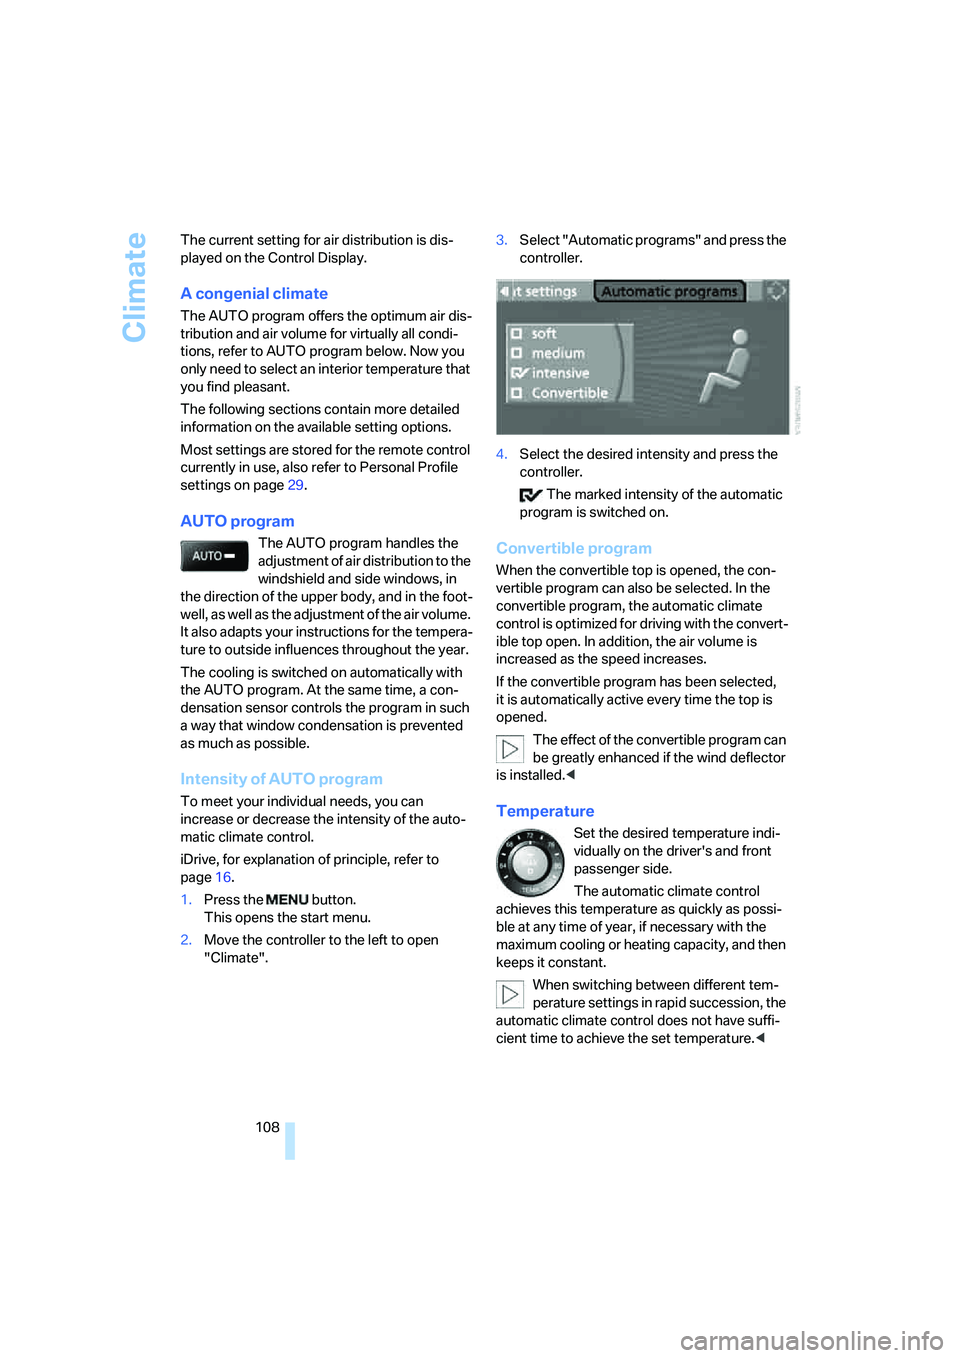
"Climate".3.Select "Automatic programs" and press the
controller.
4.Select the desired intensity and press the
controller.
The marked intensity of the automatic
program is switched on.
Convertible program
When the convertible top is opened, the con-
vertible program can also be selected. In the
convertible program, the automatic climate
control is optimized for driving with the convert-
ible top open. In addition, the air volume is
increased as the speed increases.
If the convertible program has been selected,
it is automatically active every time the top is
opened.
The effect of the convertible program can
be greatly enhanced if the wind deflector
is installed.<
Temperature
Set the desired temperature indi-
vidually on the driver's and front
passenger side.
The automatic climate control
achieves this temperature as quickly as possi-
ble at any time of year, if necessary with the
maximum cooling or heating capacity, and then
keeps it constant.
When switching between different tem-
perature settings in rapid succession, the
automatic climate control does not have suffi-
cient time to achieve the set temperature.<
Page 111 of 256
Controls
109Reference
At a glance
Driving tips
Communications
Navigation
Entertainment
Mobility
Adapting temperature in upper body
region
1.Open the start menu.
2.Open "Climate".
3.Select "Vent settings" and press the con-
troller.
4.Select the field by moving the controller and
adjust the temperature by turning the con-
troller.
Defrosting windows and removing
condensation
Quickly remove ice and condensa-
tion from the windshield and front
side windows.
Rear window defroster
The rear window defroster
switches off automatically after a
certain amount of time.
Convertible: the rear window defroster is only
activated when the rear window is closed.
Air volume, manual
You can adjust the air volume by
turning. You can reactivate the
automatic mode for the air volume
with the AUTO button.
Manual air distribution
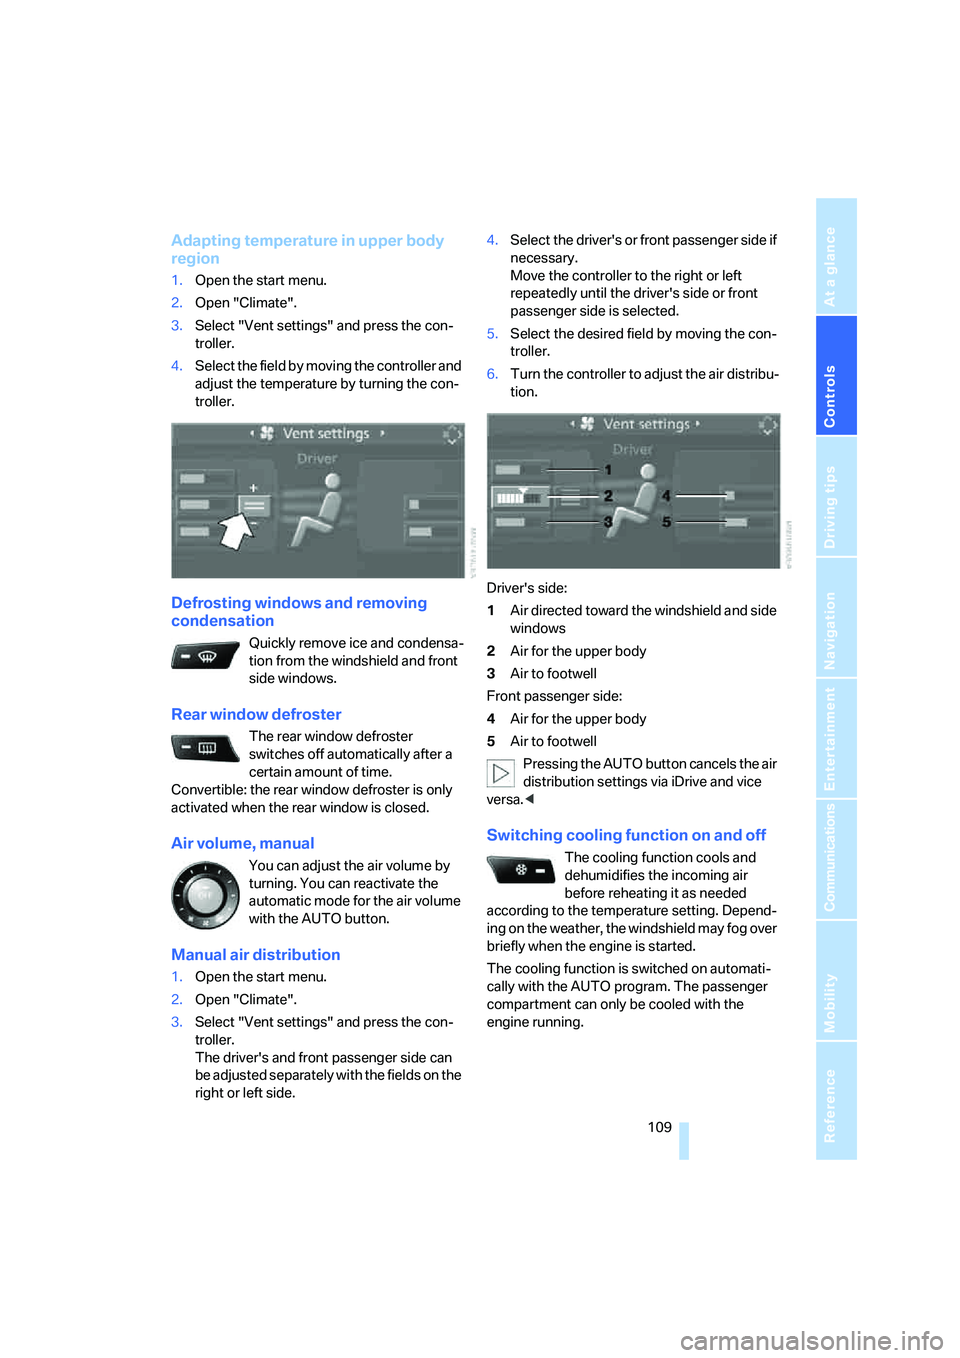
1.Open the start menu.
2.Open "Climate".
3.Select "Vent settings" and press the con-
troller.
The driver's and front passenger side can
be adjusted separately with the fields on the
right or left side.4.Select the driver's or front passenger side if
necessary.
Move the controller to the right or left
repeatedly until the driver's side or front
passenger side is selected.
5.Select the desired field by moving the con-
troller.
6.Turn the controller to adjust the air distribu-
tion.
Driver's side:
1Air directed toward the windshield and side
windows
2Air for the upper body
3Air to footwell
Front passenger side:
4Air for the upper body
5Air to footwell
Pressing the AUTO button cancels the air
distribution settings via iDrive and vice
versa.<
Switching cooling function on and off
The cooling function cools and
dehumidifies the incoming air
before reheating it as needed
according to the temperature setting. Depend-
ing on the weather, the windshield may fog over
briefly when the engine is started.
The cooling function is switched on automati-
cally with the AUTO program. The passenger
compartment can only be cooled with the
engine running.
Page 112 of 256
Climate
110
Maximum cooling
Maximally cooled air is obtained as
quickly as possible from an outside
temperature above approx. 327/
06 and with the engine running.
The automatic climate control changes over to
the lowest temperature and switches into the
recirculated-air mode. The maximum air vol-
ume only flows out of the vents for the upper
body. It is therefore necessary for these vents to
be open for maximum cooling.
AUC Automatic recirculated-air
control/recirculated-air mode
You can respond to unpleasant
odors or pollutants in the immedi-
ate environment by temporarily
suspending the supply of outside air. The sys-
tem then recirculates the air currently within the
vehicle. In AUC mode, a sensor detects pollut-
ants in the outside air and controls the shut-off
automatically.
Press the button repeatedly to run through the
following control sequence:
>LED off: outside air flows into the vehicle
continuously.
>Right LED on, AUC mode: the system
detects pollutants in the outside air and
responds by blocking the supply of outside
air when required.
>Left LED on, recirculated-air mode: the
supply of outside air into the vehicle is shut
off continuously.
If condensation starts to form on the
inside window surfaces during operation
in the recirculated-air mode, you should switch
it off while also increasing the air volume as
required.
The recirculated-air mode should not be used
over a longer period of time, as the air quality
inside the vehicle deteriorates continuously.<
Residual heat
The heat stored in the engine is
used to heat the passenger com-
partment, e.g. while stopped at a
school to pick up a child.
The function can be switched on when the fol-
lowing conditions are met:
>up to 15 minutes after switching off the
engine
>engine at operating temperature
>sufficient battery voltage
>outside temperature below 777/256
The LED lights up when the function is
switched on.
With the ignition lock at radio readiness or
higher the interior temperature, the air volume
and the air distribution can be set.
Switching automatic climate control on
and off
The air volume, the heater and the
cooling function are all switched
off.
You can restart the automatic cli-
mate control by pressing any of its buttons
except the REST button.
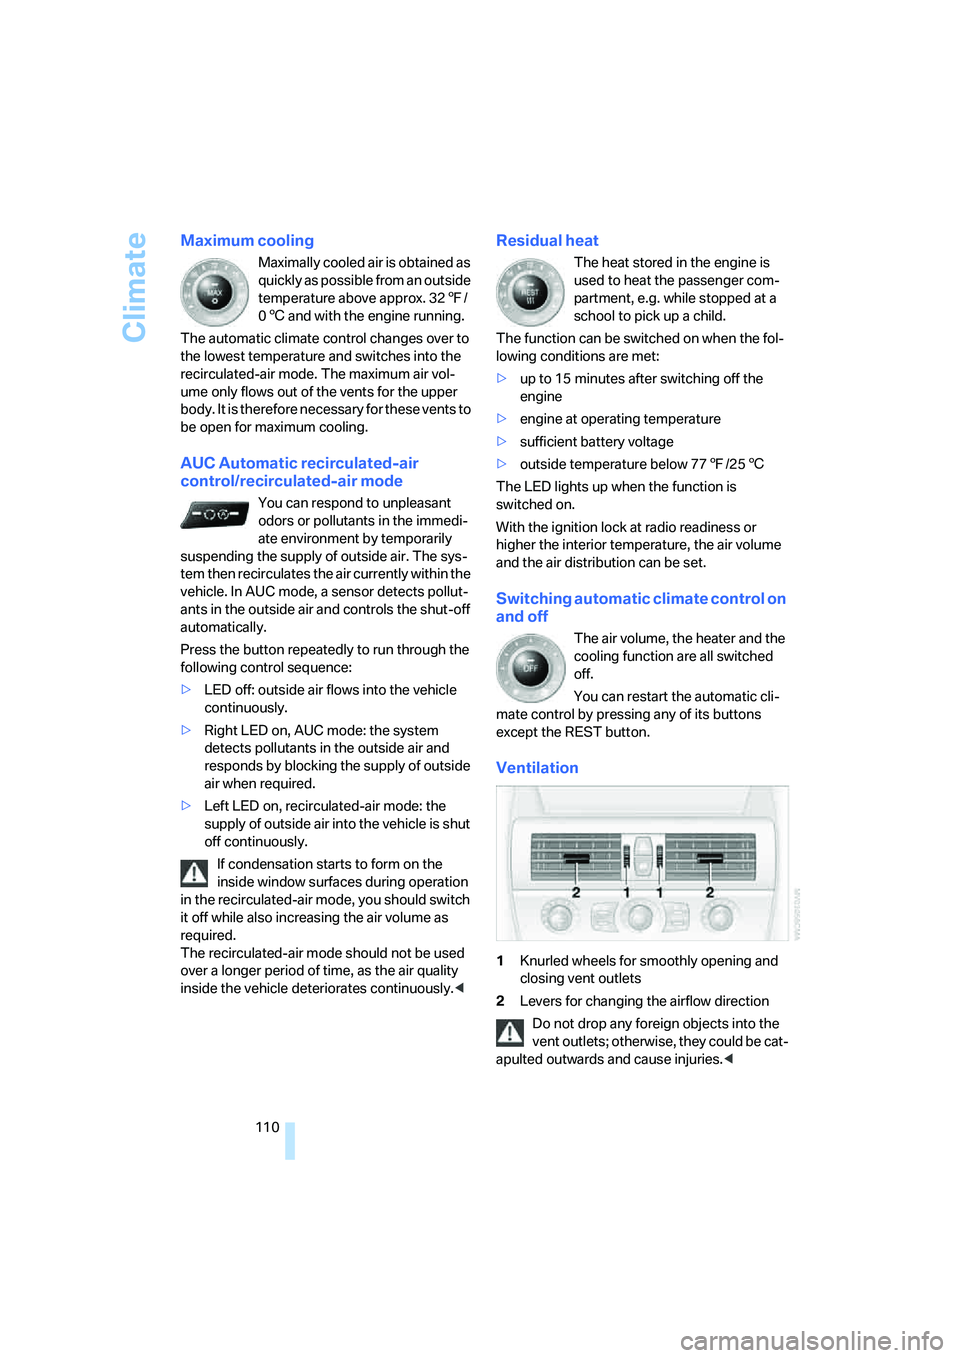
Ventilation
1Knurled wheels for smoothly opening and
closing vent outlets
2Levers for changing the airflow direction
Do not drop any foreign objects into the
vent outlets; otherwise, they could be cat-
apulted outwards and cause injuries.<