2007 BMW 650I COUPE&CONVERTIBLE ignition
[x] Cancel search: ignitionPage 77 of 256
Controls
75Reference
At a glance
Driving tips
Communications
Navigation
Entertainment
Mobility
Everything under control
Odometer, outside
temperature display, clock
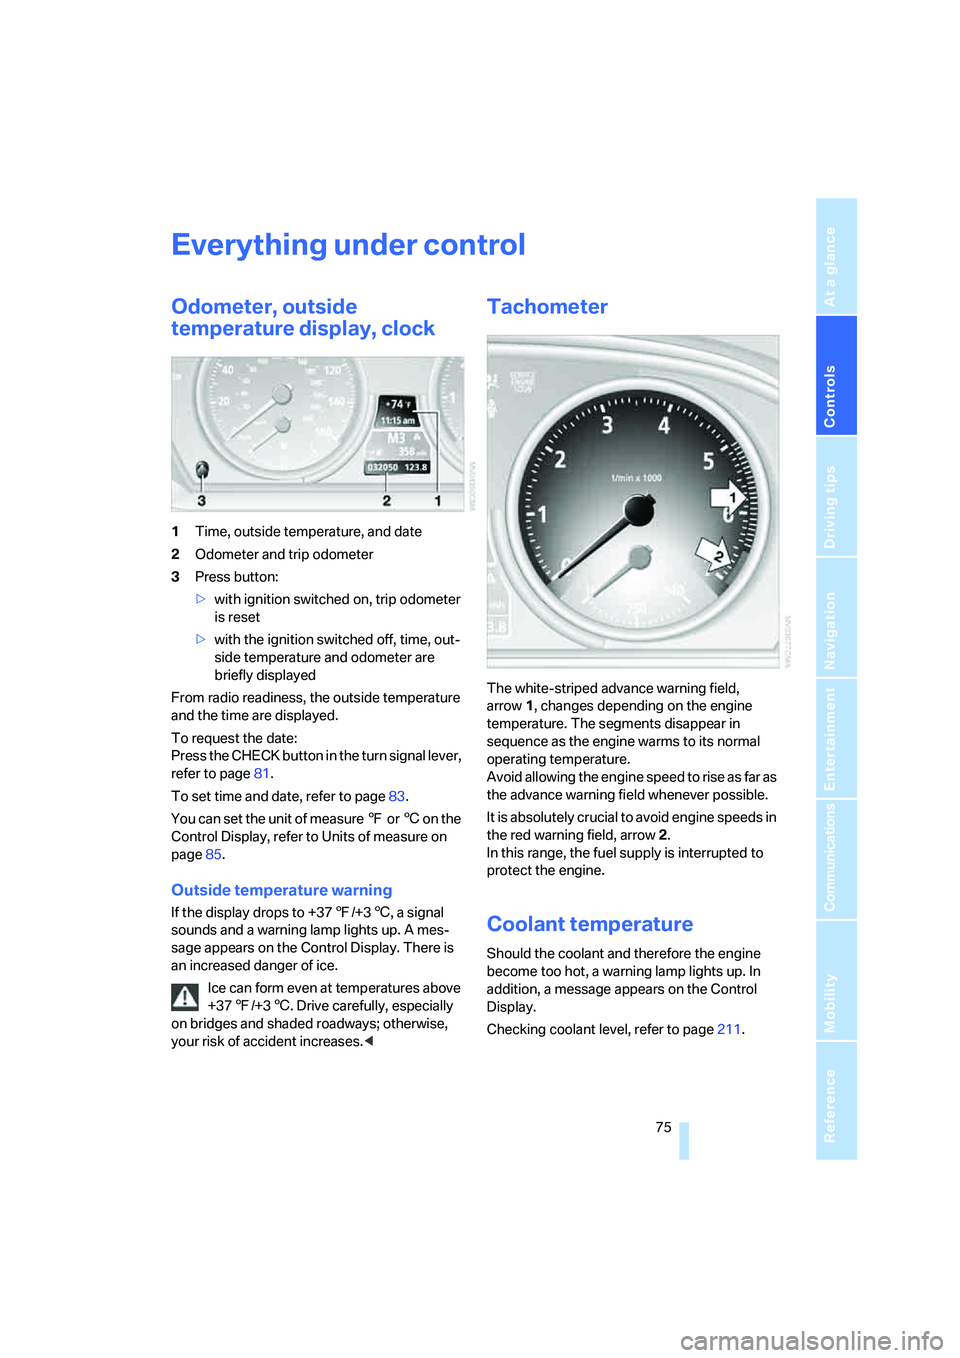
1Time, outside temperature, and date
2Odometer and trip odometer
3Press button:
>with ignition switched on, trip odometer
is reset
>with the ignition switched off, time, out-
side temperature and odometer are
briefly displayed
From radio readiness, the outside temperature
and the time are displayed.
To request the date:
Press the CHECK button in the turn signal lever,
refer to page81.
To set time and date, refer to page83.
You can set the unit of measure 7 or 6 on the
Control Display, refer to Units of measure on
page85.
Outside temperature warning
If the display drops to +377/+36, a signal
sounds and a warning lamp lights up. A mes-
sage appears on the Control Display. There is
an increased danger of ice.
Ice can form even at temperatures above
+377/+36. Drive carefully, especially
on bridges and shaded roadways; otherwise,
your risk of accident increases.<
Tachometer
The white-striped advance warning field,
arrow1, changes depending on the engine
temperature. The segments disappear in
sequence as the engine warms to its normal
operating temperature.
Avoid allowing the engine speed to rise as far as
the advance warning field whenever possible.
It is absolutely crucial to avoid engine speeds in
the red warning field, arrow2.
In this range, the fuel supply is interrupted to
protect the engine.
Coolant temperature
Should the coolant and therefore the engine
become too hot, a warning lamp lights up. In
addition, a message appears on the Control
Display.
Checking coolant level, refer to page211.
Page 80 of 256
Everything under control
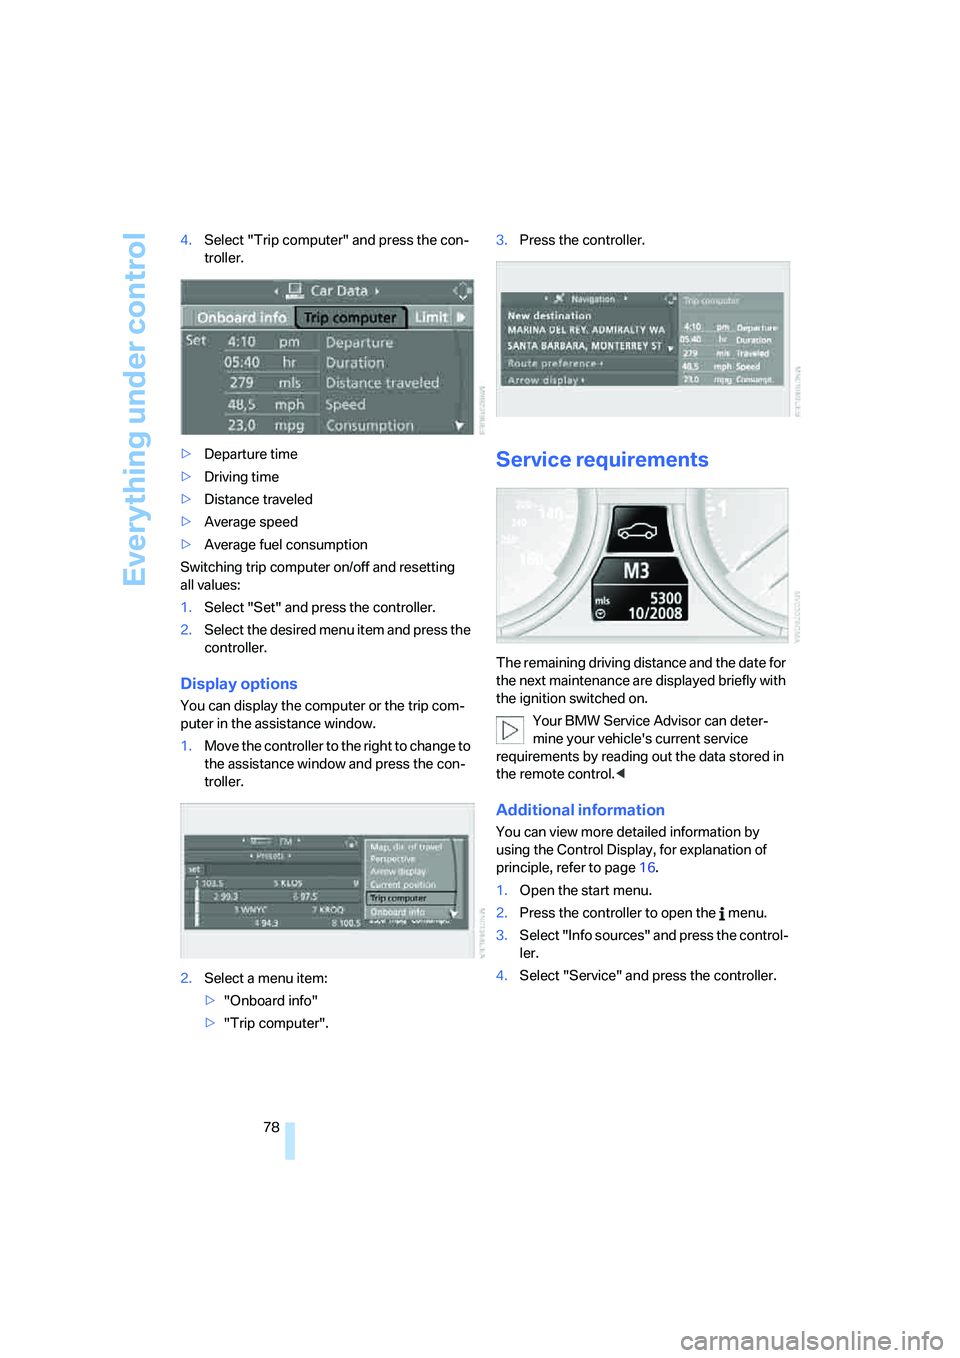
78 4.Select "Trip computer" and press the con-
troller.
>Departure time
>Driving time
>Distance traveled
>Average speed
>Average fuel consumption
Switching trip computer on/off and resetting
all values:
1.Select "Set" and press the controller.
2.Select the desired menu item and press the
controller.
Display options
You can display the computer or the trip com-
puter in the assistance window.
1.Move the controller to the right to change to
the assistance window and press the con-
troller.
2.Select a menu item:
>"Onboard info"
>"Trip computer".3.Press the controller.
Service requirements
The remaining driving distance and the date for
the next maintenance are displayed briefly with
the ignition switched on.
Your BMW Service Advisor can deter-
mine your vehicle's current service
requirements by reading out the data stored in
the remote control.<
Additional information
You can view more detailed information by
using the Control Display, for explanation of
principle, refer to page16.
1.Open the start menu.
2.Press the controller to open the menu.
3.Select "Info sources" and press the control-
ler.
4.Select "Service" and press the controller.
Page 84 of 256
Everything under control
82
Displaying the urgency of malfunctions
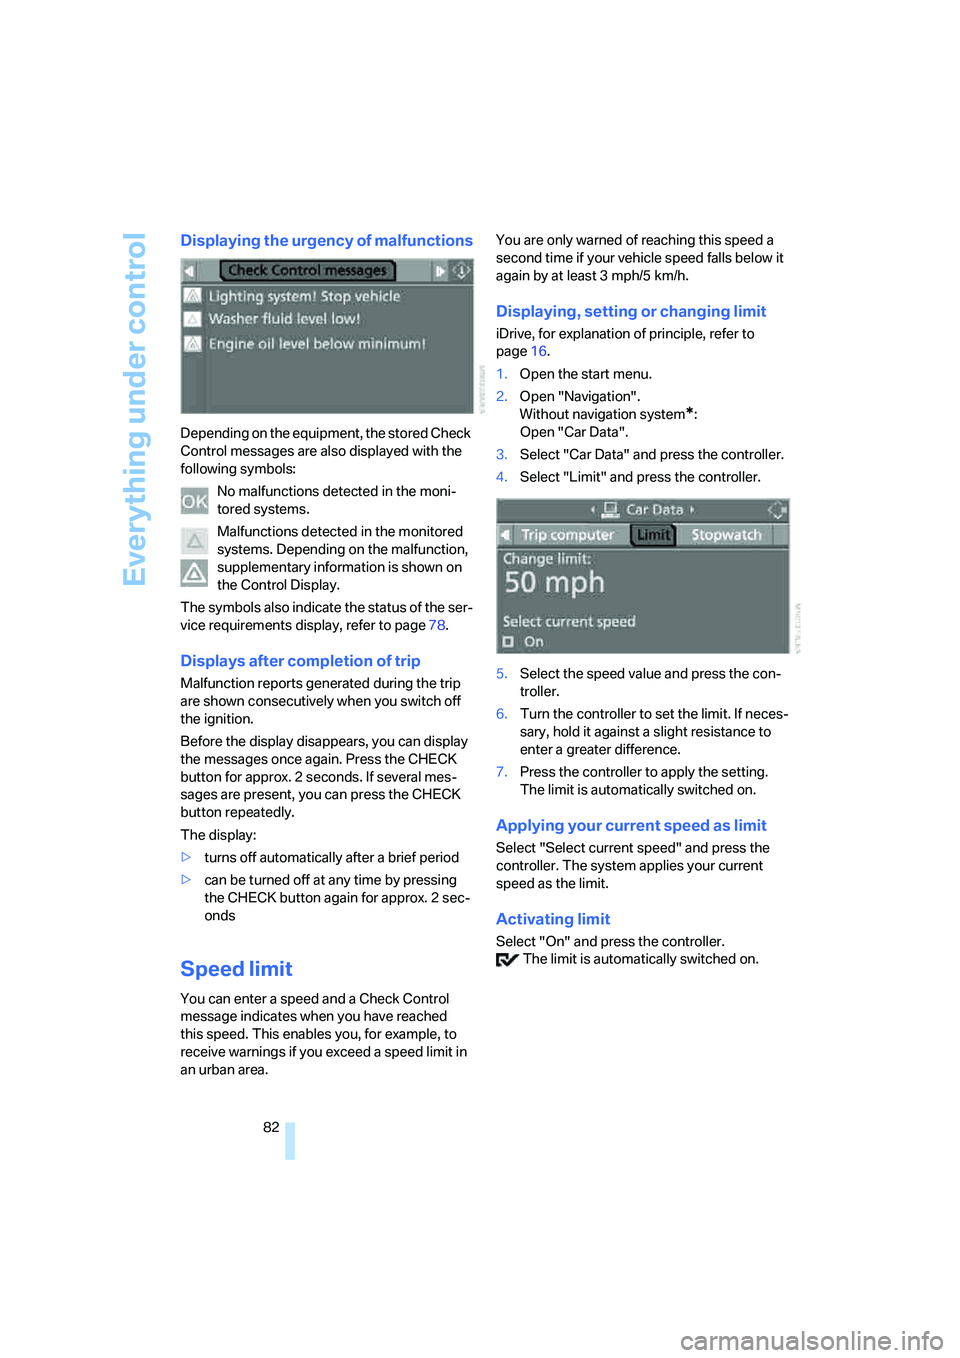
Depending on the equipment, the stored Check
Control messages are also displayed with the
following symbols:
No malfunctions detected in the moni-
tored systems.
Malfunctions detected in the monitored
systems. Depending on the malfunction,
supplementary information is shown on
the Control Display.
The symbols also indicate the status of the ser-
vice requirements display, refer to page78.
Displays after completion of trip
Malfunction reports generated during the trip
are shown consecutively when you switch off
the ignition.
Before the display disappears, you can display
the messages once again. Press the CHECK
button for approx. 2 seconds. If several mes-
sages are present, you can press the CHECK
button repeatedly.
The display:
>turns off automatically after a brief period
>can be turned off at any time by pressing
the CHECK button again for approx. 2 sec-
onds
Speed limit
You can enter a speed and a Check Control
message indicates when you have reached
this speed. This enables you, for example, to
receive warnings if you exceed a speed limit in
an urban area.You are only warned of reaching this speed a
second time if your vehicle speed falls below it
again by at least 3 mph/5 km/h.
Displaying, setting or changing limit
iDrive, for explanation of principle, refer to
page16.
1.Open the start menu.
2.Open "Navigation".
Without navigation system
*:
Open "Car Data".
3.Select "Car Data" and press the controller.
4.Select "Limit" and press the controller.
5.Select the speed value and press the con-
troller.
6.Turn the controller to set the limit. If neces-
sary, hold it against a slight resistance to
enter a greater difference.
7.Press the controller to apply the setting.
The limit is automatically switched on.
Applying your current speed as limit
Select "Select current speed" and press the
controller. The system applies your current
speed as the limit.
Activating limit
Select "On" and press the controller.
The limit is automatically switched on.
Page 89 of 256
Controls
87Reference
At a glance
Driving tips
Communications
Navigation
Entertainment
Mobility
Technology for comfort, convenience and
safety
PDC Park Distance Control*
The concept
The PDC assists you when you are parking.
Acoustic signals and an optical display
* alert
you to the approach of an object from behind
your vehicle. To measure the distance, there
are four ultrasonic sensors in each bumper.
The range of these sensors is approx. 7 ft/2 m.
However, an acoustic warning first sounds for
the sensors at the front and at the two rear cor-
ners at approx. 24 in/60 cm, and for the center
rear sensors at approx. 5 ft/1.50 m.
PDC is a parking aid that can indicate the
presence of objects when they are being
approached slowly, as is usually the case when
parking. Avoid approaching an object at high
speed; otherwise, the physical circumstances
could cause the system warning to be activated
too late.<
Switching on automatically
With the engine running or the ignition switched
on, the system starts to operate automatically
approx. 1 second after you shift into reverse
gear or move the selector lever into position R.
Wait this short period before driving.
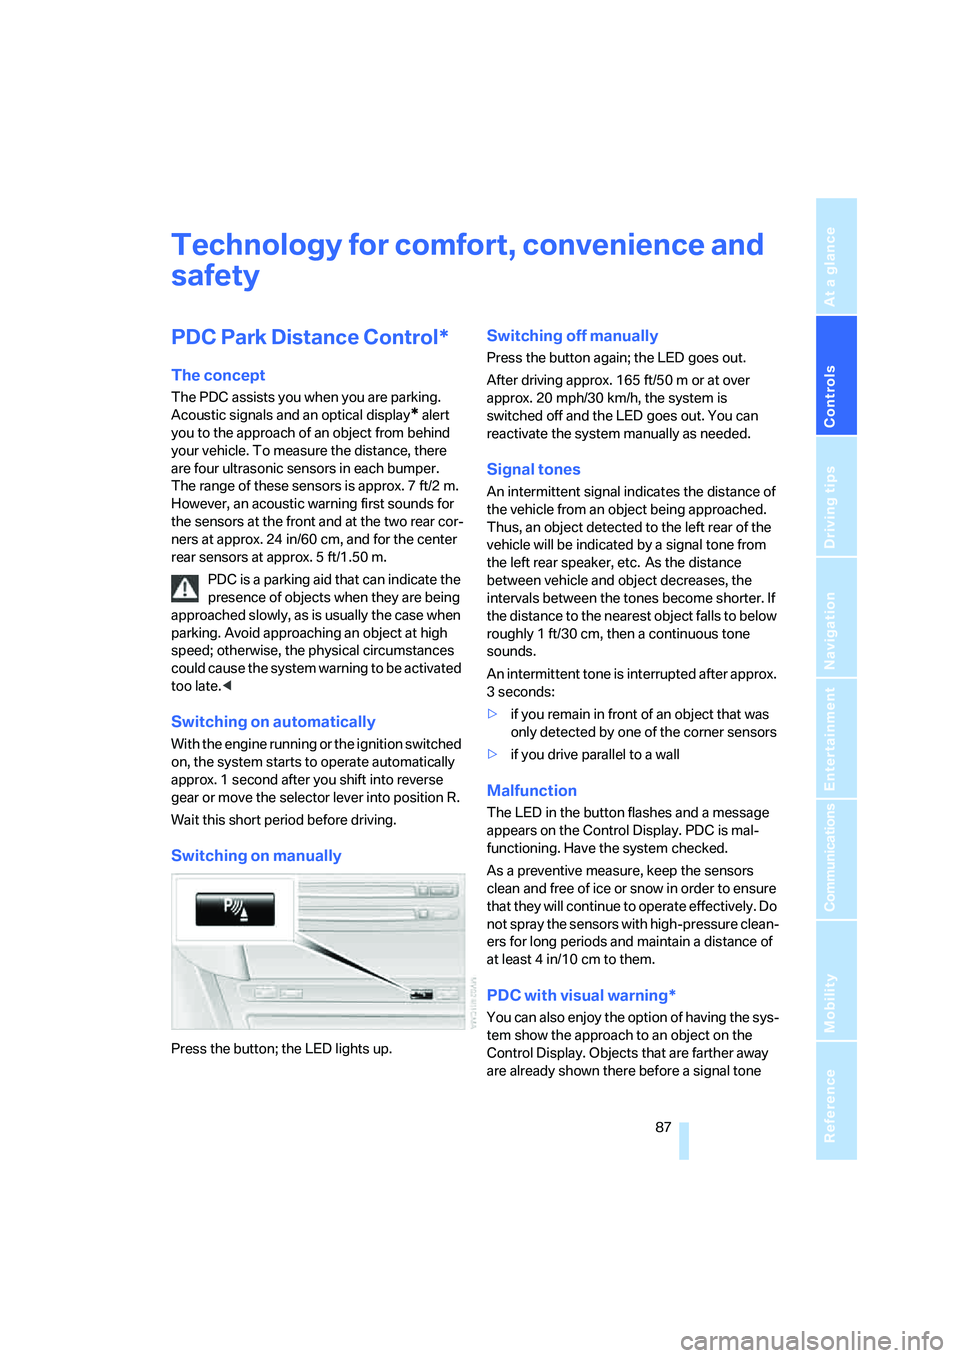
Switching on manually
Press the button; the LED lights up.
Switching off manually
Press the button again; the LED goes out.
After driving approx. 165 ft/50 m or at over
approx. 20 mph/30 km/h, the system is
switched off and the LED goes out. You can
reactivate the system manually as needed.
Signal tones
An intermittent signal indicates the distance of
the vehicle from an object being approached.
Thus, an object detected to the left rear of the
vehicle will be indicated by a signal tone from
the left rear speaker, etc. As the distance
between vehicle and object decreases, the
intervals between the tones become shorter. If
the distance to the nearest object falls to below
roughly 1 ft/30 cm, then a continuous tone
sounds.
An intermittent tone is interrupted after approx.
3seconds:
>if you remain in front of an object that was
only detected by one of the corner sensors
>if you drive parallel to a wall
Malfunction
The LED in the button flashes and a message
appears on the Control Display. PDC is mal-
functioning. Have the system checked.
As a preventive measure, keep the sensors
clean and free of ice or snow in order to ensure
that they will continue to operate effectively. Do
not spray the sensors with high-pressure clean-
ers for long periods and maintain a distance of
at least 4 in/10 cm to them.
PDC with visual warning*
You can also enjoy the option of having the sys-
tem show the approach to an object on the
Control Display. Objects that are farther away
are already shown there before a signal tone
Page 105 of 256
Controls
103Reference
At a glance
Driving tips
Communications
Navigation
Entertainment
Mobility
Lamps
Parking lamps/low beams
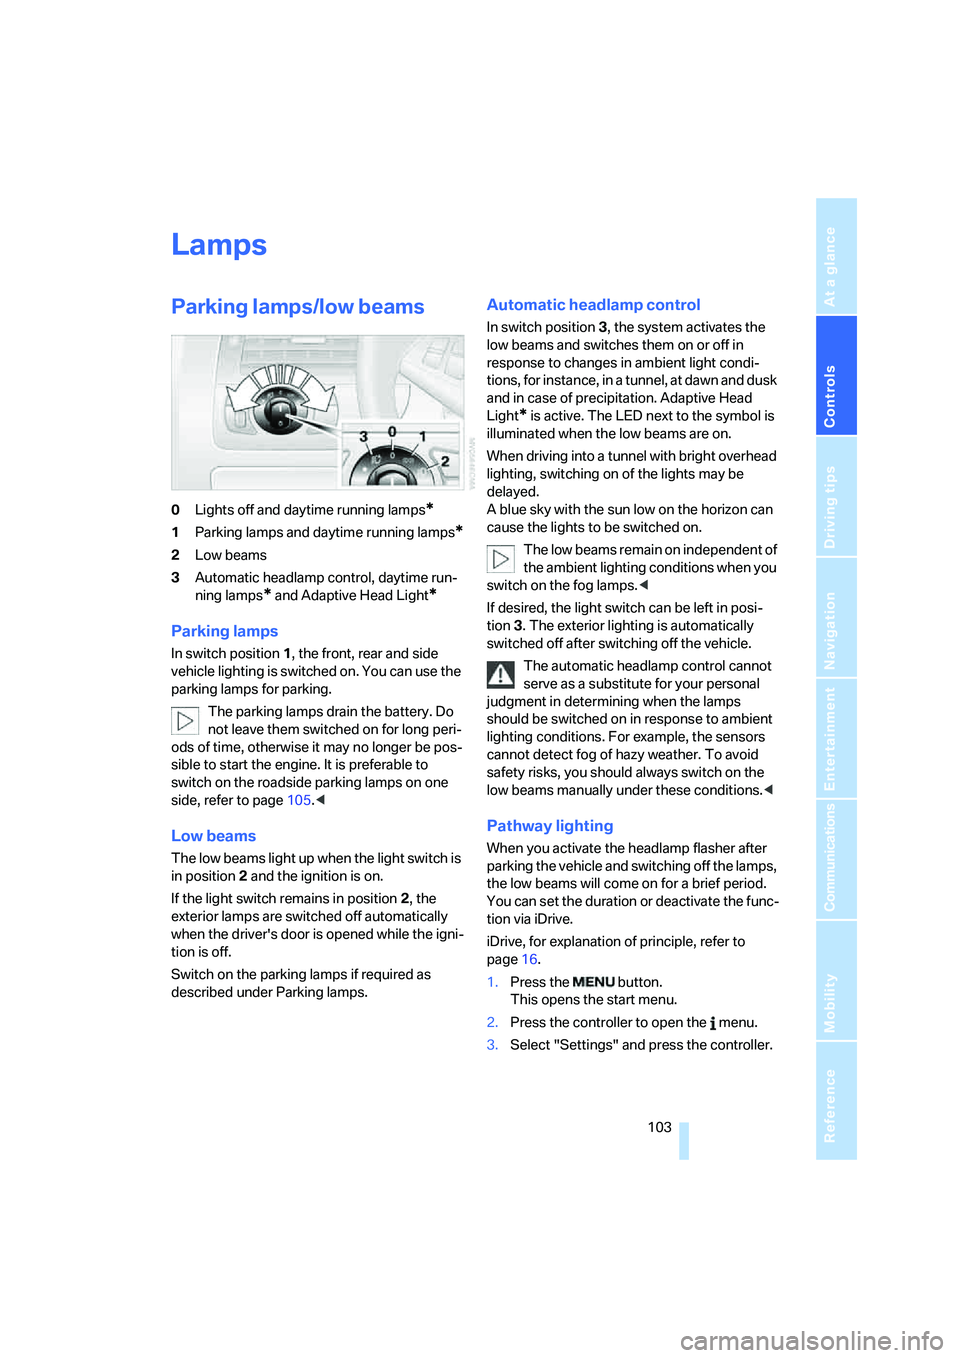
0Lights off and daytime running lamps*
1Parking lamps and daytime running lamps*
2Low beams
3Automatic headlamp control,
daytime run-
ning lamps
* and Adaptive Head Light*
Parking lamps
In switch position1, the front, rear and side
vehicle lighting is switched on. You can use the
parking lamps for parking.
The parking lamps drain the battery. Do
not leave them switched on for long peri-
ods of time, otherwise it may no longer be pos-
sible to start the engine. It is preferable to
switch on the roadside parking lamps on one
side, refer to page105.<
Low beams
The low beams light up when the light switch is
in position 2 and the ignition is on.
If the light switch remains in position 2, the
exterior lamps are switched off automatically
when the driver's door is opened while the igni-
tion is off.
Switch on the parking lamps if required as
described under Parking lamps.
Automatic headlamp control
In switch position3, the system activates the
low beams and switches them on or off in
response to changes in ambient light condi-
tions, for instance, in a tunnel, at dawn and dusk
and in case of precipitation. Adaptive Head
Light
* is active. The LED next to the symbol is
illuminated when the low beams are on.
When driving into a tunnel with bright overhead
lighting, switching on of the lights may be
delayed.
A blue sky with the sun low on the horizon can
cause the lights to be switched on.
The low beams remain on independent of
the ambient lighting conditions when you
switch on the fog lamps.<
If desired, the light switch can be left in posi-
tion3. The exterior lighting is automatically
switched off after switching off the vehicle.
The automatic headlamp control cannot
serve as a substitute for your personal
judgment in determining when the lamps
should be switched on in response to ambient
lighting conditions. For example, the sensors
cannot detect fog of hazy weather. To avoid
safety risks, you should always switch on the
low beams manually under these conditions.<
Pathway lighting
When you activate the headlamp flasher after
parking the vehicle and switching off the lamps,
the low beams will come on for a brief period.
You can set the duration or deactivate the func-
tion via iDrive.
iDrive, for explanation of principle, refer to
page16.
1.Press the button.
This opens the start menu.
2.Press the controller to open the menu.
3.Select "Settings" and press the controller.
Page 106 of 256
Lamps
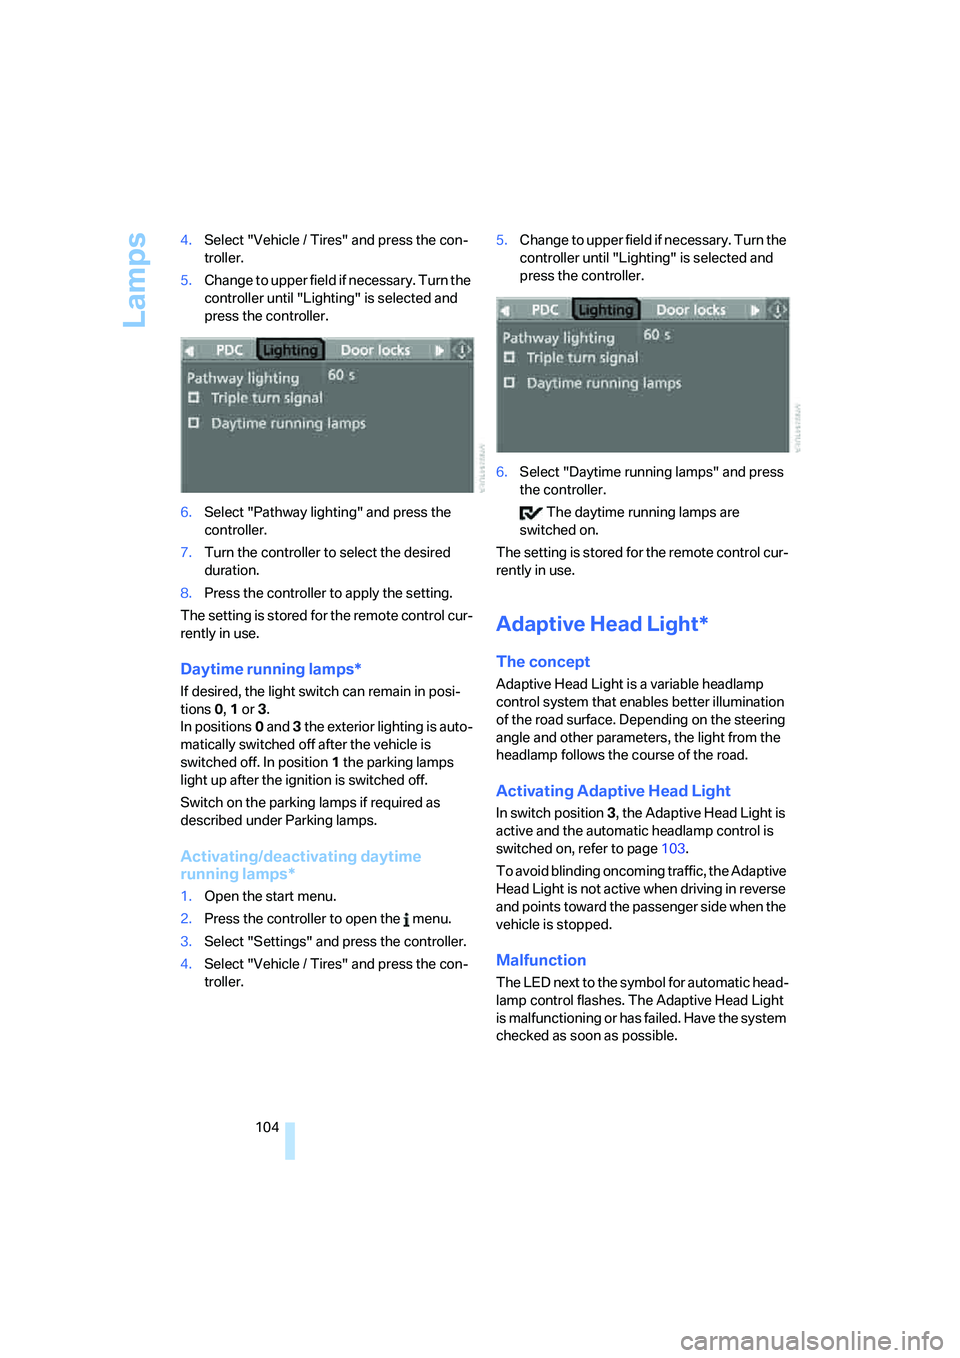
104 4.Select "Vehicle / Tires" and press the con-
troller.
5.Change to upper field if necessary. Turn the
controller until "Lighting" is selected and
press the controller.
6.Select "Pathway lighting" and press the
controller.
7.Turn the controller to select the desired
duration.
8.Press the controller to apply the setting.
The setting is stored for the remote control cur-
rently in use.
Daytime running lamps*
If desired, the light switch can remain in posi-
tions0, 1 or 3.
In positions0 and 3 the exterior lighting is auto-
matically switched off after the vehicle is
switched off. In position1 the parking lamps
light up after the ignition is switched off.
Switch on the parking lamps if required as
described under Parking lamps.
Activating/deactivating daytime
running lamps*
1.Open the start menu.
2.Press the controller to open the menu.
3.Select "Settings" and press the controller.
4.Select "Vehicle / Tires" and press the con-
troller.5.Change to upper field if necessary. Turn the
controller until "Lighting" is selected and
press the controller.
6.Select "Daytime running lamps" and press
the controller.
The daytime running lamps are
switched on.
The setting is stored for the remote control cur-
rently in use.
Adaptive Head Light*
The concept
Adaptive Head Light is a variable headlamp
control system that enables better illumination
of the road surface. Depending on the steering
angle and other parameters, the light from the
headlamp follows the course of the road.
Activating Adaptive Head Light
In switch position3, the Adaptive Head Light is
active and the automatic headlamp control is
switched on, refer to page103.
To avoid blinding oncoming traffic, the Adaptive
Head Light is not active when driving in reverse
and points toward the passenger side when the
vehicle is stopped.
Malfunction
The LED next to the symbol for automatic head-
lamp control flashes. The Adaptive Head Light
is malfunctioning or has failed. Have the system
checked as soon as possible.
Page 112 of 256
Climate
110
Maximum cooling
Maximally cooled air is obtained as
quickly as possible from an outside
temperature above approx. 327/
06 and with the engine running.
The automatic climate control changes over to
the lowest temperature and switches into the
recirculated-air mode. The maximum air vol-
ume only flows out of the vents for the upper
body. It is therefore necessary for these vents to
be open for maximum cooling.
AUC Automatic recirculated-air
control/recirculated-air mode
You can respond to unpleasant
odors or pollutants in the immedi-
ate environment by temporarily
suspending the supply of outside air. The sys-
tem then recirculates the air currently within the
vehicle. In AUC mode, a sensor detects pollut-
ants in the outside air and controls the shut-off
automatically.
Press the button repeatedly to run through the
following control sequence:
>LED off: outside air flows into the vehicle
continuously.
>Right LED on, AUC mode: the system
detects pollutants in the outside air and
responds by blocking the supply of outside
air when required.
>Left LED on, recirculated-air mode: the
supply of outside air into the vehicle is shut
off continuously.
If condensation starts to form on the
inside window surfaces during operation
in the recirculated-air mode, you should switch
it off while also increasing the air volume as
required.
The recirculated-air mode should not be used
over a longer period of time, as the air quality
inside the vehicle deteriorates continuously.<
Residual heat
The heat stored in the engine is
used to heat the passenger com-
partment, e.g. while stopped at a
school to pick up a child.
The function can be switched on when the fol-
lowing conditions are met:
>up to 15 minutes after switching off the
engine
>engine at operating temperature
>sufficient battery voltage
>outside temperature below 777/256
The LED lights up when the function is
switched on.
With the ignition lock at radio readiness or
higher the interior temperature, the air volume
and the air distribution can be set.
Switching automatic climate control on
and off
The air volume, the heater and the
cooling function are all switched
off.
You can restart the automatic cli-
mate control by pressing any of its buttons
except the REST button.
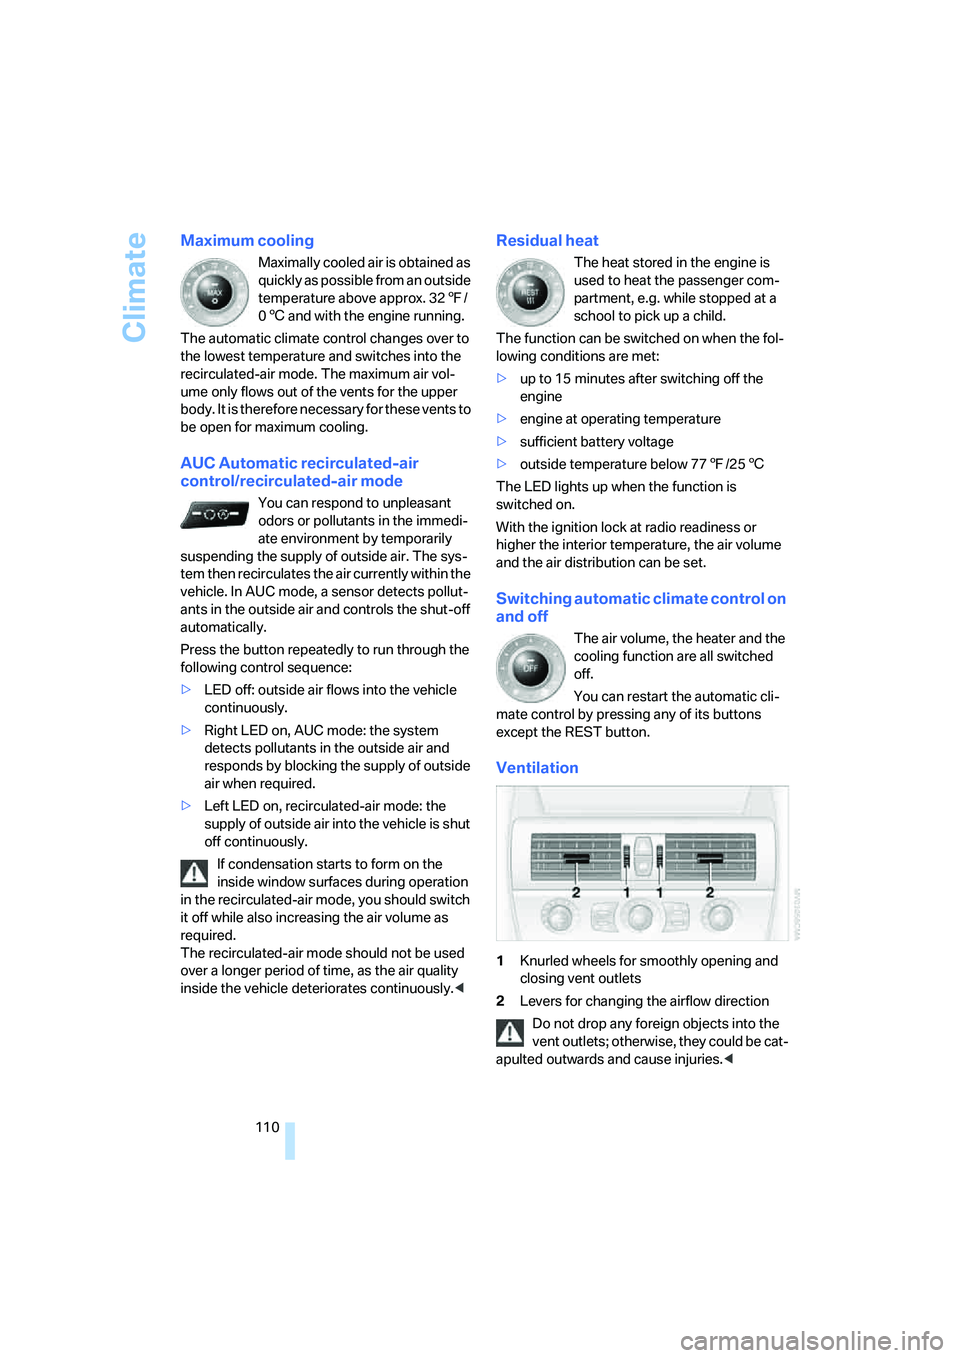
Ventilation
1Knurled wheels for smoothly opening and
closing vent outlets
2Levers for changing the airflow direction
Do not drop any foreign objects into the
vent outlets; otherwise, they could be cat-
apulted outwards and cause injuries.<
Page 115 of 256
Controls
113Reference
At a glance
Driving tips
Communications
Navigation
Entertainment
Mobility
Practical interior accessories
Integrated universal remote
control*
The concept
The integrated universal remote control
replaces up to three different hand-held trans-
mitters for various items of radio-controlled
equipment such as door openers and house
alarm systems. The integrated universal remote
control registers and stores signals from the
original hand-held transmitters.
The signal of an original hand-held transmitter
can be programmed on one of the three mem-
ory buttons1. After this, the programmed
memory button1 will operate the system in
question. The LED2 flashes to confirm trans-
mission of the signal.
If you sell your vehicle one day, delete the saved
programs beforehand for your own security,
refer to page114.
To prevent possible damage or injury,
before programming or using the inte-
grated universal remote control, always inspect
the immediate area to make certain that no peo-
ple, animals or objects are within the travel
range of the device. Also, comply with the
safety precautions of the original hand-held
transmitter.<
Checking compatibility
If you see this symbol on the packaging
or in the manual supplied with the orig-
inal hand-held transmitter, it is safe to
assume that it is compatible with the integrated
universal remote control.
If you have additional questions, please
contact your BMW center or call:
1-800-355-3515.
Information is also provided on the Internet at:
www.bmwusa.com or
www.homelink.com.
HomeLink is a registered trademark of
Johnson Controls, Inc.<
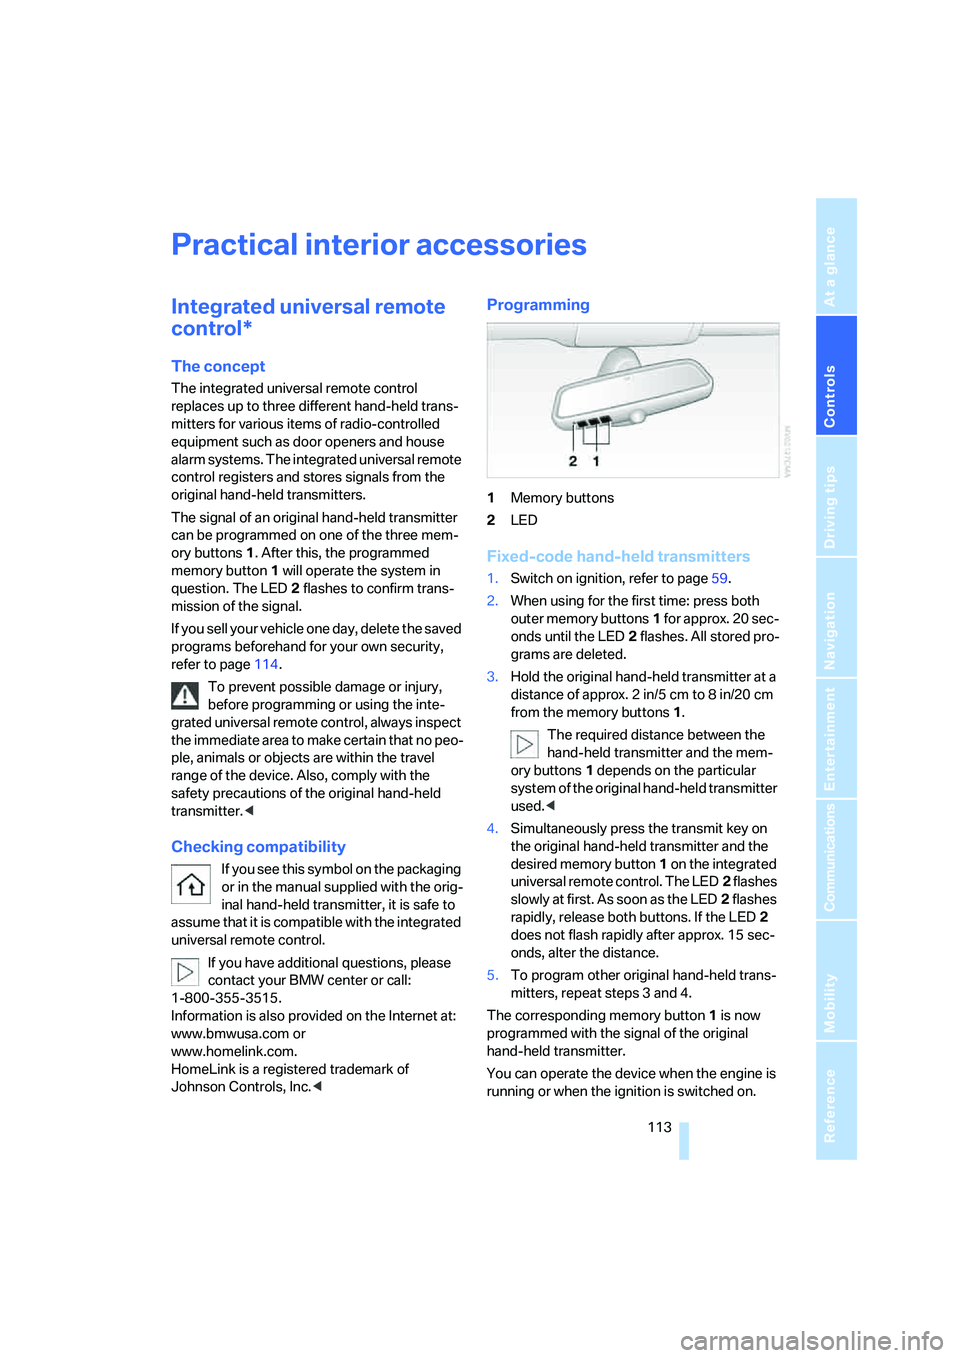
Programming
1Memory buttons
2LED
Fixed-code hand-held transmitters
1.Switch on ignition, refer to page59.
2.When using for the first time: press both
outer memory buttons1 for approx. 20 sec-
onds until the LED2 flashes. All stored pro-
grams are deleted.
3.Hold the original hand-held transmitter at a
distance of approx. 2in/5cm to 8in/20cm
from the memory buttons1.
The required distance between the
hand-held transmitter and the mem-
ory buttons1 depends on the particular
system of the original hand-held transmitter
used.<
4.Simultaneously press the transmit key on
the original hand-held transmitter and the
desired memory button 1 on the integrated
universal remote control. The LED2 flashes
slowly at first. As soon as the LED2 flashes
rapidly, release both buttons. If the LED2
does not flash rapidly after approx. 15 sec-
onds, alter the distance.
5.To program other original hand-held trans-
mitters, repeat steps 3 and 4.
The corresponding memory button 1 is now
programmed with the signal of the original
hand-held transmitter.
You can operate the device when the engine is
running or when the ignition is switched on.