2007 BMW 550I TOURING height
[x] Cancel search: heightPage 38 of 286

Opening and closing
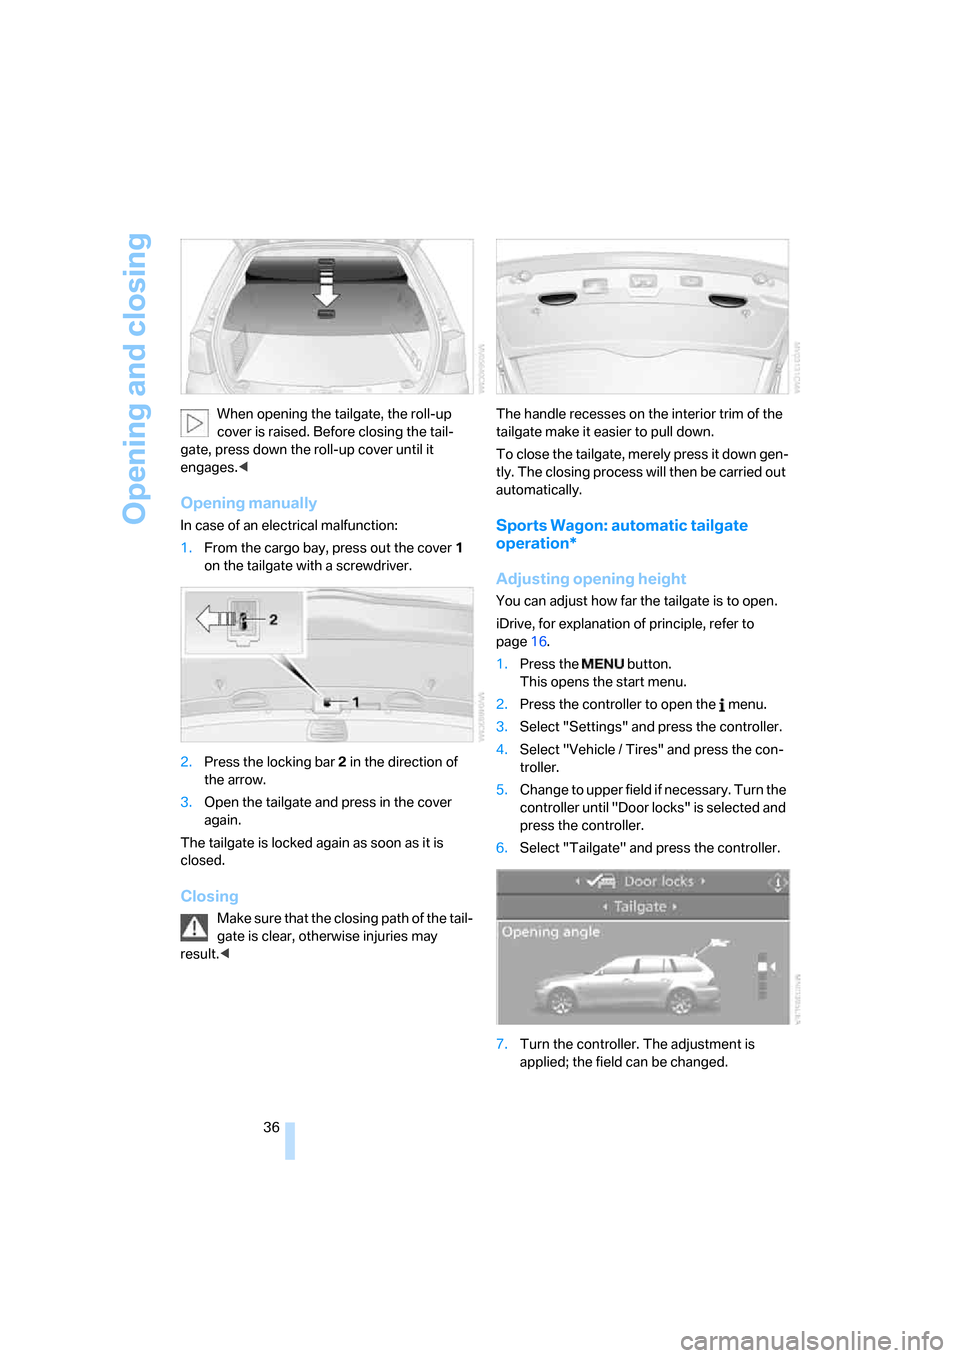
36 When opening the tailgate, the roll-up
cover is raised. Before closing the tail-
gate, press down the roll-up cover until it
engages.<
Opening manually
In case of an electrical malfunction:
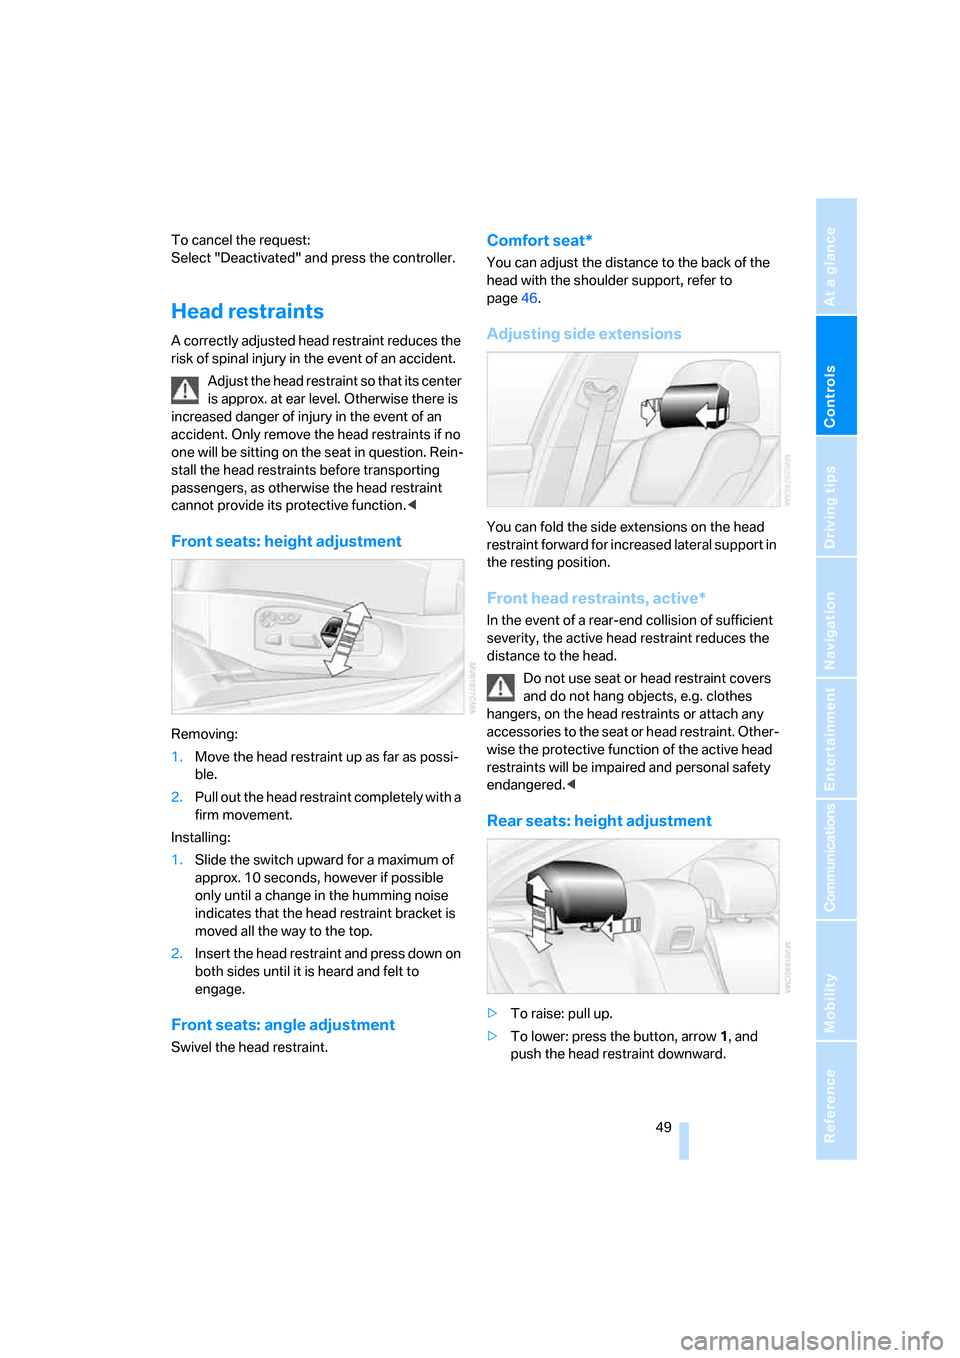
1.From the cargo bay, press out the cover1
on the tailgate with a screwdriver.
2.Press the locking bar2 in the direction of
the arrow.
3.Open the tailgate and press in the cover
again.
The tailgate is locked again as soon as it is
closed.
Closing
Make sure that the closing path of the tail-
gate is clear, otherwise injuries may
result.
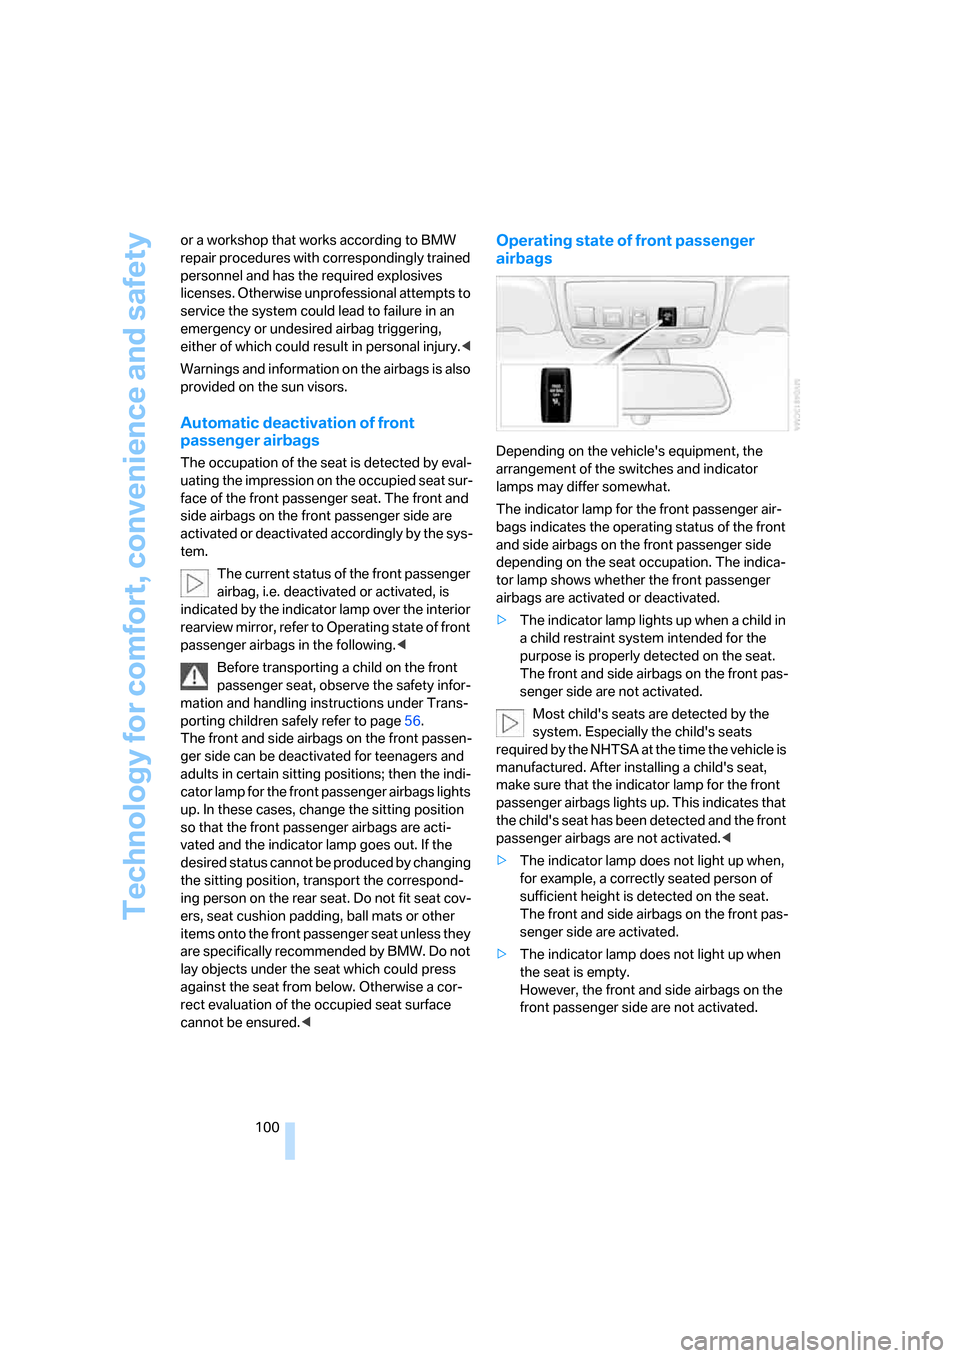
To close the tailgate, merely press it down gen-
tly. The closing process will then be carried out
automatically.
Sports Wagon: automatic tailgate
operation*
Adjusting opening height
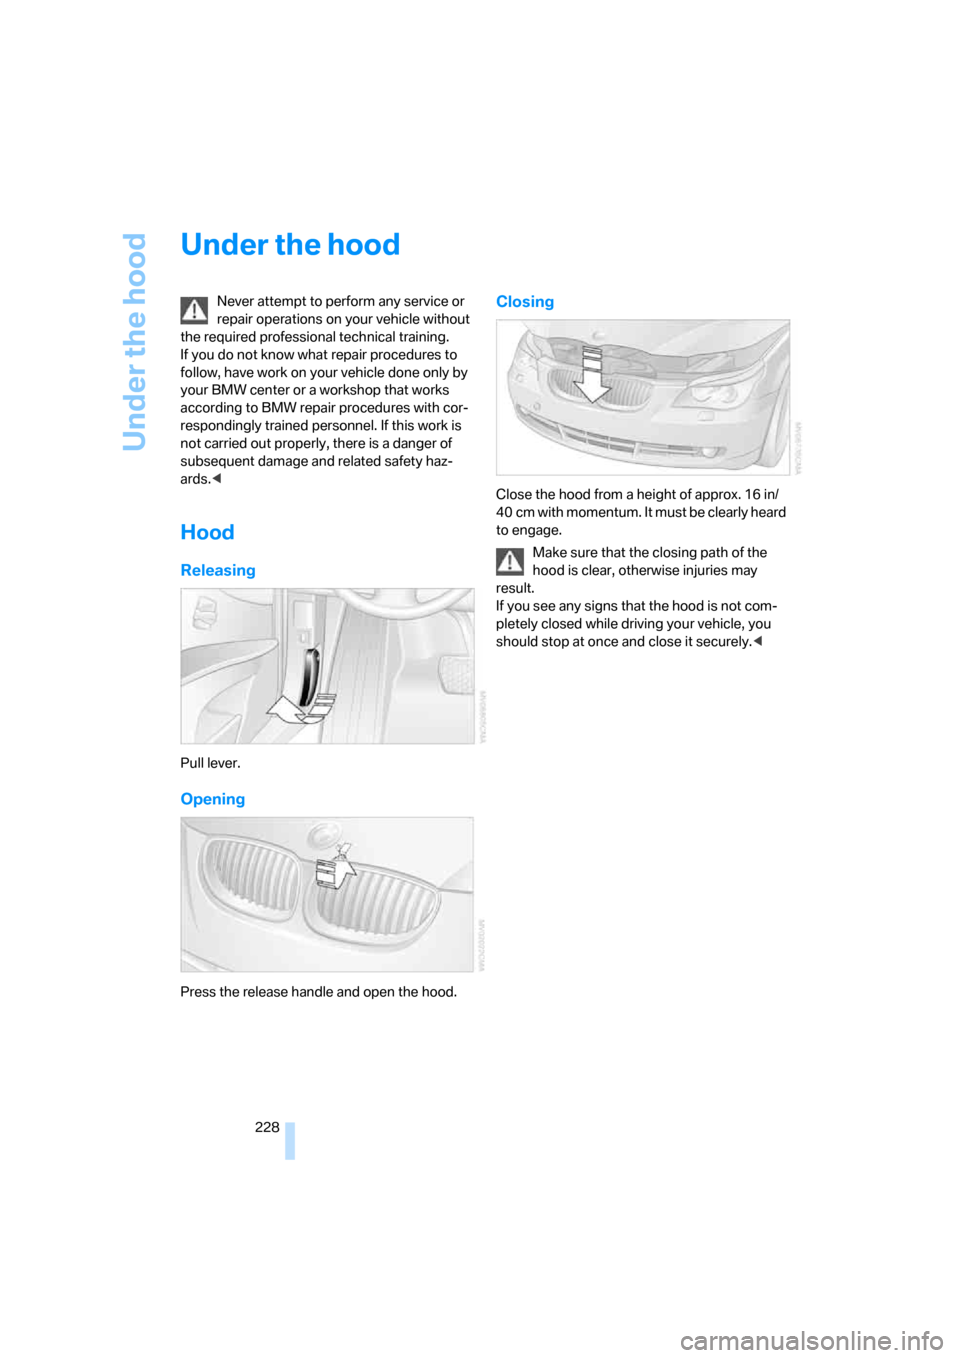
You can adjust how far the tailgate is to open.
iDrive, for explanation of principle, refer to
page16.
1.Press the button.
This opens the start menu.
2.Press the controller to open the menu.
3.Select "Settings" and press the controller.
4.Select "Vehicle / Tires" and press the con-
troller.
5.Change to upper field if necessary. Turn the
controller until "Door locks" is selected and
press the controller.
6.Select "Tailgate" and press the controller.
7.Turn the controller. The adjustment is
applied; the field can be changed.
Page 48 of 286

Adjusting
46
Seats
Note before adjusting
Never attempt to adjust your seat while
the vehicle is moving. The seat could
respond with unexpected movement, and the
ensuing loss of vehicle control could lead to an
accident.
Also on the passenger side, do not incline the
backrest too far to the rear while the vehicle is
being driven, otherwise there is a danger in the
event of an accident of sliding under the safety
belt, eliminating the protection normally pro-
vided by the belt.<
Please observe the information on damage to
safety belts provided on page50 and the infor-
mation on the active front
head restraints* on
page49.
Adjusting seat
To ensure that the safety systems con-
tinue to provide optimized protection,
please observe the adjustment instructions on
page45.<
1Longitudinal direction
2Height
3Angle4Backrest
Adjusting comfort seat*
In this seat, you can also adjust:
1Backrest width
2Shoulder support
3Thigh support
4Lumbar support
*
Shoulder support
the adjustable upper backrest also supports the
back in the shoulder region. This provides a
relaxed driving position and helps relieve stress
on the shoulder muscles.
Page 51 of 286

Controls
49Reference
At a glance
Driving tips
Communications
Navigation
Entertainment
Mobility
To cancel the request:
Select "Deactivated" and press the controller.
Head restraints
A correctly adjusted head restraint reduces the
risk of spinal injury in the event of an accident.
Adjust the head restraint so that its center
is approx. at ear level. Otherwise there is
increased danger of injury in the event of an
accident. Only remove the head restraints if no
one will be sitting on the seat in question. Rein-
stall the head restraints before transporting
passengers, as otherwise the head restraint
cannot provide its protective function.<
Front seats: height adjustment
Removing:
1.Move the head restraint up as far as possi-
ble.
2.Pull out the head restraint completely with a
firm movement.
Installing:
1.Slide the switch upward for a maximum of
approx. 10 seconds, however if possible
only until a change in the humming noise
indicates that the head restraint bracket is
moved all the way to the top.
2.Insert the head restraint and press down on
both sides until it is heard and felt to
engage.
Front seats: angle adjustment
Swivel the head restraint.
Comfort seat*
You can adjust the distance to the back of the
head with the shoulder support, refer to
page46.
Adjusting side extensions
You can fold the side extensions on the head
restraint forward for increased lateral support in
the resting position.
Front head restraints, active*
In the event of a rear-end collision of sufficient
severity, the active head restraint reduces the
distance to the head.
Do not use seat or head restraint covers
and do not hang objects, e.g. clothes
hangers, on the head restraints or attach any
accessories to the seat or head restraint. Other-
wise the protective function of the active head
restraints will be impaired and personal safety
endangered.<
Rear seats: height adjustment
>To raise: pull up.
>To lower: press the button, arrow1, and
push the head restraint downward.
Page 58 of 286

Transporting children safely
56
Transporting children safely
The right place for children
Do not leave children unattended in the
vehicle, otherwise they could endanger
themselves and other persons, e.g. by opening
the doors.<
Children always in the rear
Accident research shows that the safest place
for children is on the rear seat.
Children younger than 13 years of age or
with a height under 5 ft/150 cm may only
be transported in the rear in child restraint sys-
tems which correspond to the age, weight and
height of the child. Otherwise there is an
increased danger of injury in an accident.<
Children 13 years of age or older must wear a
safety belt as soon as a suitable child restraint
system can no longer be used due to their age,
size and weight.
Exception for front passenger seat
Should it be necessary to use a child
restraint system on the front passenger
seat, the front and side airbags on the passen-
ger side must be deactivated. Otherwise, there
is an increased risk of injury for the child if the
airbags are triggered, even with a child restraint
system.<
For more information on automatic deactivation
of the front passenger airbags, refer to
page100.
Installing child restraint
systems
Observe the child restraint system manu-
facturer's instructions for selection,
installation and use of the child restraint sys-
tems. Otherwise the degree of protection may
be reduced.<
On front passenger seat
After mounting a child restraint system on
the front passenger seat, make sure that
the front and side airbags on the front passen-
ger side are deactivated, as otherwise there is
an increased risk of injury if the airbags are trig-
gered.<
Backrest width*
Before mounting a child restraint system
on the front passenger seat, the backrest
width adjustment must be open completely.
After mounting the child's seat, no memory
position may be called up and the active back-
rest width adjustment must be deactivated,
otherwise the stability of the child's seat on the
front passenger seat is limited.<
1.After unlocking the vehicle, sit on the front
passenger seat and close the door to call up
the memory position.
2.Completely open the backrest width adjust-
ment, refer to page46.
3.Deactivate active backrest width adjust-
ment, refer to page47.
4.Install child's seat.
Child seat security
All rear safety belts and the safety belt for the
front passenger can be locked against pulling
out to secure child restraint systems.
Page 76 of 286

Driving
74 Do not apply adhesive labels etc. in the area of
the short-range sensors.If the sensor is not aligned properly, e. g. due to
damage, the active cruise control cannot be
activated.
System limitations
As with conventional cruise control sys-
tems, active cruise control in no way
diminishes or substitutes for the driver's own
personal responsibility, alertness and aware-
ness in adjusting speed, braking or otherwise
controlling the vehicle. The driver should
decide when to use the system on the basis of
road, traffic, visibility, and weather conditions.
Active cruise control is intended for use on
highway-type roadways where traffic is moving
relatively smoothly. Do not use this system in
city driving; in complex driving situations; on
curvy, winding roads, slippery roads or roads
with sharp curves such as highway off-ramps;
during inclement weather such as snow, strong
rain or fog; or when entering interchanges, ser-
vice/parking areas or toll booths. It is also
important to regulate your vehicle's speed and
distance setting within applicable legal limits.
Always be ready to take action or apply the
brakes if necessary, especially when the sys-
tem is actively following a vehicle in front of
you.<
Always remember that the range and abil-
ity of the system do have physical limita-
tions. For example, vehicles driving ahead,
which suddenly brake heavily in stop-and-go
traffic during acceleration, may no longer be
detected. It will not apply the brakes or deceler-
ate your vehicle when there is a very slow-mov-
ing vehicle, stopped vehicle or stationary object
ahead of you, for example when approaching a
traffic light or a parked vehicle or when a vehicle
is stalled in your lane. Also, the system does not react to oncoming traffic, pedestrians or other
types of potential traffic such as a rider on a
horseback. It is also possible that the system
may not detect smaller moving objects such as
motorcycles or bicycles. Be especially alert
when encountering any of these situations as
the system will neither automatically brake, nor
provide a warning to you. Also, be aware that
every decrease in the distance setting allows
your vehicle to come closer to a vehicle in front
of you and requires a heightened amount of
alertness.<
The system cannot allow the vehicle to drive off
automatically in situations that make driving off
considerably more difficult, e.g. on steep uphill
grades, with a heavy trailer or before raised
areas in the road.
Near radio astronomy stations, the system
radar is deactivated at speeds under 20 mph/
30 km/h due to legal regulations.
Be certain to interrupt the system when
you pull into an exit lane for a highway off-
ramp.<
Also, vehicles traveling in a staggered manner
on a highway may cause a delay in the system’s
reaction to a vehicle in front of you or may cause
the system to react to a vehicle actually in the
lane next to you. Always be ready to take action
or apply the brakes if necessary.
In addition, the system is interrupted
whenever the driver applies the vehicle
brakes, shifts the transmission from drive/D to
Page 102 of 286

Technology for comfort, convenience and safety
100 or a workshop that works according to BMW
repair procedures with correspondingly trained
personnel and has the required explosives
licenses. Otherwise unprofessional attempts to
service the system could lead to failure in an
emergency or undesired airbag triggering,
either of which could result in personal injury.<
Warnings and information on the airbags is also
provided on the sun visors.
Automatic deactivation of front
passenger airbags
The occupation of the seat is detected by eval-
uating the impression on the occupied seat sur-
face of the front passenger seat. The front and
side airbags on the front passenger side are
activated or deactivated accordingly by the sys-
tem.
The current status of the front passenger
airbag, i.e. deactivated or activated, is
indicated by the indicator lamp over the interior
rearview mirror, refer to Operating state of front
passenger airbags in the following.<
Before transporting a child on the front
passenger seat, observe the safety infor-
mation and handling instructions under Trans-
porting children safely refer to page56.
The front and side airbags on the front passen-
ger side can be deactivated for teenagers and
adults in certain sitting positions; then the indi-
cator lamp for the front passenger airbags lights
up. In these cases, change the sitting position
so that the front passenger airbags are acti-
vated and the indicator lamp goes out. If the
desired status cannot be produced by changing
the sitting position, transport the correspond-
ing person on the rear seat. Do not fit seat cov-
ers, seat cushion padding, ball mats or other
items onto the front passenger seat unless they
are specifically recommended by BMW. Do not
lay objects under the seat which could press
against the seat from below. Otherwise a cor-
rect evaluation of the occupied seat surface
cannot be ensured.<
Operating state of front passenger
airbags
Depending on the vehicle's equipment, the
arrangement of the switches and indicator
lamps may differ somewhat.
The indicator lamp for the front passenger air-
bags indicates the operating status of the front
and side airbags on the front passenger side
depending on the seat occupation. The indica-
tor lamp shows whether the front passenger
airbags are activated or deactivated.
>The indicator lamp lights up when a child in
a child restraint system intended for the
purpose is properly detected on the seat.
The front and side airbags on the front pas-
senger side are not activated.
Most child's seats are detected by the
system. Especially the child's seats
required by the NHTSA at the time the vehicle is
manufactured. After installing a child's seat,
make sure that the indicator lamp for the front
passenger airbags lights up. This indicates that
the child's seat has been detected and the front
passenger airbags are not activated.<
>The indicator lamp does not light up when,
for example, a correctly seated person of
sufficient height is detected on the seat.
The front and side airbags on the front pas-
senger side are activated.
>The indicator lamp does not light up when
the seat is empty.
However, the front and side airbags on the
front passenger side are not activated.
Page 230 of 286

Under the hood
228
Under the hood
Never attempt to perform any service or
repair operations on your vehicle without
the required professional technical training.
If you do not know what repair procedures to
follow, have work on your vehicle done only by
your BMW center or a workshop that works
according to BMW repair procedures with cor-
respondingly trained personnel. If this work is
not carried out properly, there is a danger of
subsequent damage and related safety haz-
ards.<
Hood
Releasing
Pull lever.
Opening
Press the release handle and open the hood.
Closing
Close the hood from a height of approx. 16 in/
40 cm with momentum. It must be clearly heard
to engage.
Make sure that the closing path of the
hood is clear, otherwise injuries may
result.
If you see any signs that the hood is not com-
pletely closed while driving your vehicle, you
should stop at once and close it securely.<
Page 241 of 286

Mobility
239Reference
At a glance
Controls
Driving tips
Communications
Navigation
Entertainment
Lamps in luggage compartment lid
License plate lamp
5-watt bulb, C5W
1.Insert screwdriver into the slot and press to
the right, refer to arrows. This releases the
lamp.
2.Remove the lamp and replace the bulb.
Sports Wagon:
Brake lamp and backup lamp
1.Turn the locks to the left and fold down the
trim.
2.Fold down the foam insulation.3.Pull out the bulb holder for the backup
lamp1 or brake lamp2 downward.
4.Backup lamp: remove the bulb for replace-
ment.
Brake lamp: apply gentle pressure to the
bulb while turning it to the left for removal
and replacement.
Changing wheels
Safety precautions in the event of a flat
tire or wheel change: park the vehicle as
far as possible from passing traffic and on solid
ground. Switch on the hazard warning flashers.
Have all vehicle occupants get out of the vehicle
and ensure that they remain outside the imme-
diate area in a safe place, such as behind a
guardrail.
If a warning triangle
* or portable hazard warning
lamp
* is required, set it up on the roadside at an
appropriate distance from the rear of the vehi-
cle. Comply with all safety guidelines and regu-
lations.
Change the wheel only on a level, firm surface
which is not slippery. The vehicle or the jack
could slip to the side if you attempt to raise the
vehicle on a soft or slippery surface such as
snow, ice, tiles, etc.
Position the jack on a firm support surface.
Do not use a wooden block or similar object as a
support base for the jack, as this would prevent
it from extending to its full support height and
reduce its load-carrying capacity.
To avoid serious or fatal injury: never lie under
the vehicle, and never start the engine while it is
supported by the jack.<