2007 BMW 530XI TOURING navigation
[x] Cancel search: navigationPage 123 of 286

Controls
121Reference
At a glance
Driving tips
Communications
Navigation
Entertainment
Mobility
Ventilating lower compartment*
Push the slide in the lower compartment
upward.
Depending on the automatic climate con-
trol setting, the temperature inside the
ventilated compartment may be higher than in
the rest of the interior. Should this be the case,
push the slide downward to close off the venti-
lation.<
Adjusting
Push the illustrated section of the center arm-
rest into the desired position.
Connection for external audio device
You can connect an external audio device such
as a CD or MP3 player and play audio tracks
over the vehicle's loudspeaker system:
>AUX-In connection, refer to page185.
>USB/audio interface
*, refer to page186.
Storage compartments
Storage compartments are located on the
doors, in the front center console and in the
rear.
Storage nets are located on the backrests of the
front seats, and a net
* is provided in the front
passenger footwell.
Do not stow hard or sharp-edged objects
in the storage nets or the net, otherwise
there is an increased risk of injury in an acci-
dent.<
Clothes hooks
Clothes hooks are located near the grab han-
dles in the rear.
When hanging clothing on the hooks,
ensure that it will not obstruct the driver's
vision. Do not hang heavy objects on the hooks.
If you do so, they could cause personal injury to
occupants during braking or evasive maneu-
vers.<
Cup holders
Do not place containers made of glass in
the cup holders. This would lead to an
increased risk of injury in the event of an acci-
dent. Do not force containers that are too large
into the cup holders, otherwise damage could
result.<
Opening
Briefly press the button.
Closing
Press the cover in the center and push in the
cup holder.
Page 125 of 286
Controls
123Reference
At a glance
Driving tips
Communications
Navigation
Entertainment
Mobility
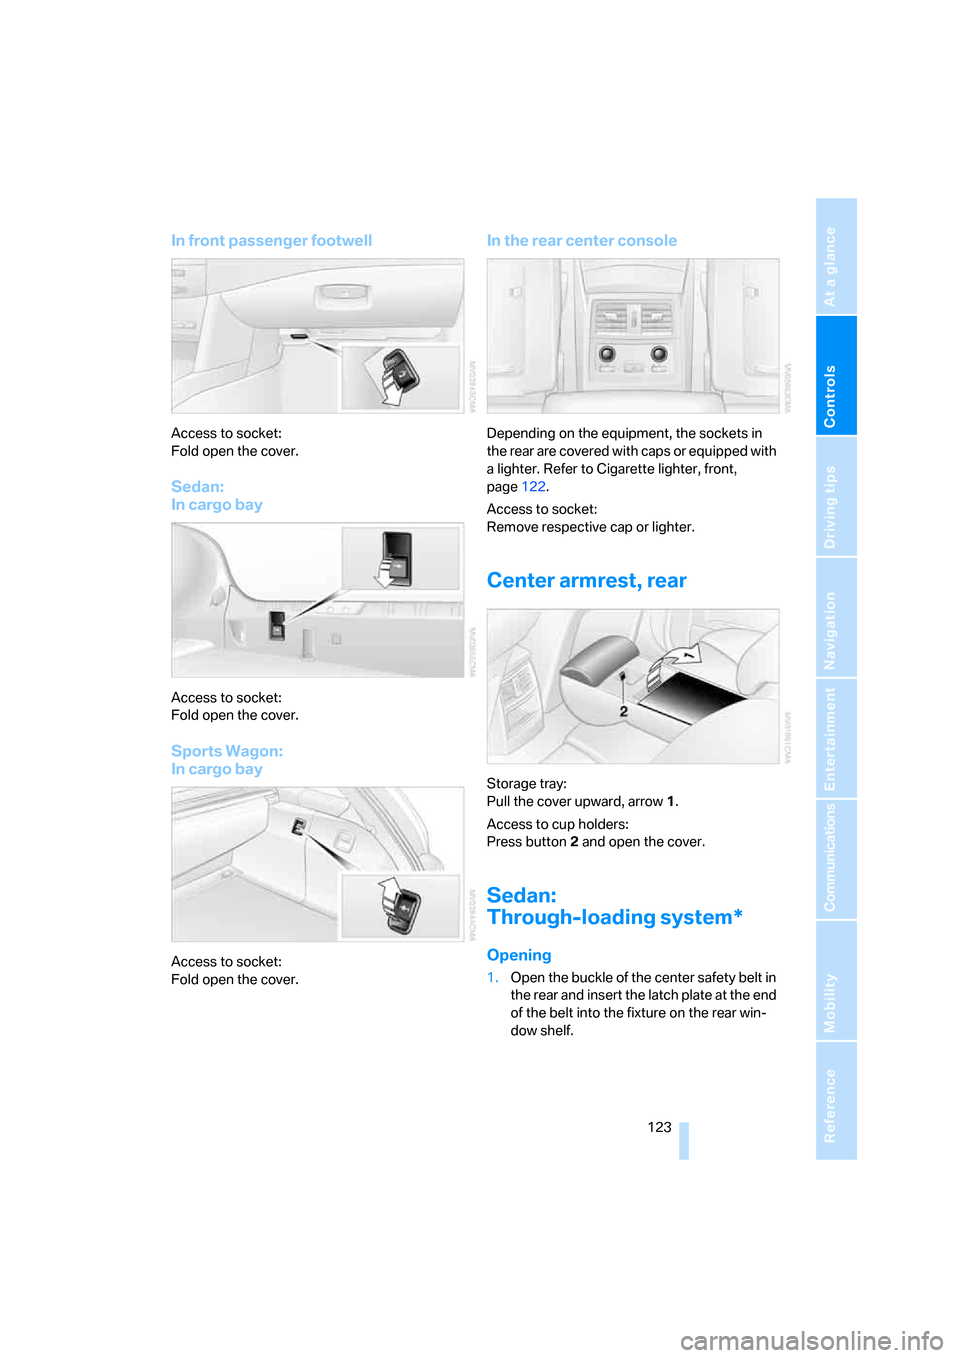
In front passenger footwell
Access to socket:
Fold open the cover.
Sedan:
In cargo bay
Access to socket:
Fold open the cover.
Sports Wagon:
In cargo bay
Access to socket:
Fold open the cover.
In the rear center console
Depending on the equipment, the sockets in
the rear are covered with caps or equipped with
a lighter. Refer to Cigarette lighter, front,
page122.
Access to socket:
Remove respective cap or lighter.
Center armrest, rear
Storage tray:
Pull the cover upward, arrow1.
Access to cup holders:
Press button2 and open the cover.
Sedan:
Through-loading system*
Opening
1.Open the buckle of the center safety belt in
the rear and insert the latch plate at the end
of the belt into the fixture on the rear win-
dow shelf.
Page 127 of 286
Controls
125Reference
At a glance
Driving tips
Communications
Navigation
Entertainment
Mobility
wise the payload or the roll-up cover may be
damaged.<
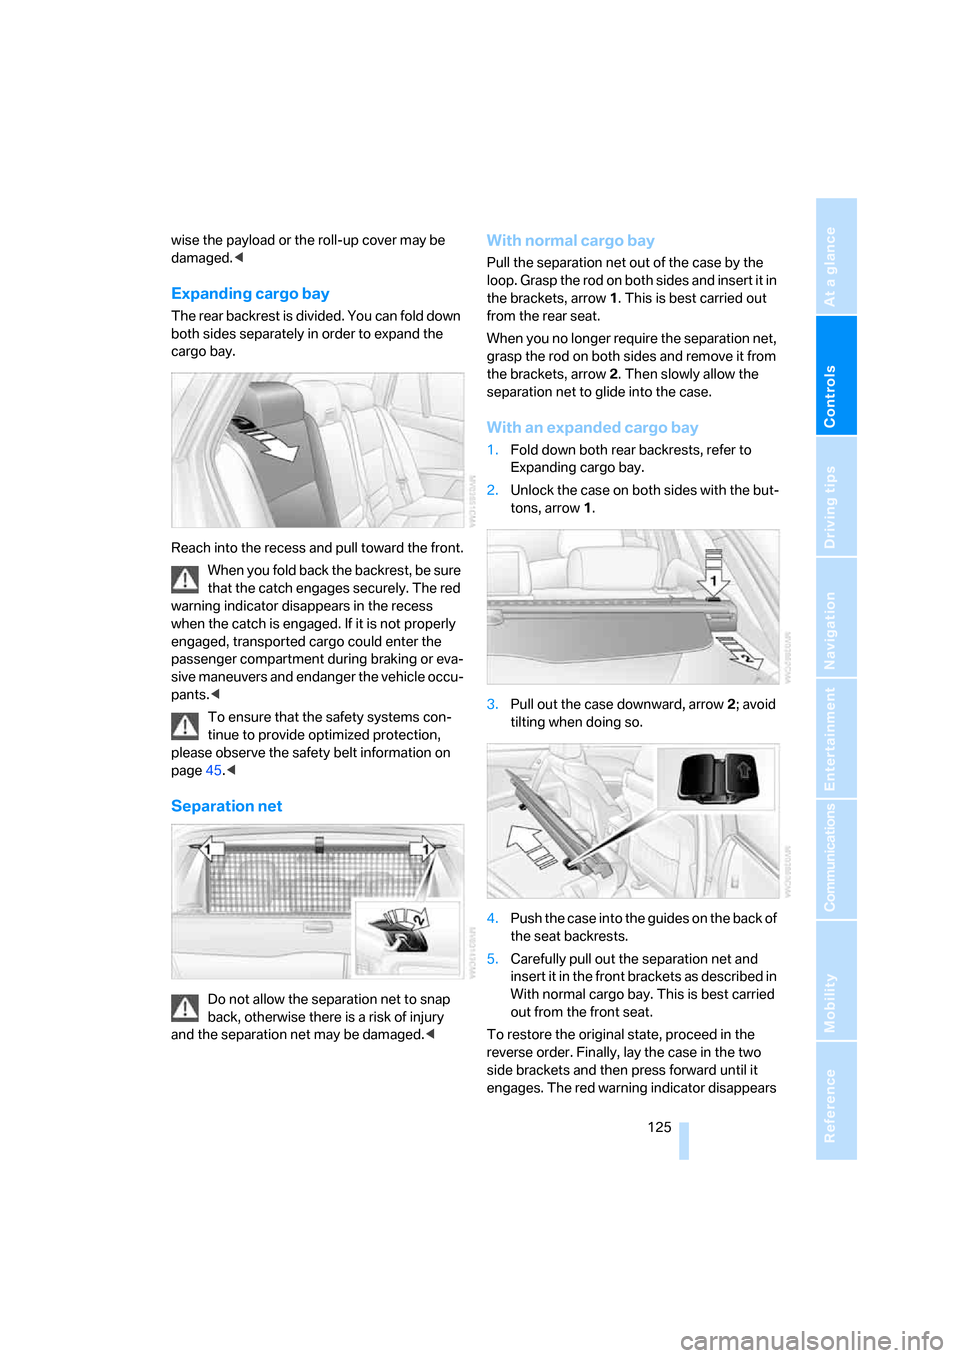
Expanding cargo bay
The rear backrest is divided. You can fold down
both sides separately in order to expand the
cargo bay.
Reach into the recess and pull toward the front.
When you fold back the backrest, be sure
that the catch engages securely. The red
warning indicator disappears in the recess
when the catch is engaged. If it is not properly
engaged, transported cargo could enter the
passenger compartment during braking or eva-
sive maneuvers and endanger the vehicle occu-
pants.<
To ensure that the safety systems con-
tinue to provide optimized protection,
please observe the safety belt information on
page45.<
Separation net
Do not allow the separation net to snap
back, otherwise there is a risk of injury
and the separation net may be damaged.<
With normal cargo bay
Pull the separation net out of the case by the
loop. Grasp the rod on both sides and insert it in
the brackets, arrow1. This is best carried out
from the rear seat.
When you no longer require the separation net,
grasp the rod on both sides and remove it from
the brackets, arrow2. Then slowly allow the
separation net to glide into the case.
With an expanded cargo bay
1.Fold down both rear backrests, refer to
Expanding cargo bay.
2.Unlock the case on both sides with the but-
tons, arrow1.
3.Pull out the case downward, arrow2; avoid
tilting when doing so.
4.Push the case into the guides on the back of
the seat backrests.
5.Carefully pull out the separation net and
insert it in the front brackets as described in
With normal cargo bay. This is best carried
out from the front seat.
To restore the original state, proceed in the
reverse order. Finally, lay the case in the two
side brackets and then press forward until it
engages. The red warning indicator disappears
Page 129 of 286
Controls
127Reference
At a glance
Driving tips
Communications
Navigation
Entertainment
Mobility
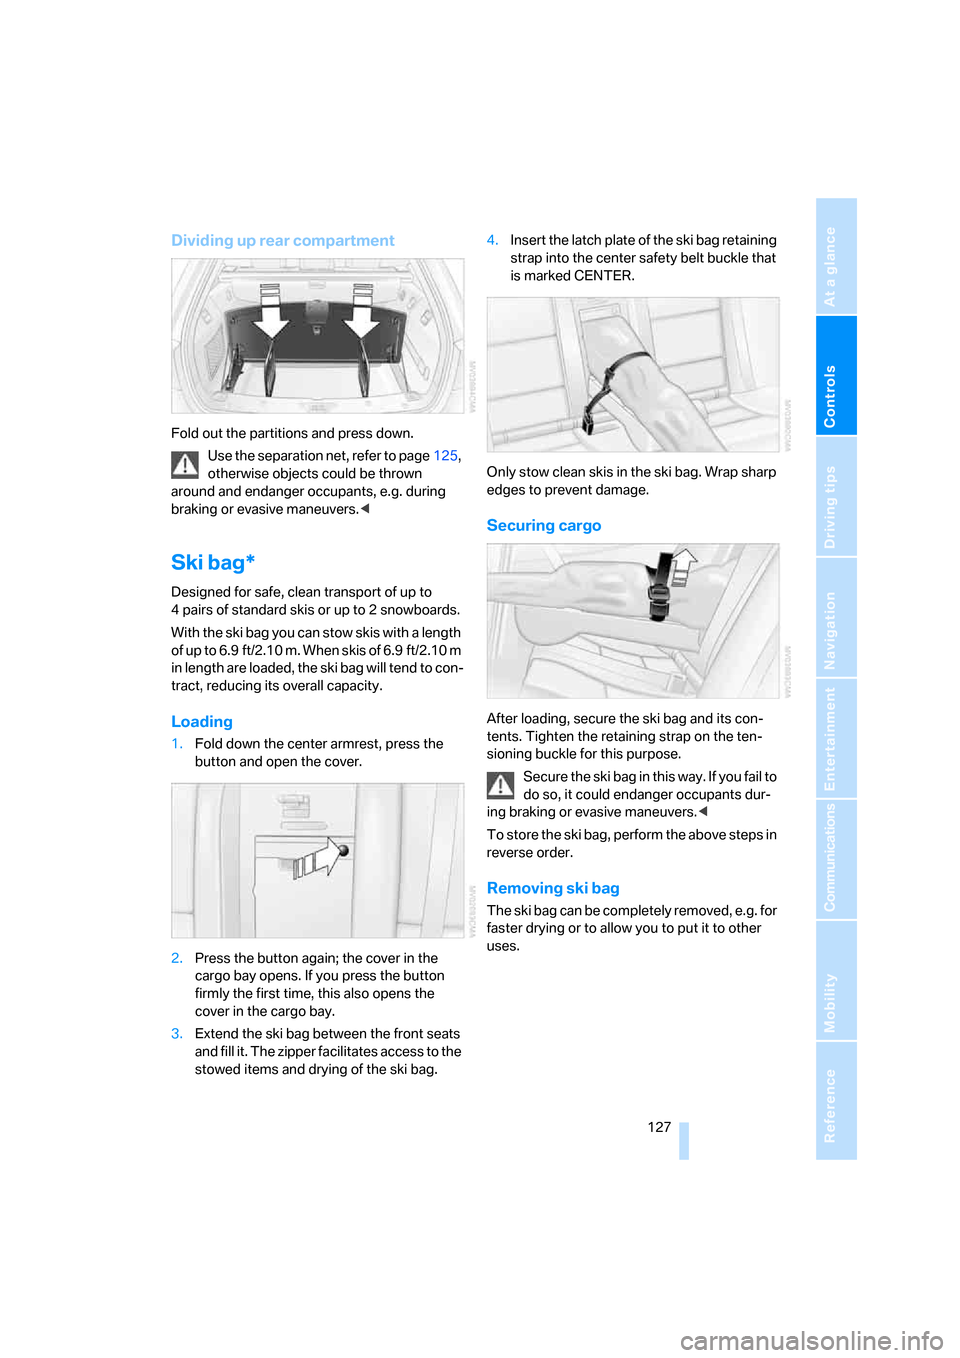
Dividing up rear compartment
Fold out the partitions and press down.
Use the separation net, refer to page125,
otherwise objects could be thrown
around and endanger occupants, e.g. during
braking or evasive maneuvers.<
Ski bag*
Designed for safe, clean transport of up to
4 pairs of standard skis or up to 2 snowboards.
With the ski bag you can stow skis with a length
of up to 6.9 ft/2.10 m. When skis of 6.9 ft/2.10 m
in length are loaded, the ski bag will tend to con-
tract, reducing its overall capacity.
Loading
1.Fold down the center armrest, press the
button and open the cover.
2.Press the button again; the cover in the
cargo bay opens. If you press the button
firmly the first time, this also opens the
cover in the cargo bay.
3.Extend the ski bag between the front seats
and fill it. The zipper facilitates access to the
stowed items and drying of the ski bag.4.Insert the latch plate of the ski bag retaining
strap into the center safety belt buckle that
is marked CENTER.
Only stow clean skis in the ski bag. Wrap sharp
edges to prevent damage.
Securing cargo
After loading, secure the ski bag and its con-
tents. Tighten the retaining strap on the ten-
sioning buckle for this purpose.
Secure the ski bag in this way. If you fail to
do so, it could endanger occupants dur-
ing braking or evasive maneuvers.<
To store the ski bag, perform the above steps in
reverse order.
Removing ski bag
The ski bag can be completely removed, e.g. for
faster drying or to allow you to put it to other
uses.
Page 131 of 286

Controls
129Reference
At a glance
Driving tips
Communications
Navigation
Entertainment
Mobility
Page 135 of 286
Driving tips
133Reference
At a glance
Controls
Communications
Navigation
Entertainment
Mobility
vehicle electronics and mobile communication
device can influence one another. In addition,
there is no assurance that the radiation which
results from transmission will be dissipated
from the vehicle interior.<
Hydroplaning
When driving on wet or slushy roads,
reduce road speed. If you do not, a wedge
of water can form between tires and road sur-
face. This phenomenon is referred to as hydro-
planing, and is characterized by a partial or
complete loss of contact between the tires and
the road surface, ultimately undermining your
ability to steer and brake the vehicle.<
The risk of hydroplaning increases as the tread
depth of the tires decreases, refer also to Mini-
mum tire tread on page225.
Driving through water
Do not drive through water on the road if it
is deeper than 1 ft/30 cm, and then only at
walking speed at the most. Otherwise, the vehi-
cle's engine, the electrical systems and the
transmission may be damaged.<
Using handbrake on inclines
On inclines, do not hold the vehicle with
the clutch; use the handbrake. Otherwise
greater clutch wear will result.<
Starting assistant
The starting assistant enables you to start off
conveniently on slopes. The handbrake is not
required for this purpose.
1.Hold the vehicle with the footbrake.
2.Release the footbrake and drive off quickly.
The starting assistant holds the vehicle
for approx. 2 seconds after releasing the
footbrake. Depending on the load, the vehicle
may also roll back slightly during this time.
After releasing the footbrake, drive off quickly,
otherwise the starting assistant no longer holds
the vehicle after approx. 2 seconds and it
begins to roll back.<
Braking safely
Your BMW is equipped with ABS as a standard
feature. In situations that require it, it is best to
brake with full force. Since the vehicle maintains
steering responsiveness, you can still avoid
possible obstacles with a minimum of steering
effort.
Pulsation of the brake pedal, combined with
sounds from the hydraulic circuits, indicate that
ABS is in its active mode.
Do not drive with your foot resting on the
brake pedal. Even light but consistent
pedal pressure can lead to high temperatures,
brake wear and possibly even brake failure.<
Driving in wet conditions
When roads are wet or there is heavy rain,
briefly exert gentle pressure on the brake pedal
every few miles. Monitor traffic conditions to
ensure that this maneuver does not endanger
other road users. The heat generated in this
process helps dry the pads and rotors to ensure
that full braking efficiency will then be available
when you need it.
Hills
To prevent overheating and the resulting
reduced efficiency of the brake system,
drive long or steep downhill gradients in the
gear in which the least braking is required. Even
light but consistent pressure on the brake pedal
can lead to high temperatures, brake wear and
possibly even brake failure.<
The braking effect of the engine can be further
increased by downshifting, if necessary all the
way down into first gear. This strategy helps
you avoid placing excessive loads on the brake
system. For information on downshifting in the
manual mode of the automatic transmission,
refer to page63.
Do not drive with the clutch depressed, in
idle or with the engine switched off, other-
wise there will be no engine braking action or
support of the braking force and steering.
Never allow floor mats, carpets or any other
objects to protrude into the area of movement
of the pedals and impair their operation.<
Page 137 of 286
Driving tips
135Reference
At a glance
Controls
Communications
Navigation
Entertainment
Mobility
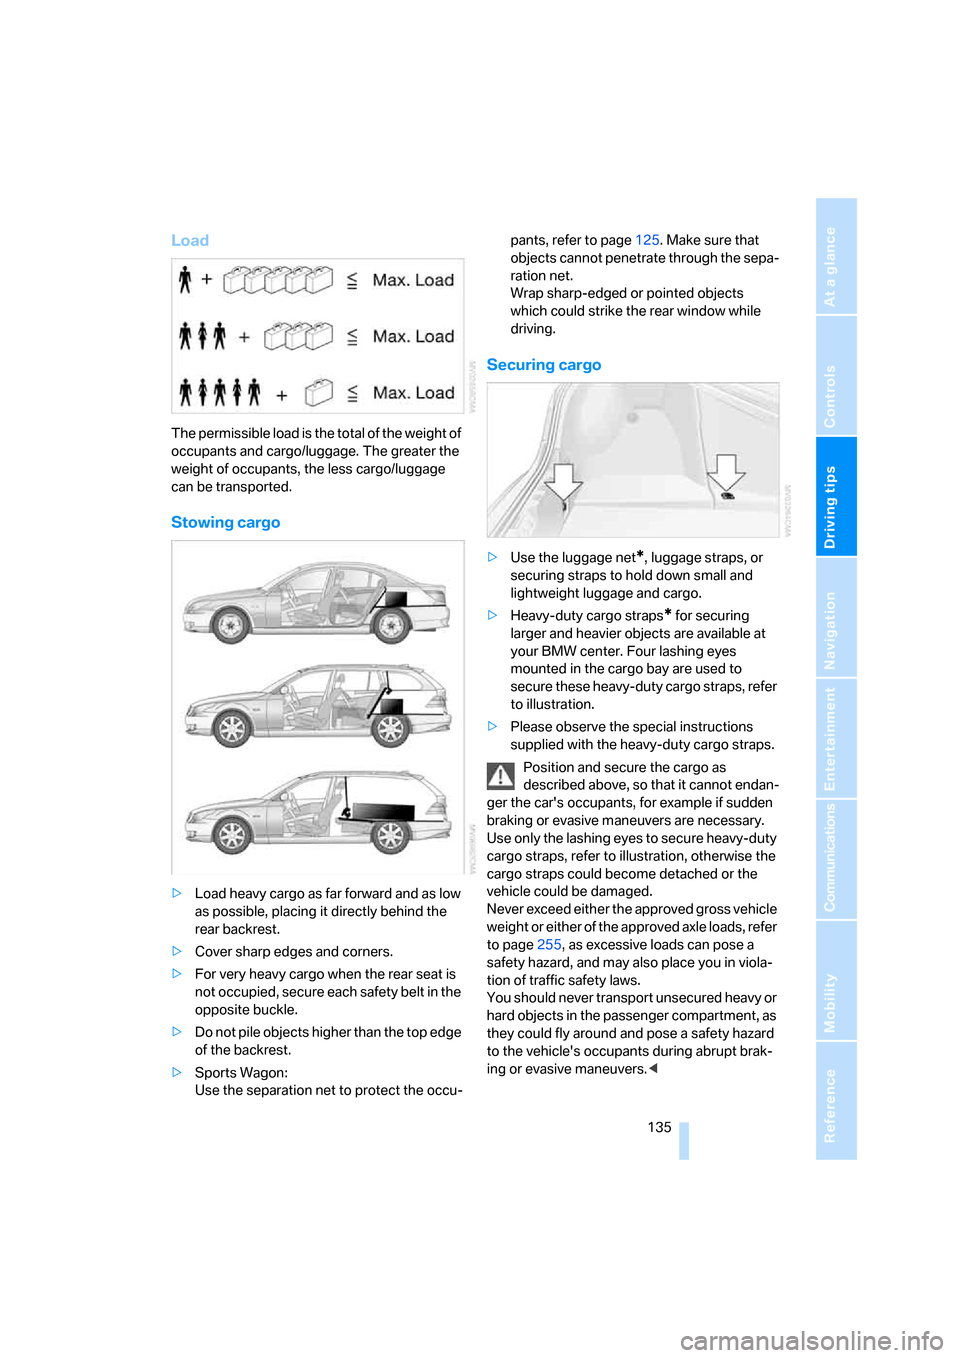
Load
The permissible load is the total of the weight of
occupants and cargo/luggage. The greater the
weight of occupants, the less cargo/luggage
can be transported.
Stowing cargo
>Load heavy cargo as far forward and as low
as possible, placing it directly behind the
rear backrest.
>Cover sharp edges and corners.
>For very heavy cargo when the rear seat is
not occupied, secure each safety belt in the
opposite buckle.
>Do not pile objects higher than the top edge
of the backrest.
>Sports Wagon:
Use the separation net to protect the occu-pants, refer to page125. Make sure that
objects cannot penetrate through the sepa-
ration net.
Wrap sharp-edged or pointed objects
which could strike the rear window while
driving.
Securing cargo
>Use the luggage net*, luggage straps, or
securing straps to hold down small and
lightweight luggage and cargo.
>Heavy-duty cargo straps
* for securing
larger and heavier objects are available at
your BMW center. Four lashing eyes
mounted in the cargo bay are used to
secure these heavy-duty cargo straps, refer
to illustration.
>Please observe the special instructions
supplied with the heavy-duty cargo straps.
Position and secure the cargo as
described above, so that it cannot endan-
ger the car's occupants, for example if sudden
braking or evasive maneuvers are necessary.
Use only the lashing eyes to secure heavy-duty
cargo straps, refer to illustration, otherwise the
cargo straps could become detached or the
vehicle could be damaged.
Never exceed either the approved gross vehicle
weight or either of the approved axle loads, refer
to page255, as excessive loads can pose a
safety hazard, and may also place you in viola-
tion of traffic safety laws.
You should never transport unsecured heavy or
hard objects in the passenger compartment, as
they could fly around and pose a safety hazard
to the vehicle's occupants during abrupt brak-
ing or evasive maneuvers.<
Page 139 of 286

Driving tips
137Reference
At a glance
Controls
Communications
Navigation
Entertainment
Mobility