2007 BMW 525XI TOURING instrument cluster
[x] Cancel search: instrument clusterPage 73 of 286

Controls
71Reference
At a glance
Driving tips
Communications
Navigation
Entertainment
Mobility
tions can result which lead to a violation of the
law or elevated risk of an accident.
The minimum initial activation speed is 20 mph/
30 km/h, and the maximum speed is 110 mph/
180 km/h. However, you can also activate the
system while stopped, refer to While stopped,
page72.
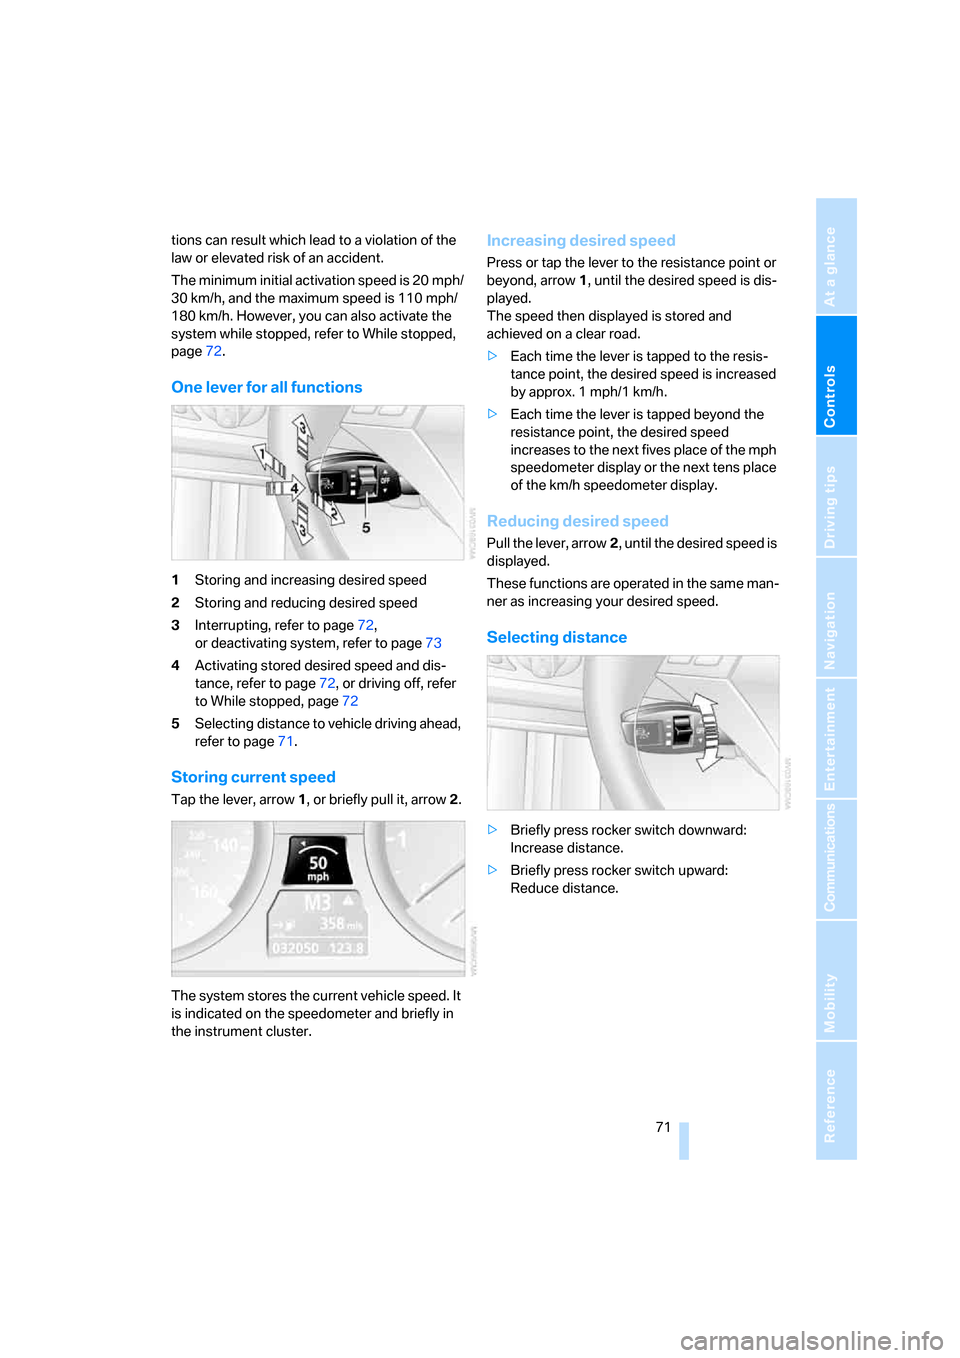
One lever for all functions
1Storing and increasing desired speed
2Storing and reducing desired speed
3Interrupting, refer to page72,
or deactivating system, refer to page73
4Activating stored desired speed and dis-
tance, refer to page72, or driving off, refer
to While stopped, page72
5Selecting distance to vehicle driving ahead,
refer to page71.
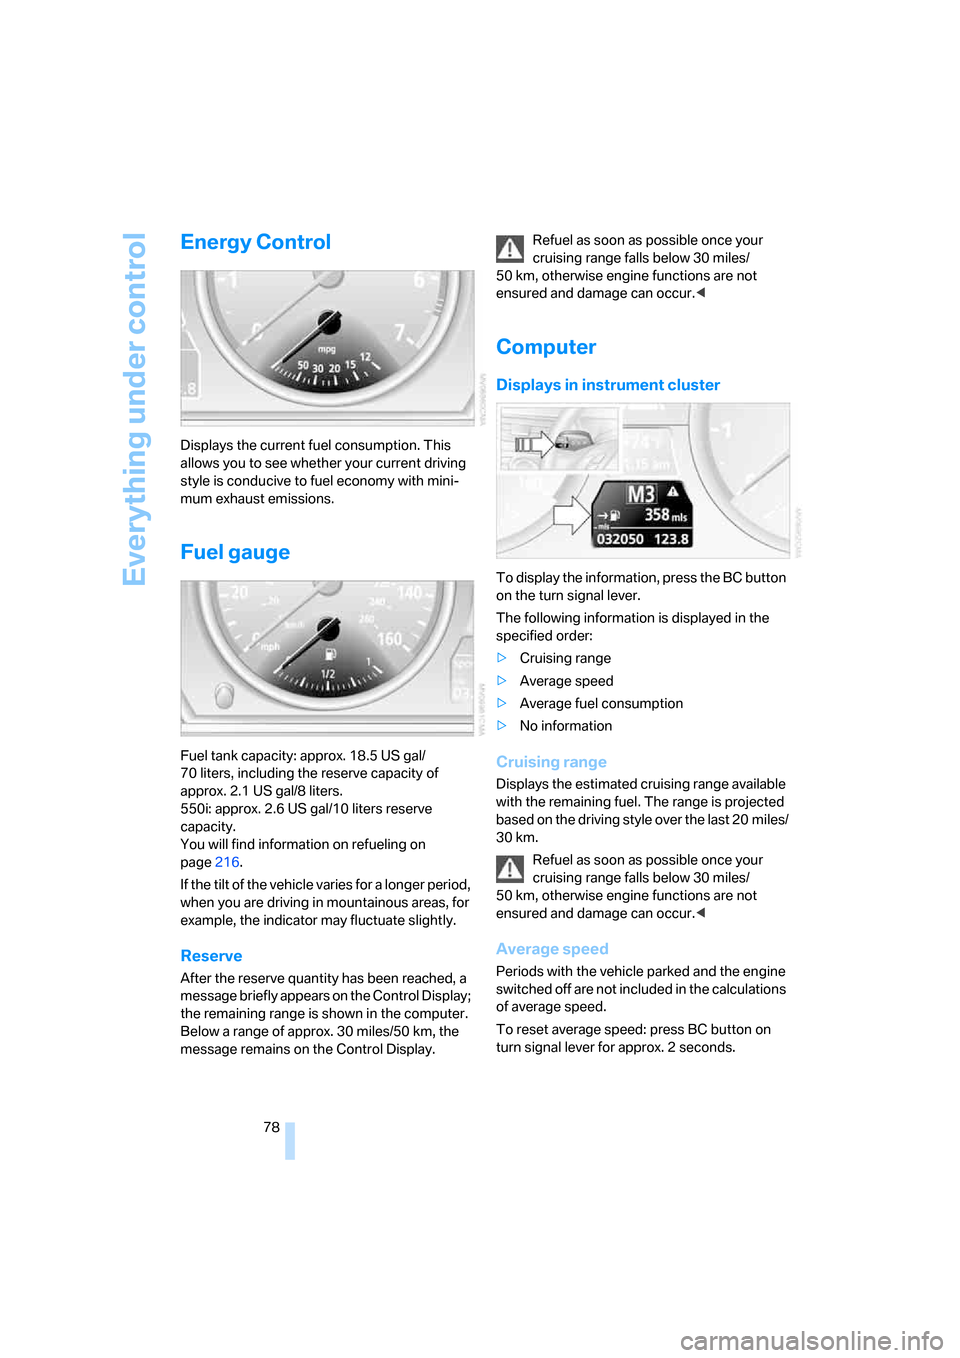
Storing current speed
Tap the lever, arrow1, or briefly pull it, arrow2.
The system stores the current vehicle speed. It
is indicated on the speedometer and briefly in
the instrument cluster.
Increasing desired speed
Press or tap the lever to the resistance point or
beyond, arrow1, until the desired speed is dis-
played.
The speed then displayed is stored and
achieved on a clear road.
>Each time the lever is tapped to the resis-
tance point, the desired speed is increased
by approx. 1 mph/1 km/h.
>Each time the lever is tapped beyond the
resistance point, the desired speed
increases to the next fives place of the mph
speedometer display or the next tens place
of the km/h speedometer display.
Reducing desired speed
Pull the lever, arrow2, until the desired speed is
displayed.
These functions are operated in the same man-
ner as increasing your desired speed.
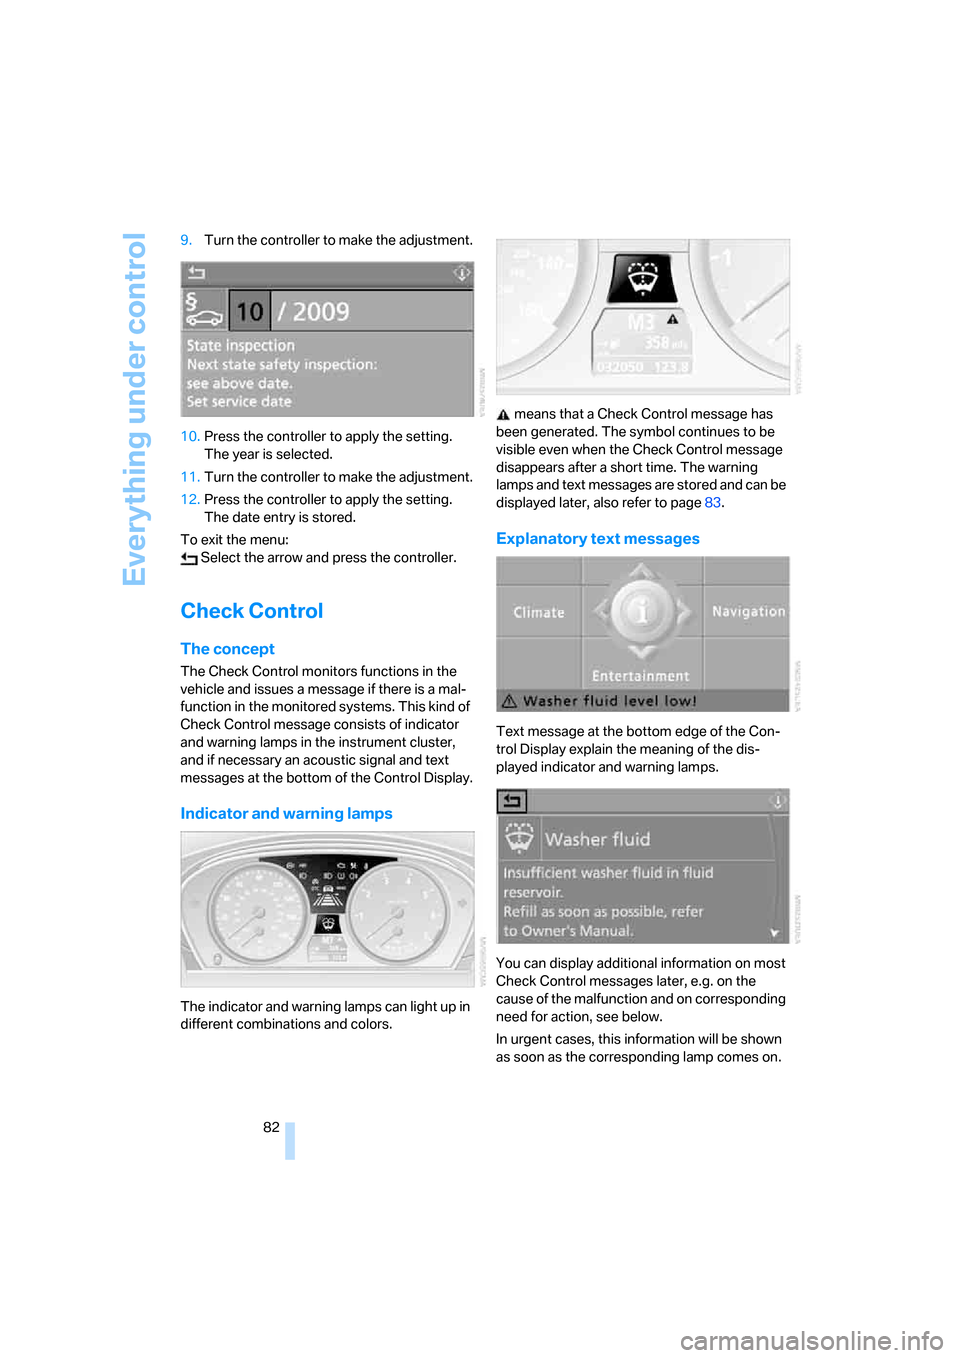
Selecting distance
>Briefly press rocker switch downward:
Increase distance.
>Briefly press rocker switch upward:
Reduce distance.
Page 74 of 286

Driving
72 The selected distance is displayed in the instru-
ment cluster.
Use good judgment to select the appro-
priate following distance, given road con-
ditions, traffic, applicable laws and State driving
recommendations for safe following distance.
Otherwise, a violation of the law or risk of an
accident could result.<
Interrupting cruise control
Press the lever upward or downward, and with
the vehicle stopped also depress the brake
pedal. The marking in the speedometer
changes color and the distance indicator goes
out.
In addition, the system is automatically inter-
rupted:
>when you apply the vehicle brakes
>when you shift the transmission>when DTC is activated or DSC is deacti-
vated
>when DSC comes on
>when you apply the handbrake
>when you release the safety belt and open
the driver's door with the vehicle stopped
>when the system does not recognize any
objects for an extended period of time, e. g.
on infrequently traveled roads without a
shoulder or guard rails, or if the radar sensor
is covered with dirt, refer to page73
If the system is interrupted, then it is nec-
essary for the driver to actively intervene
by braking and steering. Otherwise, there is a
risk of an accident.<
Resuming stored desired speed and
distance
While driving
Press button4.
The displays appear in the instrument cluster.
While stopped
Before leaving the vehicle with the engine
running, engage position P of the auto-
matic transmission and apply the handbrake.
Otherwise the vehicle can roll.<
If a detected vehicle in front of you brakes to a
complete stop and your vehicle has also been
braked to a complete stop by the system:
>If the vehicle in front of you drives off while
the marking1 for the desired speed in the
speedometer is green, your vehicle will
accelerate without you having to do any-
thing.
>If the vehicle in front of you drives off while
the marking1 is orange, you briefly depress
the accelerator pedal or press button4.
Rolling bars in the distance indicator3
mean that the vehicle in front of you has
driven off. Distance 1, closest
Distance 2
Distance 3
Distance 4, furthest
This distance is always set when
you activate the system.
Page 75 of 286

Controls
73Reference
At a glance
Driving tips
Communications
Navigation
Entertainment
Mobility
If you are stopped behind a vehicle with the
brake pedal depressed and the system is inter-
rupted or deactivated:
1.Press button4 to activate a stored desired
speed or select a desired speed with the
lever, arrow1 or arrow2.
2.Release the brake pedal.
3.If the vehicle in front of you drives off, briefly
depress the accelerator pedal or press
button4.
Deactivating system
>Press the lever upward or downward twice
while driving.
>When stopped, do the same with the brake
pedal depressed.
>Switch off the ignition.
The displays turn off, and the stored desired
speed and distance are deleted.
Displays in instrument cluster
1Stored desired speed
>Green: the system is active.
>Orange: the system is interrupted.
2Lights up yellow: vehicle detected ahead
Display also used for warnings, please read
all information on warnings
3Selected distance to vehicle ahead
The indicator lights up as soon as the sys-
tem is activated
The bars roll: the vehicle in front of you has
driven off
4Brief display of stored desired speedIf the display --- mph/--- km/h appears
briefly, the conditions necessary for oper-
ation may currently not be met.<
Warning lamps
The indicator2 continuously
flashes yellow.
The prerequisites for operating the
system are no longer met, e.g. as a
result of ABS or DSC interven-
tions. The system brakes until you actively take
over.
The indicator2 flashes red; a sig-
nal sounds.
The system indicates that you
must brake and/or maneuver the
vehicle yourself. The system can-
not automatically restore the distance to the
vehicle driving ahead.
However, this display cannot relieve the driver
of the responsibility for adjusting the desired
speed and driving style to the traffic conditions.
Radar sensors
1Long-range sensor
2Location of the short-range sensors behind
the bumper
3Location of the short-range sensors behind
the bumper with the M sports package
*
Heavy rain and also dirt, snow or ice can limit
the detection of vehicles ahead. If needed,
clean the radar sensor under the front bumper
as well as the bumper area covering the short
range sensors. When doing so, be particularly
careful in removing layers of snow and ice.
Page 80 of 286

Everything under control
78
Energy Control
Displays the current fuel consumption. This
allows you to see whether your current driving
style is conducive to fuel economy with mini-
mum exhaust emissions.
Fuel gauge
Fuel tank capacity: approx. 18.5 US gal/
70 liters, including the reserve capacity of
approx. 2.1 US gal/8 liters.
550i: approx. 2.6 US gal/10 liters reserve
capacity.
You will find information on refueling on
page216.
If the tilt of the vehicle varies for a longer period,
when you are driving in mountainous areas, for
example, the indicator may fluctuate slightly.
Reserve
After the reserve quantity has been reached, a
message briefly appears on the Control Display;
the remaining range is shown in the computer.
Below a range of approx. 30 miles/50 km, the
message remains on the Control Display.Refuel as soon as possible once your
cruising range falls below 30 miles/
50 km, otherwise engine functions are not
ensured and damage can occur.<
Computer
Displays in instrument cluster
To display the information, press the BC button
on the turn signal lever.
The following information is displayed in the
specified order:
>Cruising range
>Average speed
>Average fuel consumption
>No information
Cruising range
Displays the estimated cruising range available
with the remaining fuel. The range is projected
based on the driving style over the last 20 miles/
30 km.
Refuel as soon as possible once your
cruising range falls below 30 miles/
50 km, otherwise engine functions are not
ensured and damage can occur.<
Average speed
Periods with the vehicle parked and the engine
switched off are not included in the calculations
of average speed.
To reset average speed: press BC button on
turn signal lever for approx. 2 seconds.
Page 84 of 286

Everything under control
82 9.Turn the controller to make the adjustment.
10.Press the controller to apply the setting.
The year is selected.
11.Turn the controller to make the adjustment.
12.Press the controller to apply the setting.
The date entry is stored.
To exit the menu:
Select the arrow and press the controller.
Check Control
The concept
The Check Control monitors functions in the
vehicle and issues a message if there is a mal-
function in the monitored systems. This kind of
Check Control message consists of indicator
and warning lamps in the instrument cluster,
and if necessary an acoustic signal and text
messages at the bottom of the Control Display.
Indicator and warning lamps
The indicator and warning lamps can light up in
different combinations and colors. means that a Check Control message has
been generated. The symbol continues to be
visible even when the Check Control message
disappears after a short time. The warning
lamps and text messages are stored and can be
displayed later, also refer to page83.
Explanatory text messages
Text message at the bottom edge of the Con-
trol Display explain the meaning of the dis-
played indicator and warning lamps.
You can display additional information on most
Check Control messages later, e.g. on the
cause of the malfunction and on corresponding
need for action, see below.
In urgent cases, this information will be shown
as soon as the corresponding lamp comes on.
Page 93 of 286

Controls
91Reference
At a glance
Driving tips
Communications
Navigation
Entertainment
Mobility
Adaptive brake assistant*
In conjunction with the active cruise control
with the stop-and-go function, the adaptive
brake assistant ensures that the brake
responds even more quickly during braking
with the brake assistant.
DSC Dynamic Stability Control
DSC prevents traction loss in the driving wheels
when starting off and accelerating. The system
also identifies unstable driving conditions, such
as a loss of traction at the rear of the vehicle or
sliding of the vehicle in its front wheels. In these
cases, DSC helps the vehicle maintain a safe
course within physical limits by reducing engine
output and through braking actions in the indi-
vidual wheels.
The laws of physics cannot be repealed,
even with DSC. An appropriate driving
style always remains the responsibility of the
driver. Therefore, do not restrict the additional
safety margin with a risky driving style, as other-
wise there is a risk of an accident.<
Deactivating DSC
Press the button until the DSC indicator lamp in
the instrument cluster lights up, but not longer
than approx. 10 seconds. DTC Dynamic Trac-
tion Control and DSC are deactivated together.
Stabilizing and drive output promoting actions
are no longer executed. In addition, the stability
promoting intervention of the active steering
*
is deactivated, refer to page98.
A message appears on the Control Display.
Please note any supplementary information
that appears there.To increase vehicle stability, activate DSC again
as soon as possible.
Activating DSC
Press the button; the indicator lamp in the
instrument cluster goes out.
For better control
The indicator lamp flashes:
DSC controls the drive forces and
brake forces.
The indicator lamp lights up:
DSC is deactivated.
DTC Dynamic Traction Control
DTC is a version of DSC in which the drive out-
put is optimized for particular road conditions,
e.g. unplowed snow-covered roads. The sys-
tem assures the maximal drive output, but with
reduced driving stability. It is therefore neces-
sary to drive with appropriate caution.
You may find it useful to briefly activate DTC
under the following special circumstances:
>When driving on snowy inclines, in slush, or
on unplowed, snow-covered road surfaces
>When rocking a stuck vehicle free or start-
ing off in deep snow or on loose ground
>When driving with snow chains
*
Activating DTC
Press the button briefly; the DTC indicator lamp
in the instrument cluster lights up.
Page 94 of 286

Technology for comfort, convenience and safety
92
For better control
The indicator lamp flashes:
DTC controls the drive forces and
brake forces.
The indicator lamp lights up:
DTC is activated.
Deactivating DTC
Press the button again; the DTC indicator lamp
in the instrument cluster goes out.
xDrive on 528xi, 535xi
xDrive is the 4-wheel drive system of your
BMW. The combined effects of xDrive and DSC
further optimize the traction and dynamic driv-
ing characteristics. The 4-wheel drive system
xDrive variably distributes the drive torque to
the front and rear axle depending on the driving
situation and prevailing road conditions.
HDC Hill Descent Control on 528xi,
535xi
The concept
HDC is a system for driving downhill in steep
terrain. This system reduces vehicle speed on
steep downhill gradients, thus allowing you to
maintain even better control of your BMW
under these conditions. The vehicle moves at
approximately twice walking speed without
active intervention from the driver.
HDC is available for activation at vehicle speeds
below approx. 22 mph/35 km/h. When driving
down steep hills with a speed below approx.
22 mph/35 km/h, the vehicle reduces speed
automatically down to approximately double
walking speed, approx. 7 mph/12 km/h, and
then maintains this speed at a constant.
You can use the accelerator or brakes to vary
this automatically controlled speed within a
range extending from approx. 3 mph/5 km/h to
15 mph/25 km/h.
You can specify a target speed within the same
range by using the lever of the cruise control
*.
Activating HDC
You can activate HDC:
>with the programmable buttons on the
steering wheel, refer to page54
>using iDrive
iDrive, for explanation of principle, refer to
page16.
1.Press the button.
This opens the start menu.
2.Press the controller to open the menu.
3.Select "Settings" and press the controller.
4.Select "Vehicle / Tires" and press the con-
troller.
5.Change to upper field if necessary. Turn the
controller until "HDC" is selected and press
the controller.
6.Select "HDC on" and press the controller.
HDC is shown in the instrument cluster.
If the vehicle is automatically braked, a message
is displayed on the Control Display for approx.
20 seconds.
Deactivating HDC
When you use the programmable buttons on
the steering wheel or via iDrive, the HDC display
goes out.
HDC is automatically deactivated in the follow-
ing situations:
>Above approx. 37 mph/60 km/h
>After switching off the ignition
Page 95 of 286

Controls
93Reference
At a glance
Driving tips
Communications
Navigation
Entertainment
Mobility
Using HDC
Manual transmission:
Use HDC in low gears and reverse gear.
Automatic transmission:
You can use HDC in every drive position.
Displays in instrument cluster
1Display for target speed
2HDC display
Malfunction in driving-stability control
systems
The warning lamp for the brake system
lights up, together with the indicator
and warning lamps for ABS, DSC and
Tire Pressure Control or Flat Tire Mon-
itor. A message appears on the Control
Display. The driving-stability control
systems have failed. Conventional
braking efficiency remains available
without limitations. While you may con-
tinue, you should remember to proceed
cautiously and drive defensively while avoiding
full brake applications. In addition, the Tire
Pressure Control or the Flat Tire Monitor has
also failed. Have the system checked as soon as
possible.
Display of the previously described
malfunction in Canadian models.The DSC indicator lamp lights up. A
message appears on the Control Dis-
play. A malfunction has occurred in the
DSC and DTC. The stabilizing actions are no
longer available. The vehicle remains opera-
tional. Have the system checked as soon as
possible.
The brake system warning lamp lights
up yellow. A message appears on the
Control Display. The brake assistant is
defective. Have the system checked as soon as
possible.
Display of the previously described
malfunction in Canadian models.
Dynamic Drive*
The concept
Dynamic Drive minimizes body roll and opti-
mizes vehicle stability during cornering and
evasive maneuvers.
Dynamic Drive is based on active stabilizers on
the front and rear axles. Suspension compli-
ance adapts to suit driving conditions, varying
from performance-oriented during cornering to
smooth and comfort-oriented when the vehicle
is proceeding in a straight line. During vehicle
operation, the system continuously runs
through closed-loop control cycles lasting only
fractions of a second.
The system assumes operational status each
time you start the engine.
Sports Wagon: self-leveling
suspension
Malfunction
The warning lamp for self-leveling sus-
pension lights up yellow and a message
is shown on the Control Display. A mal-
function has occurred in the self-leveling sus-
pension. Stop and check the vehicle. If it is con-
siderably lower at the rear than at the front, and
possibly also on one side – rear left compared to