2007 BMW 525XI TOURING length
[x] Cancel search: lengthPage 129 of 286
Controls
127Reference
At a glance
Driving tips
Communications
Navigation
Entertainment
Mobility
Dividing up rear compartment
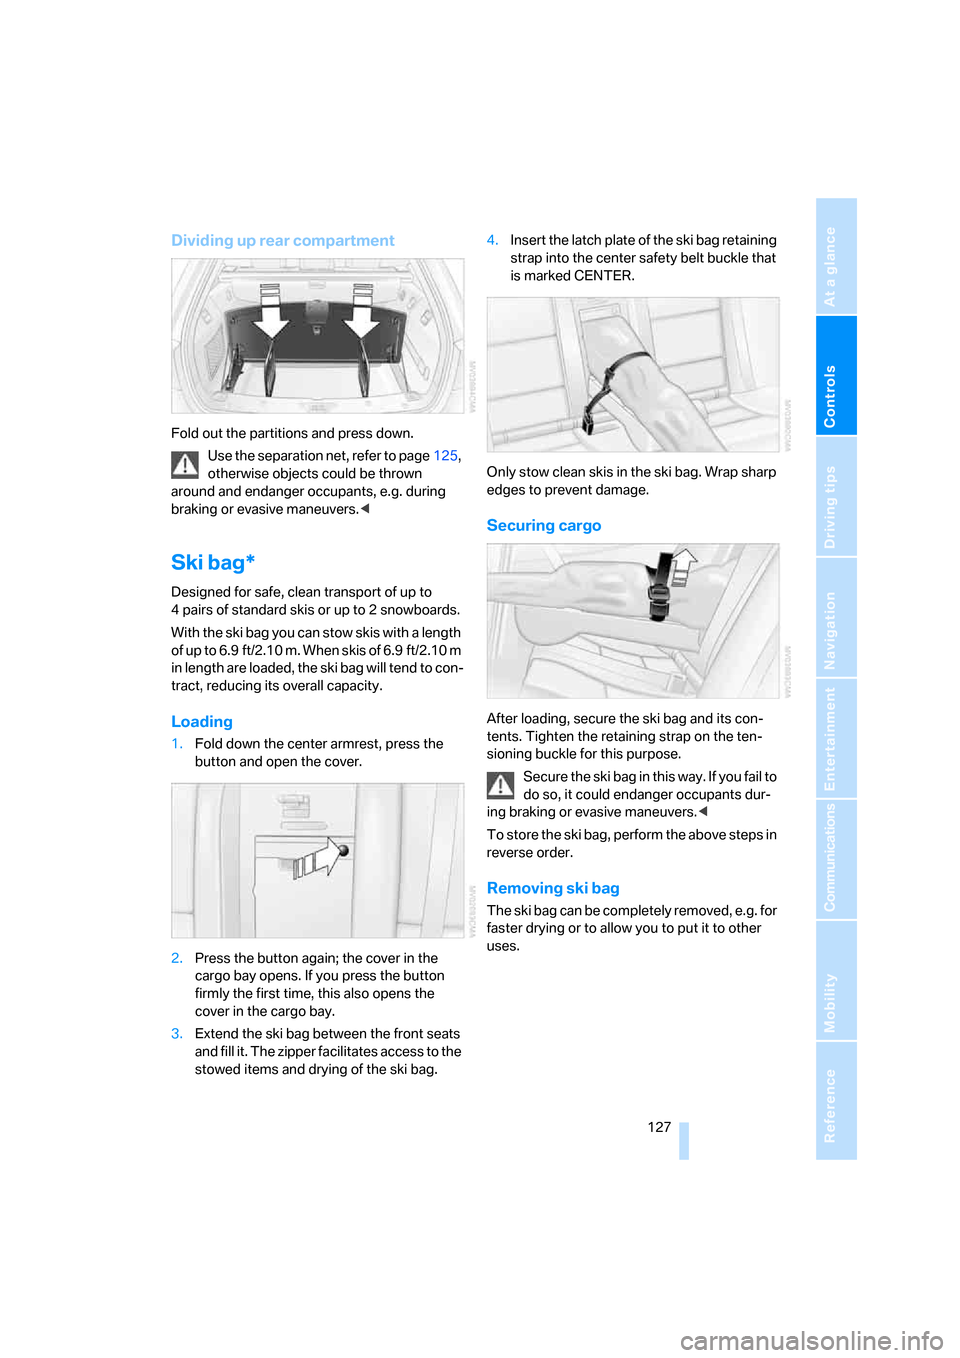
Fold out the partitions and press down.
Use the separation net, refer to page125,
otherwise objects could be thrown
around and endanger occupants, e.g. during
braking or evasive maneuvers.<
Ski bag*
Designed for safe, clean transport of up to
4 pairs of standard skis or up to 2 snowboards.
With the ski bag you can stow skis with a length
of up to 6.9 ft/2.10 m. When skis of 6.9 ft/2.10 m
in length are loaded, the ski bag will tend to con-
tract, reducing its overall capacity.
Loading
1.Fold down the center armrest, press the
button and open the cover.
2.Press the button again; the cover in the
cargo bay opens. If you press the button
firmly the first time, this also opens the
cover in the cargo bay.
3.Extend the ski bag between the front seats
and fill it. The zipper facilitates access to the
stowed items and drying of the ski bag.4.Insert the latch plate of the ski bag retaining
strap into the center safety belt buckle that
is marked CENTER.
Only stow clean skis in the ski bag. Wrap sharp
edges to prevent damage.
Securing cargo
After loading, secure the ski bag and its con-
tents. Tighten the retaining strap on the ten-
sioning buckle for this purpose.
Secure the ski bag in this way. If you fail to
do so, it could endanger occupants dur-
ing braking or evasive maneuvers.<
To store the ski bag, perform the above steps in
reverse order.
Removing ski bag
The ski bag can be completely removed, e.g. for
faster drying or to allow you to put it to other
uses.
Page 154 of 286
Destination entry
152 3.Select "Use current location as address", or
"Save current destination" during the desti-
nation guidance, and press the controller.
4.Select "Store in address book" and press
the controller.
Adopting home address as destination
1.Select "Home address" and press the con-
troller.
2.Select "Start guidance" and press the con-
troller.
Changing home address
1.Select "Home address" and press the con-
troller.
2.Select "Edit address" and press the con-
troller. For operation, refer to Entering a
destination manually, page142.
Selecting route
You can influence the calculated route by
choosing certain route criteria. You can change
the route criteria as often as you like while
entering the destination and whenever the des-
tination guidance is active.
The route is planned according to fixed rules.
The type of road is taken into account, e.g.
whether it is a highway or a winding road. The
road types are stored on the navigation DVD.
As a result, the routes recommended by the
navigation system may not always be the same
ones that you would choose based on personal
experience.
Changing route criteria
1.Select "Navigation" and press the control-
ler.
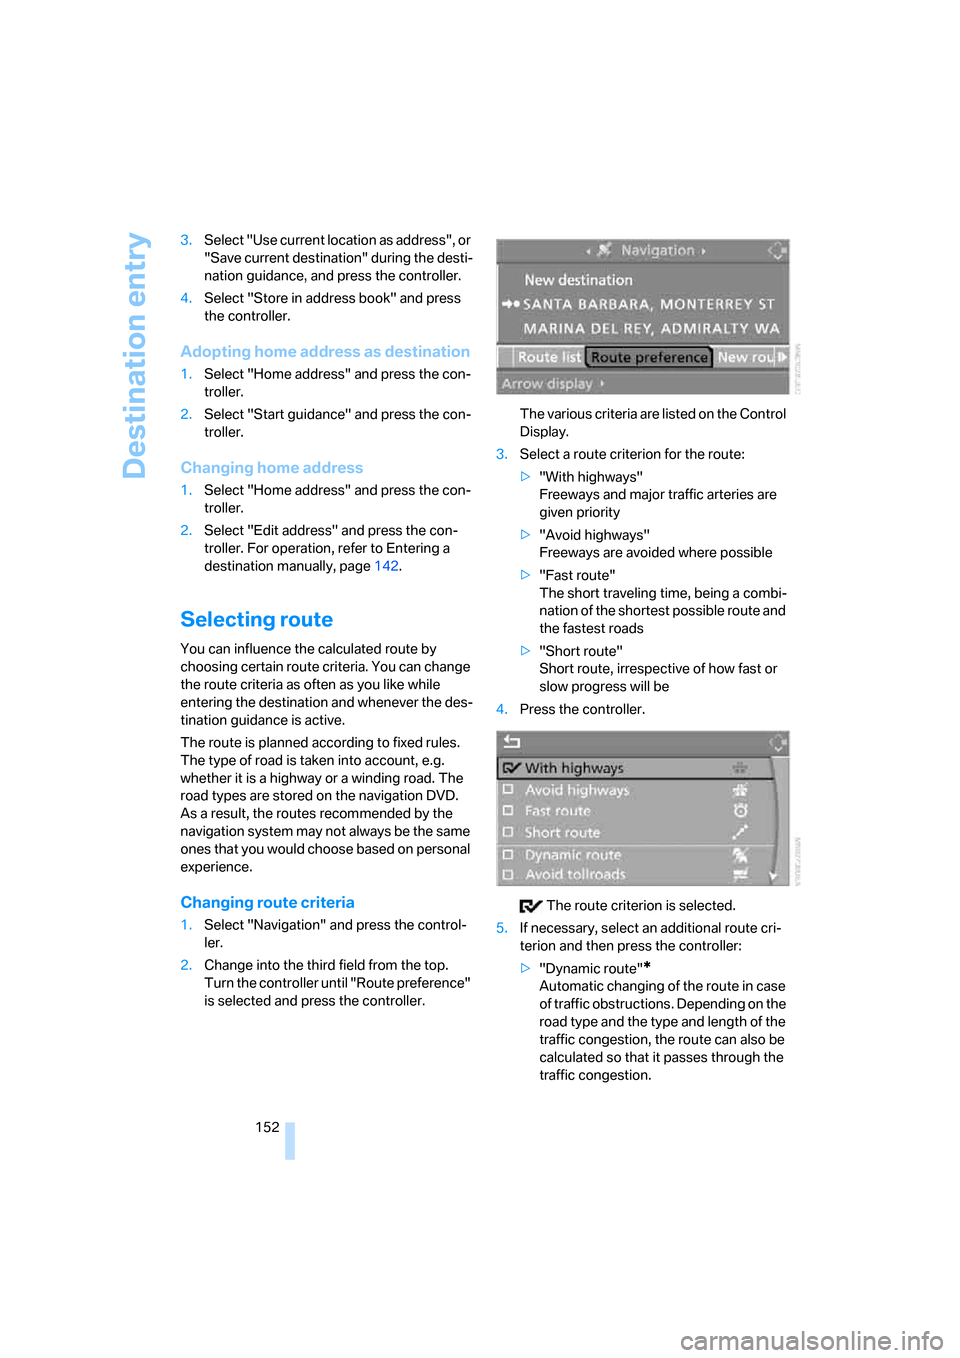
2.Change into the third field from the top.
Turn the controller until "Route preference"
is selected and press the controller.The various criteria are listed on the Control
Display.
3.Select a route criterion for the route:
>"With highways"
Freeways and major traffic arteries are
given priority
>"Avoid highways"
Freeways are avoided where possible
>"Fast route"
The short traveling time, being a combi-
nation of the shortest possible route and
the fastest roads
>"Short route"
Short route, irrespective of how fast or
slow progress will be
4.Press the controller.
The route criterion is selected.
5.If necessary, select an additional route cri-
terion and then press the controller:
>"Dynamic route"
*
Automatic changing of the route in case
of traffic obstructions. Depending on the
road type and the type and length of the
traffic congestion, the route can also be
calculated so that it passes through the
traffic congestion.
Page 162 of 286
Destination guidance
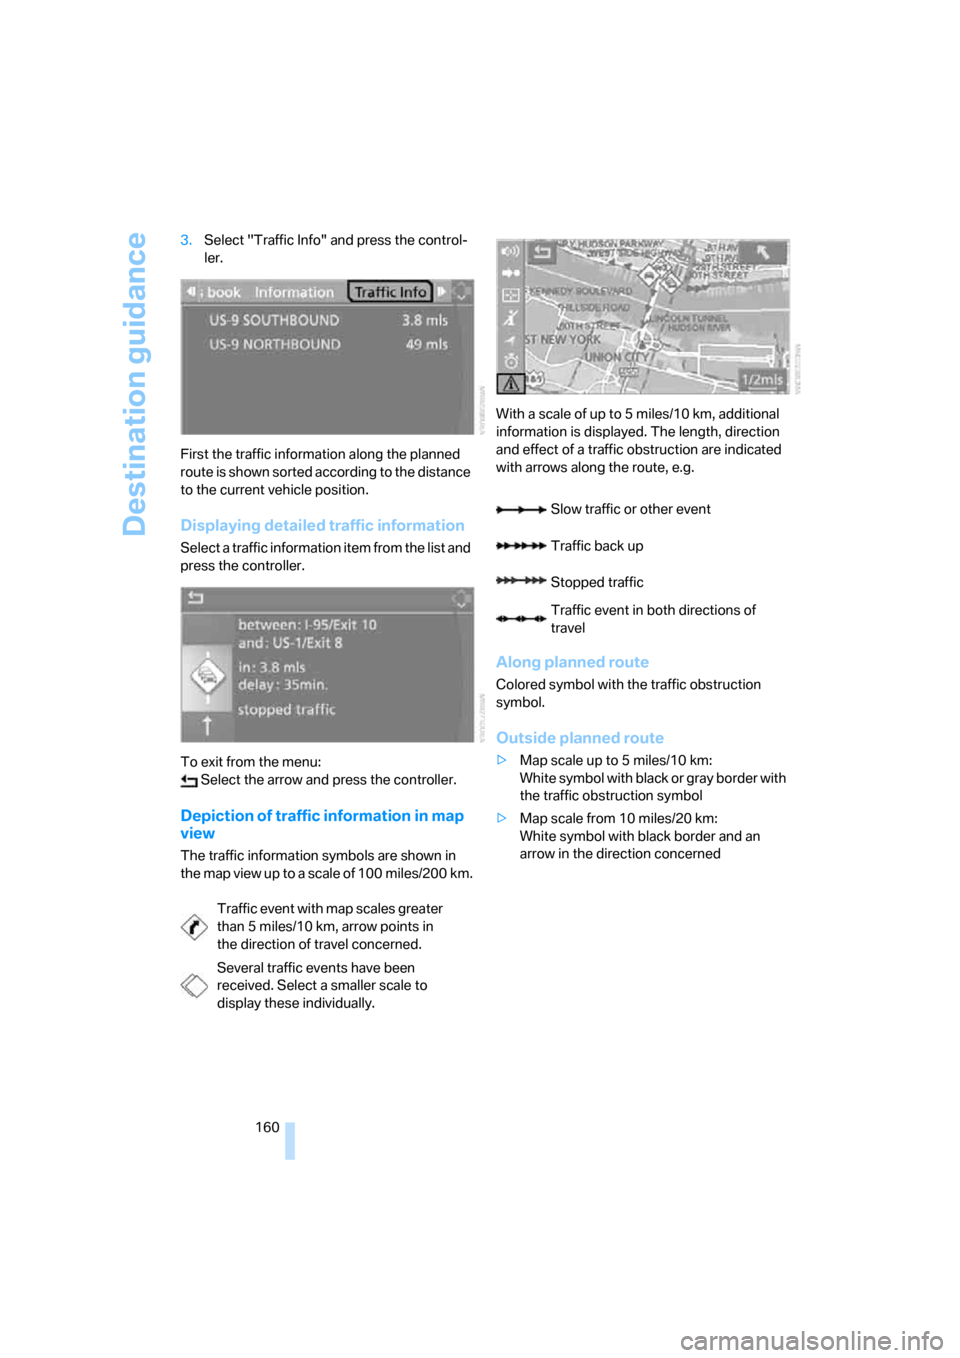
160 3.Select "Traffic Info" and press the control-
ler.
First the traffic information along the planned
route is shown sorted according to the distance
to the current vehicle position.
Displaying detailed traffic information
Select a traffic information item from the list and
press the controller.
To exit from the menu:
Select the arrow and press the controller.
Depiction of traffic information in map
view
The traffic information symbols are shown in
the map view up to a scale of 100 miles/200 km.With a scale of up to 5 miles/10 km, additional
information is displayed. The length, direction
and effect of a traffic obstruction are indicated
with arrows along the route, e.g.
Along planned route
Colored symbol with the traffic obstruction
symbol.
Outside planned route
>Map scale up to 5 miles/10 km:
White symbol with black or gray border with
the traffic obstruction symbol
>Map scale from 10 miles/20 km:
White symbol with black border and an
arrow in the direction concerned
Traffic event with map scales greater
than 5miles/10km, arrow points in
the direction of travel concerned.
Several traffic events have been
received. Select a smaller scale to
display these individually.
Slow traffic or other event
Traffic back up
Stopped traffic
Traffic event in both directions of
travel
Page 163 of 286
Navigation
Driving tips
161Reference
At a glance
Controls
Communications
Entertainment
Mobility
Traffic information during destination
guidance
The system behavior varies depending on
whether "Dynamic route" is selected.
Displaying traffic obstructions
If a traffic obstruction is reported to the naviga-
tion system and "Dynamic route" is not
selected, you will be provided with certain infor-
mation from a distance of approx. 25 miles/
40 km, e.g. the length of the traffic congestion.
The last possible junction will be displayed
shortly before this.
Select "Detour" and press the controller.
The navigation system determines a new route
to bypass the traffic congestion.
This information is also displayed if you have
called up a different application on the Control
Display.
Hiding traffic obstructions
If "Dynamic route" is selected, the route in case
of traffic obstructions is automatically changed.
The system does not point out traffic obstruc-
tions along the original route.
Depending on the road type and the type and
length of the traffic congestion, the route can
also be calculated so that it passes through the
traffic congestion.
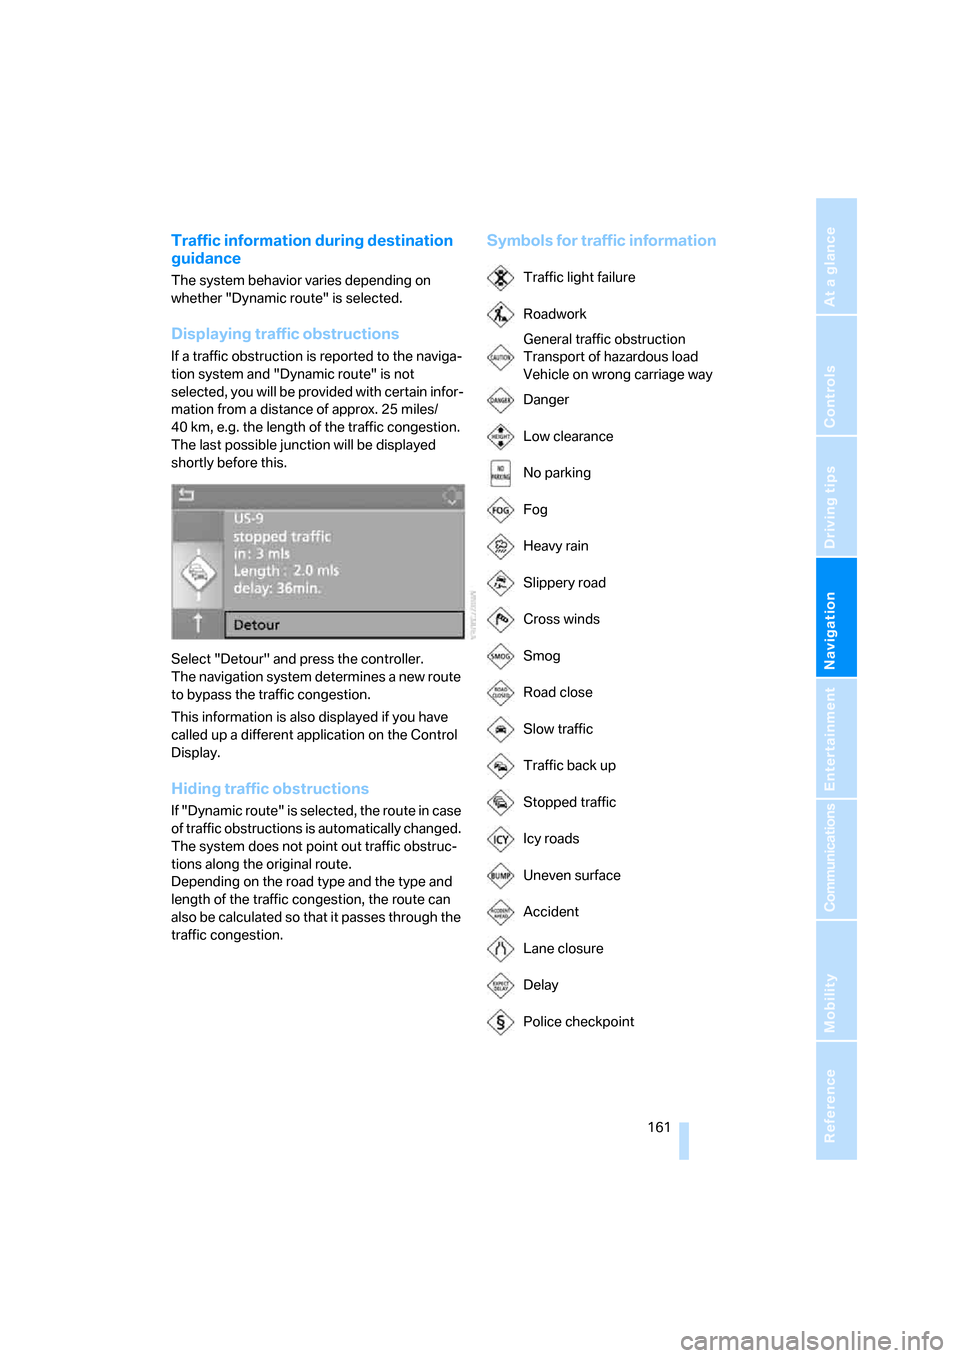
Symbols for traffic information
Traffic light failure
Roadwork
General traffic obstruction
Transport of hazardous load
Vehicle on wrong carriage way
Danger
Low clearance
No parking
Fog
Heavy rain
Slippery road
Cross winds
Smog
Road close
Slow traffic
Traffic back up
Stopped traffic
Icy roads
Uneven surface
Accident
Lane closure
Delay
Police checkpoint
Page 207 of 286
205
Entertainment
Reference
At a glance
Controls
Driving tips Communications
Navigation
Mobility
Creating and editing voice phone
book*
Store entry:
An entry always consists of a name and phone
number.
Delete entry:
You can delete any entry from the voice phone
book.
Delete all entries:
{Delete phone book} deletes all entries in the
phone book.
Have entries read aloud and select:
You can have all the entries of your voice phone
book read aloud in the order of input and select
a certain entry to establish a connection:
Selecting an entry
The connection to the phone number of the
selected entry is established.
Redialing
The {Redial} command calls "Redial".
Notes
Important for voice commands
For voice commands, keep the following in
mind:
>Issue the commands smoothly and at nor-
mal volume, avoiding excessive emphasis
and pauses.
>Keep the doors, windows and glass sunroof
closed to prevent interference from ambi-
ent noise.
>Avoid making other noise in the vehicle
while speaking.
Mounting/removing snap-in
adapter
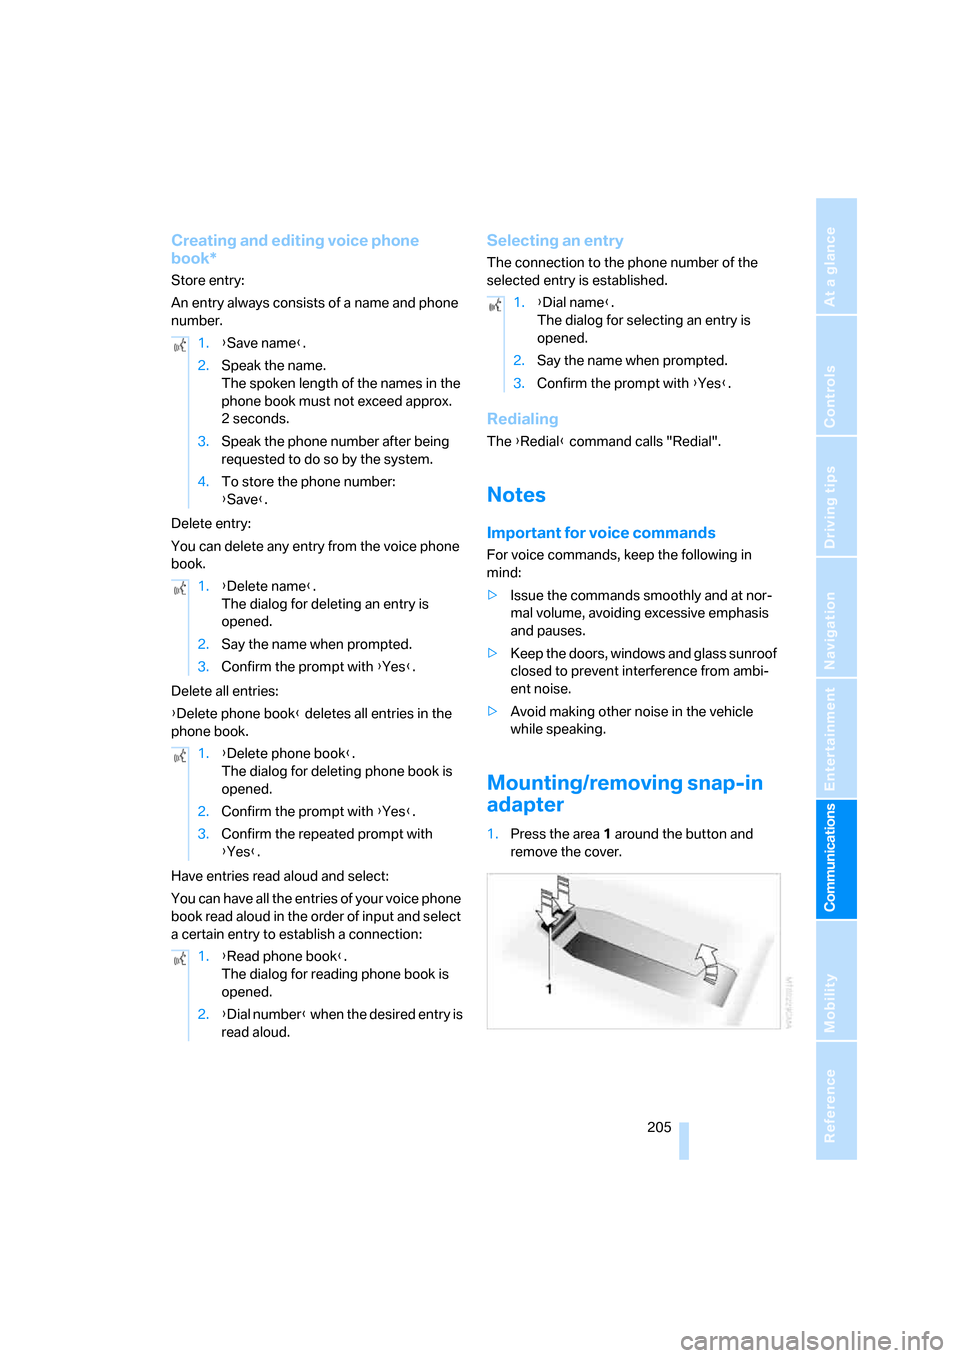
1.Press the area 1 around the button and
remove the cover. 1.{Save name}.
2.Speak the name.
The spoken length of the names in the
phone book must not exceed approx.
2seconds.
3.Speak the phone number after being
requested to do so by the system.
4.To store the phone number:
{Save}.
1.{Delete name}.
The dialog for deleting an entry is
opened.
2.Say the name when prompted.
3.Confirm the prompt with {Yes}.
1.{Delete phone book}.
The dialog for deleting phone book is
opened.
2.Confirm the prompt with {Yes}.
3.Confirm the repeated prompt with
{Yes}.
1.{Read phone book}.
The dialog for reading phone book is
opened.
2.{Dial number} when the desired entry is
read aloud.
1.{Dial name}.
The dialog for selecting an entry is
opened.
2.Say the name when prompted.
3.Confirm the prompt with {Yes}.
Page 273 of 286

Reference 271
At a glance
Controls
Driving tips
Communications
Navigation
Entertainment
Mobility
Inflation pressure, refer to Tire
inflation pressure218
Inflation pressure monitoring
– refer to Flat Tire Monitor94
– refer to TPM Tire Pressure
Monitor95
Info menu17
Information
– on another location147
– on current position147
– on destination location147
"Information" for navigation
system147
Information menu, refer to
imenu17
"Information on
destination"149
Information service210
"Info sources"80
Initializing
– Flat Tire Monitor94
– radio, refer to Storing
stations172
– refer to Power failure242
– refer to Setting time and
date85
– seat, mirror and steering
wheel memory47
"Input map"147
Installation location
– CD changer183
– drive for navigation DVD140
– mobile phone120
Instructions for navigation
system, refer to Voice
instructions157
Instrument cluster12
Instrument illumination, refer
to Instrument lighting110
Instrument lighting110
Instrument panel
– refer to Cockpit10
– refer to Instrument
cluster12
Integrated key28
Integrated universal remote
control118
Interesting destination for
navigation147"Interim time"85
Interior lamps110
– switching on with remote
control31
Interior motion sensor38
– switching off38
Interior rearview mirror53
– automatic dimming
feature53
Intermittent mode of the
wipers67
J
Jacking points241
Joystick
– refer to iDrive16
– refer to Selector lever,
selecting transmission
positions63
Jump starting246
K
Keyless-Go, refer to Comfort
access39
Keyless opening and closing,
refer to Comfort access39
Key Memory, refer to Personal
Profile29
"Keypad"202
Keys28
– key-related settings, refer to
Personal Profile29
– spare key28
Kick-down, automatic
transmission with
Steptronic63
Knock control217
L
Lamps, refer to Parking lamps/
low beams107
Lamps and bulbs235
Lane limit lines, refer to
Leaving lane warning105"Language / Units"87
– for navigation
system141,157
"Languages"87
– for navigation
system141,157
Lashing eyes, refer to
Securing cargo135
Last destinations, refer to
Destination list149
"Last seat pos."48
LATCH child restraint fixing
system58
Leaving lane warning105
LEDs light-emitting
diodes235
Length, refer to
Dimensions253
License plate lamp, replacing
bulbs239
Light-emitting diodes
LEDs235
Lighter122
"Lighting"66
Lighting
– instruments110
– lamps and bulbs235
– of the vehicle, refer to
Lamps107
Light switch107
"Limit"84
Loading
– securing cargo135
– stowing cargo135
– vehicle134
Load securing equipment,
refer to Securing cargo135
"Lock after driving"33
Locking31,33
– confirmation signals31
– from inside33
– from outside31
– without key, refer to Comfort
access39
Locking and unlocking doors
– confirmation signals31
– from inside33
– from outside30