2007 BMW 525XI ECU
[x] Cancel search: ECUPage 3 of 273

525i
530i
550i
525xi
530xiOwner's Manual for Vehicle
Congratulations, and thank you for choosing a BMW.
Thorough familiarity with your vehicle will provide you with
enhanced control and security when you drive it. We therefore
have this request:
Please take the time to read this Owner's Manual and familiarize
yourself with the information that we have compiled for you
before starting off in your new vehicle. It contains important data
and instructions intended to assist you in gaining maximum use
and satisfaction from your BMW's unique range of technical fea-
tures. The manual also contains information on maintenance
designed to enhance operating safety and contribute to main-
taining the value of your BMW throughout an extended service
life.
This manual is supplemented by a Service and Warranty Infor-
mation Booklet for US models or a Warranty and Service Guide
Booklet for Canadian models.
We wish you an enjoyable driving experience.
BMW AG
Page 45 of 273
Controls
43Reference
At a glance
Driving tips
Communications
Navigation
Entertainment
Mobility
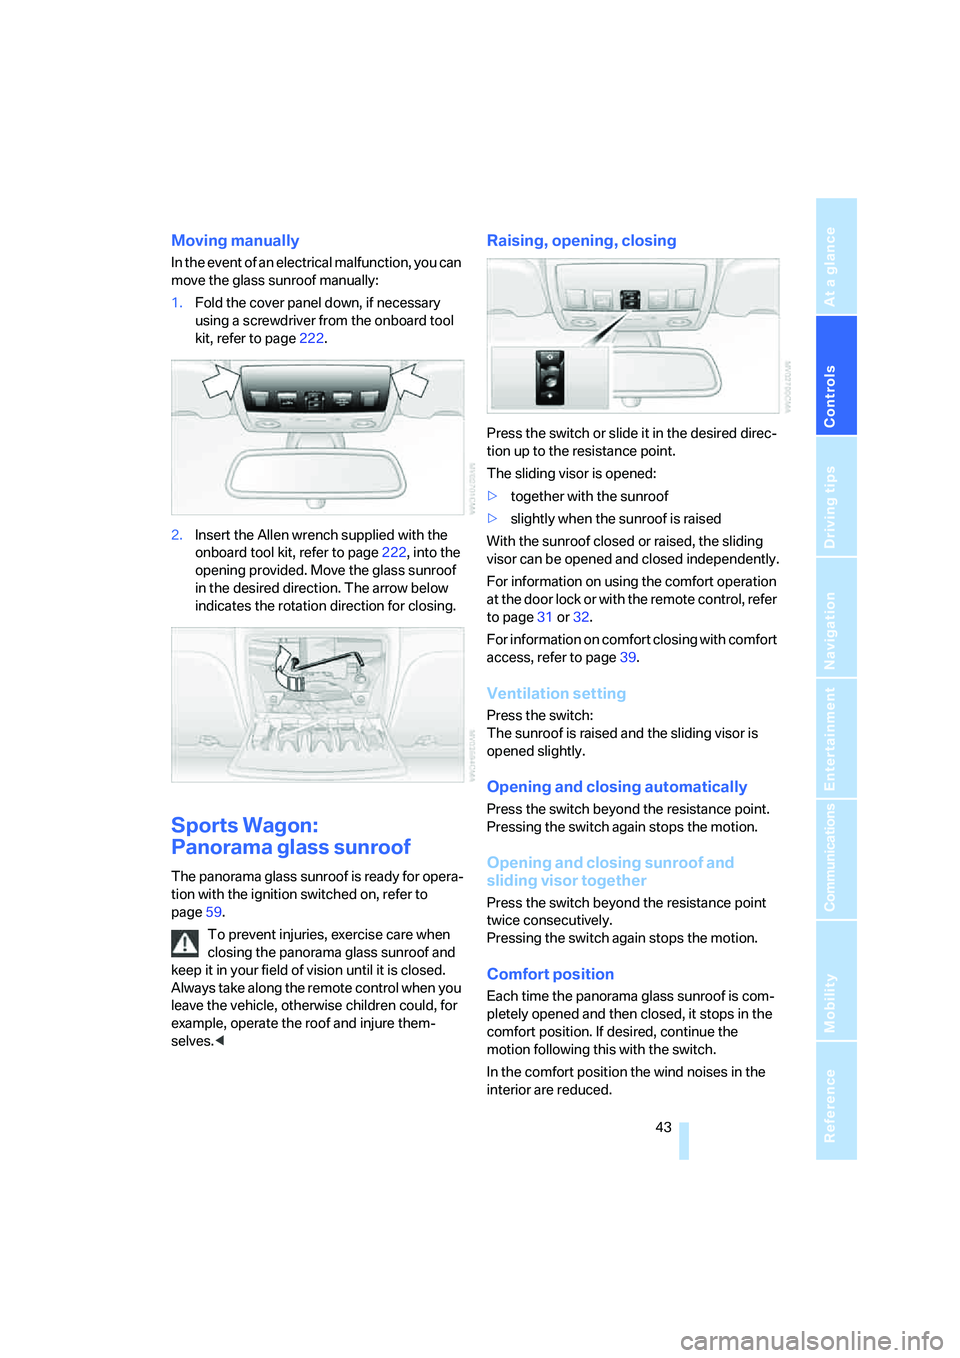
Moving manually
In the event of an electrical malfunction, you can
move the glass sunroof manually:
1.Fold the cover panel down, if necessary
using a screwdriver from the onboard tool
kit, refer to page222.
2.Insert the Allen wrench supplied with the
onboard tool kit, refer to page222, into the
opening provided. Move the glass sunroof
in the desired direction. The arrow below
indicates the rotation direction for closing.
Sports Wagon:
Panorama glass sunroof
The panorama glass sunroof is ready for opera-
tion with the ignition switched on, refer to
page59.
To prevent injuries, exercise care when
closing the panorama glass sunroof and
keep it in your field of vision until it is closed.
Always take along the remote control when you
leave the vehicle, otherwise children could, for
example, operate the roof and injure them-
selves.<
Raising, opening, closing
Press the switch or slide it in the desired direc-
tion up to the resistance point.
The sliding visor is opened:
>together with the sunroof
>slightly when the sunroof is raised
With the sunroof closed or raised, the sliding
visor can be opened and closed independently.
For information on using the comfort operation
at the door lock or with the remote control, refer
to page31 or32.
For information on comfort closing with comfort
access, refer to page39.
Ventilation setting
Press the switch:
The sunroof is raised and the sliding visor is
opened slightly.
Opening and closing automatically
Press the switch beyond the resistance point.
Pressing the switch again stops the motion.
Opening and closing sunroof and
sliding visor together
Press the switch beyond the resistance point
twice consecutively.
Pressing the switch again stops the motion.
Comfort position
Each time the panorama glass sunroof is com-
pletely opened and then closed, it stops in the
comfort position. If desired, continue the
motion following this with the switch.
In the comfort position the wind noises in the
interior are reduced.
Page 57 of 273
Controls
55Reference
At a glance
Driving tips
Communications
Navigation
Entertainment
Mobility
Transporting children safely
The right place for children
Do not leave children unattended in the
vehicle, otherwise they could endanger
themselves and other persons, e.g. by opening
the doors.<
Children always in the rear
Accident research shows that the safest place
for children is on the rear seat.
Children younger than 13 years of age or
with a height under 5 ft/150 cm may only
be transported in the rear in child restraint sys-
tems which correspond to the age, weight and
height of the child. Otherwise there is an
increased danger of injury in an accident.<
Children 13 years of age or older must wear a
safety belt as soon as a suitable child restraint
system can no longer be used due to their age,
size and weight.
With the exception of the driver's seat, all seats
in your BMW comply with the recommenda-
tions of the standard SAE J1819 for the safe
securing of child restraint systems in motor
vehicles.
Exception for front passenger seat
Should it be necessary to use a child
restraint system on the front passenger
seat, the front and side airbags on the passen-
ger side must be deactivated. Otherwise, there
is an increased risk of injury for the child if the
airbags are triggered, even with a child restraint
system. Your BMW center will be glad to advise
you.<
For more information on automatic deactivation
of the front passenger airbags, refer to page97.
Installing child restraint
systems
Observe the child restraint system manu-
facturer's instructions for selection,
installation and use of the child restraint sys-
tems. Otherwise the degree of protection may
be reduced.<
Backrest width* on front passenger
seat
Before mounting a child restraint system
on the front passenger seat, the backrest
width adjustment must be open completely.
After mounting the child's seat, no memory
position may be called up and the active back-
rest width adjustment must be deactivated,
otherwise the stability of the child's seat on the
front passenger seat is limited.<
1.After unlocking the vehicle, sit on the front
passenger seat and close the door to call up
the memory position.
2.Completely open the backrest width adjust-
ment, refer to page46.
3.Deactivate active backrest width adjust-
ment, refer to page47.
4.Install child's seat.
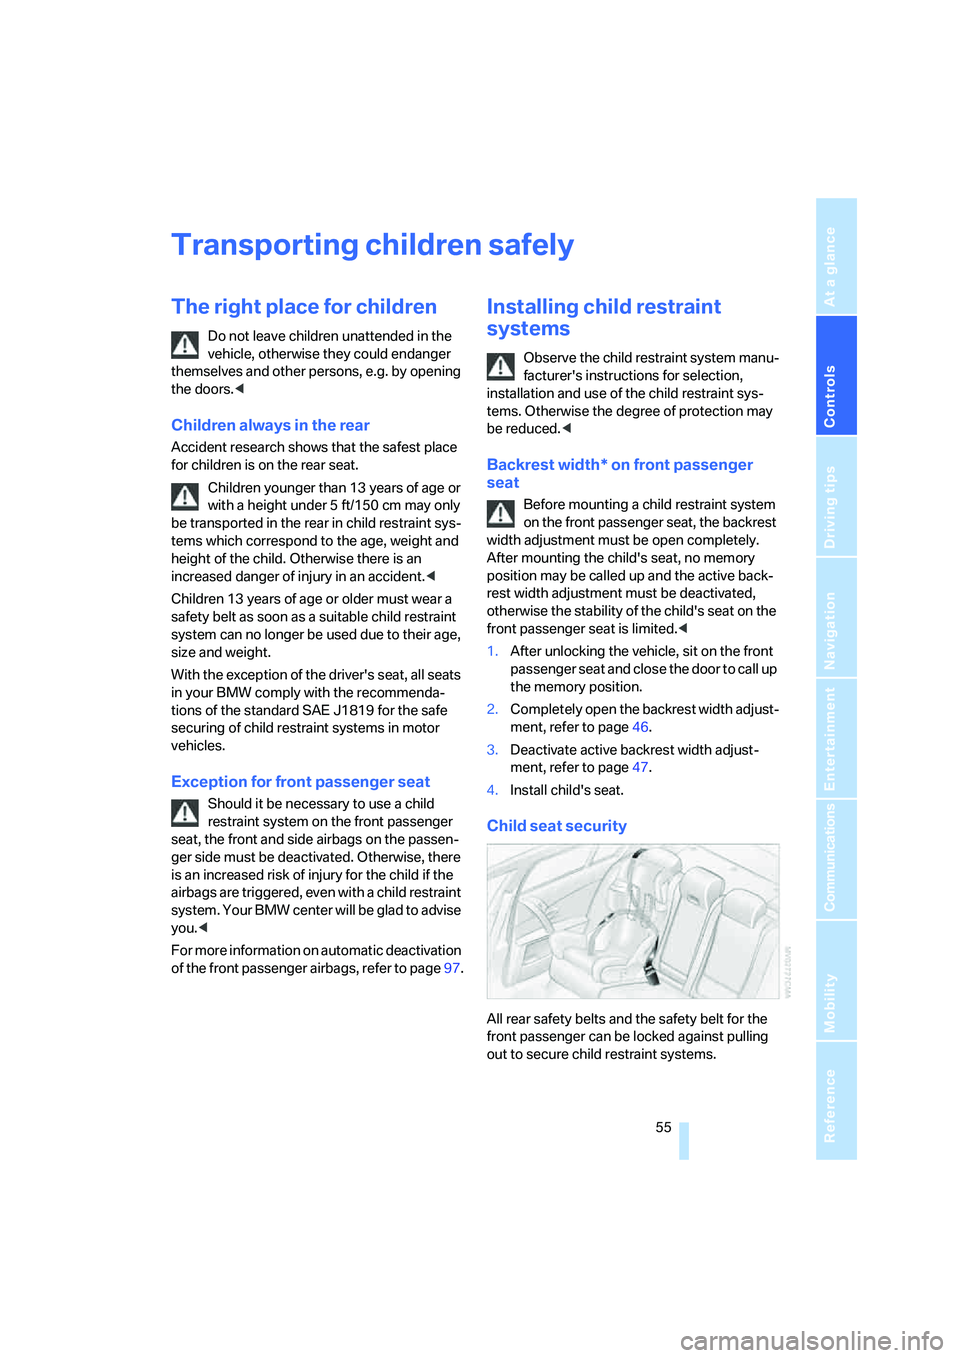
Child seat security
All rear safety belts and the safety belt for the
front passenger can be locked against pulling
out to secure child restraint systems.
Page 58 of 273
Transporting children safely
56
Locking safety belt
1.Secure the child restraint system with the
belt.
2.Pull out the belt webbing completely.
3.Allow the belt webbing to be pulled in and
pull taut against the child restraint system.
The safety belt is locked.
Unlocking safety belt
1.Open the belt buckle.
2.Remove the child restraint system.
3.Allow the belt webbing to be pulled in com-
pletely.
Child restraint system with tether strap
Only use the tether-strap mounting
points to secure child restraint systems,
otherwise the mounting points could be dam-
aged.<
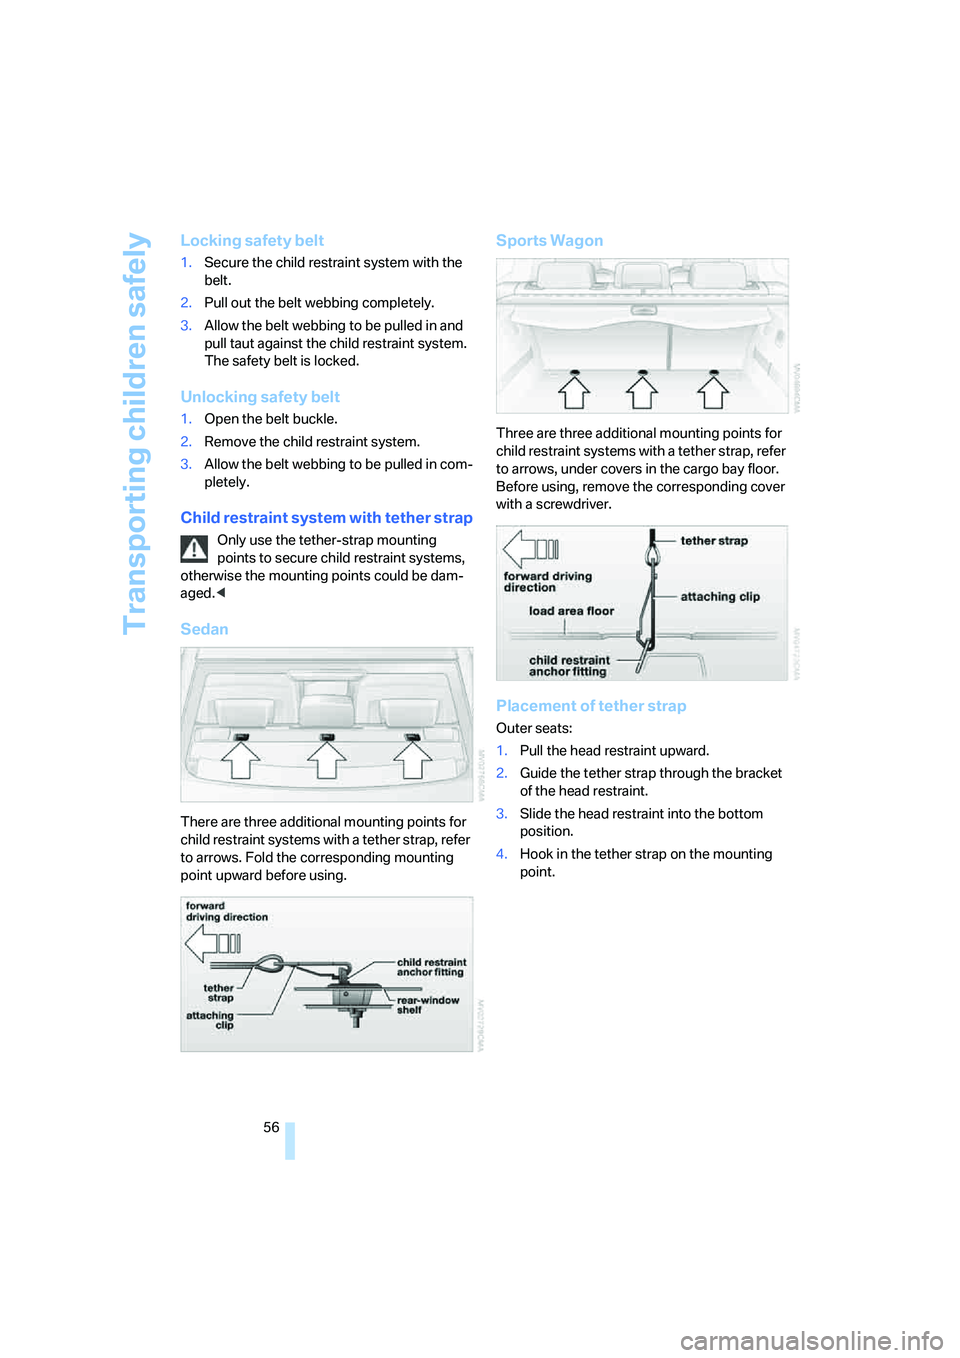
Sedan
There are three additional mounting points for
child restraint systems with a tether strap, refer
to arrows. Fold the corresponding mounting
point upward before using.
Sports Wagon
Three are three additional mounting points for
child restraint systems with a tether strap, refer
to arrows, under covers in the cargo bay floor.
Before using, remove the corresponding cover
with a screwdriver.
Placement of tether strap
Outer seats:
1.Pull the head restraint upward.
2.Guide the tether strap through the bracket
of the head restraint.
3.Slide the head restraint into the bottom
position.
4.Hook in the tether strap on the mounting
point.
Page 65 of 273

Controls
63Reference
At a glance
Driving tips
Communications
Navigation
Entertainment
Mobility
Shiftlock
Press the brake pedal before shifting out of N;
the shift command will not be executed unless
the brake is applied.
R Reverse
Select only when the vehicle is stationary.
Sequential mode
After every engine start, as soon as the selector
lever is pushed to the right and the brake pedal
is depressed, the Sequential mode is activated.
You can shift up and down using the shift pad-
dles or the selector lever. You do not need to
remove your foot from the accelerator to do so.
It is also possible to start off in second gear, e. g.
in slippery conditions.
In the following situations, SMG thinks for you:
>Upshifts and downshifts are executed only
when they will result in a plausible combina-
tion of engine and vehicle speed; thus, for
example, a downshift that would cause the
engine to overrev will not be executed by
the system.
>When the vehicle is stationary, the trans-
mission automatically downshifts into first
gear.
>Shortly before dropping below a gear-
dependent minimum speed, the transmis-
sion downshifts automatically even without
your intervention.
D Drive mode
In the Drive mode, all forward gears are shifted
automatically.
Shifting from Sequential mode to Drive mode:
press selector lever to the right toward D.
Kick-down: for rapid acceleration, e. g. when
passing, press the accelerator pedal as far
down as it will go. You achieve maximum accel-
eration.
To switch back into the Sequential mode: press
selector lever to the right again toward D or shift
using the shift paddles or the selector lever.Start off quickly on slopes. Do not hold
the vehicle on a hill by pressing the accel-
erator, but apply the handbrake instead. Other-
wise overheating can occur in the transmission
region.<
Gear changes
Using selector lever
>To upshift, pull the selector lever back.
>To downshift, push the selector lever for-
ward.
Using shift paddles on steering wheel
>To upshift, pull one of the shift paddles.
>To downshift, press.
Dynamic Driving Control
The Dynamic Driving Control makes it possible
for your BMW to react in an even more perfor-
mance-oriented manner at the push of a button:
>The engine responds more spontaneously
to accelerator pedal movements.
>Gearshifts are faster.
>The engine speed range is used optimally in
the Drive mode.
>Cruise control
*:
The stored speed is reached more quickly
when it is requested.
Page 67 of 273
Controls
65Reference
At a glance
Driving tips
Communications
Navigation
Entertainment
Mobility
N Neutral
Can, for example, be engaged in automatic car
washes. The vehicle can roll.
D Drive, automatic position
Position for normal vehicle operation. All for-
ward gears are available.
Under normal operating conditions, the fuel
consumption is lowest when driving in posi-
tion D.
Kick-down
The kick-down mode provides maximum accel-
eration: press the accelerator pedal beyond the
full-throttle resistance point.
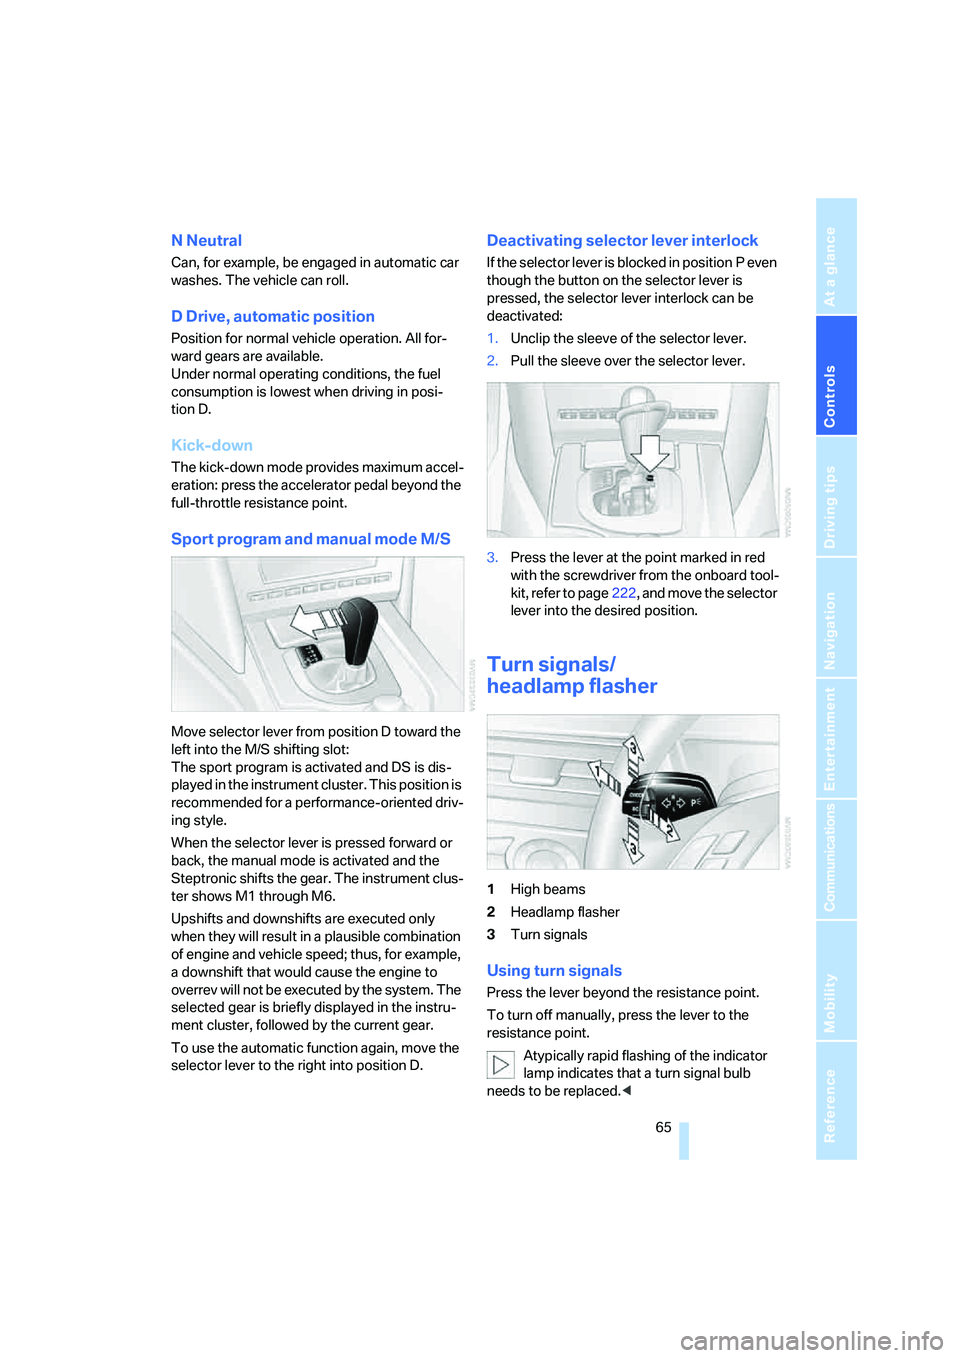
Sport program and manual mode M/S
Move selector lever from position D toward the
left into the M/S shifting slot:
The sport program is activated and DS is dis-
played in the instrument cluster. This position is
recommended for a performance-oriented driv-
ing style.
When the selector lever is pressed forward or
back, the manual mode is activated and the
Steptronic shifts the gear. The instrument clus-
ter shows M1 through M6.
Upshifts and downshifts are executed only
when they will result in a plausible combination
of engine and vehicle speed; thus, for example,
a downshift that would cause the engine to
overrev will not be executed by the system. The
selected gear is briefly displayed in the instru-
ment cluster, followed by the current gear.
To use the automatic function again, move the
selector lever to the right into position D.
Deactivating selector lever interlock
If the selector lever is blocked in position P even
though the button on the selector lever is
pressed, the selector lever interlock can be
deactivated:
1.Unclip the sleeve of the selector lever.
2.Pull the sleeve over the selector lever.
3.Press the lever at the point marked in red
with the screwdriver from the onboard tool-
kit, refer to page222, and move the selector
lever into the desired position.
Turn signals/
headlamp flasher
1High beams
2Headlamp flasher
3Turn signals
Using turn signals
Press the lever beyond the resistance point.
To turn off manually, press the lever to the
resistance point.
Atypically rapid flashing of the indicator
lamp indicates that a turn signal bulb
needs to be replaced.<
Page 84 of 273
Everything under control
82
Displays after completion of trip
Malfunction reports generated during the trip
are shown consecutively when you switch off
the ignition.
Before the display disappears, you can display
the messages once again. Press the CHECK
button for approx. 2 seconds. If several mes-
sages are present, you can continue to press
the CHECK button to view them in succession.
The display goes out
>automatically after a brief period
>when you press the CHECK button again
for approx. 2 seconds
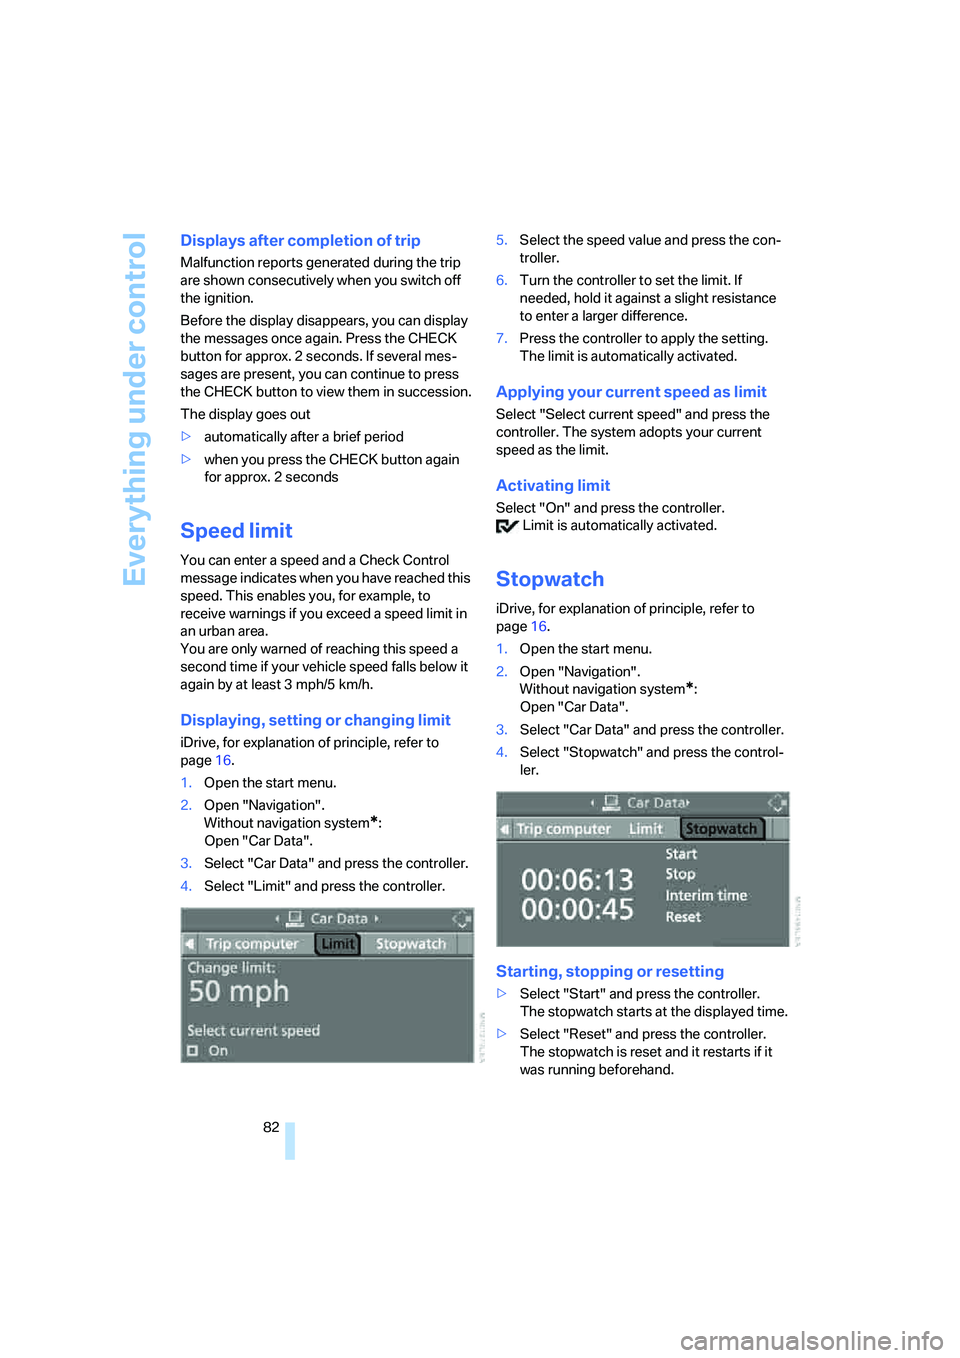
Speed limit
You can enter a speed and a Check Control
message indicates when you have reached this
speed. This enables you, for example, to
receive warnings if you exceed a speed limit in
an urban area.
You are only warned of reaching this speed a
second time if your vehicle speed falls below it
again by at least 3 mph/5 km/h.
Displaying, setting or changing limit
iDrive, for explanation of principle, refer to
page16.
1.Open the start menu.
2.Open "Navigation".
Without navigation system
*:
Open "Car Data".
3.Select "Car Data" and press the controller.
4.Select "Limit" and press the controller.5.Select the speed value and press the con-
troller.
6.Turn the controller to set the limit. If
needed, hold it against a slight resistance
to enter a larger difference.
7.Press the controller to apply the setting.
The limit is automatically activated.
Applying your current speed as limit
Select "Select current speed" and press the
controller. The system adopts your current
speed as the limit.
Activating limit
Select "On" and press the controller.
Limit is automatically activated.
Stopwatch
iDrive, for explanation of principle, refer to
page16.
1.Open the start menu.
2.Open "Navigation".
Without navigation system
*:
Open "Car Data".
3.Select "Car Data" and press the controller.
4.Select "Stopwatch" and press the control-
ler.
Starting, stopping or resetting
>Select "Start" and press the controller.
The stopwatch starts at the displayed time.
>Select "Reset" and press the controller.
The stopwatch is reset and it restarts if it
was running beforehand.
Page 90 of 273

Technology for comfort, convenience and safety
88
DSC Dynamic Stability Control
DSC prevents traction loss in the driving wheels
when starting off and accelerating. DSC also
identifies unstable driving conditions, such as a
loss of traction at the rear of the vehicle or slid-
ing of the vehicle in its front wheels. In these
cases, DSC helps the vehicle maintain a safe
course within physical limits by reducing engine
output and through braking actions in the indi-
vidual wheels.
The laws of physics cannot be repealed,
even with DSC. An appropriate driving
style always remains the responsibility of the
driver. Therefore, do not reduce the additional
safety margin further by taking risks.<
Deactivating DSC
Press the button until the DSC indicator lamp in
the instrument cluster lights up, but not longer
than approx. 10 seconds. DTC Dynamic Trac-
tion Control and DSC are deactivated together.
Stabilizing and drive output promoting actions
are no longer executed. In addition, the stability
promoting intervention of the active steering
*
is deactivated, refer to page95.
A message appears on the Control Display.
Please note any supplementary information
that appears there.
To increase vehicle stability, activate DSC again
as soon as possible.
Activating DSC
Press the button; the indicator lamp in the
instrument cluster goes out.
For better control
The indicator lamp flashes:
DSC controls the drive forces and
brake forces.
The indicator lamp lights up:
DSC is deactivated.
DTC Dynamic Traction Control
DTC is a version of DSC in which the drive out-
put is optimized for particular road conditions,
e.g. unplowed snow-covered roads. The sys-
tem assures the maximal drive output, but with
reduced driving stability. It is therefore neces-
sary to drive with appropriate caution.
You may find it useful to briefly activate DTC
under the following special circumstances:
>When driving on snowy inclines, in slush, or
on unplowed, snow-covered road surfaces
>When rocking a stuck vehicle free or start-
ing off in deep snow or on loose ground
>When driving with snow chains
*
Activating DTC
Press the button briefly; the DTC indicator lamp
in the instrument cluster lights up.
For better control
The indicator lamp flashes:
DTC controls the drive forces and
brake forces.
The indicator lamp lights up:
DTC is activated.