2007 BMW 525XI window
[x] Cancel search: windowPage 121 of 273
Controls
119Reference
At a glance
Driving tips
Communications
Navigation
Entertainment
Mobility
Sedan:
Through-loading system*
Opening
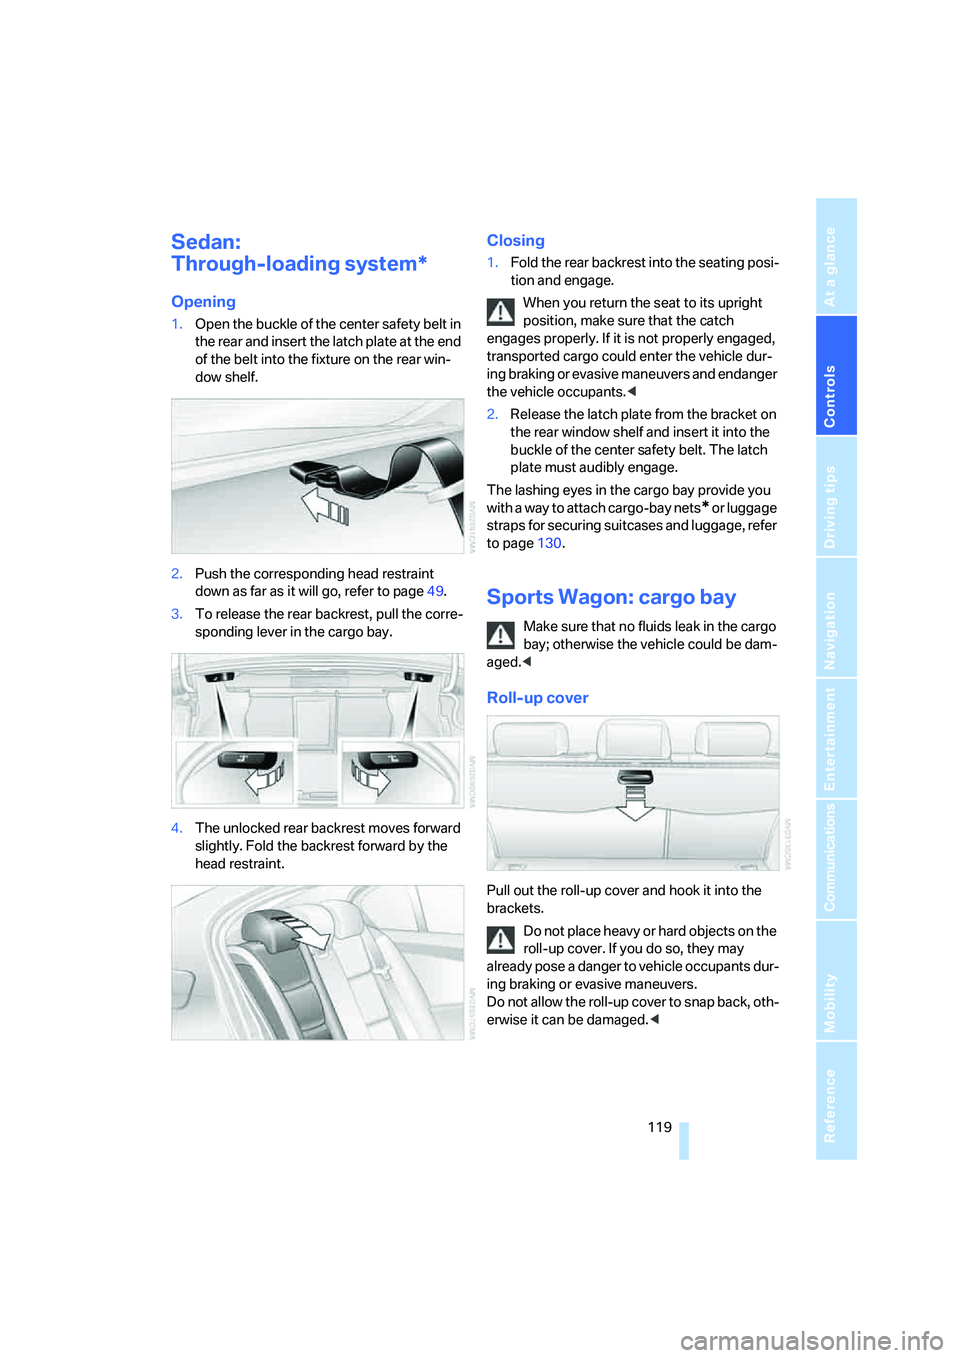
1.Open the buckle of the center safety belt in
the rear and insert the latch plate at the end
of the belt into the fixture on the rear win-
dow shelf.
2.Push the corresponding head restraint
down as far as it will go, refer to page49.
3.To release the rear backrest, pull the corre-
sponding lever in the cargo bay.
4.The unlocked rear backrest moves forward
slightly. Fold the backrest forward by the
head restraint.
Closing
1.Fold the rear backrest into the seating posi-
tion and engage.
When you return the seat to its upright
position, make sure that the catch
engages properly. If it is not properly engaged,
transported cargo could enter the vehicle dur-
ing braking or evasive maneuvers and endanger
the vehicle occupants.<
2.Release the latch plate from the bracket on
the rear window shelf and insert it into the
buckle of the center safety belt. The latch
plate must audibly engage.
The lashing eyes in the cargo bay provide you
with a way to attach cargo-bay nets
* or luggage
straps for securing suitcases and luggage, refer
to page130.
Sports Wagon: cargo bay
Make sure that no fluids leak in the cargo
bay; otherwise the vehicle could be dam-
aged.<
Roll-up cover
Pull out the roll-up cover and hook it into the
brackets.
Do not place heavy or hard objects on the
roll-up cover. If you do so, they may
already pose a danger to vehicle occupants dur-
ing braking or evasive maneuvers.
Do not allow the roll-up cover to snap back, oth-
erwise it can be damaged.<
Page 122 of 273
Practical interior accessories
120
Manual roll-up cover
When opening the tailgate or rear window, the
roll-up cover is raised. Before closing the tail-
gate and rear window, press down the roll-up
cover until it engages.
Automatic roll-up cover*
When the tailgate or rear window are opened,
the roll-up cover is raised, and when the tailgate
and rear window are closed, it is lowered.
Make sure that the closing area of the roll-
up cover is clear of obstructions, other-
wise the payload or the roll-up cover may be
damaged.<
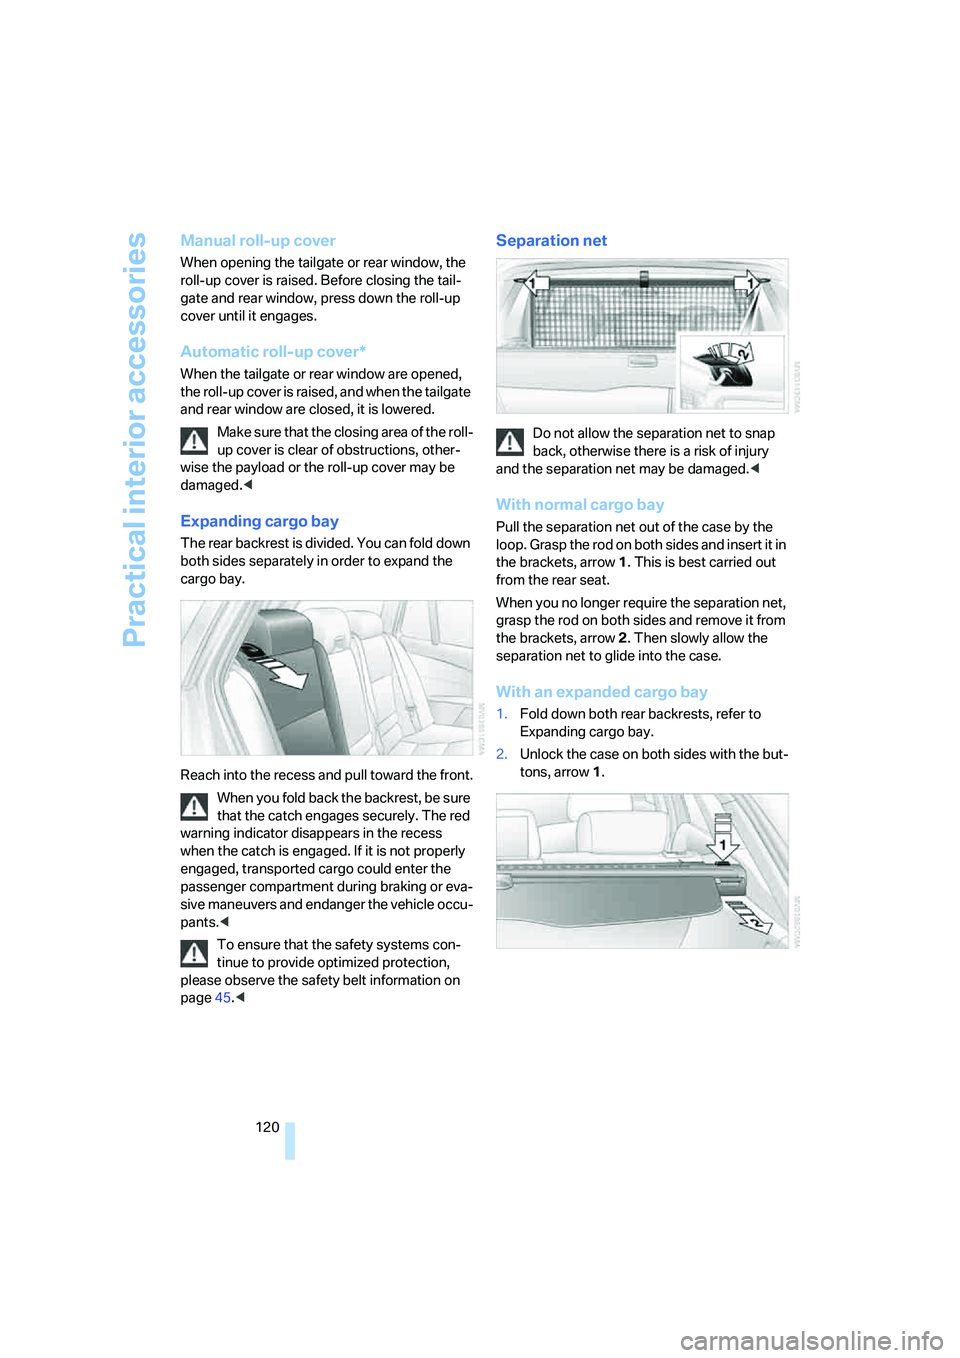
Expanding cargo bay
The rear backrest is divided. You can fold down
both sides separately in order to expand the
cargo bay.
Reach into the recess and pull toward the front.
When you fold back the backrest, be sure
that the catch engages securely. The red
warning indicator disappears in the recess
when the catch is engaged. If it is not properly
engaged, transported cargo could enter the
passenger compartment during braking or eva-
sive maneuvers and endanger the vehicle occu-
pants.<
To ensure that the safety systems con-
tinue to provide optimized protection,
please observe the safety belt information on
page45.<
Separation net
Do not allow the separation net to snap
back, otherwise there is a risk of injury
and the separation net may be damaged.<
With normal cargo bay
Pull the separation net out of the case by the
loop. Grasp the rod on both sides and insert it in
the brackets, arrow1. This is best carried out
from the rear seat.
When you no longer require the separation net,
grasp the rod on both sides and remove it from
the brackets, arrow2. Then slowly allow the
separation net to glide into the case.
With an expanded cargo bay
1.Fold down both rear backrests, refer to
Expanding cargo bay.
2.Unlock the case on both sides with the but-
tons, arrow1.
Page 128 of 273

Things to remember when driving
126
Things to remember when driving
Break-in period
Moving parts need breaking-in time to adjust to
each other. To ensure that your vehicle contin-
ues to provide optimized economy of operation
throughout an extended service life, we request
that you devote careful attention to the follow-
ing section.
Engine and differential
Always obey all official speed limits.
Up to 1,200 miles/2,000 km
Drive at changing engine and driving speeds,
however do not exceed 4,500 rpm or 100 mph/
160 km/h.
Avoid full-throttle operation and use of the
transmission's kick-down mode during these
initial miles.
From 1,200 miles/2,000 km
The engine and vehicle speed can gradually be
increased.
SMG Sequential Manual Transmission
Do not use the acceleration assistant during the
break-in period, refer to page64.
Tires
Due to technical factors associated with their
manufacture, tires do not achieve their full trac-
tion potential until after an initial break-in
period. Therefore, drive reservedly during the
first 200 miles/300 km.
Brake system
Brakes require an initial break-in period of
approx. 300 miles/500 km to achieve optimized
contact and wear patterns between brake pads
and rotors. Drive in a reserved manner during
this break-in period.
Clutch
The function of the clutch is only at its opti-
mized level after a distance driven of approx.
300 miles/500 km.During this break-in period,
engage the clutch gently.
Following part replacement
Observe the break-in instructions again if com-
ponents mentioned above must be replaced
after subsequent driving operation.
General driving notes
Closing luggage compartment lid/
tailgate
Operate the vehicle only when the lug-
gage compartment lid/tailgate is com-
pletely closed. Otherwise, exhaust fumes could
enter the interior of the vehicle.<
If special circumstances should make it abso-
lutely necessary to operate the vehicle with the
luggage compartment lid/tailgate open:
1.Close all windows and the glass sunroof or
panorama glass sunroof.
2.Increase the air volume of the automatic cli-
mate control to a high level, refer to
page109.
Hot exhaust system
As in all vehicles, extremely high temper-
atures are generated on the exhaust sys-
tem. Do not remove the heat shields installed
adjacent to it, and never apply undercoating to
them. When driving, standing at idle and while
parking take care to avoid possible contact
between the hot exhaust system and any highly
flammable materials such as hay, leaves, grass,
etc. Such contact could lead to a fire, and with it
the risk of serious property damage as well as
personal injury. Do not touch hot exhaust tail
pipes. Otherwise there is a risk of burns.<
Page 130 of 273
Things to remember when driving
128 can lead to high temperatures, brake wear and
possibly even brake failure.<
The braking effect of the engine can be further
increased by downshifting, if necessary all the
way down into first gear. This strategy helps
you avoid placing excessive loads on the brake
system. For information on downshifting in the
manual mode of the automatic transmission,
refer to page65.
Do not drive with the clutch depressed, in
idle or with the engine switched off, other-
wise there will be no engine braking action or
support of the braking force and steering.
Never allow floor mats, carpets or any other
objects to protrude into the area of movement
of the pedals and impair their operation.<
Corrosion on brake rotors
When the vehicle is driven only occasionally,
during extended periods when the vehicle is not
used at all, and in operating conditions where
brake applications are less frequent, there is an
increased tendency for corrosion to form on
rotors, while contaminants accumulate on the
brake pads. This occurs because the minimum
pressure which must be exerted by the pads
during brake applications to clean the rotors is
not reached.
Should corrosion form on the brake rotors, the
brakes will tend to respond with a pulsating
effect that even extended application will fail to
cure.
When vehicle is parked
Condensation forms in the air conditioner sys-
tem during operation, and then exits under the
vehicle. Traces of condensed water under the
vehicle are therefore normal.
Before driving into a car wash
To prevent the exterior mirrors on this vehicle
from being damaged, always fold them in by
hand before entering an automatic car wash.
General information on the care and mainte-
nance of your BMW is contained in the Caring
for your vehicle brochure.
Rear window wiper*
The rear window wiper can be damaged in car
washes. Take appropriate protective measures;
ask the car wash operator if necessary.
With comfort access and automatic
transmission
Insert the remote control into the ignition lock.
The engine can be switched off in selector lever
position N. Also refer to page40.
Cargo loading
To avoid loading the tires beyond their
approved carrying capacity, never over-
load the vehicle. Overloading can lead to over-
heating and increases the rate at which damage
develops inside the tires. The ultimate result
can assume the form of a sudden blow-out.<
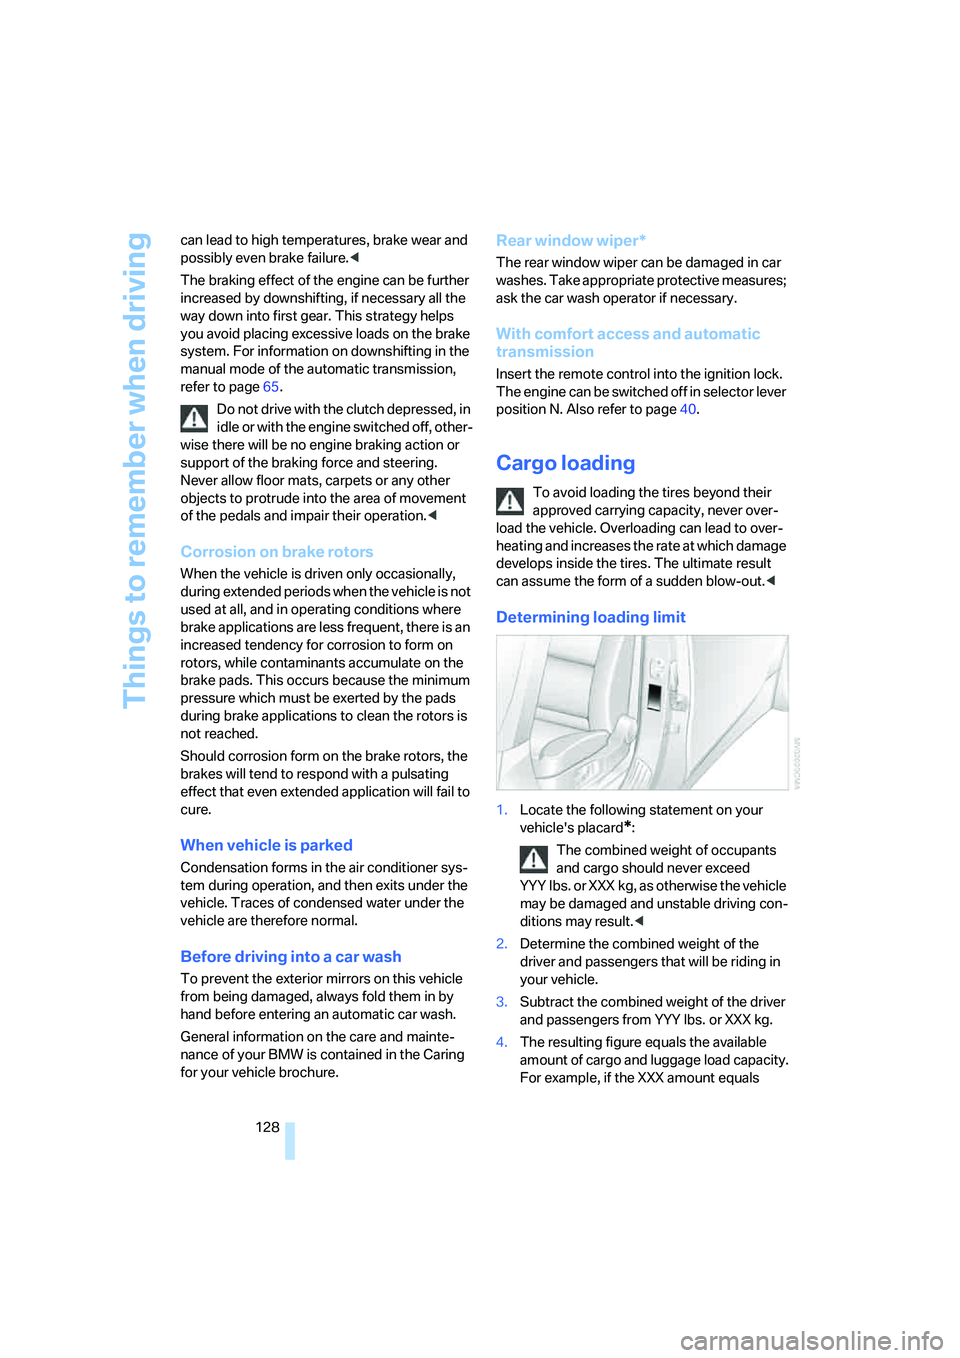
Determining loading limit
1.Locate the following statement on your
vehicle's placard
*:
The combined weight of occupants
and cargo should never exceed
YYY lbs. or XXX kg, as otherwise the vehicle
may be damaged and unstable driving con-
ditions may result.<
2.Determine the combined weight of the
driver and passengers that will be riding in
your vehicle.
3.Subtract the combined weight of the driver
and passengers from YYY lbs. or XXX kg.
4.The resulting figure equals the available
amount of cargo and luggage load capacity.
For example, if the XXX amount equals
Page 131 of 273
Driving tips
129Reference
At a glance
Controls
Communications
Navigation
Entertainment
Mobility
1,400 lbs. and there will be five 150-lb. pas-
sengers in your vehicle, the amount of avail-
able cargo and luggage load capacity is
650 lbs.:
1,400 lbs. minus 750 lbs. = 650 lbs.
5.Determine the combined weight of luggage
and cargo being loaded on the vehicle. That
weight may not safely exceed the available
cargo and luggage load capacity calculated
in step 4.
6.If your vehicle will be towing a trailer, part of
the load from your trailer will be transferred
to your vehicle. Consult the manual for
transporting a trailer to determine how this
may reduce the available cargo and luggage
load capacity of your vehicle.
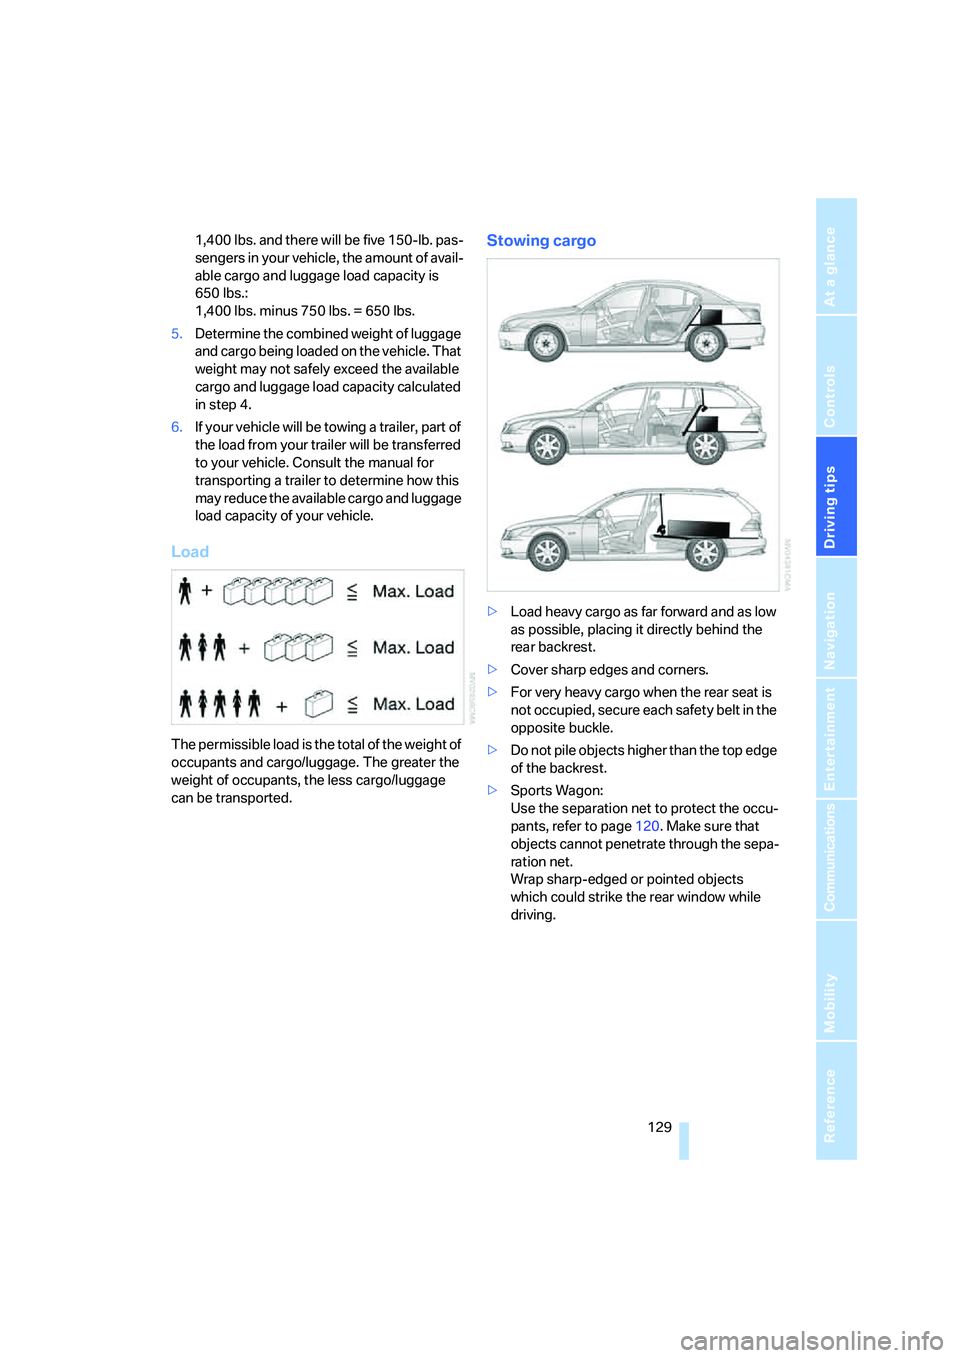
Load
The permissible load is the total of the weight of
occupants and cargo/luggage. The greater the
weight of occupants, the less cargo/luggage
can be transported.
Stowing cargo
>Load heavy cargo as far forward and as low
as possible, placing it directly behind the
rear backrest.
>Cover sharp edges and corners.
>For very heavy cargo when the rear seat is
not occupied, secure each safety belt in the
opposite buckle.
>Do not pile objects higher than the top edge
of the backrest.
>Sports Wagon:
Use the separation net to protect the occu-
pants, refer to page120. Make sure that
objects cannot penetrate through the sepa-
ration net.
Wrap sharp-edged or pointed objects
which could strike the rear window while
driving.
Page 136 of 273
Starting navigation system
134
Starting navigation system
Your navigation system can use satellites to
ascertain the precise position of your vehicle
and guide you reliably to any destination you
enter.
Navigation DVD
The navigation system requires a special navi-
gation DVD. The latest version is available at
your BMW center.
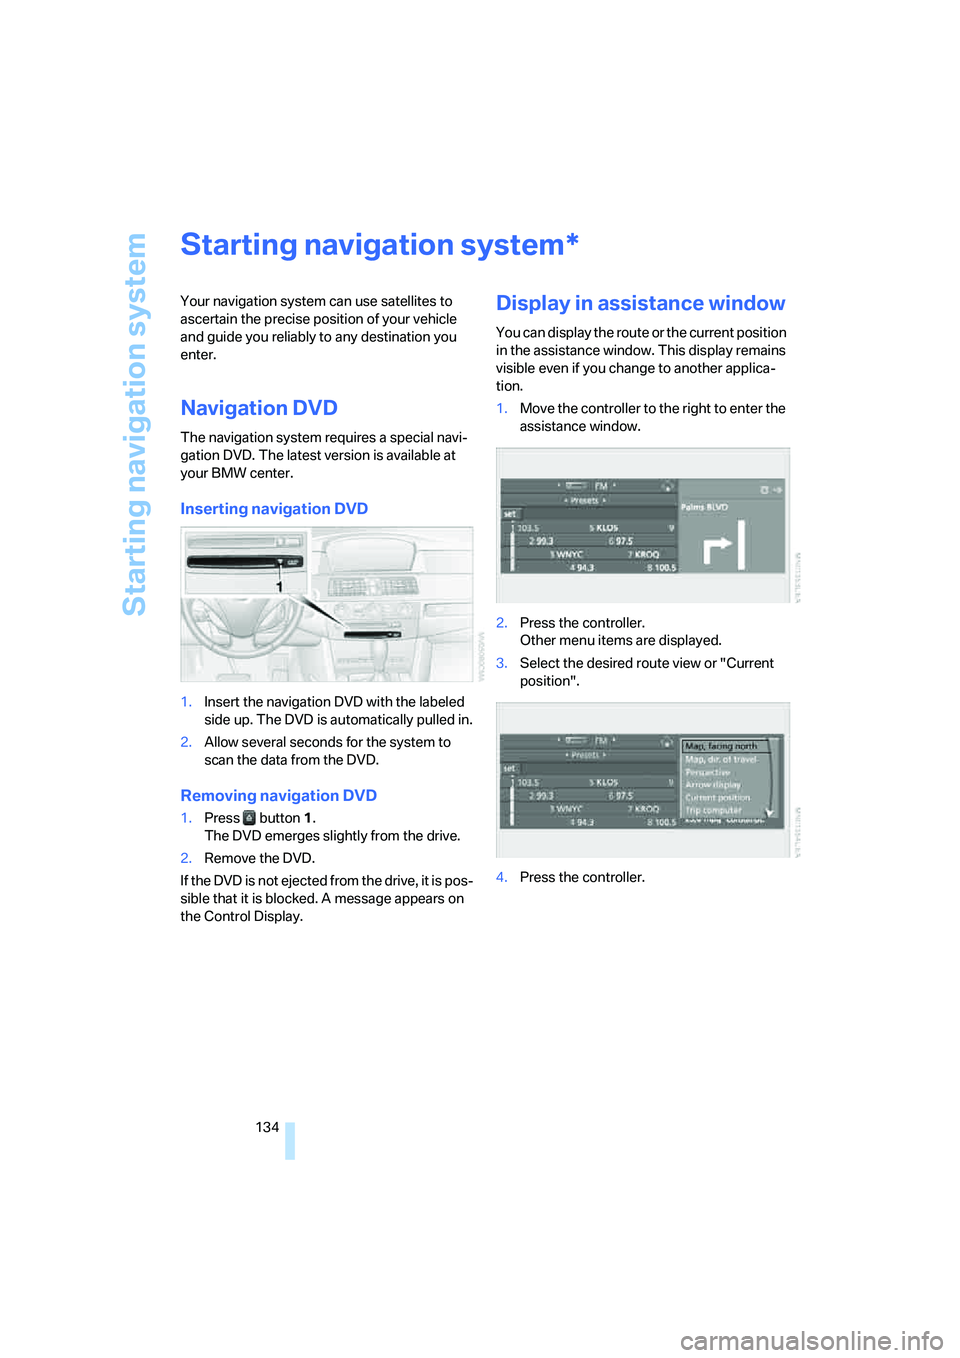
Inserting navigation DVD
1.Insert the navigation DVD with the labeled
side up. The DVD is automatically pulled in.
2.Allow several seconds for the system to
scan the data from the DVD.
Removing navigation DVD
1.Press button 1.
The DVD emerges slightly from the drive.
2.Remove the DVD.
If the DVD is not ejected from the drive, it is pos-
sible that it is blocked. A message appears on
the Control Display.
Display in assistance window
You can display the route or the current position
in the assistance window. This display remains
visible even if you change to another applica-
tion.
1.Move the controller to the right to enter the
assistance window.
2.Press the controller.
Other menu items are displayed.
3.Select the desired route view or "Current
position".
4.Press the controller.
*
Page 189 of 273
187
Entertainment
Reference
At a glance
Controls
Driving tips Communications
Navigation
Mobility
When the ignition and radio readiness are
switched off, e.g. after removing the remote
control from the ignition lock, you can continue
an ongoing call via the hands-free system for no
more than 25 minutes.
Speech quality
If the person you are talking to cannot under-
stand you well, this may be due to excessively
loud background noises. The full mobile phone
preparation package can compensate for these
noises to a certain degree. To optimize the
speech quality during a call, we recommend
that you:
>Reduce background noises, e.g. by closing
the windows, reducing the air volume of the
automatic climate control or pointing the
front vent outlets downward
>Reduce volume of hands-free system
Requirements
The logon data of the mobile phone are stored
in the vehicle and the mobile phone is ready to
operate.
The engine is running or the ignition is switched
on.
The mobile phone is detected by the vehicle.
iDrive, for explanation of principle, refer to
page16.
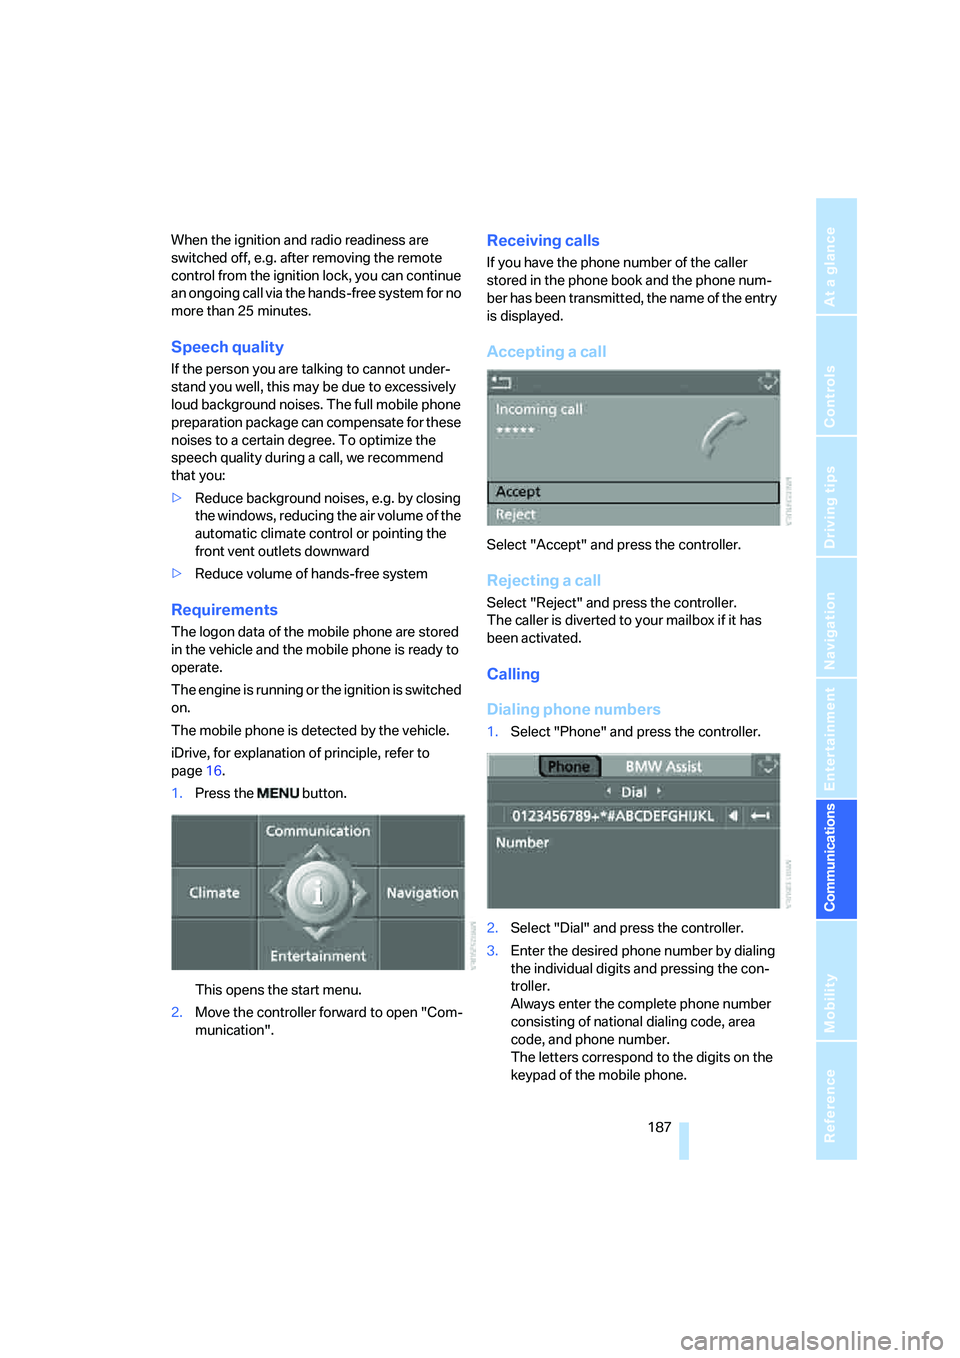
1.Press the button.
This opens the start menu.
2.Move the controller forward to open "Com-
munication".
Receiving calls
If you have the phone number of the caller
stored in the phone book and the phone num-
ber has been transmitted, the name of the entry
is displayed.
Accepting a call
Select "Accept" and press the controller.
Rejecting a call
Select "Reject" and press the controller.
The caller is diverted to your mailbox if it has
been activated.
Calling
Dialing phone numbers
1.Select "Phone" and press the controller.
2.Select "Dial" and press the controller.
3.Enter the desired phone number by dialing
the individual digits and pressing the con-
troller.
Always enter the complete phone number
consisting of national dialing code, area
code, and phone number.
The letters correspond to the digits on the
keypad of the mobile phone.
Page 196 of 273
Telephoning
194
Selecting an entry
The connection to the phone number of the
selected entry is established.
Redialing
The {Redial} command calls "Redial".
Notes
The commands in English were available
as of this printing. Other languages are
currently not available. To operate the mobile
phone via the voice command system, refer to
page22.<
Important for voice commands
For voice commands, keep the following in
mind:
>Issue the commands smoothly and at nor-
mal volume, avoiding excessive emphasis
and pauses.
>Keep the doors, windows and glass sunroof
closed to prevent interference from ambi-
ent noise.
>Avoid making other noise in the vehicle
while speaking.
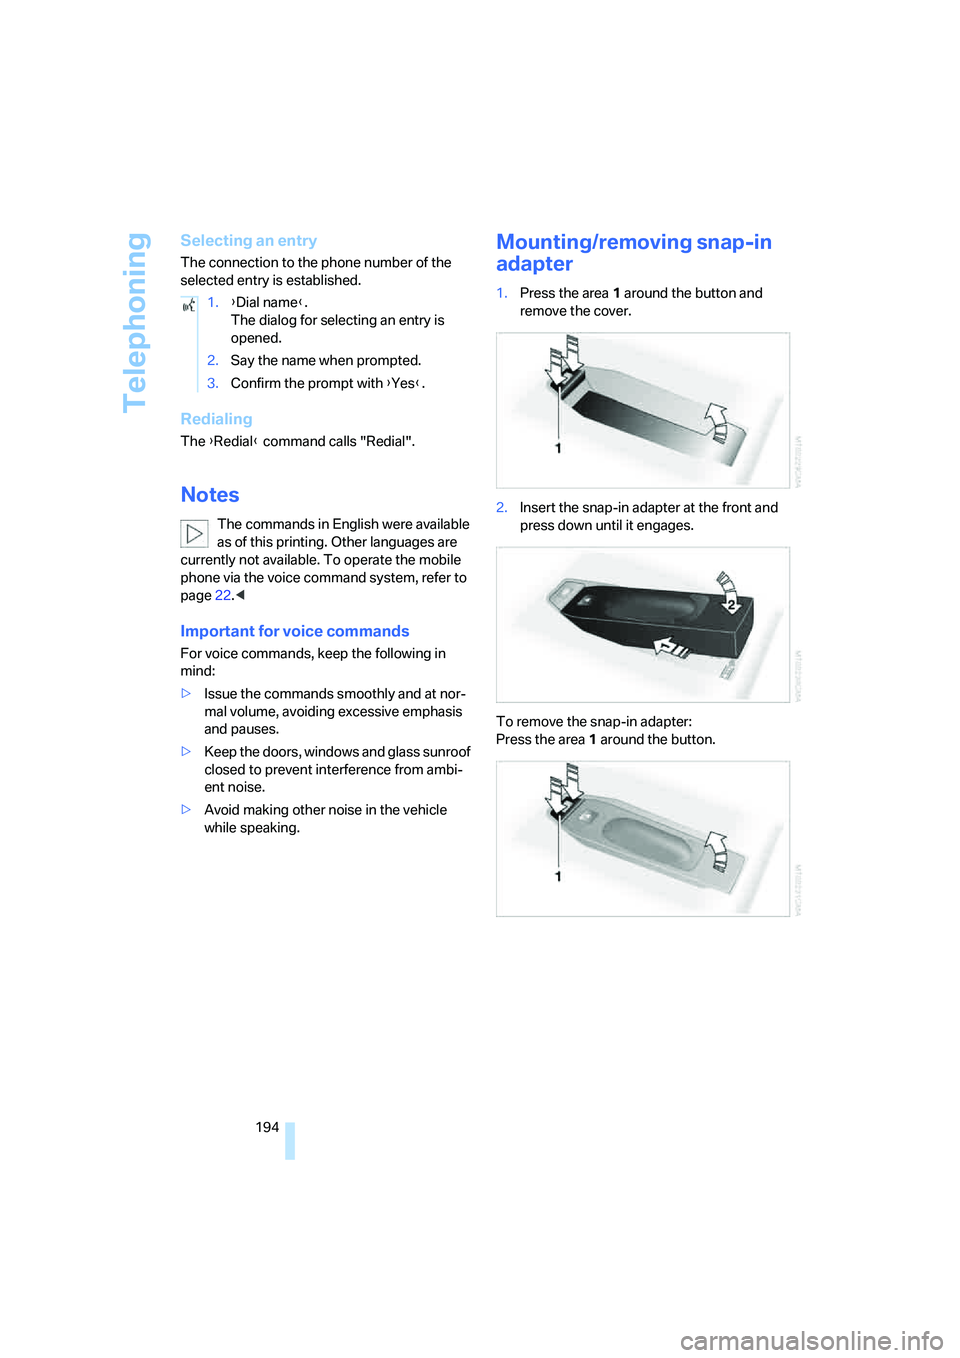
Mounting/removing snap-in
adapter
1.Press the area 1 around the button and
remove the cover.
2.Insert the snap-in adapter at the front and
press down until it engages.
To remove the snap-in adapter:
Press the area 1 around the button. 1.{Dial name}.
The dialog for selecting an entry is
opened.
2.Say the name when prompted.
3.Confirm the prompt with {Yes}.