2007 BMW 525XI radio
[x] Cancel search: radioPage 30 of 273

Opening and closing
28
Opening and closing
Keys/remote control
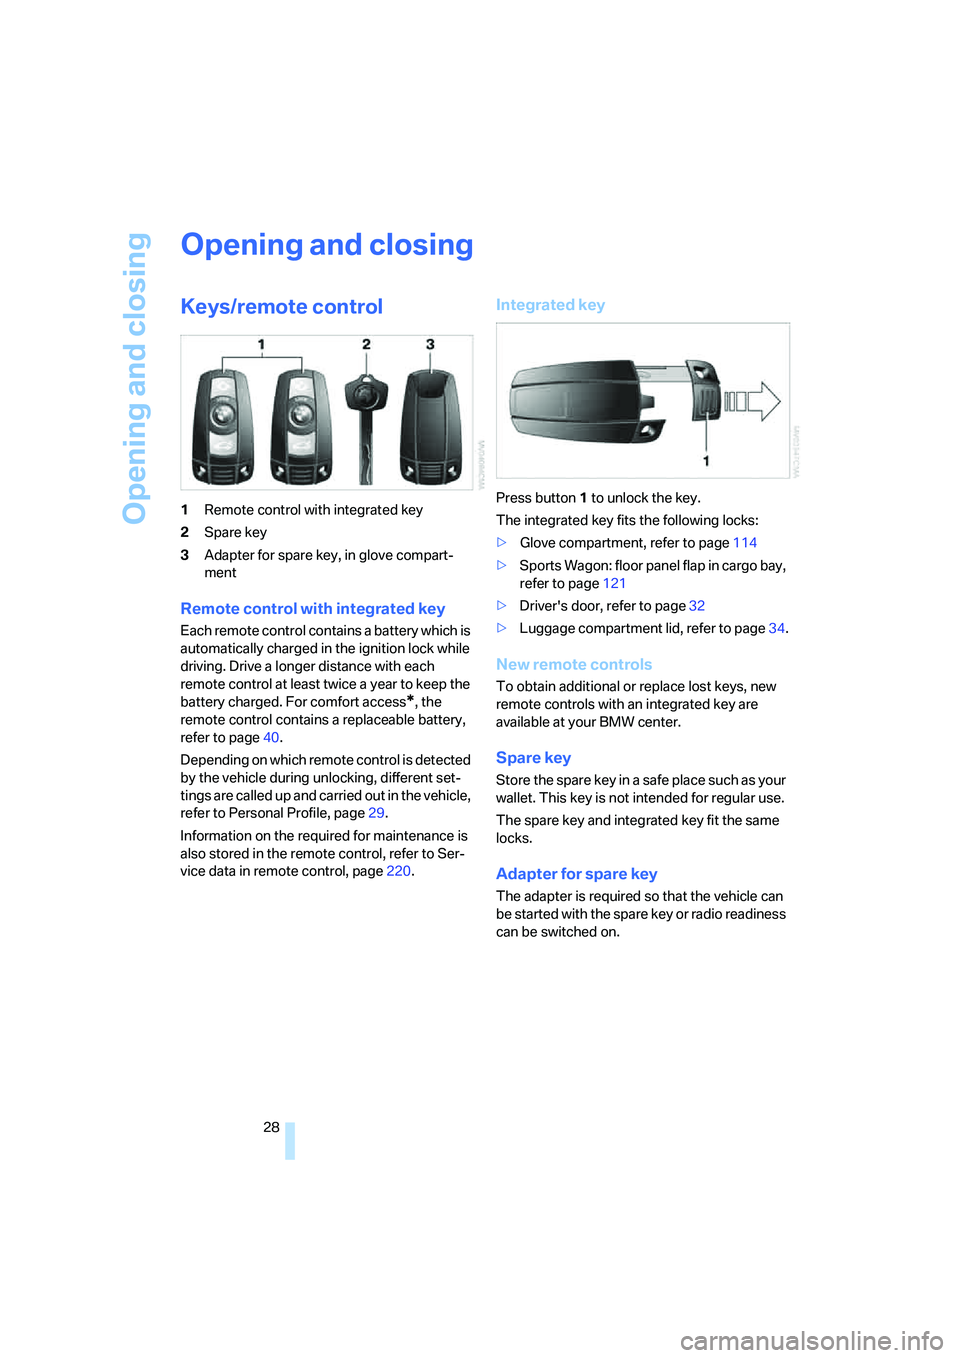
1Remote control with integrated key
2Spare key
3Adapter for spare key, in glove compart-
ment
Remote control with integrated key
Each remote control contains a battery which is
automatically charged in the ignition lock while
driving. Drive a longer distance with each
remote control at least twice a year to keep the
battery charged. For comfort access
*, the
remote control contains a replaceable battery,
refer to page40.
Depending on which remote control is detected
by the vehicle during unlocking, different set-
tings are called up and carried out in the vehicle,
refer to Personal Profile, page29.
Information on the required for maintenance is
also stored in the remote control, refer to Ser-
vice data in remote control, page220.
Integrated key
Press button1 to unlock the key.
The integrated key fits the following locks:
>Glove compartment, refer to page114
>Sports Wagon: floor panel flap in cargo bay,
refer to page121
>Driver's door, refer to page32
>Luggage compartment lid, refer to page34.
New remote controls
To obtain additional or replace lost keys, new
remote controls with an integrated key are
available at your BMW center.
Spare key
Store the spare key in a safe place such as your
wallet. This key is not intended for regular use.
The spare key and integrated key fit the same
locks.
Adapter for spare key
The adapter is required so that the vehicle can
be started with the spare key or radio readiness
can be switched on.
Page 31 of 273

Controls
29Reference
At a glance
Driving tips
Communications
Navigation
Entertainment
Mobility
Remove the adapter from the holder in the
glove compartment and slide the spare key into
the adapter before use.
Personal Profile
The concept
You can set a number of functions of your BMW
individually according to your preferences. Per-
sonal Profile ensures that most of these set-
tings are stored for the remote control currently
in use without you having to do anything. When
the vehicle is unlocked, the corresponding
remote control is detected and the settings
stored for it are called up and carried out.
This means that you will always find your BMW
set to your own personal settings even if
another person with his/her own remote control
and settings has used the vehicle since the last
time you drove it. The individual settings are
stored for a maximum of four remote controls.
Personal Profile settings
Details on the settings are provided on the
specified pages.
>When unlocking with the remote control,
either unlock only the driver's door or the
entire vehicle, refer to page30
>Locking the vehicle after a short time or
after starting off, refer to page33
>Assigning the programmable buttons
* on
the steering wheel, refer to page53>Settings for the display on the Control Dis-
play:
>Brightness of the Control Display, refer
to page84
>Measuring units for consumption, route/
distances, temperature, and pressure,
refer to page85
>Language on Control Display, refer to
page85
>12h/24h mode of the clock, refer to
page84
>Date format, refer to page84
>Lighting settings:
>Pathway lighting, refer to page103
>Daytime running lamps
*, refer to
page104
>Triple turn signal activation, refer to
page66
>Showing optical warning for PDC Park Dis-
tance Control
*, refer to page86
>Selection and brightness of display in
Head-Up Display
*, refer to page98
>Display settings of BMW Night Vision
*,
refer to page101
>Air distribution, temperature in the upper
body area and intensity of the automatic cli-
mate control, refer to page108
>Setting voice instructions for destination
guidance in the navigation system
*, refer to
Starting navigation system, page134
In addition, the following, most recently
selected settings are recalled during unlocking:
>Positions of driver's seat, outside mirrors,
and steering wheel
*, refer to page47
>Audio sources, volume and tone settings,
refer to page161
>Radio, displaying stored stations, refer to
page164
>Telephone, setting volume, refer to
pages186,192
Page 34 of 273

Opening and closing
32 7.Select the desired signal.
8.Press the controller.
The signal is activated.
Malfunction
The remote control may malfunction due to
local radio waves. Should the remote control fail
to operate due to interference of this kind,
unlock and lock the vehicle via the door lock
using a key.
If it is no longer possible to lock the vehicle
using the remote control, then the battery is
discharged. Use this remote control during an
extended drive; this will recharge the battery,
refer to page28.
For US owners only
The transmitter and receiver units comply with
part 15 of the FCC/Federal Communication
Commission regulations. Operation is gov-
erned by the following:
FCC ID:
LX8766S
LX8766E
LX8CAS
LX8CAS2
Compliance statement:
This device complies with part 15 of the FCC
Rules. Operation is subject to the following two
conditions:
>This device must not cause harmful inter-
ference, and
>this device must accept any interference
received, including interference that may
cause undesired operation.
Any unauthorized modifications or
changes to these devices could void the
user's authority to operate this equipment.<
Using door lock
When unlocking
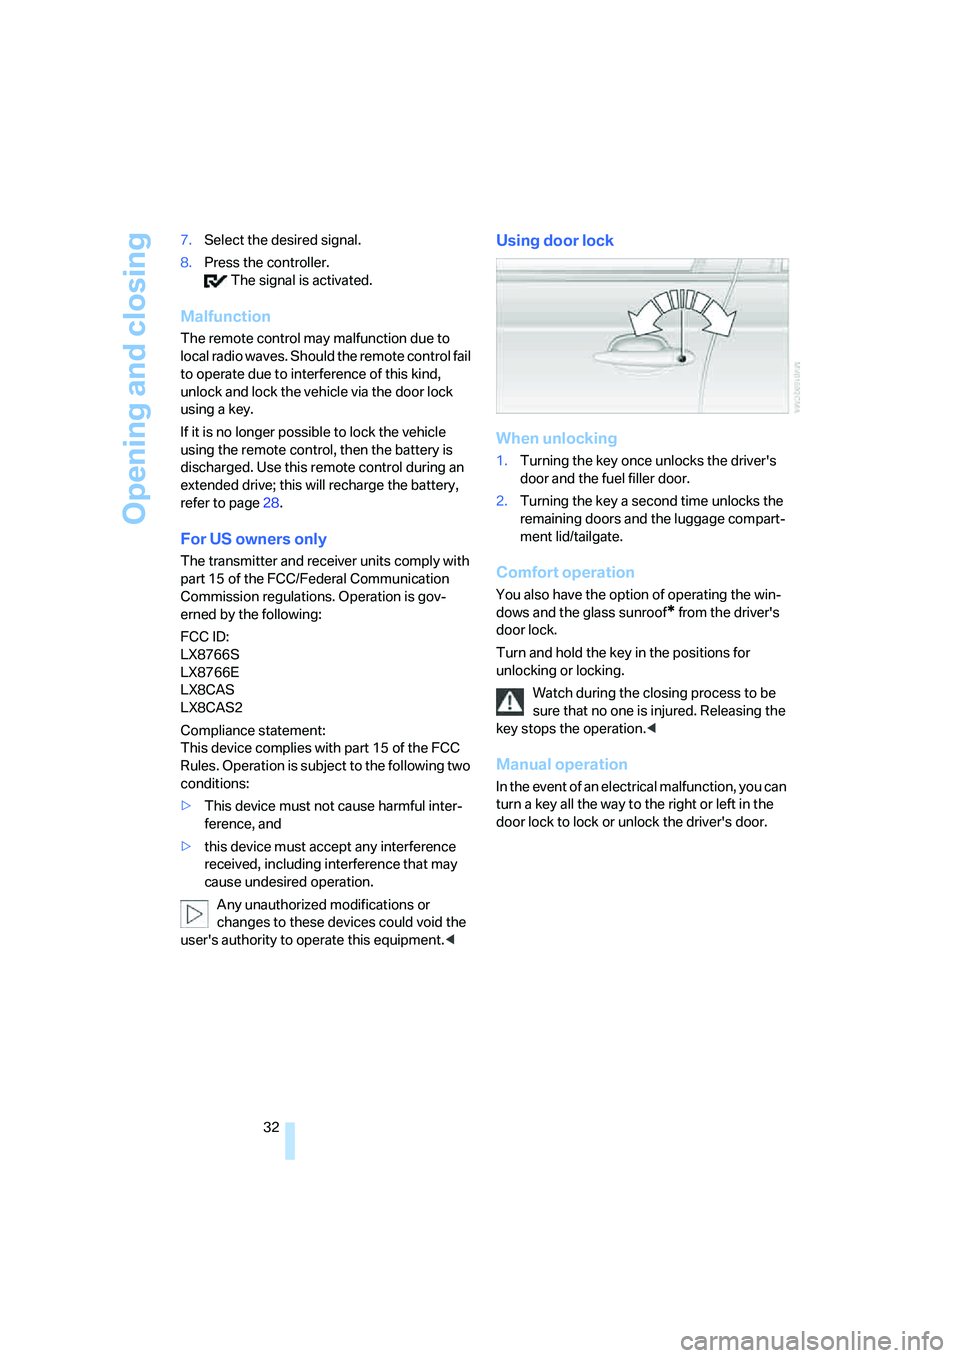
1.Turning the key once unlocks the driver's
door and the fuel filler door.
2.Turning the key a second time unlocks the
remaining doors and the luggage compart-
ment lid/tailgate.
Comfort operation
You also have the option of operating the win-
dows and the glass sunroof
* from the driver's
door lock.
Turn and hold the key in the positions for
unlocking or locking.
Watch during the closing process to be
sure that no one is injured. Releasing the
key stops the operation.<
Manual operation
In the event of an electrical malfunction, you can
turn a key all the way to the right or left in the
door lock to lock or unlock the driver's door.
Page 42 of 273

Opening and closing
40 If a remote control accidentally left in the
cargo bay is detected in the locked vehi-
cle after closing the luggage compartment lid/
tailgate or the rear window, the lid or rear win-
dow opens again. The hazard warning flashers
flash and a signal
* sounds.<
Sports Wagon: opening rear window
separately
Press the button on the rear window, refer to
page35.
Switching on radio readiness
By briefly pressing the Start/Stop button, you
switch on the radio readiness, refer to page59.
When doing so, do not depress the brake
or clutch pedal, otherwise the engine will
start immediately.<
Starting engine
You can start the engine or switch on the igni-
tion if a remote control is located in the interior
of the vehicle. It need not be inserted in the igni-
tion lock, refer to page59.
If you take the remote control with you when
leaving the vehicle with the engine running, a
warning lamp lights up. In addition, a message
appears on the Control Display. As long as no
remote control is detected in the vehicle, it is
only possible to restart the engine within
approx. 10 seconds after it is switched off.
Switching off engine with automatic
transmission
The engine can only be switched off in selector
lever position P, refer to page61.
To switch off the engine in selector lever posi-
tion N, the remote control must be inserted in
the ignition lock.
Before driving into a car wash with
automatic transmission
1.Insert remote control into ignition lock.
2.Depress brake pedal.
3.Place selector lever in position N.
4.Switch off the engine.The vehicle can roll.
Malfunction
The comfort access function may malfunction
due to local radio waves. Then open or close the
vehicle with the buttons on the remote control
or with a key. To start the engine following this,
insert the remote control in the ignition lock.
Replacing battery
The remote control for comfort access contains
a battery which must be replaced if necessary.
1.Remove integrated key from remote con-
trol, refer to page28.
2.Remove cover.
3.Lay in new battery with positive side facing
upward.
4.Press cover closed.
Return used battery to a recycling collec-
tion point or to your BMW center.<
Windows
To prevent injuries, exercise care when
closing the windows and keep them in
your field of vision until they are shut.
Always take along the remote control when you
leave the vehicle, otherwise children could, for
example, operate the windows and injure them-
selves.<
Page 49 of 273

Controls
47Reference
At a glance
Driving tips
Communications
Navigation
Entertainment
Mobility
Adjusting lumbar support*
You can also adjust the contour of the backrest
to obtain additional support in the lumbar
region.
The upper hips and spinal column receive sup-
plementary support to help you maintain a
relaxed, upright sitting position.
>Increase or decrease curvature: press front
or rear section of switch.
>Shift curvature up or down: press upper or
lowers section of switch.
Adjusting active backrest width*
First set a comfortable backrest width, see
above. Based on the backrest width set, the lat-
eral support is automatically adapted to the cur-
rent driving situation.
The adaptation of the backrest width and the
speed of the adjustment vary depending on the
program. You can select from among three pro-
grams from comfort to sport.
Press button once per program:
>"Comfort" program: one LED
>"Normal" program: two LEDs
>"Sport" program: three LEDs
To switch off: press button longer.
Easy entry/exit*
To facilitate entry and exit, the backrest width
temporarily opens all the way.
Seat, mirror and steering
wheel memory*
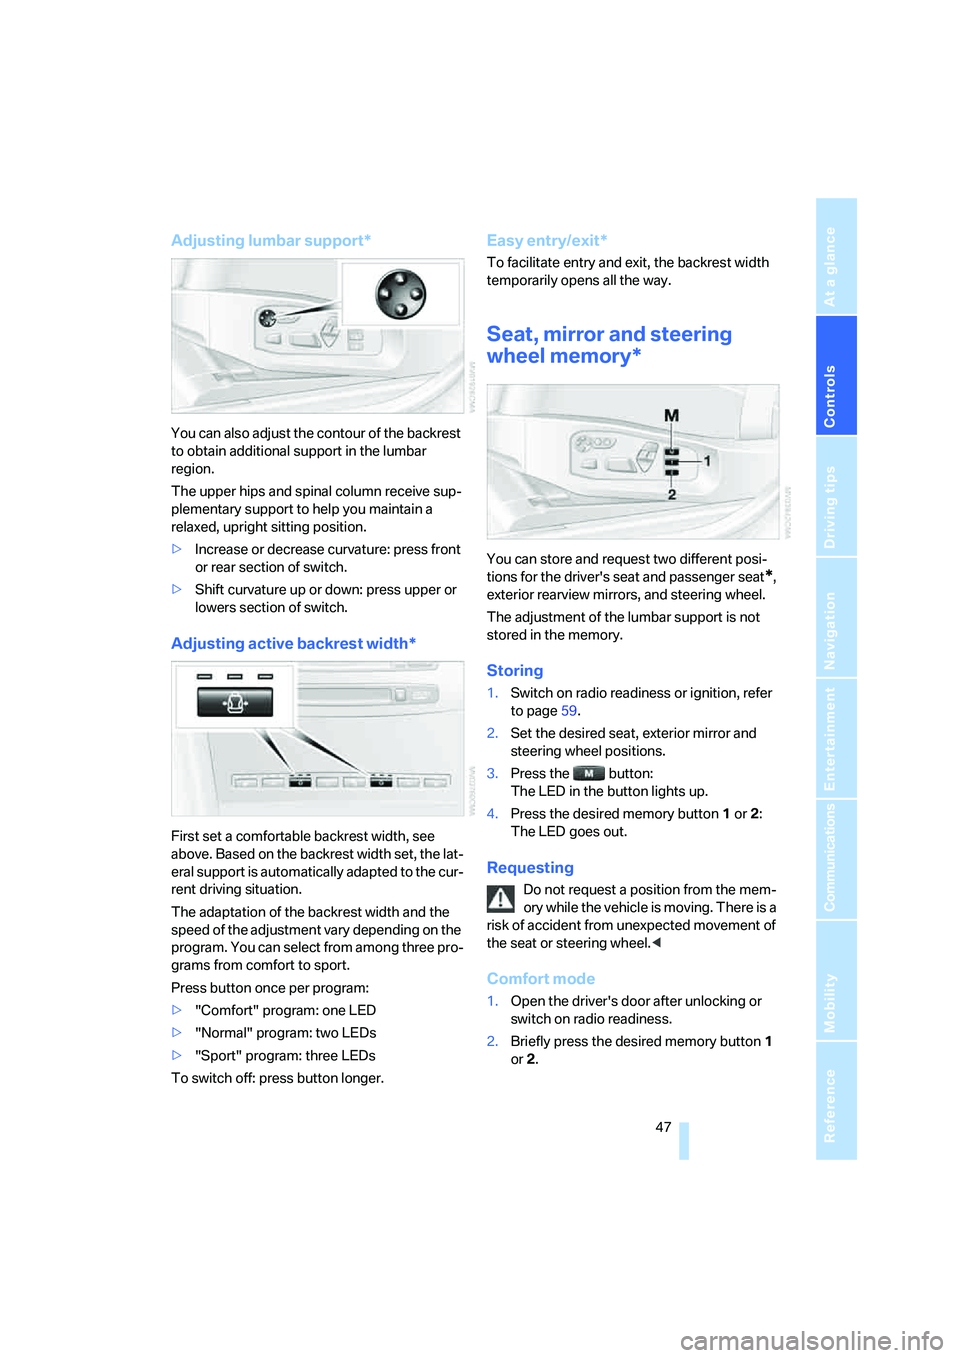
You can store and request two different posi-
tions for the driver's seat and passenger seat
*,
exterior rearview mirrors, and steering wheel.
The adjustment of the lumbar support is not
stored in the memory.
Storing
1.Switch on radio readiness or ignition, refer
to page59.
2.Set the desired seat, exterior mirror and
steering wheel positions.
3.Press the button:
The LED in the button lights up.
4.Press the desired memory button1 or2:
The LED goes out.
Requesting
Do not request a position from the mem-
ory while the vehicle is moving. There is a
risk of accident from unexpected movement of
the seat or steering wheel.<
Comfort mode
1.Open the driver's door after unlocking or
switch on radio readiness.
2.Briefly press the desired memory button1
or2.
Page 61 of 273

Controls
59Reference
At a glance
Driving tips
Communications
Navigation
Entertainment
Mobility
Driving
Ignition lock
Insert the remote control as far as possible into
the ignition lock.
>Radio readiness switches on.
Some electronic systems/consumers are
ready for operation.
>The electric steering-wheel lock audibly
unlocks.
Before moving the vehicle, insert the
remote control into the ignition lock;
otherwise, the electric steering-wheel lock will
not be unlocked and the vehicle cannot be
steered.<
Removing remote control from ignition
lock
Briefly press in the remote control; it is pushed
out somewhat.
>The ignition is switched off if it was still
switched on.
>The electric steering-wheel lock audibly
locks.
Automatic transmission
The remote control can only be removed when
selector lever position P is selected: interlock.
Start/Stop button
Briefly pressing the Start/Stop button several
times switches the radio readiness or the igni-
tion on and off.
Briefly pressing the Start/Stop button
with the brake or clutch pedal depressed
starts the engine.<
Radio readiness
Some electronic systems/consumers are ready
for operation. The time and outside tempera-
ture are displayed in the instrument cluster.
Radio readiness is automatically switched off:
>when the remote control is removed from
the ignition lock
>with comfort access
* by touching the sen-
sitive surface on the door handle, refer to
Locking on page39
Ignition on
All electronic systems/consumers are ready for
operation. The odometer and the trip odometer
are displayed in the instrument cluster, refer to
page75.
Please switch off the ignition and the
electronic systems/consumers which are
not required when the engine is not running to
save the battery.<
Page 62 of 273

Driving
60
Radio readiness and ignition switched
off
All indicator and warning lamps in the instru-
ment cluster go out.
Starting engine
Do not run the engine in closed rooms,
otherwise the inhalation of toxic exhaust
gases can cause unconsciousness and death.
The exhaust gases contain carbon monoxide,
an odorless and colorless, but highly toxic gas.
Never leave an unattended vehicle with the
engine running, as such a vehicle represents a
potential safety hazard.
Before leaving the vehicle with the engine run-
ning, select the idling position, or move the
selector lever to position P and apply the hand-
brake, otherwise the vehicle can begin to roll.<
When starting the engine, do not press the
accelerator pedal.
Do not allow the engine to warm up by leaving it
running while the vehicle remains stationary.
Instead, begin to drive at a moderate engine
speed.
Do not press either the brake or the clutch
pedal as long as you do not want to start
the engine. The engine starts when you briefly
press the Start/Stop button and press the brake
pedal with an automatic transmission
* or the
clutch pedal with a manual transmission.<
Manual transmission
1.Apply the handbrake.
2.Depress the clutch pedal and select the
idling position.
3.Briefly press the Start/Stop button.
The system responds by automatically engag-
ing the starter for a certain period and automat-
ically disengaging it as soon as the engine
starts.
Automatic transmission*
1.Depress brake pedal.
2.Place selector lever in position P or N.
3.Briefly press the Start/Stop button.
The system responds by automatically engag-
ing the starter for a certain period and automat-
ically disengaging it as soon as the engine
starts.
SMG Sequential Manual
Transmission*
1.Depress brake pedal.
2.Engage selector lever position N and make
sure that this position is also indicated in the
instrument cluster.
3.Briefly press the Start/Stop button.
The system responds by automatically engag-
ing the starter for a certain period and automat-
ically disengaging it as soon as the engine
starts.
If the engine fails to start, depress the
brake pedal and press the selector lever
to the right then engage position N. Watch the
display in the instrument cluster while doing
so.<
Special starting conditions
Depress the accelerator pedal half way when
starting the engine in the following situations:
>The engine fails to start on the first attempt,
e.g. if it is very hot or cold.
>The engine is started at very low tempera-
tures, below approx. + 57/– 156, at high
altitudes, over approx. 3,300 ft/1,000 m.
Page 77 of 273

Controls
75Reference
At a glance
Driving tips
Communications
Navigation
Entertainment
Mobility
Everything under control
Odometer, outside
temperature display, clock
1Time, outside temperature and date
2Odometer and trip odometer
3Press button:
>with ignition switched on, trip odometer
is reset
>with the ignition switched off, time, out-
side temperature and odometer are
briefly displayed
From radio readiness the outside temperature
and the time are displayed.
Date retrieval:
Press CHECK button on turn signal lever, refer
to page81.
Time and date setting, refer to page83.
You can set the unit of measure 7 or 6 on the
Control Display, refer to Units of measure on
page85.
Outside temperature warning
If the display drops to +377/+36, a signal
sounds and a warning lamp lights up. A mes-
sage appears on the Control Display. There is
an increased danger of ice.
Even at temperatures above +377/
+36 ice can form. Therefore, drive care-
fully, e.g. on bridges and sections of road in the
shade, otherwise there is an increased accident
risk.<
Tachometer
The white-striped advance warning field,
arrow1, changes depending on the engine
temperature. With increasing engine tempera-
ture the advance warning field becomes corre-
spondingly smaller. Avoid allowing the engine
speed to rise as far as the orange warning field
whenever possible.
Be sure to avoid engine speeds in the red warn-
ing field, arrow2. In this range, the fuel supply is
interrupted to protect the engine.
Coolant temperature
Should the coolant, and with it the engine
become too hot, a warning lamp lights up. In
addition, a message appears on the Control
Display.
Checking coolant level, refer to page219.