2007 BMW 525I tailgate
[x] Cancel search: tailgatePage 39 of 273

Controls
37Reference
At a glance
Driving tips
Communications
Navigation
Entertainment
Mobility
Opening tailgate
The tailgate opens automatically when you:
>Press the button on the outside of the tail-
gate when the vehicle is unlocked.
>Press the button in the driver's foot-
well.
>Press the button on the remote control
for approx. 1 second.
During opening, the tailgate pivots back
and up. Make sure that adequate clear-
ance is available before opening.<
To interrupt opening:
>Press the button on the outside of the tail-
gate.
>Press and hold the button on the remote
control.
>Press the button on the inside of the tail-
gate.
Automatic roll-up cover
When the tailgate or rear window are opened,
the roll-up cover is raised, and when the tailgate
and rear window are closed, it is lowered.
Make sure that the closing area of the roll-
up cover is clear of obstructions, other-wise the payload or the roll-up cover may be
damaged.<
Details on the roll-up cover are provided on
page119.
Closing tailgate
Make sure that the closing path of the tail-
gate is clear, otherwise injuries may
result.<
The tailgate closes automatically when the but-
ton on the inside of the tailgate is pressed.
To interrupt closing:
>Press the button on the inside of the tail-
gate.
>Press the button on the outside of the tail-
gate.
Closing is not canceled when you put the
vehicle into motion.<
Alarm system
The concept
The vehicle alarm system responds:
>When a door, the hood or the luggage com-
partment lid/tailgate or rear window are
opened
>To movements in the vehicle: interior
motion sensor, refer to page38
>To changes in the vehicle's tilt if someone
attempts to steal the wheels or tow the
vehicle
>To interruptions in battery voltage
Unauthorized operations are briefly signaled by
the alarm system:
Page 40 of 273

Opening and closing
38 >with an acoustic alarm
>by switching on
the hazard warning flashers
>by flashing the high beams
Arming and disarming alarm system
When you lock or unlock the vehicle, either with
the remote control or at the door lock, the alarm
system is armed or disarmed at the same time.
The luggage compartment lid/tailgate can also
be opened with the system armed with the
button on the remote control, refer to page34.
When the luggage compartment lid/tailgate is
closed, it is locked and monitored again.
Switching off alarm
>Unlock the vehicle using the remote control,
refer to page30.
>Insert the remote control all the way into the
ignition lock.
Indicator lamp displays
>The indicator lamp under the interior rear-
view mirror flashes continuously: the sys-
tem is armed.
>The indicator lamp flashes after locking:
doors, hood, luggage compartment lid/tail-
gate or rear window
is/are not properly
closed. Even if you do not close the alerted
area, the system begins to monitor the
remaining areas, and the indicator lamp
flashes continuously after approx. 10 sec-
onds. However, the interior motion sensor
is not activated.
>The indicator lamp goes out after unlocking:
your vehicle has not been disturbed while
you were away.>The indicator lamp flashes after unlocking
until the remote control is inserted into the
ignition lock, however for a maximum of
approx. 5 minutes: your vehicle has been
disturbed while you were away.
Tilt alarm sensor
The tilt of the vehicle is monitored. The alarm
system reacts, e.g. in case of an attempted
wheel theft or towing.
Interior motion sensor
In order for the interior motion sensor to func-
tion properly, the windows and glass sunroof
*
must be completely closed.
Avoiding unintentional alarms
The tilt alarm sensor and interior motion sensor
may be switched off at the same time. This pre-
vents unintentional alarms, e.g. in the following
situations:
>In two-level garages
>When transporting on car-carrying trains,
by sea or on a trailer
>When animals are to remain in the vehicle
Switching off tilt alarm sensor and
interior motion sensor
Press the button on the remote control
again as soon as the vehicle is locked.
The indicator lamp lights up briefly and then
flashes continuously. The tilt alarm sensor and
the interior motion sensor are switched off until
the next time the vehicle is unlocked and subse-
quently locked again.
Comfort access*
Comfort access enables you to access your
vehicle without having to hold the remote con-
trol in your hand. It is sufficient to carry the
remote control with you, e.g. in your jacket
pocket. The vehicle automatically detects the
related remote control in the immediate vicinity
or in the interior.
Page 41 of 273

Controls
39Reference
At a glance
Driving tips
Communications
Navigation
Entertainment
Mobility
Comfort access supports the following func-
tions:
>Unlocking/locking vehicle
>Comfort closing
>Opening luggage compartment lid/tailgate
separately
>Sports Wagon: opening rear window sepa-
rately
>Starting engine
Functional requirement
>The vehicle or the luggage compartment
lid/tailgate can only be locked if the vehicle
detects that the remote control you are car-
rying is outside the vehicle.
>The next unlocking and locking cycle is not
possible until after approx. 2 seconds.
>The engine can only be started if the vehicle
detects that the remote control is located in
the vehicle.
Comparison with ordinary remote
control
You can control the functions mentioned previ-
ously with the comfort access or by pressing
the buttons on the remote control. Therefore,
please familiarize yourself with the information
on opening and closing beginning on page28
beforehand.
The special features when using comfort
access are described in the following.
Should a short delay occur when opening
or closing the windows or the glass sun-
roof, the system is checking whether a remote
control is located in the vehicle. Please repeat
opening or closing if necessary.<
Unlocking
Completely grasp a door handle, arrow1.
This corresponds to pressing the button.
If a remote control is detected in the interior
after unlocking, the electric steering-wheel lock
unlocks, refer to page59.
Locking
>For the driver's door, touch the area high-
lighted in the picture, arrow2, with your fin-
ger for approx. 1 second.
>For the remaining doors, touch the area
highlighted in the picture, arrow3, with your
finger for approx. 1 second.
This corresponds to pressing the but-
ton.
Please make sure that the ignition and all
electronic systems/consumers are
switched off before locking to save the bat-
tery.<
Comfort closing
Hold a finger or the back of the hand on the sur-
face, arrow2 or 3.
The windows and the glass sunroof
* are
closed.
Watch during the closing process to be
sure that no one is injured. Removing the
hand from the door handle stops the closing
process immediately.<
Opening luggage compartment lid/
tailgate separately
Press the button on the luggage compartment
lid/tailgate. This corresponds to pressing the
button.
Page 42 of 273

Opening and closing
40 If a remote control accidentally left in the
cargo bay is detected in the locked vehi-
cle after closing the luggage compartment lid/
tailgate or the rear window, the lid or rear win-
dow opens again. The hazard warning flashers
flash and a signal
* sounds.<
Sports Wagon: opening rear window
separately
Press the button on the rear window, refer to
page35.
Switching on radio readiness
By briefly pressing the Start/Stop button, you
switch on the radio readiness, refer to page59.
When doing so, do not depress the brake
or clutch pedal, otherwise the engine will
start immediately.<
Starting engine
You can start the engine or switch on the igni-
tion if a remote control is located in the interior
of the vehicle. It need not be inserted in the igni-
tion lock, refer to page59.
If you take the remote control with you when
leaving the vehicle with the engine running, a
warning lamp lights up. In addition, a message
appears on the Control Display. As long as no
remote control is detected in the vehicle, it is
only possible to restart the engine within
approx. 10 seconds after it is switched off.
Switching off engine with automatic
transmission
The engine can only be switched off in selector
lever position P, refer to page61.
To switch off the engine in selector lever posi-
tion N, the remote control must be inserted in
the ignition lock.
Before driving into a car wash with
automatic transmission
1.Insert remote control into ignition lock.
2.Depress brake pedal.
3.Place selector lever in position N.
4.Switch off the engine.The vehicle can roll.
Malfunction
The comfort access function may malfunction
due to local radio waves. Then open or close the
vehicle with the buttons on the remote control
or with a key. To start the engine following this,
insert the remote control in the ignition lock.
Replacing battery
The remote control for comfort access contains
a battery which must be replaced if necessary.
1.Remove integrated key from remote con-
trol, refer to page28.
2.Remove cover.
3.Lay in new battery with positive side facing
upward.
4.Press cover closed.
Return used battery to a recycling collec-
tion point or to your BMW center.<
Windows
To prevent injuries, exercise care when
closing the windows and keep them in
your field of vision until they are shut.
Always take along the remote control when you
leave the vehicle, otherwise children could, for
example, operate the windows and injure them-
selves.<
Page 122 of 273

Practical interior accessories
120
Manual roll-up cover
When opening the tailgate or rear window, the
roll-up cover is raised. Before closing the tail-
gate and rear window, press down the roll-up
cover until it engages.
Automatic roll-up cover*
When the tailgate or rear window are opened,
the roll-up cover is raised, and when the tailgate
and rear window are closed, it is lowered.
Make sure that the closing area of the roll-
up cover is clear of obstructions, other-
wise the payload or the roll-up cover may be
damaged.<
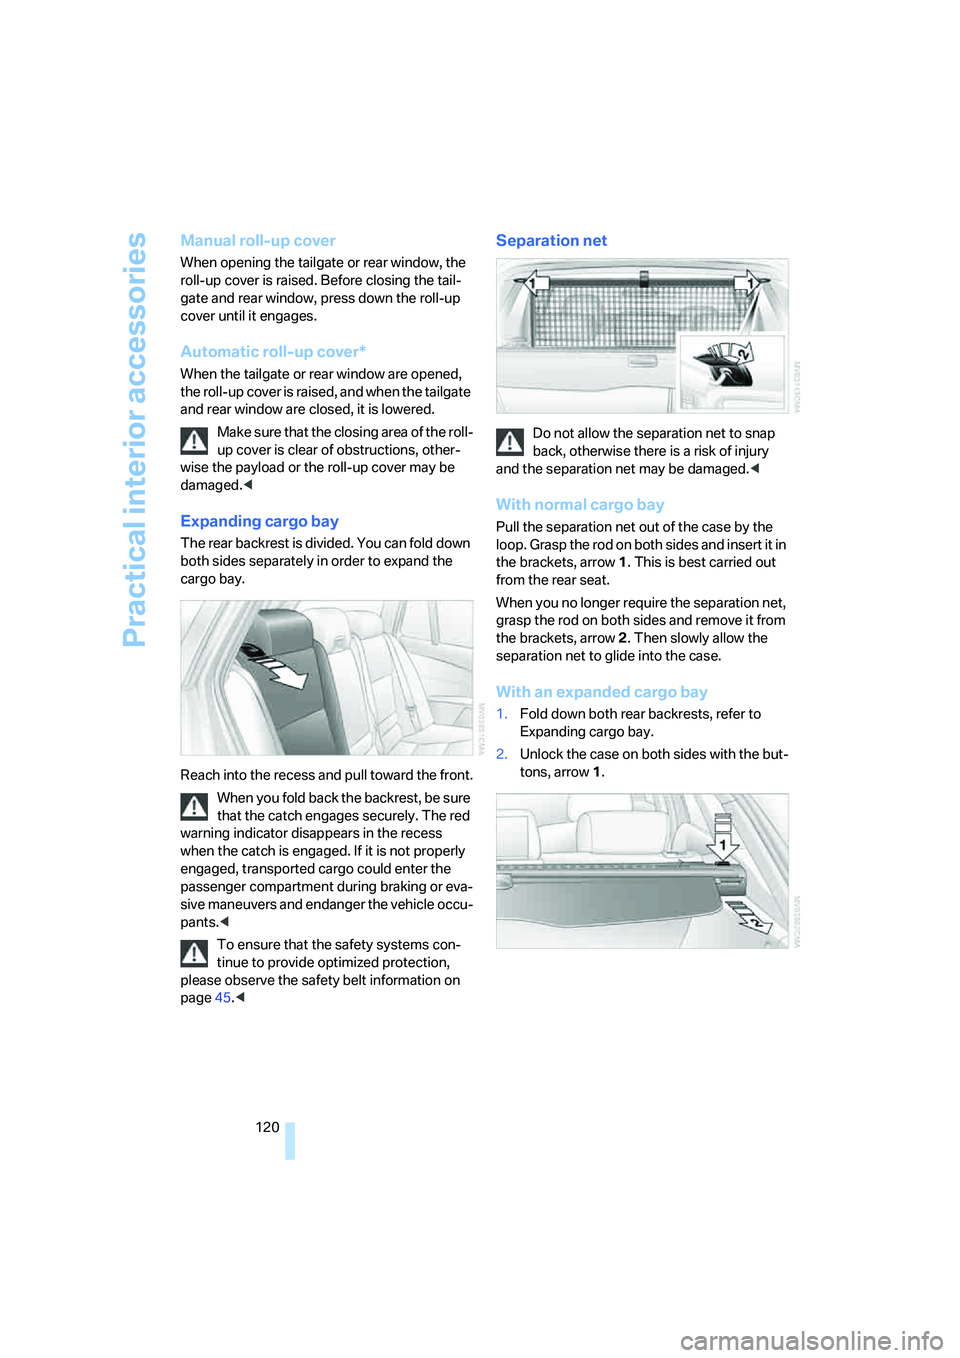
Expanding cargo bay
The rear backrest is divided. You can fold down
both sides separately in order to expand the
cargo bay.
Reach into the recess and pull toward the front.
When you fold back the backrest, be sure
that the catch engages securely. The red
warning indicator disappears in the recess
when the catch is engaged. If it is not properly
engaged, transported cargo could enter the
passenger compartment during braking or eva-
sive maneuvers and endanger the vehicle occu-
pants.<
To ensure that the safety systems con-
tinue to provide optimized protection,
please observe the safety belt information on
page45.<
Separation net
Do not allow the separation net to snap
back, otherwise there is a risk of injury
and the separation net may be damaged.<
With normal cargo bay
Pull the separation net out of the case by the
loop. Grasp the rod on both sides and insert it in
the brackets, arrow1. This is best carried out
from the rear seat.
When you no longer require the separation net,
grasp the rod on both sides and remove it from
the brackets, arrow2. Then slowly allow the
separation net to glide into the case.
With an expanded cargo bay
1.Fold down both rear backrests, refer to
Expanding cargo bay.
2.Unlock the case on both sides with the but-
tons, arrow1.
Page 128 of 273

Things to remember when driving
126
Things to remember when driving
Break-in period
Moving parts need breaking-in time to adjust to
each other. To ensure that your vehicle contin-
ues to provide optimized economy of operation
throughout an extended service life, we request
that you devote careful attention to the follow-
ing section.
Engine and differential
Always obey all official speed limits.
Up to 1,200 miles/2,000 km
Drive at changing engine and driving speeds,
however do not exceed 4,500 rpm or 100 mph/
160 km/h.
Avoid full-throttle operation and use of the
transmission's kick-down mode during these
initial miles.
From 1,200 miles/2,000 km
The engine and vehicle speed can gradually be
increased.
SMG Sequential Manual Transmission
Do not use the acceleration assistant during the
break-in period, refer to page64.
Tires
Due to technical factors associated with their
manufacture, tires do not achieve their full trac-
tion potential until after an initial break-in
period. Therefore, drive reservedly during the
first 200 miles/300 km.
Brake system
Brakes require an initial break-in period of
approx. 300 miles/500 km to achieve optimized
contact and wear patterns between brake pads
and rotors. Drive in a reserved manner during
this break-in period.
Clutch
The function of the clutch is only at its opti-
mized level after a distance driven of approx.
300 miles/500 km.During this break-in period,
engage the clutch gently.
Following part replacement
Observe the break-in instructions again if com-
ponents mentioned above must be replaced
after subsequent driving operation.
General driving notes
Closing luggage compartment lid/
tailgate
Operate the vehicle only when the lug-
gage compartment lid/tailgate is com-
pletely closed. Otherwise, exhaust fumes could
enter the interior of the vehicle.<
If special circumstances should make it abso-
lutely necessary to operate the vehicle with the
luggage compartment lid/tailgate open:
1.Close all windows and the glass sunroof or
panorama glass sunroof.
2.Increase the air volume of the automatic cli-
mate control to a high level, refer to
page109.
Hot exhaust system
As in all vehicles, extremely high temper-
atures are generated on the exhaust sys-
tem. Do not remove the heat shields installed
adjacent to it, and never apply undercoating to
them. When driving, standing at idle and while
parking take care to avoid possible contact
between the hot exhaust system and any highly
flammable materials such as hay, leaves, grass,
etc. Such contact could lead to a fire, and with it
the risk of serious property damage as well as
personal injury. Do not touch hot exhaust tail
pipes. Otherwise there is a risk of burns.<
Page 132 of 273

Things to remember when driving
130
Securing cargo
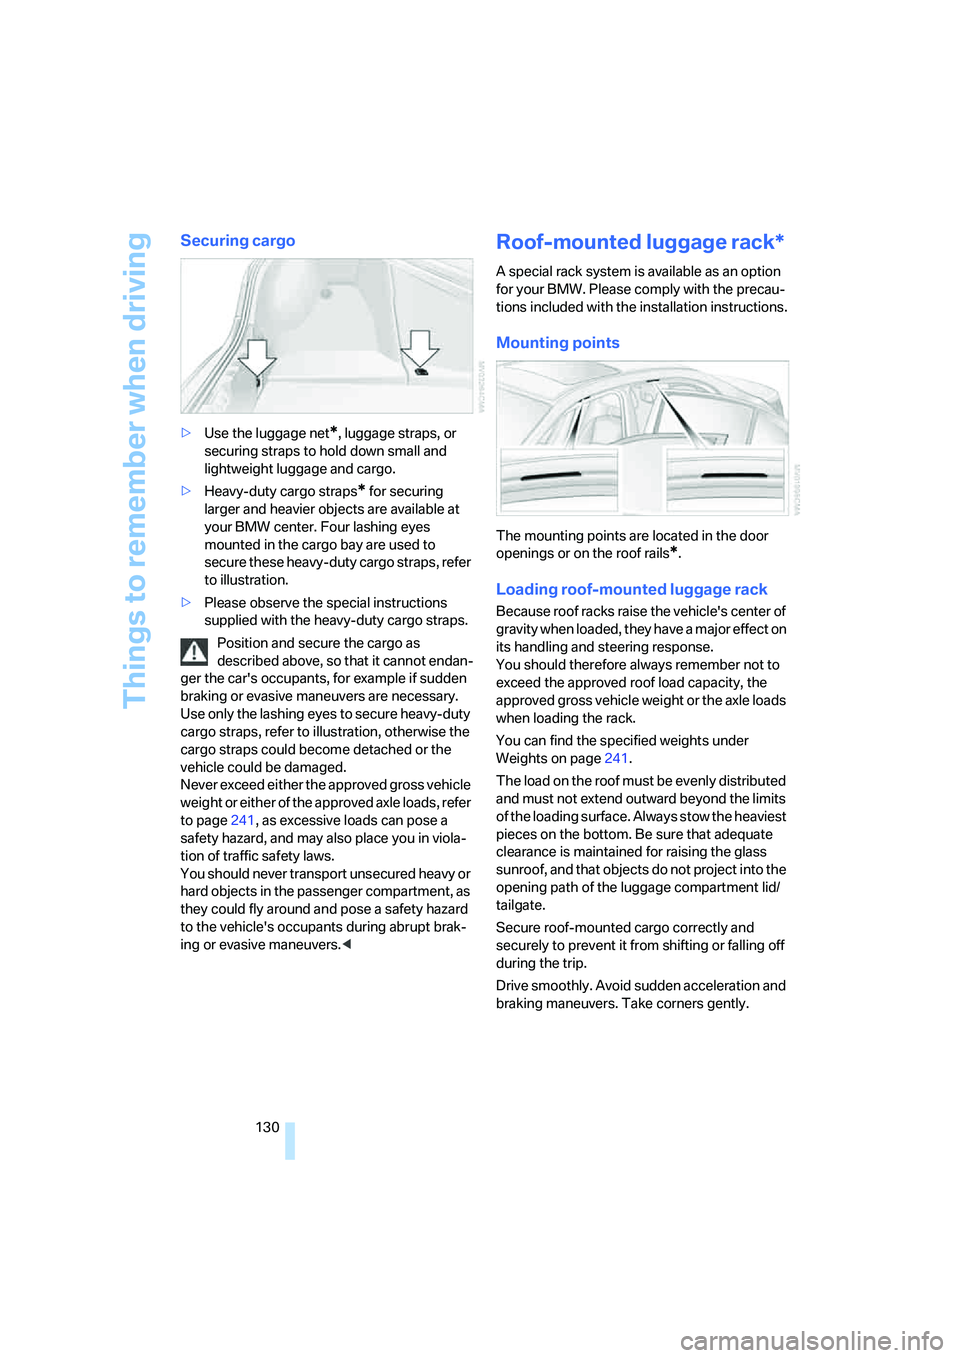
>Use the luggage net*, luggage straps, or
securing straps to hold down small and
lightweight luggage and cargo.
>Heavy-duty cargo straps
* for securing
larger and heavier objects are available at
your BMW center. Four lashing eyes
mounted in the cargo bay are used to
secure these heavy-duty cargo straps, refer
to illustration.
>Please observe the special instructions
supplied with the heavy-duty cargo straps.
Position and secure the cargo as
described above, so that it cannot endan-
ger the car's occupants, for example if sudden
braking or evasive maneuvers are necessary.
Use only the lashing eyes to secure heavy-duty
cargo straps, refer to illustration, otherwise the
cargo straps could become detached or the
vehicle could be damaged.
Never exceed either the approved gross vehicle
weight or either of the approved axle loads, refer
to page241, as excessive loads can pose a
safety hazard, and may also place you in viola-
tion of traffic safety laws.
You should never transport unsecured heavy or
hard objects in the passenger compartment, as
they could fly around and pose a safety hazard
to the vehicle's occupants during abrupt brak-
ing or evasive maneuvers.<
Roof-mounted luggage rack*
A special rack system is available as an option
for your BMW. Please comply with the precau-
tions included with the installation instructions.
Mounting points
The mounting points are located in the door
openings or on the roof rails
*.
Loading roof-mounted luggage rack
Because roof racks raise the vehicle's center of
gravity when loaded, they have a major effect on
its handling and steering response.
You should therefore always remember not to
exceed the approved roof load capacity, the
approved gross vehicle weight or the axle loads
when loading the rack.
You can find the specified weights under
Weights on page241.
The load on the roof must be evenly distributed
and must not extend outward beyond the limits
of the loading surface. Always stow the heaviest
pieces on the bottom. Be sure that adequate
clearance is maintained for raising the glass
sunroof, and that objects do not project into the
opening path of the luggage compartment lid/
tailgate.
Secure roof-mounted cargo correctly and
securely to prevent it from shifting or falling off
during the trip.
Drive smoothly. Avoid sudden acceleration and
braking maneuvers. Take corners gently.
Page 228 of 273

Replacing components
226 3.Press together the two clips at the top and
bottom on the bulb holder and remove the
bulb holder.
4.Backup lamps:
Remove and replace the bulb.
Other lamps:
Apply gentle pressure to the bulb while
turning it to the left for removal and replace-
ment.
Sports Wagon
1.Right side: unhook the retaining strap*,
refer to page121.
2.Open the side panel.
3.Turn the bulb socket to the left and remove.
4.Apply gentle pressure to the bulb while
turning it to the left for removal and replace-
ment.
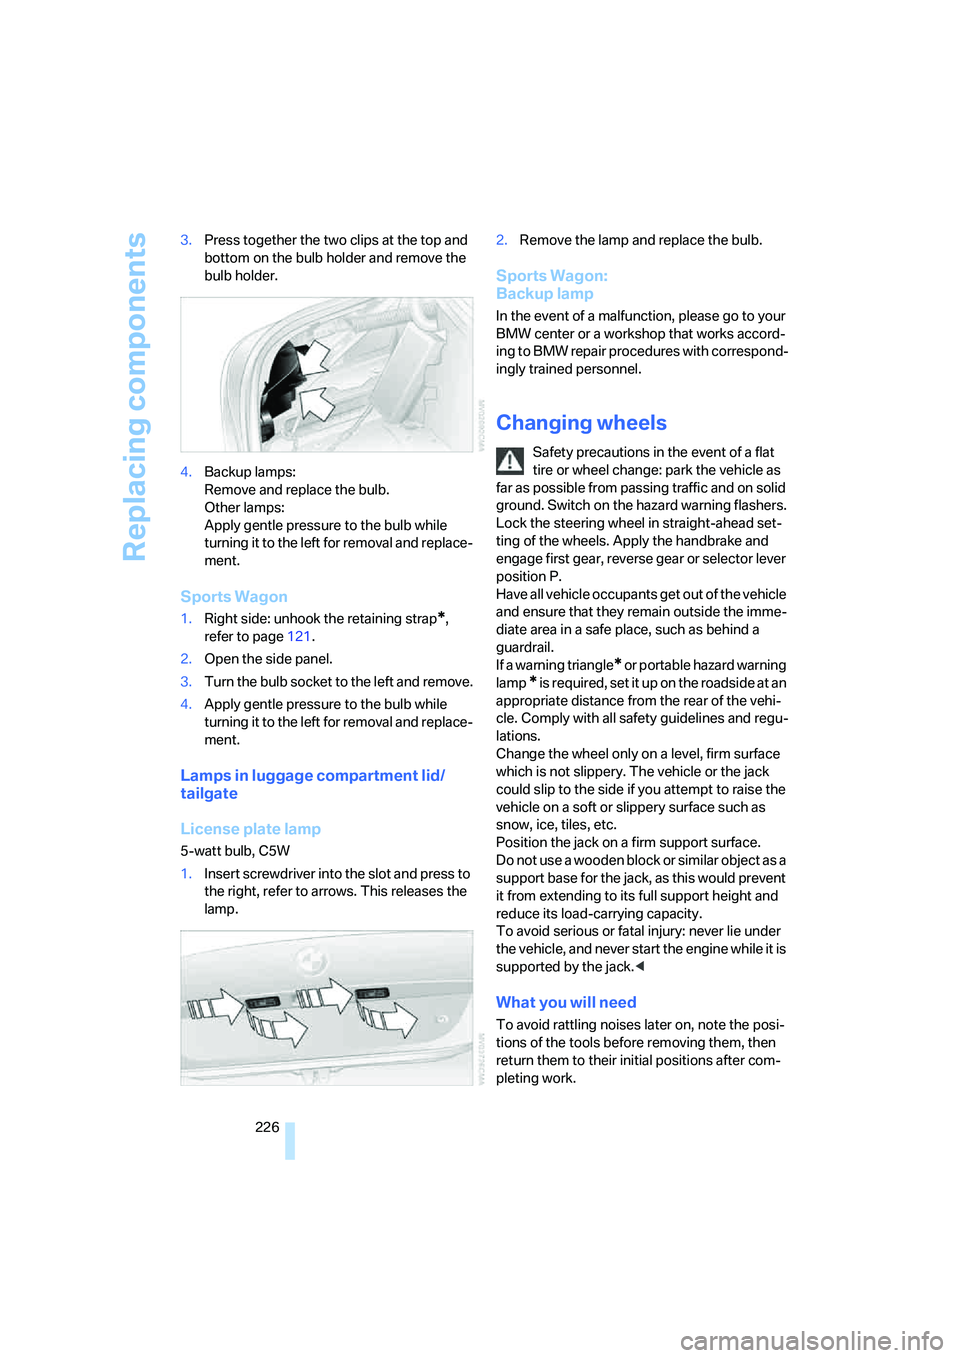
Lamps in luggage compartment lid/
tailgate
License plate lamp
5-watt bulb, C5W
1.Insert screwdriver into the slot and press to
the right, refer to arrows. This releases the
lamp.2.Remove the lamp and replace the bulb.
Sports Wagon:
Backup lamp
In the event of a malfunction, please go to your
BMW center or a workshop that works accord-
ing to BMW repair procedures with correspond-
ingly trained personnel.
Changing wheels
Safety precautions in the event of a flat
tire or wheel change: park the vehicle as
far as possible from passing traffic and on solid
ground. Switch on the hazard warning flashers.
Lock the steering wheel in straight-ahead set-
ting of the wheels. Apply the handbrake and
engage first gear, reverse gear or selector lever
position P.
Have all vehicle occupants get out of the vehicle
and ensure that they remain outside the imme-
diate area in a safe place, such as behind a
guardrail.
If a warning triangle
* or portable hazard warning
lamp
* is required, set it up on the roadside at an
appropriate distance from the rear of the vehi-
cle. Comply with all safety guidelines and regu-
lations.
Change the wheel only on a level, firm surface
which is not slippery. The vehicle or the jack
could slip to the side if you attempt to raise the
vehicle on a soft or slippery surface such as
snow, ice, tiles, etc.
Position the jack on a firm support surface.
Do not use a wooden block or similar object as a
support base for the jack, as this would prevent
it from extending to its full support height and
reduce its load-carrying capacity.
To avoid serious or fatal injury: never lie under
the vehicle, and never start the engine while it is
supported by the jack.<
What you will need
To avoid rattling noises later on, note the posi-
tions of the tools before removing them, then
return them to their initial positions after com-
pleting work.