Page 112 of 268
Practical interior accessories
110
Roller sun blinds*
Rear window blind
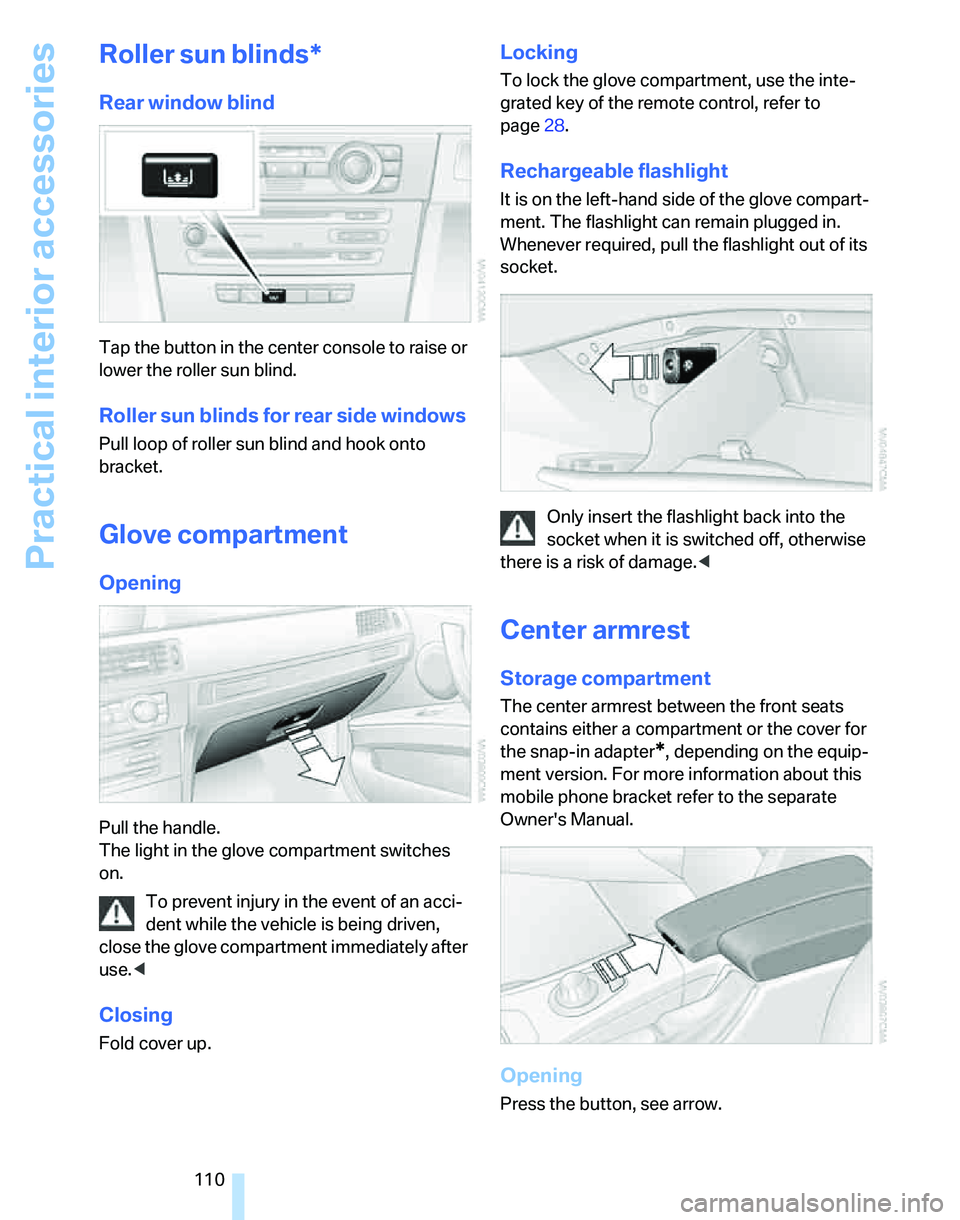
Tap the button in the center console to raise or
lower the roller sun blind.
Roller sun blinds for rear side windows
Pull loop of roller sun blind and hook onto
bracket.
Glove compartment
Opening
Pull the handle.
The light in the glove compartment switches
on.
To prevent injury in the event of an acci-
dent while the vehicle is being driven,
close the glove compartment immediately after
use.<
Closing
Fold cover up.
Locking
To lock the glove compartment, use the inte-
grated key of the remote control, refer to
page28.
Rechargeable flashlight
It is on the left-hand side of the glove compart-
ment. The flashlight can remain plugged in.
Whenever required, pull the flashlight out of its
socket.
Only insert the flashlight back into the
socket when it is switched off, otherwise
there is a risk of damage.<
Center armrest
Storage compartment
The center armrest between the front seats
contains either a compartment or the cover for
the snap-in adapter
*, depending on the equip-
ment version. For more information about this
mobile phone bracket refer to the separate
Owner's Manual.
Opening
Press the button, see arrow.
Page 115 of 268
Controls
113Reference
At a glance
Driving tips
Communications
Navigation
Entertainment
Mobility
Sockets in the rear center console*
Remove corresponding cover.
Socket in the cargo bay*
Sedan
Sports Wagon
Open the cap.
Sedan:
Through-loading system*
Opening
1.Open the belt lock of the rear center safety
belt. To do so, press the button, see arrow,
and release the latch plate.
2.Insert the latch plate at the end of the belt
into the specially designated fixture on the
rear window shelf.
3.Push the corresponding head restraint
down as far as it will go, refer to page47.
4.To release the rear seat backrest, pull the
corresponding lever in the cargo bay.
Page 116 of 268
Practical interior accessories
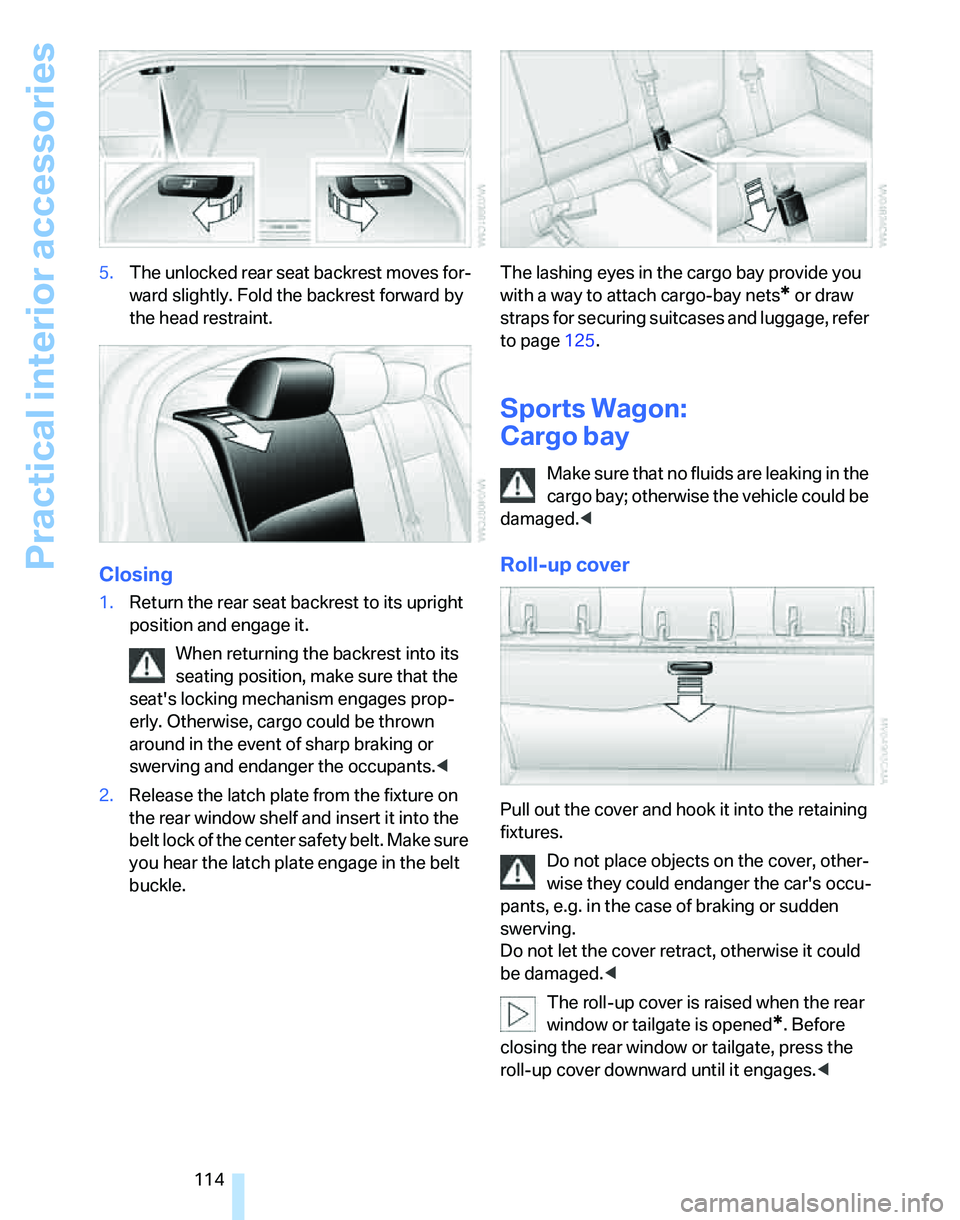
114 5.The unlocked rear seat backrest moves for-
ward slightly. Fold the backrest forward by
the head restraint.
Closing
1.Return the rear seat backrest to its upright
position and engage it.
When returning the backrest into its
seating position, make sure that the
seat's locking mechanism engages prop-
erly. Otherwise, cargo could be thrown
around in the event of sharp braking or
swerving and endanger the occupants.<
2.Release the latch plate from the fixture on
the rear window shelf and insert it into the
belt lock of the center safety belt. Make sure
you hear the latch plate engage in the belt
buckle.The lashing eyes in the cargo bay provide you
with a way to attach cargo-bay nets
* or draw
straps for securing suitcases and luggage, refer
to page125.
Sports Wagon:
Cargo bay
Ma ke sure tha t no fluids are leaking in the
cargo bay; otherwise the vehicle could be
damaged.<
Roll-up cover
Pull out the cover and hook it into the retaining
fixtures.
Do not place objects on the cover, other-
wise they could endanger the car's occu-
pants, e.g. in the case of braking or sudden
swerving.
Do not let the cover retract, otherwise it could
be damaged.<
The roll-up cover is raised when the rear
window or tailgate is opened
*. Before
closing the rear window or tailgate, press the
roll-up cover downward until it engages.<
Page 117 of 268
Controls
115Reference
At a glance
Driving tips
Communications
Navigation
Entertainment
Mobility
Expanding the cargo bay
The rear seat backrest is divided. You can fold
down either division in order to expand the
cargo bay.
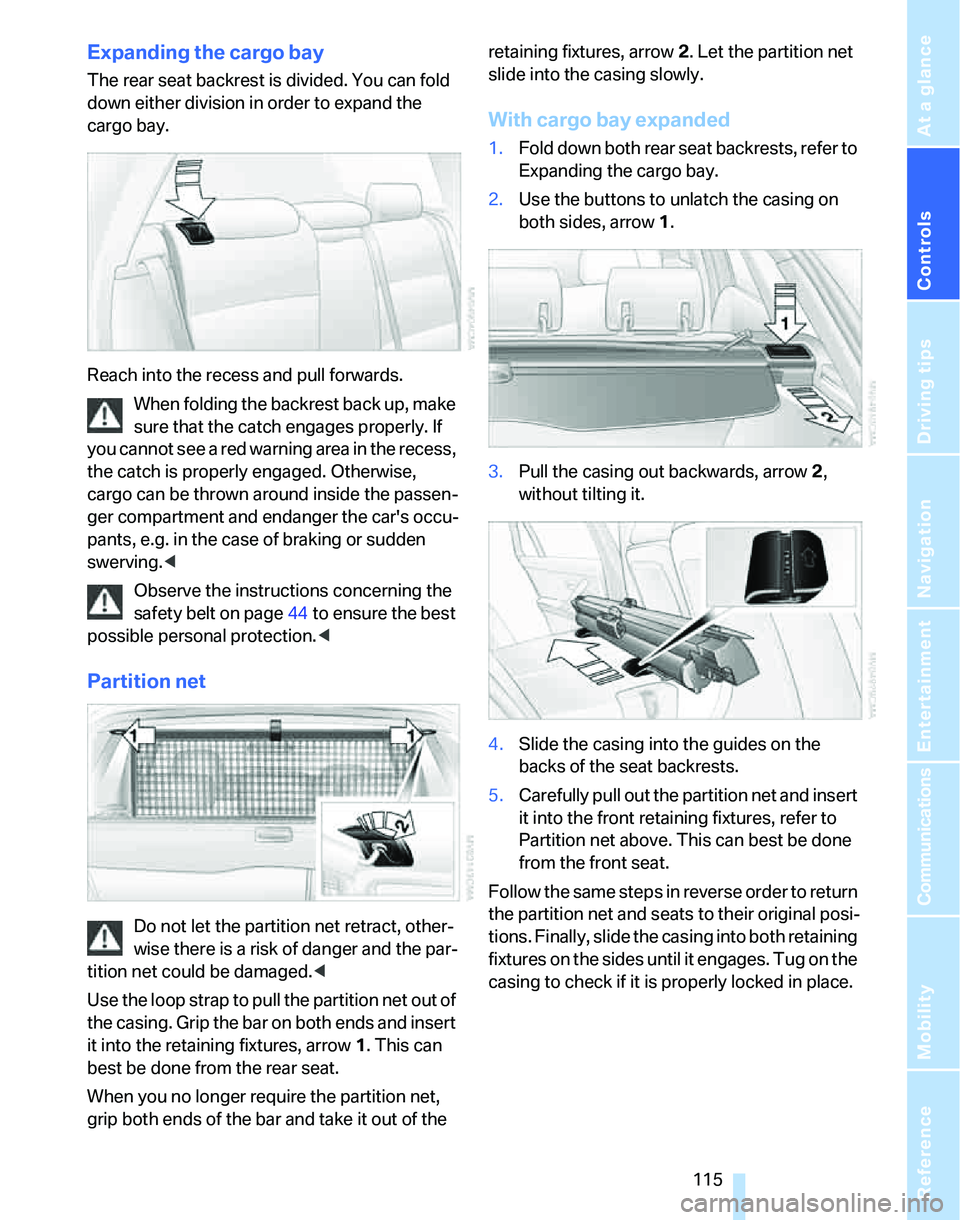
Reach into the recess and pull forwards.
When folding the backrest back up, make
sure that the catch engages properly. If
you cannot see a red warning area in the recess,
the catch is properly engaged. Otherwise,
cargo can be thrown around inside the passen-
ger compartment and endanger the car's occu-
pants, e.g. in the case of braking or sudden
swerving.<
Observe the instructions concerning the
safety belt on page44 to ensure the best
possible personal protection.<
Partition net
Do not let the partition net retract, other-
wise there is a risk of danger and the par-
tition net could be damaged.<
Use the loop strap to pull the partition net out of
the casing. Grip the bar on both ends and insert
it into the retaining fixtures, arrow 1. This can
best be done from the rear seat.
When you no longer require the partition net,
grip both ends of the bar and take it out of the retaining fixtures, arrow 2. Let the partition net
slide into the casing slowly.
With cargo bay expanded
1.Fold down both rear seat backrests, refer to
Expanding the cargo bay.
2.Use the buttons to unlatch the casing on
both sides, arrow 1.
3.Pull the casing out backwards, arrow 2,
without tilting it.
4.Slide the casing into the guides on the
backs of the seat backrests.
5.Carefully pull out the partition net and insert
it into the front retaining fixtures, refer to
Partition net above. This can best be done
from the front seat.
Follow the same steps in reverse order to return
the partition net and seats to their original posi-
tions. Finally, slide the casing into both retaining
fixtures on the sides until it engages. Tug on the
casing to check if it is properly locked in place.
Page 119 of 268
Controls
117Reference
At a glance
Driving tips
Communications
Navigation
Entertainment
Mobility
>Hooks for hanging up shopping bags or tote
bags, for example, on the left and right-hand
sides of the cargo bay
>Net for small objects on the right trim panel
of the cargo bay
>Storage compartment under the floor panel
Depending on your vehicle's equipment, other
storage spaces can be found in the cargo bay:
>Net
* for securing smaller objects, to be
attached to the fixtures on the floor panel
>Net
* on the left side trim of the cargo bay
instead of the rubber strap
>Reversible cargo area floor panel with inte-
grated plastic cover
* for cargo bay or
bumper
>Folding, removable box
* under the floor
panel, e.g. for wet or dirty items
>Insertable dividers
* and removable storage
tray for the storage compartment under the
floor panel
Folding up the floor panel
Do not exceed the maximum permissible
load of 55 lbs/25 kg for the storage com-
partment under the floor panel, otherwise dam-
age could result.<
Sedan
Press the floor panel against the ceiling of the
cargo bay; a locking device holds the floor panel
in place. To detach the floor panel, pull it out of
the locking device.
Equipment version with drawer:
Take the retaining strap on the right-hand side
of the drawer out of the bracket and use it to fix
the floor panel in place.
Sports Wagon
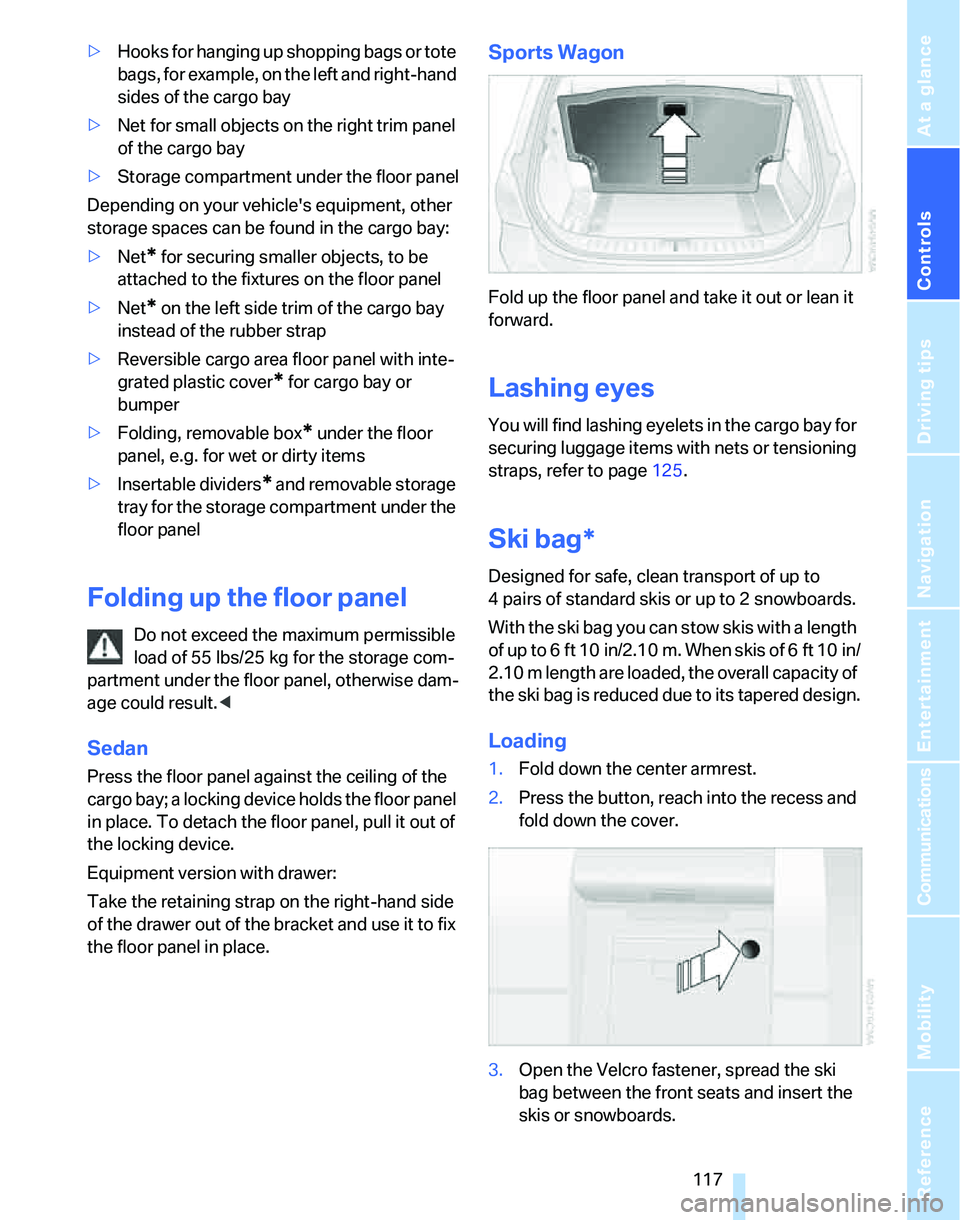
Fold up the floor panel and take it out or lean it
forward.
Lashing eyes
You will find lashing eyelets in the cargo bay for
securing luggage items with nets or tensioning
straps, refer to page125.
Ski bag*
Designed for safe, clean transport of up to
4 pairs of standard skis or up to 2 snowboards.
With the ski bag you can stow skis with a length
of up to 6ft 10in/2.10m. When skis of 6ft 10in/
2.10 m length are loaded, the overall capacity of
the ski bag is reduced due to its tapered design.
Loading
1.Fold down the center armrest.
2.Press the button, reach into the recess and
fold down the cover.
3.Open the Velcro fastener, spread the ski
bag between the front seats and insert the
skis or snowboards.
Page 132 of 268
Starting the navigation system
130
Starting the navigation system
Your navigation system can use satellites to
ascertain the precise position of your vehicle
and guide you reliably to any destination you
enter.
Navigation DVD
The navigation system requires a special navi-
gation DVD. You can obtain the latest version at
your BMW center.
Inserting navigation DVD
Use the lower drive for navigation DVDs.
1.Insert the navigation DVD with the labeled
side up.
The navigation DVD is pulled in automati-
cally.
2.Wait for several seconds to allow the con-
tents of the DVD to be read in.
Removing navigation DVD
1. Press button 1.
The DVD emerges slightly from the drive.
2.Remove the DVD.
If the DVD is not ejected from the drive, it is pos-
sible that it is blocked. A message appears on
the Control Display.
Display in the assistance
window
You can display the route or the current position
in the assistance window. This display remains
visible even if you change to another applica-
tion.
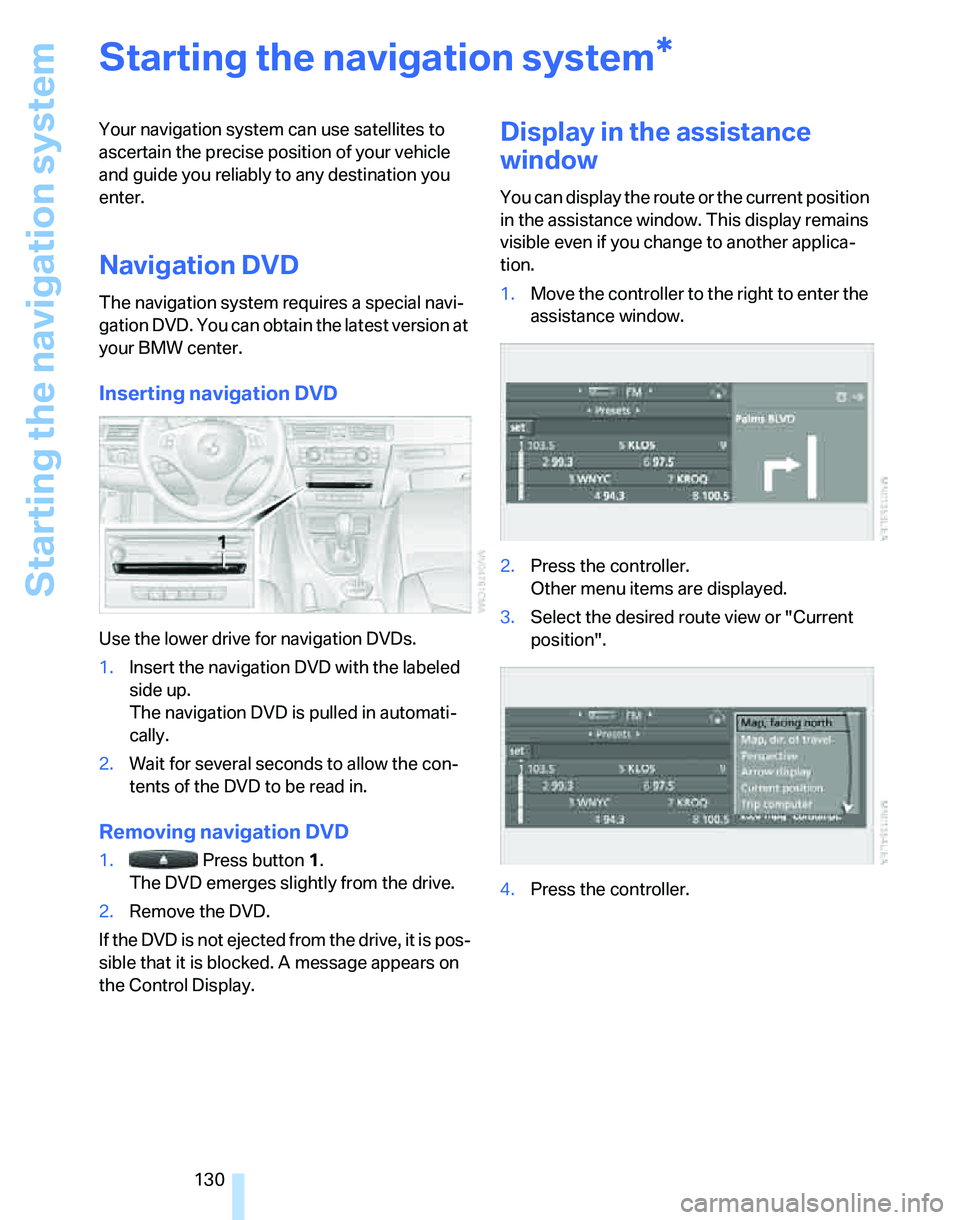
1.Move the controller to the right to enter the
assistance window.
2.Press the controller.
Other menu items are displayed.
3.Select the desired route view or "Current
position".
4.Press the controller.
*
Page 179 of 268

177
Entertainment
Reference
At a glance
Controls
Driving tips Communications
Navigation
Mobility
Making phone calls with the
BMW Assist system*: BMW Assist
calls
You can use the BMW Assist System via the
hands-free unit for BMW Assist calls.
When the status information "BMW Assist" or
"BMW Service" is displayed in "Communica-
tion", only BMW Assist calls are possible.
It may not be possible to establish a telephone
connection using the mobile phone while a con-
nection is being established to BMW Assist or
while a call to BMW Assist is already in
progress. If this happens, you must unpair the
mobile phone and the vehicle if you wish to
place a call with the mobile phone.
Start-up
Pairing the mobile phone with the
vehicle
The following prerequisites must be met:
>The mobile phone is ready to operate
>The Bluetooth link in the vehicle, refer to
page180, and in the mobile phone are acti-
vated
>Depending on the mobile phone, some
default settings may be necessary for the
mobile phone: e.g. via the menu item Blue-
tooth switched on or the menu item Con-
nection without confirmation.
>For pairing purposes, define any number as
the Bluetooth passkey, e.g. 1. This Blue-
tooth passkey is no longer required after
pairing has been successful.
>The ignition is switched on.
Pair the mobile phone with the vehicle
only when the car is stationary, to avoid
endangering the car's occupants and other
road users by being distracted.<
Switch on ignition
1.Insert remote control all the way into the
ignition lock.
2.Switch on ignition without operating the
brake or clutch or pressing the start/stop
button.
Preparation via iDrive
iDrive, for operating principle refer to page16.
3.Press the button to call up the start
menu.
4.Call up the menu by pressing the control-
ler.
5.Select "Settings" and press the controller.
6.Select "Bluetooth" and press the controller.
7.If necessary, move the highlight marker to
the uppermost field. Turn the controller
Page 191 of 268
189
Entertainment
Reference
At a glance
Controls
Driving tips Communications
Navigation
Mobility
tact points and press it downward until it
engages.
The mobile phone's battery is charged as soon
as the vehicle is in radio readiness or the steer-
ing is unlocked.
To conserve battery power, you should
avoid using the mobile phone when the
ignition is switched off.<
Remove the mobile phone
Press the button.