2007 AUDI R8 driver seat adjustment
[x] Cancel search: driver seat adjustmentPage 69 of 210
Seats and storage67
Controls
Safety
Driving tips
General maintenance
Self-help
Technical data
Seats and storageManually adjustable front seatsApplies to vehicles: with manual seat adjustmentSeat adjuster controls
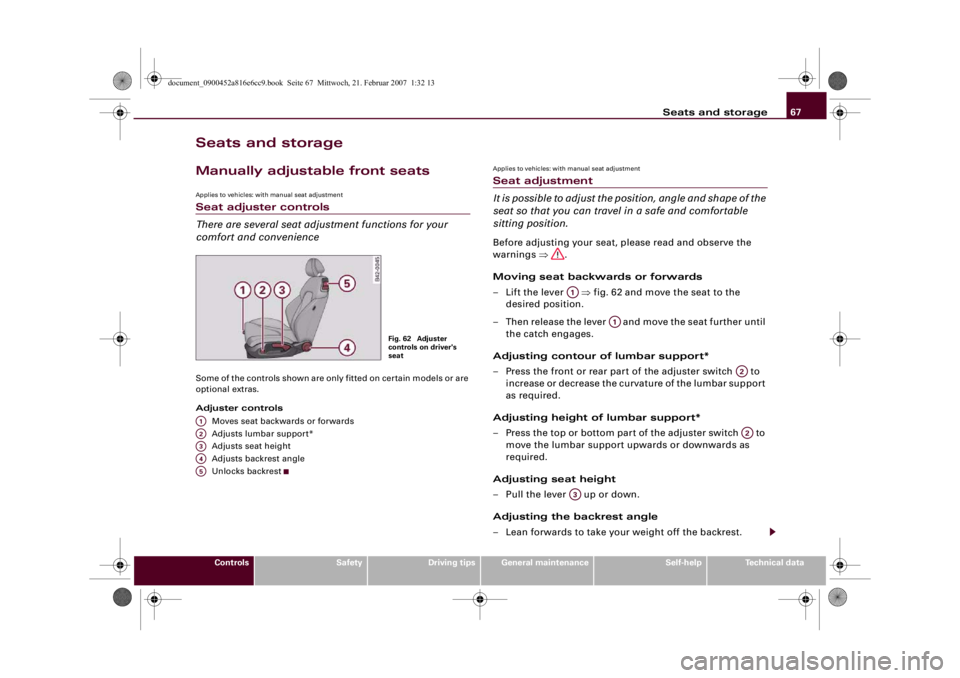
There are several seat adjustment functions for your
comfort and convenienceSome of the controls shown are only fitted on certain models or are
optional extras.
Adjuster controls
Moves seat backwards or forwards
Adjusts lumbar support*
Adjusts seat height
Adjusts backrest angle
Unlocks backrest
Applies to vehicles: with manual seat adjustmentSeat adjustment
It is possible to adjust the position, angle and shape of the
seat so that you can travel in a safe and comfortable
sitting position.Before adjusting your seat, please read and observe the
warnings ⇒.
Moving seat backwards or forwards
– Lift the lever ⇒fig. 62 and move the seat to the
desired position.
– Then release the lever and move the seat further until
the catch engages.
Adjusting contour of lumbar support*
– Press the front or rear part of the adjuster switch to
increase or decrease the curvature of the lumbar support
as required.
Adjusting height of lumbar support*
– Press the top or bottom part of the adjuster switch to
move the lumbar support upwards or downwards as
required.
Adjusting seat height
– Pull the lever up or down.
Adjusting the backrest angle
– Lean forwards to take your weight off the backrest.
Fig. 62 Adjuster
controls on driver's
seat
A1A2A3A4A5
A1
A1
A2A2
A3
document_0900452a816e6cc9.book Seite 67 Mittwoch, 21. Februar 2007 1:32 13
Page 70 of 210

Seats and storage 68
– Turn the adjuster wheel to set the angle of the back-
rest as required.
Unlocking backrest
– Push the handle upwards.
– Fold the backrest forwards
WARNING
•
Never adjust the driver's seat when the vehicle is moving - this
could lead to an accident.
•
Be careful when adjusting the seat angle. Careless or uncon-
trolled use of the seat adjustment can cause injuries.
•
Do not drive with the backrests of the front seats reclined too
far as otherwise the seat belt and airbag could fail to restrain the
wearer properly in an accident, possibly leading to injury.
•
For safety reasons the front seat backrests must be locked
while driving.
Electrically adjustable front seatsApplies to vehicles: with electric seat adjustmentSeat adjuster controls
The arrangement of the switches corresponds with the
design of the seats.The adjustment switches for the seat and backrest correspond with
the design of the seat. The seats can be adjusted simply by pressing
the corresponding switch in the required direction.
Adjuster controls
Adjusts lumbar support
Adjusts seat height and moves seat backwards or forwards
Adjusts backrest angle
Unlocks backrest
A4
A5
Fig. 63 Front seat:
Adjuster controls
A1A2A3A4
document_0900452a816e6cc9.book Seite 68 Mittwoch, 21. Februar 2007 1:32 13
Page 71 of 210
Seats and storage69
Controls
Safety
Driving tips
General maintenance
Self-help
Technical data
Applies to vehicles: with electric seat adjustmentSeat adjustment
You can use the electrical adjustment to set the position,
angle and shape of the seat so that you can travel in a
safe and comfortable sitting position.Before adjusting your seat, please read and observe the
warnings ⇒.
Adjusting contour of lumbar support*
– Press the front or rear part of the adjuster switch
⇒page 68, fig. 63 to increase or decrease the curvature
of the lumbar support as required.
Adjusting height of lumbar support*
– Press the top or bottom part of the adjuster switch to
move the lumbar support upwards or downwards as
required.
Moving seat backwards or forwards
– Press the switch forwards or backwards.
Adjusting seat height
– Press the switch up or down.
Raising/lowering seat at front
– Press the front of switch up or down.
Raising/lowering seat at rear
– Press the rear of switch up or down.
Adjusting the backrest angle
– Press the switch forwards or backwards.Unlocking backrest
– Push the handle upwards.
– Fold the backrest forwards
WARNING
•
Never adjust the driver's seat when the vehicle is moving - this
could lead to an accident.
•
The electrical seat adjustment also works when the ignition is
off and when the key is not in the ignition. To avoid accidental inju-
ries, never leave children unattended in the vehicle.
•
Be careful when adjusting the seat height. Careless or uncon-
trolled use of the height adjustment can cause injuries.
•
Do not drive with the backrests of the front seats reclined too
far as otherwise the seat belt and airbag could fail to restrain the
wearer properly in an accident, possibly leading to injury.
•
For safety reasons the front seat backrests must be locked
while driving.
A1A1
A2A2
A2A2
A3
A4
document_0900452a816e6cc9.book Seite 69 Mittwoch, 21. Februar 2007 1:32 13
Page 72 of 210
Seats and storage 70Bucket seatsApplies to vehicles: with bucket seatsSeat adjuster controls
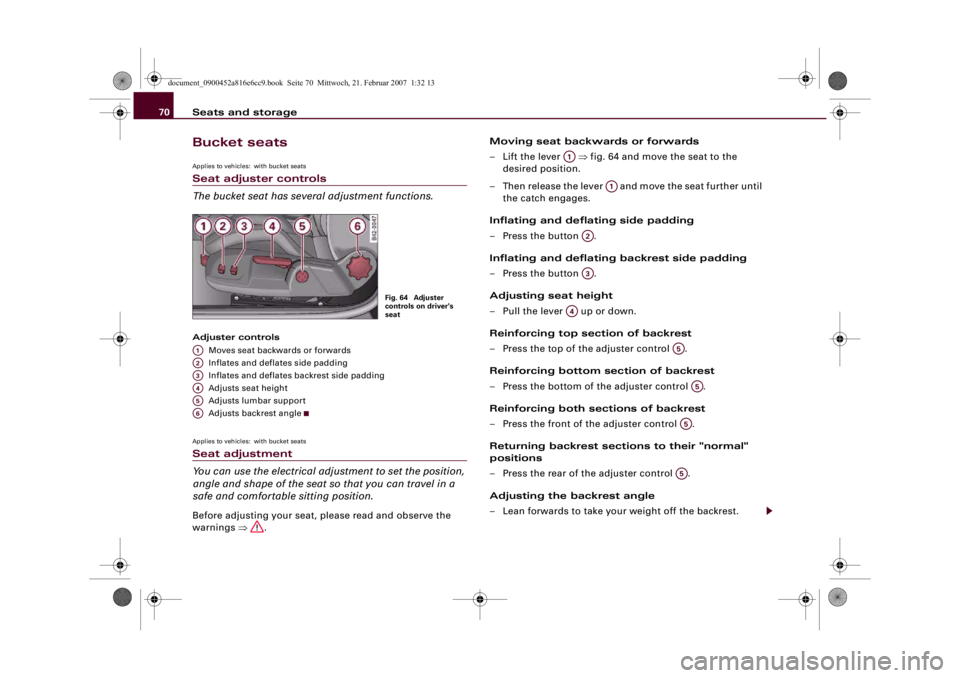
The bucket seat has several adjustment functions.Adjuster controls
Moves seat backwards or forwards
Inflates and deflates side padding
Inflates and deflates backrest side padding
Adjusts seat height
Adjusts lumbar support
Adjusts backrest angleApplies to vehicles: with bucket seatsSeat adjustment
You can use the electrical adjustment to set the position,
angle and shape of the seat so that you can travel in a
safe and comfortable sitting position.Before adjusting your seat, please read and observe the
warnings ⇒.Moving seat backwards or forwards
– Lift the lever ⇒fig. 64 and move the seat to the
desired position.
– Then release the lever and move the seat further until
the catch engages.
Inflating and deflating side padding
– Press the button .
Inflating and deflating backrest side padding
– Press the button .
Adjusting seat height
– Pull the lever up or down.
Reinforcing top section of backrest
– Press the top of the adjuster control .
Reinforcing bottom section of backrest
– Press the bottom of the adjuster control .
Reinforcing both sections of backrest
– Press the front of the adjuster control .
Returning backrest sections to their "normal"
positions
– Press the rear of the adjuster control .
Adjusting the backrest angle
– Lean forwards to take your weight off the backrest.
Fig. 64 Adjuster
controls on driver's
seat
A1A2A3A4A5A6
A1
A1
A2A3
A4
A5
A5
A5A5
document_0900452a816e6cc9.book Seite 70 Mittwoch, 21. Februar 2007 1:32 13
Page 73 of 210
Seats and storage71
Controls
Safety
Driving tips
General maintenance
Self-help
Technical data
– Turn the adjuster wheel to set the angle of the back-
rest as required.
Unlocking backrest
– Press one of the two levers ⇒page 68, fig. 63
upwards and fold down the backrest.
WARNING
•
Never adjust the driver's seat when the vehicle is moving - this
could lead to an accident.
•
The electrical seat adjustment also works when the ignition is
off and when the key is not in the ignition. To avoid accidental inju-
ries, never leave children unattended in the vehicle.
•
Be careful when adjusting the seat height. Careless or uncon-
trolled use of the seat adjustment can cause injuries.
•
Do not drive with the backrests of the front seats reclined too
far as otherwise the seat belt and airbag could fail to restrain the
wearer properly in an accident, possibly leading to injury.
•
For safety reasons the front seat backrests must be locked
while driving.
Head restraintsFront head restraints
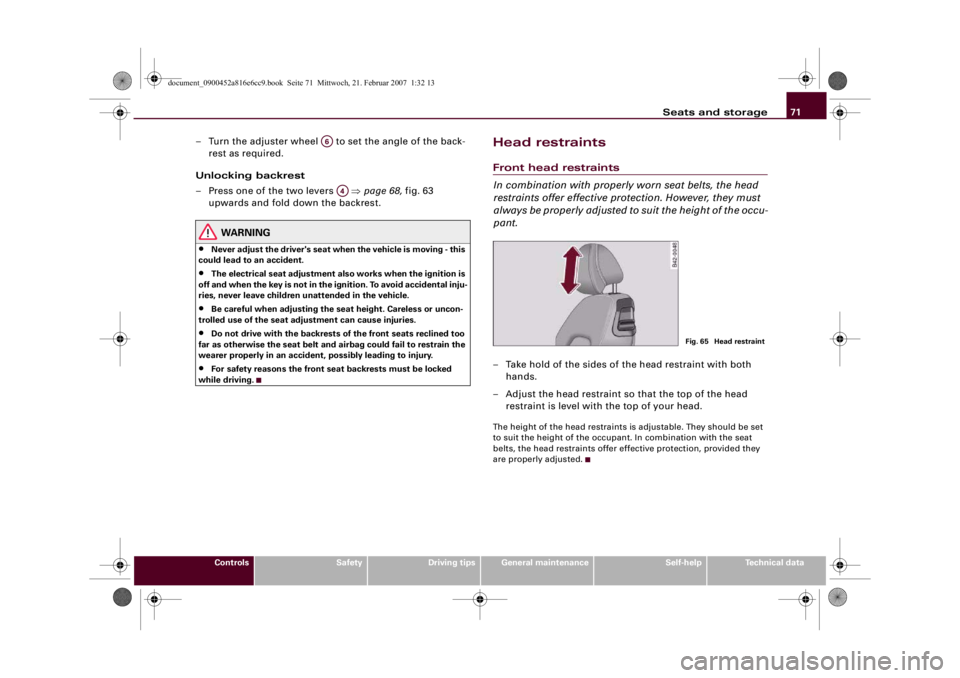
In combination with properly worn seat belts, the head
restraints offer effective protection. However, they must
always be properly adjusted to suit the height of the occu-
pant.– Take hold of the sides of the head restraint with both
hands.
– Adjust the head restraint so that the top of the head
restraint is level with the top of your head.The height of the head restraints is adjustable. They should be set
to suit the height of the occupant. In combination with the seat
belts, the head restraints offer effective protection, provided they
are properly adjusted.
A6
A4
Fig. 65 Head restraint
document_0900452a816e6cc9.book Seite 71 Mittwoch, 21. Februar 2007 1:32 13
Page 108 of 210

Safe driving 106Correct adjustment of head restraints
Properly adjusted head restraints are an important part of
the vehicle's occupant protection system. They can help
to reduce the risk of injuries in most accident situations.The head restraints must be adjusted properly to provide
maximum protection.
– Adjust the head restraint so that the top of the head
restraint is level with the top of your head ⇒fig. 84 and
⇒fig. 85.For more information on how to adjust the head restraints, see
⇒page 71.
WARNING
Travelling with the head restraints removed or incorrectly
adjusted increases the risk of severe injuries.•
Incorrectly adjusted head restraints could lead to death in the
event of a collision or accident.
•
Incorrectly adjusted head restraints can also increase the risk
of injury during sudden or unexpected braking or other manoeu-
vres.
•
The head restraints must always be adjusted according to the
occupant's size.
Examples of incorrect sitting positions
Occupants can suffer severe or fatal injuries injuries if
they sit in an incorrect position while the vehicle is
moving.Seat belts can only provide maximum protection if the belt
webbing is positioned correctly. Sitting out of position
greatly reduces the effectiveness of the seat belts and
increases the risk of injury since the belt webbing is not
worn in the position for which it is designed. The driver is
responsible for the safety of all vehicle occupants, espe-
cially for children.
– Never allow anyone to sit out of position while the
vehicle is moving ⇒.The following list shows just some examples of incorrect sitting
positions which can be dangerous to all occupants. The list is not
complete, but will help to make you aware of possible dangers
which can be avoided.
Therefore, whenever the vehicle is moving:•
never stand up in the vehicle,
Fig. 84 Correctly
adjusted head restraint
(seen from the front)Fig. 85 Correctly
adjusted head restraint
(seen from the side)
document_0900452a816e6cc9.book Seite 106 Mittwoch, 21. Februar 2007 1:32 13
Page 114 of 210
Seat belts 112How to wear seat belts properlyPutting on the three-point seat belts
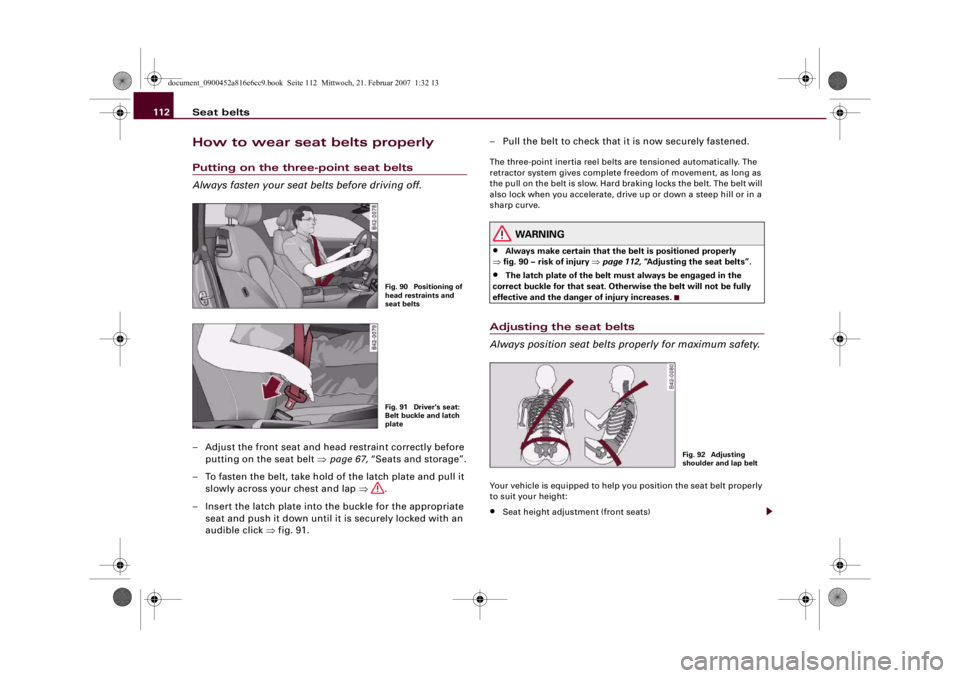
Always fasten your seat belts before driving off.– Adjust the front seat and head restraint correctly before
putting on the seat belt ⇒page 67, “Seats and storage”.
– To fasten the belt, take hold of the latch plate and pull it
slowly across your chest and lap ⇒.
– Insert the latch plate into the buckle for the appropriate
seat and push it down until it is securely locked with an
audible click ⇒fig. 91.– Pull the belt to check that it is now securely fastened.
The three-point inertia reel belts are tensioned automatically. The
retractor system gives complete freedom of movement, as long as
the pull on the belt is slow. Hard braking locks the belt. The belt will
also lock when you accelerate, drive up or down a steep hill or in a
sharp curve.
WARNING
•
Always make certain that the belt is positioned properly
⇒fig. 90 – risk of injury ⇒page 112, “Adjusting the seat belts”.
•
The latch plate of the belt must always be engaged in the
correct buckle for that seat. Otherwise the belt will not be fully
effective and the danger of injury increases.
Adjusting the seat belts
Always position seat belts properly for maximum safety.Your vehicle is equipped to help you position the seat belt properly
to suit your height:•
Seat height adjustment (front seats)
Fig. 90 Positioning of
head restraints and
seat beltsFig. 91 Driver's seat:
Belt buckle and latch
plate
Fig. 92 Adjusting
shoulder and lap belt
document_0900452a816e6cc9.book Seite 112 Mittwoch, 21. Februar 2007 1:32 13
Page 206 of 210

Index 204
Red symbols . . . . . . . . . . . . . . . . . . . . . 33
Service interval display . . . . . . . . . . . . 21
Setting . . . . . . . . . . . . . . . . . . . . . . . . . . 26
Yellow symbols . . . . . . . . . . . . . . . . . . . 33
Driver messages . . . . . . . . . . . . . . . . . . . . . 34
Driving abroad . . . . . . . . . . . . . . . . . . . . . 138
Headlights . . . . . . . . . . . . . . . . . . . . . . 138
Unleaded fuel . . . . . . . . . . . . . . . . . . . 138
Driving away on a slope
hill hold assist . . . . . . . . . . . . . . . . . . . . 84
Driving safety . . . . . . . . . . . . . . . . . . . . . . 103
Driving time . . . . . . . . . . . . . . . . . . . . . . . . . 22
Dry sump lubrication system . . . . . . . . . 137
Dust filter . . . . . . . . . . . . . . . . . . . . . . . . . . . 76
EElectric fuses . . . . . . . . . . . . . . . . . . . . . . . 190
Electric seat adjustment
SeeSeat adjustment . . . . . . . . . . . . . . . 68
Electric voltage . . . . . . . . . . . . . . . . . . . . . . 14
Electric windows . . . . . . . . . . . . . . . . . . . . 50
Central locking system . . . . . . . . . . . . . 43
Possible malfunctions . . . . . . . . . . . . . 50
Electrical socket . . . . . . . . . . . . . . . . . . . . . 72
Electrical system . . . . . . . . . . . . . . . . . . . . . 18
Electronic differential lock . . . . . . . . . . . 132
Warning lamp . . . . . . . . . . . . . . . . . . . . 19
Electronic immobiliser . . . . . . . . . . . . . . . . 42
Electronic stabilisation program . . . . . . 132
Emission control systems . . . . . . . . . . . . 138
Emissions . . . . . . . . . . . . . . . . . . . . . . . . . 196Engine compartment
Lighting . . . . . . . . . . . . . . . . . . . . . . . . . 58
Safety notes . . . . . . . . . . . . . . . . . . . . . 155
Engine compartment layout . . . . . . . . . . 156
Engine data
SeePerformance, weights and
dimensions . . . . . . . . . . . . . . . . . . . . 198
Engine hood
SeeEngine lid . . . . . . . . . . . . . . . . . . . 155
Engine lid
Closing . . . . . . . . . . . . . . . . . . . . . . . . . 156
Opening . . . . . . . . . . . . . . . . . . . . . . . . 155
Engine oil . . . . . . . . . . . . . . . . . . . . . . . . . . 157
Checking oil level . . . . . . . . . . . . . . . . 157
Consumption . . . . . . . . . . . . . . . . . . . . 157
Dry sump lubrication system . . . . . . . 137
LongLife Service . . . . . . . . . . . . . . . . . 157
Temperature gauge . . . . . . . . . . . . . . . 10
Topping up . . . . . . . . . . . . . . . . . . . . . . 158
See alsoPerformance, weights and
dimensions . . . . . . . . . . . . . . . . . . . . 198
Engine oil capacity
SeePerformance, weights and
dimensions . . . . . . . . . . . . . . . . . . . . 198
Engine oil pressure (too low) . . . . . . . . . . 36
Engine oil sensor defective . . . . . . . . . . . . 37
Environmental compatibility . . . . . . . . . . 139
Environmental tips
Filling the tank . . . . . . . . . . . . . . . . . . . 153
Leaks . . . . . . . . . . . . . . . . . . . . . . . . . . . 156
Warming up the engine . . . . . . . . . . . . 82
EPC warning lamp . . . . . . . . . . . . . . . . . . . 16ESP . . . . . . . . . . . . . . . . . . . . . . . . . . . . . . . . 16
See alsoElectronic stabilisation program
132
Ethanol fuel . . . . . . . . . . . . . . . . . . . . . . . . 152
Exterior mirrors . . . . . . . . . . . . . . . . . . . . . . 64
FFilling the tank . . . . . . . . . . . . . . . . . . . . . 152
Releasing the tank flap manually . . . 154
First-aid kit . . . . . . . . . . . . . . . . . . . . . . . . . 178
Floor mats . . . . . . . . . . . . . . . . . . . . . . . . . 107
Foreign countries
SeeDriving abroad . . . . . . . . . . . . . . . 138
Four-wheel drive . . . . . . . . . . . . . . . . . . . . 136
Front passenger
SeeSitting position . . . . . . . . . . . . . . . 105
Fuel
Capacity . . . . . . . . . . . . . . . . . . . . . . . . 199
Consumption . . . . . . . . . . . . . . . . . . . . 196
Current consumption . . . . . . . . . . . . . . 22
Ethanol . . . . . . . . . . . . . . . . . . . . . . . . . 152
Fuel gauge . . . . . . . . . . . . . . . . . . . . . . . 13
Fuel level low . . . . . . . . . . . . . . . . . . . . . 36
Petrol . . . . . . . . . . . . . . . . . . . . . . . . . . 152
Fuel consumption . . . . . . . . . . . . . . . . . . . 196
Fuel gauge . . . . . . . . . . . . . . . . . . . . . . . . . . 13
Fuel range . . . . . . . . . . . . . . . . . . . . . . . . . . 22
Fuses
Changing . . . . . . . . . . . . . . . . . . . . . . . 190
Fuse list . . . . . . . . . . . . . . . . . . . . . . . . 190
document_0900452a816e6cc9.book Seite 204 Mittwoch, 21. Februar 2007 1:32 13