2007 AUDI R8 fuel
[x] Cancel search: fuelPage 29 of 210
Driver information system27
Controls
Safety
Driving tips
General maintenance
Self-help
Technical data
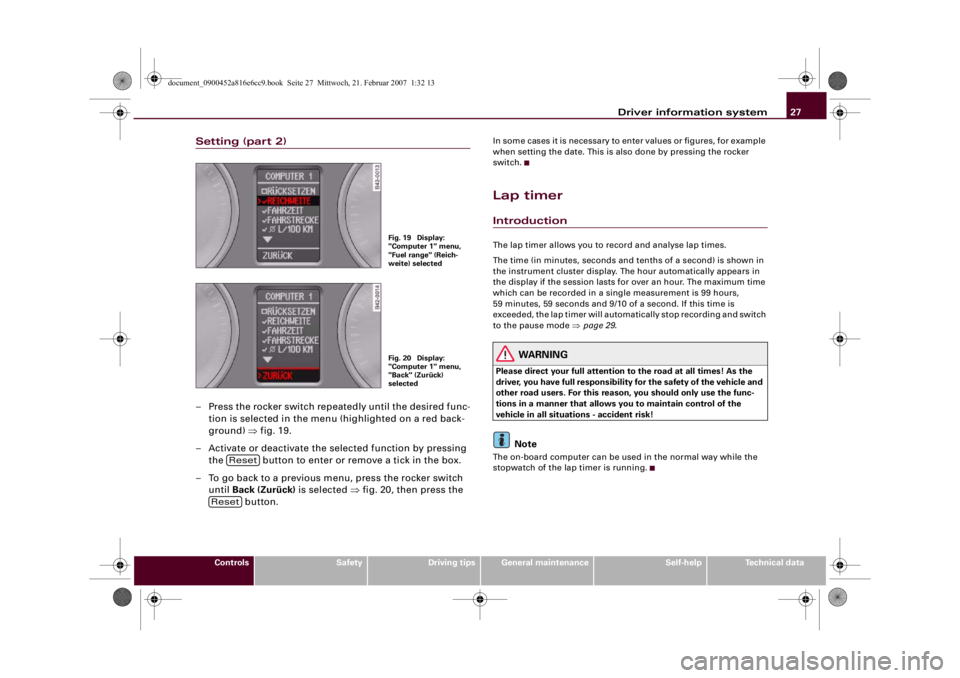
Setting (part 2)– Press the rocker switch repeatedly until the desired func-
tion is selected in the menu (highlighted on a red back-
ground) ⇒fig. 19.
– Activate or deactivate the selected function by pressing
the button to enter or remove a tick in the box.
– To go back to a previous menu, press the rocker switch
until Back (Zurück) is selected ⇒fig. 20, then press the
button.
In some cases it is necessary to enter values or figures, for example
when setting the date. This is also done by pressing the rocker
switch.Lap timerIntroductionThe lap timer allows you to record and analyse lap times.
The time (in minutes, seconds and tenths of a second) is shown in
the instrument cluster display. The hour automatically appears in
the display if the session lasts for over an hour. The maximum time
which can be recorded in a single measurement is 99 hours,
59 minutes, 59 seconds and 9/10 of a second. If this time is
exceeded, the lap timer will automatically stop recording and switch
to the pause mode ⇒page 29.
WARNING
Please direct your full attention to the road at all times! As the
driver, you have full responsibility for the safety of the vehicle and
other road users. For this reason, you should only use the func-
tions in a manner that allows you to maintain control of the
vehicle in all situations - accident risk!
Note
The on-board computer can be used in the normal way while the
stopwatch of the lap timer is running.
Fig. 19 Display:
"Computer 1" menu,
"Fuel range" (Reich-
weite) selectedFig. 20 Display:
"Computer 1" menu,
"Back" (Zurück)
selected
Reset
Reset
document_0900452a816e6cc9.book Seite 27 Mittwoch, 21. Februar 2007 1:32 13
Page 35 of 210

Driver information system33
Controls
Safety
Driving tips
General maintenance
Self-help
Technical data
Clearing speed limit
– Switch off the ignition.
– Briefly press the adjuster/test button in the instrument
cluster ⇒page 32, fig. 29. The mileage recorder display
and the digital clock will light up.
– Press the adjuster/test button for at least 2 seconds. The
display will show the speed limit which is currently set.
– Now press and hold the button on the wind-
screen wiper lever ⇒page 32, fig. 30 until the
crossed-out warning symbol for speed limit 2 appears on
the display.The display lighting for the mileage recorder and digital clock goes
off again a few seconds after the button is released.
Note
This speed limit function can also be operated via the on-board
computer ⇒page 25, “Selecting options from the menu”.Notes and symbolsRed symbols
A red symbol warns of a serious malfunction.–Stop the vehicle.
– Switch off the engine.
– Check the function displayed. Obtain professional assist-
ance if necessary.
A red symbol is accompanied by three warning chimes. The symbol
will keep flashing until the fault is corrected. If several faults are
detected at the same time, the symbols are displayed one after the
other for about 2 seconds at a time.
Note
•
You can press the left adjuster button to display a message that
gives you more information.
•
On vehicles equipped with a navigation system the warning
symbol is displayed in the top section of the display while the route
guidance is active.
Yellow symbols
A yellow symbol indicates a malfunction or other item
requiring attention.
Reset
AB
BRAKE
Fault in the brake system
⇒page 35
COOLANT
Coolant level too low / coolant
temperature too high
⇒page 35
OIL
PRESS.
Engine oil pressure too low
⇒page 36
Tyre pressure monitoring sys-
tem*
⇒page 36
Fuel level low
⇒page 36
Check engine oil level
⇒page 37
Engine oil sensor defective
⇒page 37
document_0900452a816e6cc9.book Seite 33 Mittwoch, 21. Februar 2007 1:32 13
Page 38 of 210
Driver information system 36•
The engine compartment of any motor vehicle is a dangerous
place. Before carrying out any work in the engine compartment,
switch off the engine and allow it to cool down. Please observe the
important safety warnings ⇒page 155, “Working on components
in the engine compartment”.Caution
Do not drive on if the symbol
has come on to indicate a fault in
the cooling system, otherwise there is a risk of damaging the
engine.
Engine oil pressure too low
If the engine oil pressure is too low the fault must be recti-
fied immediately.If the
symbol flashes in the display, the oil pressure is
too low. The following message will appear in the display
together with the symbol:
Switch off engine and check oil level
– Stop the vehicle.
– Switch off the engine.
– Check the engine oil level ⇒page 157.
– Obtain professional assistance if necessary.
If the engine oil level is too low
If the engine oil level is too low, add more oil ⇒page 158.If the engine oil level is correct
If the
symbol flashes and the engine oil level is correct, obtain
professional assistance. Do not drive on. Do not continue to run the
engine, not even at idle speed.
Applies to vehicles: with tyre pressure monitoring systemTyre pressure monitoring system
The tyre pressure should be corrected as soon as possible
if it is too low.If the
symbol appears, the tyre pressure on at least one
of the wheels is too low. The message Tyre pressures too
low will be displayed.
–Stop the vehicle.
– Check the tyre(s).
– Adjust the tyre pressure ⇒page 167.
For more detailed information on the tyre pressure monitoring
system please refer to ⇒page 172.Fuel level low
When this symbol
comes on for the first time, there are about
10 litres of fuel left in the tank. You should fill up as soon as possible
⇒page 152.
If this warning symbol lights up although the fuel tank is sufficiently
filled, there is a malfunction in the fuel tank system. The display will
also show the driver message Tank system malfunction ! Contact
workshop. Please take the vehicle to a qualified workshop.
WARNING (continued)
document_0900452a816e6cc9.book Seite 36 Mittwoch, 21. Februar 2007 1:32 13
Page 62 of 210

Lights and vision 60The windscreen washer jets are heated when the ignition is
switched on.
When the lights are switched on you should only pull the lever
briefly to wash the windscreen, otherwise the headlight washers
will also be activated. This will use an unnecessary amount of fluid
from the reservoir.
WARNING
•
Poor visibility can cause accidents. Always ensure that the
wiper blades are in good condition ⇒page 62, “Changing wiper
blades”.
•
The light sensor/ rain sensor* is only intended to assist the
driver. The driver is still obliged to manually operate the wind-
screen wipers and the lights as required depending on visibility.
•
Do not use water-repellent coatings on the windscreen. In bad
visibility conditions such as light rain, low sun or when driving at
night these coatings can cause increased dazzle, which is a
serious safety hazard. Such coatings can also cause the wiper
blades to judder.Caution
•
In icy conditions, always check that the wiper blades are not
frozen to the glass before using the wiper for the first time. If you
switch on the wipers when the wiper blades are frozen to the glass,
this could damage both the wiper blades and the wiper motor.
•
Make sure you switch off the windscreen wiper system (lever in
position "0") before you use an automatic car wash. This will avoid
inadvertent triggering of the wipers and possible damage to the
wiper system.Note
•
Check that the washer fluid reservoir is full before starting a long
journey. Filling the reservoir ⇒page 164.
•
Worn or dirty wiper blades can cause smearing on the glass
which can also impair the effectiveness of the light sensor/ rain
sensor*. Please check the wiper blades regularly.
•
If you leave the windscreen wiper lever set to the intermittent
wipe function when the ignition is switched off, the light sensor/
rain sensor* will not be activated until you reach a road speed of at
least 6 km/h.
•
Applies to vehicles with light sensor/ rain sensor: If the wind-
screen wipers have been activated manually and it is raining, the
automatic headlights* will come on ⇒page 53, “Automatic (sensor-
controlled) headlights”. In the daytime the headlights will automat-
ically go off again once the wipers are switched off. The automatic
headlights* function is only available if the light switch is in the
“AUTO” position ⇒page 53, fig. 47.
Headlight washer systemWith the lights switched on, operate the automatic wind-
screen wash and wipe ⇒page 59, fig. 54 , and keep the
lever pulled towards you for at least 1 second.The headlight washer jets come out of the bumper automatically
(under water pressure).
Clean off stubborn dirt (insects, etc.) from the lenses at regular
intervals, for instance when stopping for fuel.
To ensure that the system works properly in winter, keep the nozzle
holders free of snow and remove any ice with a de-icer spray.
A5
document_0900452a816e6cc9.book Seite 60 Mittwoch, 21. Februar 2007 1:32 13
Page 81 of 210
Heating and cooling79
Controls
Safety
Driving tips
General maintenance
Self-help
Technical data When driving through a tunnel or in queues of traffic, to prevent
fumes entering the interior of the vehicle.
WARNING
For reasons of safety you should not leave the air recirculation
switched on for too long. This mode prevents fresh air from
entering the vehicle, so the windows can mist over if the air
cooling is switched off. Bad visibility can cause an accident.AC mode Activating the AC mode
– Press the button ⇒page 75, fig. 69.
Deactivating the AC mode
– Press the button again.In the AC mode, the air cooling system is switched on and the
heating and ventilation are regulated automatically.
Note
If the LED in the AC button should continue to light up when the AC
mode has been switched off (i.e. the air conditioner has been
switched off) this is due to a defect in one of the air conditioner
components. If a malfunction should occur, please contact a quali-
fied workshop.
Economical operation of the air conditioner
Economical operation of the air conditioner will help to
save fuel.When the air conditioner is operating in the cooling mode it
reduces engine power and increases fuel consumption. To
ensure that the cooling mode is activated only when really
necessary, please note the following points:
– Switch the AC mode off if you wish to save fuel.
– Switch the AC mode off if you decide to open the
windows while driving.
– If the vehicle has heated up after standing in the sun,
open the windows and doors for a short time to cool the
vehicle.
For the sake of the environmentBy saving fuel you also reduce the amount of pollutants emitted
from your vehicle.Rear window heating
The rear window heating helps to demist the rear window.– Press the
button ⇒page 75, fig. 69 to switch the rear
window heating on or off.
The rear window heating only works when the engine is running. An
indicator lamp in the button lights up when the rear window heater
is switched on.
The rear window heating switches off automatically after about
10 minutes.
ACACAC
document_0900452a816e6cc9.book Seite 79 Mittwoch, 21. Februar 2007 1:32 13
Page 82 of 210
Heating and cooling 80
For the sake of the environmentSwitch off the heated rear window manually as soon as the rear
window is clear. By saving electrical power you can also save fuel.Applies to vehicles: with seat heatingSeat heating The seat cushions and backrests of the front seats can be
heated electrically.– Press the button for seat heating ⇒page 75, fig. 69
to set the desired seat temperature.Possible settings range from 1 to 3. The selected seat heating
setting is indicated by LEDs above the button.
Caution
To avoid damaging the heating elements of the seat heating, please
do not kneel on the seat or apply sharp pressure at a single point.
- +
- +
document_0900452a816e6cc9.book Seite 80 Mittwoch, 21. Februar 2007 1:32 13
Page 140 of 210
Your vehicle and the environment 138Your vehicle and the environmentRunning inA new vehicle should be run in over a distance of 2,500 km. During
the first 1,000 km do not use full throttle and do not exceed an
engine speed of 6,000 rpm. From 1,000 to 2,000 km you should also
avoid using full throttle. From 2,000 to 2,500 km you can then
increase engine speed gradually and briefly to 8,250 rpm.
During its first few hours of running, the internal friction in the
engine is greater than later on when all the moving parts have
bedded down.
How the vehicle is driven for the first 2,500 km also influences the
engine quality. After the first 2,500 km you should continue driving
at moderate engine speeds, in particular when the engine is cold.
This helps to reduce wear and tear on the engine and increases the
potential mileage which can be covered by the engine.
You should also avoid driving with the engine speed too low.
Change down to a lower gear when the engine no longer runs
“smoothly”. Excessively high engine speeds are prevented by an
automatic rev limiter.Emission control systemsThe vehicle must only be used with unleaded petrol, otherwise the
catalytic converter will be destroyed.
Never run the tank completely dry. The irregular fuel supply can
cause misfiring, which would allow unburnt fuel to enter the
exhaust system, which could cause overheating and damage the
catalytic converter.
WARNING
•
Because of the high temperatures which can occur in the emis-
sion control system, do not park the vehicle where the exhaust
can come into contact with flammable materials under the car
(e.g. on grass or at the forest edge). - Fire hazard!
•
Do not apply any underseal agents in the area around the
exhaust system - fire hazard!
Driving abroadUnleaded petrol
A car with catalytic converter must not be run with leaded petrol
⇒page 138. Before driving abroad make sure that unleaded petrol
is available there.
Changing over headlight dip settings
The asymmetric low beams of the headlights are designed to light
up the near side of the road more intensely. If you drive in a country
where traffic drives on the opposite side of the road to the home
country, this will dazzle oncoming traffic.
The headlight dip settings must be changed to avoid dazzling
oncoming traffic. For safety reasons, you should have the dip
settings changed by a qualified workshop.
For further information about changing the dip settings on xenon*
headlights, please contact your Audi R8 dealer or other qualified
workshop.
document_0900452a816e6cc9.book Seite 138 Mittwoch, 21. Februar 2007 1:32 13
Page 154 of 210

Fuel and filling the tank 152Fuel and filling the tankPetrolPetrol grade
The correct grade of petrol is listed inside the fuel tank
flap.The vehicle is equipped with a catalytic converter and must only be
run on unleaded petrol. Unleaded petrol must comply with the
European EN 228 standard. The petrol grades have different octane
ratings (RON). If, in exceptional circumstances, the correct octane
rating is not available, please note the following:
Your engine normally requires Super Plus unleaded petrol (98 RON).
Premium unleaded fuel with 95 RON can also be used. This can,
however, result in a slight loss of power under certain driving condi-
tions. If premium unleaded petrol is not available, the engine can be
run on regular unleaded petrol with 91 RON as an emergency
measure. In this case only use moderate engine speeds and a light
throttle. Avoid using full throttle. Fill up with premium or Super Plus
petrol as soon as possible.
Caution
•
Petrol complying with the EN 228 standard can contain small
quantities of ethanol. However, “bioethanol fuels”, which are
retailed under various different names such as E50 and E85, and
which contain a large proportion of ethanol, must not be put into
the vehicle, as this would damage the fuel system.
•
Even one tankful of leaded fuel would permanently impair the
efficiency of the catalytic converter.
•
High engine speed and full throttle can damage the engine when
using petrol with an octane rating lower than the correct grade for
the engine.
Filling the tankFilling the tankUnscrewing the tank cap
– Press the top button to open the fuel tank flap.
– Unscrew the tank cap anti-clockwise.
– Hook the cap onto the open flap ⇒fig. 113.
Fig. 112 Tank flap
release button in the
driver's door trimFig. 113 Fuel tank flap
with tank cap attached
document_0900452a816e6cc9.book Seite 152 Mittwoch, 21. Februar 2007 1:32 13