Page 118 of 491
�Û�Ý
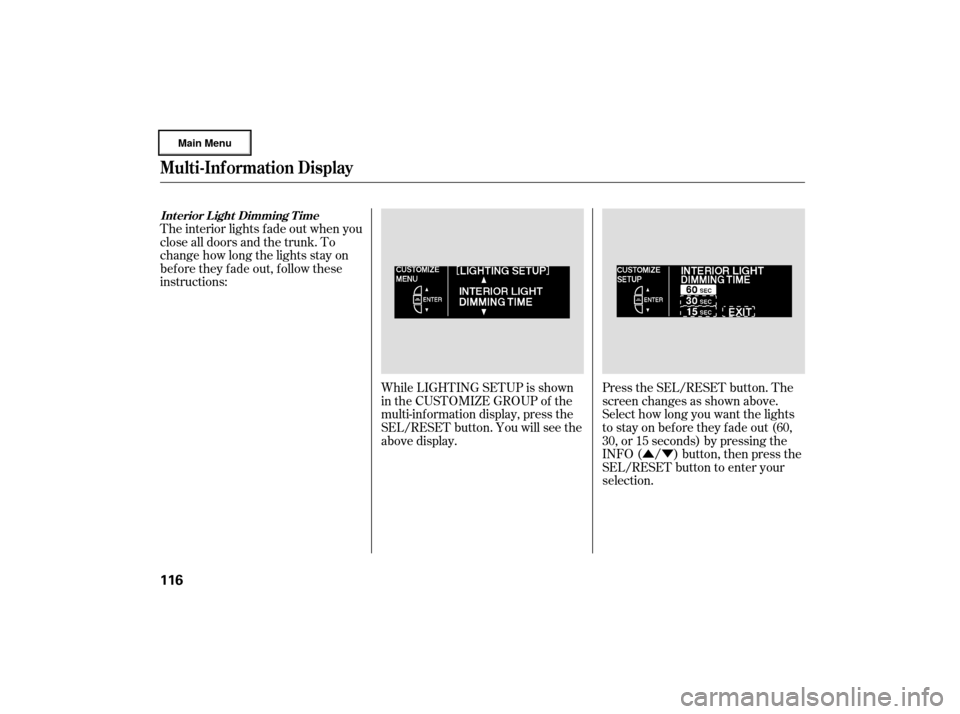
While LIGHTING SETUP is shown
in the CUSTOMIZE GROUP of the
multi-inf ormation display, press the
SEL/RESET button. You will see the
above display.
Press the SEL/RESET button. The
screen changes as shown above.
Select how long you want the lights
to stay on bef ore they f ade out (60,
30, or 15 seconds) by pressing the
INFO ( / ) button, then press the
SEL/RESET button to enter your
selection.
The interior lights f ade out when you
close all doors and the trunk. To
change how long the lights stay on
before they fade out, follow these
instructions:
Int erior L ight Dimming T ime
Multi-Inf ormation Display
116
�����—�����—�
���y�
�����������
�y���
�(�����������y���
���
�y
Page 120 of 491
�Û�Ý�Û�Ý
The headlights, parking lights, side
marker lights, taillights, and license
plate lights go of f af ter the selected
time when you close the driver’s
door and take the remote with you.
To change how long the lights stay
on before they go off, follow these
instructions:
While the multi-information display
is in the LIGHTING SETUP screen
of the CUSTOMIZE GROUP, press
the SEL/RESET button. The screen
changes to CUSTOMIZE MENU.
Press the INFO ( / ) button until
you see the above display.Press the SEL/RESET button. The
screen changes as shown above.
Select how long you want the lights
to stay on bef ore they go of f (0, 15,
30, or 60 seconds) by pressing the
INFO ( / ) button, then press the
SEL/RESET button to enter your
selection.
Headlight A uto Of f T imer
Multi-Inf ormation Display
118
�����—�����—�
���y�
�������������y���
�(�����������y���
�����y
Page 122 of 491

�µ�µ
�µ �µ
�µ �Û�Ý�Û�Ý
MAX
Theheadlightscomeonwhenitis
bright.
HIGH
Theheadlightscomeonwhenitis
somewhat bright.
MID
Theheadlightscomeonwhenitisas
bright as sunset or sunrise.
LOW
Theheadlightscomeonwhenitis
somewhat dark.
MIN
Theheadlightscomeonwhenitis
dark. While LIGHTING SETUP is shown
in the CUSTOMIZE GROUP of the
multi-inf ormation display, press the
SEL/RESET button. The screen
changes to CUSTOMIZE MENU.
Press the INFO ( / ) button until
you see the above display.
Press the SEL/RESET button. The
screen changes as shown above.
Select f rom f ive levels of sensitivity
by pressing the INFO ( / ) button,
then press the SEL/RESET button
to enter your selection.
The headlights automatically come
on when the headlight switch is in
the AUTO position and the ambient
light reaches a changeable level. You
can select the auto light sensitivity
f rom the f ollowing f ive levels:
Auto Light Sensitivity
Multi-Inf ormation Display
120
�����—�����—�
���y�
�������������y���
�(�����������y���
�����y
Page 131 of 491

�Û�Ý�Û�Ý
When you press the LOCK button
on the remote to lock the doors and
the trunk, and then press the button
again within 5 seconds, a beeper
sounds once and the exterior lights
blink once to verif y that the doors
arelockedandthesecuritysystemis
set.
When you press the UNLOCK
button on the remote to unlock the
doors, and then press the button
again within 5 seconds, a beeper
sounds twice and the exterior lights
blink twice to verify that the doors
are unlocked and the security
system is turned of f .
To turn this feature on or off, follow
these instructions.
While the multi-information display
is in the DOOR/WINDOW SETUP
screen of the CUSTOMIZE GROUP,
press the SEL/RESET button. The
screen changes to CUSTOMIZE
MENU. Press the INFO ( / )
button until you see the above
display.Press the SEL/RESET button. The
screen changes as shown above.
Select ON or OFF by pressing the
INFO ( / ) button, then press the
SEL/RESET button to enter your
selection.
CONT INUED
K eyless L ock A cknowledgment
Multi-Inf ormation Display
Inst rument s and Cont rols
129
�����—�����—�
���y�
�������������y���
�(�����������y���
�����y
Page 138 of 491

�Î�Î
�Î
�Î�Î
�Î
�Î
�Î
�Î
�Î
�ÎTo
use the horn, press the center pad of the steering wheel.
On models with navigation system, refer to the navigation system manual.
If equipped.
Canadian
models only
1:
2:
3:
4:
Controls
Near the Steering Wheel
136
MIRROR CONTROLS PASSENGER
AIRBAG
OFF INDICATOR
HANDSFREELINK
BUTTONS
VEHICLE
STABILITY ASSIST (VSA)
SYSTEM OFF SWITCH
PADDLE
SHIFTERS
REAR WINDOW
DEFOGGER BUTTON
HEATED MIRROR
BUTTON HAZARD WARNING
BUTTON
DISTANCE BUTTON CRUISE
CONTROL
BUTTONS
SEAT HEATER SWITCHES
STEERING WHEEL
AUDIO CONTROLS
STEERING
WHEEL
ADJUSTMENTS (P.35)
INSTRUMENT
PANEL
BRIGHTNESS WINDSHIELD
WIPER/WASHER
HEADLIGHT WASHER
SWITCH
COLLISION
MITIGATION
BRAKE SYSTEM (CMBS)
OFF SWITCH
ADAPTIVE FRONT LIGHTING
SYSTEM (AFS) OFF SWITCH
VOICE CONTROL
BUTTONS HORN ADAPTIVE
CRUISE
CONTROL (ACC)
BUTTONS
SEAT HEATER AND
SEAT VENTILATION BUTTONS
(P.138)
(P.158)
(P.147) (P.237)(P.287)
(P.263) (P.178)/
(P.179)
(P.145)
(P.137) (P.145)
(P.146)/
(P.159)
(P.277)/
(P.358)
(P.307) (P.278,
283)
MULTI INFORMATION
DISPLAY BUTTONS (P.71)
(P.372)
(P.144)
(P.345)
HEADLIGHTS/
TURN
SIGNAL/FOG
LIGHTS (P.140, 142)TM
2 4
4
31
4
4
�����—�����—�
���y�
�������������y���
�(�����������y���
���
�y
Page 140 of 491
�µPull back
and hold the wiper control lever.
The washers spray until you
release the lever. The wipers run
at low speed, then complete one
more sweep af ter you release the
lever.
When you activate the windshield
washer with the headlight turned on,
the headlight washer will be
activated under certain conditions.
For more inf ormation, see sectioninthenextcolumn.
The headlight washers can be
operated at any time by pressing the
headlight washer button located next
to the steering wheel column. The
headlights must be turned on to use
this button. In addition, the headlight
washer operates when the
windshield washers are f irst turned
on. The headlight washers use the same
f luid reservoir as the windshield
washers.
Windshield Wipers and Washers
Windshield Washer
Headlight Washers
Canadian models only
Headlight
Washers
138
HEADLIGHT WASHER SWITCH
�����—�����—�
���y�
�������������y���
�(�����������y���
�����y
Page 142 of 491

�µ
�µ �µPush down on the
lever to signal a left turn and up to
signal a right turn. To signal a lane
change, push lightly on the lever,
and hold it. The lever will return to
center when you release it or
complete a turn.
Tu rn signal
Off
Parking and indicator lights
AUTO
Headlights on
High beams
Flashhighbeams
Fog lights off
Fog lights on The
rotating switch
on the left lever controls the lights.
Turning this switch to the ‘‘ ’’
position turns on the parking lights,
taillights, instrument panel lights,
side-marker lights, and rear license
plate lights.
Turning the switch to the ‘‘ ’’
position turns on the headlights. If
you leave the lights on with the
ignition switch released after turned
to the LOCK (0) position or when
the built-in key is removed from the
ignition switch, you will hear a
reminder chime when you open the
driver’s door. When
the light switch is in the
‘‘ ’’ or ‘‘ ’’ position, the
lights on indicator comes on as a
reminder. This indicator stays on if
you leave the light switch on and
turn the ignition switch to the
ACCESSORY (I) or the LOCK (0)
position.
To switch f rom low
beams to high beams, push the lef t
lever f orward until you hear a click.
The blue high beam indicator will
come on (see page ). Pull it back
to return to low beams. To flash the
high beams, pull the lever back
lightly, then release it. The high
beamsstayonaslongasyouhold
the lever back.
1.
2.
3.
4.
5.
6.
7.
8.
9. 66
Turn Signal
Headlights
High Beams
Turn Signals and Headlights
140
�����—�����—�
���y�
���������
���y���
�(�����������y���
�����y
Page 143 of 491

�µThe automatic lighting feature is
controlledbyasensorlocatedontop
of the dashboard. Do not cover this
sensor or spill liquids on it.
Even
with the automatic lighting
feature turned on, we recommend
thatyouturnonthelightsmanually
when driving at night or in a dense
fog, or when you enter dark areas
such as long tunnels or parking
facilities.
To turn on automatic lighting, turn
the light switch to AUTO at any time.
The lights will come on automatically
when the outside light level becomes
low (at dusk, for example). The
lights on indicator comes on as a
reminder. The lights and indicator
will turn off automatically when the
system senses high ambient light. To change the ‘‘AUTO LIGHT
SENSITIVITY’’ setting, see page
.
The automatic lighting
f eature turns on the headlights, all
other exterior lights, and the
instrument panel lights when it
senses low ambient light.
The lights will remain on when you
turn of f the ignition switch. They will
turn of f automatically when you open
and close the driver’s door. To turn
them on again, either turn the
ignition switch to the ON (II)
position or turn the light switch to . Do not leave the light switch in
AUTO if you will not be driving the
vehicle f or an extended period (a
weekormore).Youshouldalsoturn
of f the lights if you plan to leave the
engine idling or of f f or a long time.
120
AUTO
Turn Signals and Headlights
Inst rument s and Cont rols
141
LIGHT
SENSOR
�����—�����—�
���y�
�������������y���
�(�����������y���
�����y