Page 199 of 442

�µ�µThe scan function gives
you a sampling of all channels while
in the channel mode. In the category
mode, only the channels within that
category are scanned. To acti vate
scan, press the SCAN button. The
system plays each channel in
numerical order for a few seconds,
th en selects the next channel. When
you hear a channel you want to
continue listening to, press the
button again. To
store a ch annel: Pick
a preset number for the
ch annel you want to store. Press
and hold the appropriate side of
the preset bar until you hear a
beep.
Repeat steps 2 and 3 to store the
first six channels.
Press the button again.
The oth er XM band will be shown.
Store the next six channels
repeating steps 2 and 3.
Once a channel is sto red, press and
release the proper side of the preset
bar to tune to it.
For information, see page .
For information, see page .
Youcanstoreupto12
preset channels using each side of
the preset bar. Each side of the bar
stores one channel f rom the XM1
band and one channel f rom the XM2
band.
In category mode, only channels
within that category can be selected.
In channel mode, all channels can be
selected. Usethetune,seek,orscan
function to tune to a desired
channel. Press the button. Either
XM1 or XM2 will be shown on the
center display.
4. 3.
5.
2. 1.
196
235
SCAN
XM Satellite Radio Reception Adjusting the Sound
Preset
Audio System
Features
195
�����—�����—�
���y���
�����������y���
�(�)� �������y���������y
Page 200 of 442

�µ�µ�´
�µ Use the TREBLE/
BASS modes to adjust the tone to
your liking. You can adjust each
mode in levels between 6 and 6.
These two
modes adjust the strength of the
sound coming f rom each speaker.
BALANCE adjusts the side-to-side strength, while FADER adjusts the
front-to-back strength. BALANCE
can be adjusted in levels between L9
and R9. FADER can be adjusted in
levels between F9 and R9. When
FADER adjustment level reaches F9,
the subwoof er speaker will be turned
of f .
Eachmodeisshownonthecenter
display as it changes. Turn the
PWR/VOL knob to adjust the setting
to your liking. When the level
reaches the center, you will see
‘‘ ’’ on the center display. The
system will automatically return the
display to the selected audio mode
about 5 seconds af ter you stop
adjusting a mode. Press the SOUND/CLOCK button
repeatedly to display the BASS,
TREBLE, FADER, BALANCE,
SUBWOOFER and SVC (speed-
sensitive volume compensation)
settings.
On RDX model
Treble/Bass
Balance/Fader
Adjusting the Sound
Audio System
196
ADJUSTMENT MODE
SOUND/CLOCK BUTTON
ADJUSTMENT LEVEL
U.S. model is shown. PWR/VOL KNOB
�����—�����—�
���y�
�����������
�y���
�(�)� �������y�������
�y
Page 201 of 442
�µ�µ
�´ �µ �µ
Use
the
SUBWOOFER mode to adjust the
strength of the sound from the
subwoofer speaker. Turn the PWR/
VOL knob to the desired level ( 6
to 6). Even if the adjustment level
reaches 6, the subwoofer is not
turned off. You
can use the instrument panel
brightness control knob to adjust the
illumination of the audio system (see
page ). The audio system
illuminates when the parking lights
are on, even if the system is turned
of f .
The SVC
mode controls the volume based on
vehicle speed. The f aster you go, the
louder the audio volume becomes.
As you slow down, the audio volume
decreases.
The SVC has f our modes; SVC OFF,
SVC LOW, SVC MID, and SVC
HIGH. The def ault setting is MID.
Turn the PWR/VOL knob to adjust
the setting to your liking. 124
SUBWOOFER
A udio System L ighting
Speed-sensitive volume
compensation (SVC)
Audio System
Features
197
�����—�����—�
���y�
�������������y���
�(�)� �������y���������y
Page 202 of 442
ChangethehourbypressingtheH
(preset 4) side of the preset bar until
the numbers advance to the desired
time. Change the minute by pressing
the M (preset 5) side of the bar until
the numbers advance to the desired
time. To set the time, press the SOUND/
CLOCK button until you hear a beep,
then release the button. The
displayed time begins to blink.
You can quickly set the time to the
nearest hour. If the displayed time is
bef ore the half hour, pressing the
SOUND/CLOCK button until you
hear a beep, then pressing the R
(preset 6) side of the preset bar sets
the clock back to the previous hour.
If the displayed time is after the half
hour, the clock sets f orward to the
beginning of the next hour.When you are f inished, press the
SOUND/CLOCK button again to set
the time.
On RDX modelSetting the Clock
Audio System
198
SOUND/CLOCK BUTTON
CLOCK
PRESET 5 (M)
PRESET 4 (H) PRESET 6 (R)
U.S. model is shown.
�����—�����—�
���y�
�������������y���
�(�)� �������y���������y
Page 203 of 442
 and a lower part (dial).
Turning the dial lef t or right to select
or scroll through a list or item(s) on
the navigation display and adjust the
level or")
This dial consists of an upper part
(selector) and a lower part (dial).
Turning the dial lef t or right to select
or scroll through a list or item(s) on
the navigation display and adjust the
level or condition. Push the selector
to the left, right, up, and down to
scroll through and select a list or
item(s). The selected item will be
highlighted on the display. To
confirm the item or enter the setting,
push on the center of the selector
(ENTER).
Your vehicle has the interf ace dial on
the dashboard to operate the audio
system and navigation system. Most
f unctions of these systems can also
be controlled with the appropriate
buttons on the dashboard, but some
f unctions can be accessed or
selected with the interf ace dial only. When you operate the audio system
with the interface dial, press the
AUDIObuttononthecontrolpanel
to show the audio control display on
the navigation display. You can scroll
the display and enter the setting with
the interf ace dial. You will see the
indicator , , ,
or on the display. This
indicates the direction to move the
interf ace dial.You can operate the audio system
with the control buttons on the CD
changer unit without displaying the
audio control display on the
navigation display. The audio setting
will be shown on the upper display.
The audio system f or your vehicle
can also be operated by voice control.
See the navigation section in your
quick start guide f or an overview of
this system, and the navigation
system manual f or complete details.On RDX with Technology Package
model
Audio System
Interf ace Dial
Voice Control System
Features
199
ENTER
SELECTOR
DIAL
�����—�����—�
���y���
����
������y���
�(�)� �������y���������y
Page 204 of 442
On RDX with Technology Package modelTo Play the AM/FM Radio
Audio System
200
U.S. model is shown.AUDIO CONTROL DISPLAY
RADIO BAND
SCAN INDICATOR STEREO
INDICATORA.SEL INDICATOR
PRESET NUMBER
UPPER DISPLAY
�����—�����—�
���y���������������y���
�(�)� �������y���������y
Page 205 of 442
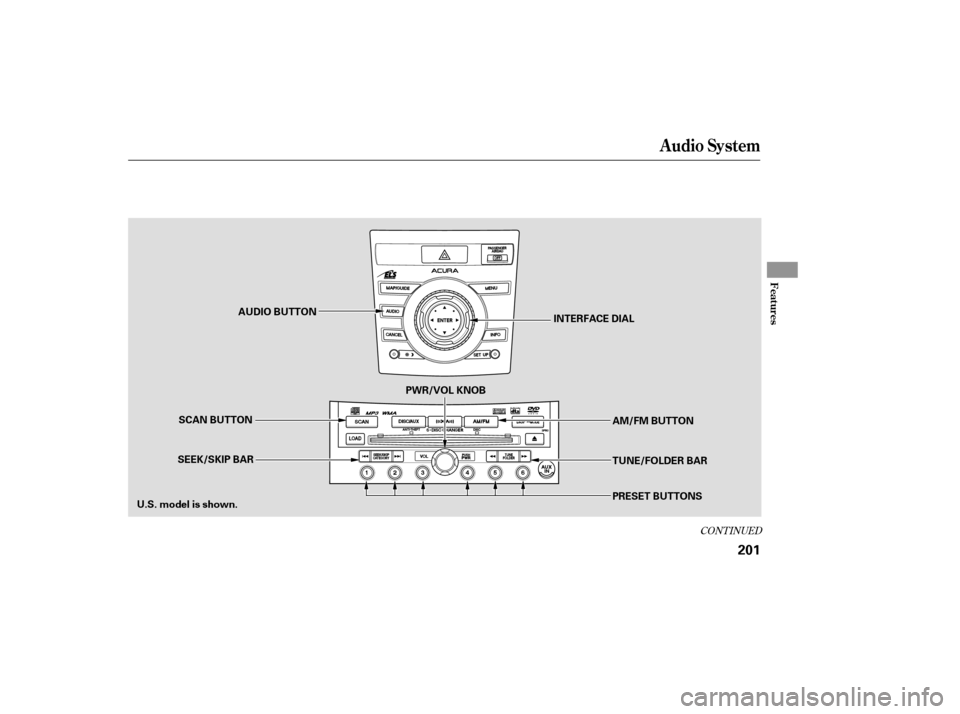
CONT INUED
Audio System
Features
201
U.S. model is shown.INTERFACE DIAL
SCAN BUTTON AUDIO BUTTON
PRESET BUTTONS TUNE/FOLDER BAR AM/FM BUTTON
PWR/VOL KNOB
SEEK/SKIP BAR
�����—�����—�
���y�
�������������y���
�(�)� �������y���������y
Page 206 of 442
 or the ON (II)
position. Press the AUDIO button to
vi ew the audio control display. Turn
the system on by pressing the PWR/
VOL kno")
�µ
The
ignition switch must be in the
ACCESSORY (I) or the ON (II)
position. Press the AUDIO button to
vi ew the audio control display. Turn
the system on by pressing the PWR/
VOL knob or the AM/FM button
(AMorFMbuttononCanadian
models). Adjust the volume by
turning the PWR/VOL knob.
To tune with the interface dial, press
the AUDIO button to view the audio
control display, then push the
selector down, and turn the dial to
TUNE. Then press ENTER on the
selector, and turn the dial to the
desired frequency. To exit the
TUNE mode, press ENTER again.
XM satellite radio inf ormation is
available on page .
You can use any of f ive methods to
f ind radio stations on the selected
band: TUNE, SEEK, SCAN, the
preset buttons or icons, and AUTO
SELECT.
Use the TUNE/FOLDER
bar to tune the radio to a desired
f requency. Press the side of the
bar to tune to a higher f requency,
and the side of the bar to tune
to a lower f requency.
If youpressandholdthe or side of the bar, the f requency
will begin to change rapidly. It will
stop when you release it.
The band and f requency the radio
waslasttunedtoareshownonthe
upper display. To change bands,
press the AM/FM button (AM or
FM button). You can also change
bands with the interf ace dial. Press
the AUDIO button to view the audio
control display and the band changes
to FM1, FM2, or AM each time you
push the selector up. On the FM
bands, ‘‘STEREO’’ will be shown on
the audio control display. ‘‘ST’’ will
also appear on the upper display if
the station is broadcasting in stereo.
Stereo reproduction on AM is not
available. 221
On U.S. models
Audio System
To Select a Station
TUNE
202
TUNE ICON
�����—�����—�
���y�
�������������y���
�(�)� �������y���������y

 side of the preset bar until
the numbers advance to the desired
time. Change the minute by pressing
the M (preset 5) side of the bar until
the numbers advance to")