Page 190 of 479

�µ
�µ �µ
The XM satellites are in orbit over
the equator; therefore, objects south
of the vehicle may cause satellite
reception interruptions. To help
compensate f or this, ground-based
repeaters are placed in major
metropolitan areas. Satellite signals are more likely to be
blocked by tall buildings and
mountains the f arther north you
travel f rom the equator. Carrying
large items on a roof rack can also
block the signal.
The signal is
currently too weak. Move the vehicle
to an area away from tall buildings,
and with an unobstructed view of the
southern horizon.
The selected channel
number does not exist or is not part
of your subscription, or this channel
has no artist or title inf ormation at
this time.
There is a problem
with the XM antenna. Please consult
your dealer.
Playing the XMSatellite Radio (Models without navigation system)
‘‘NO SIGNA L ’’
‘‘----’’
‘‘A NT ENNA ’’
186
Signal may be blocked by
mountains or large obstacles to
the south. Signal weaker in
these areas.
SATELLITE GROUND REPEATER
�����—�����—�����y�
�������������y���
�(�)�-�������y���
���
�y
Page 202 of 479

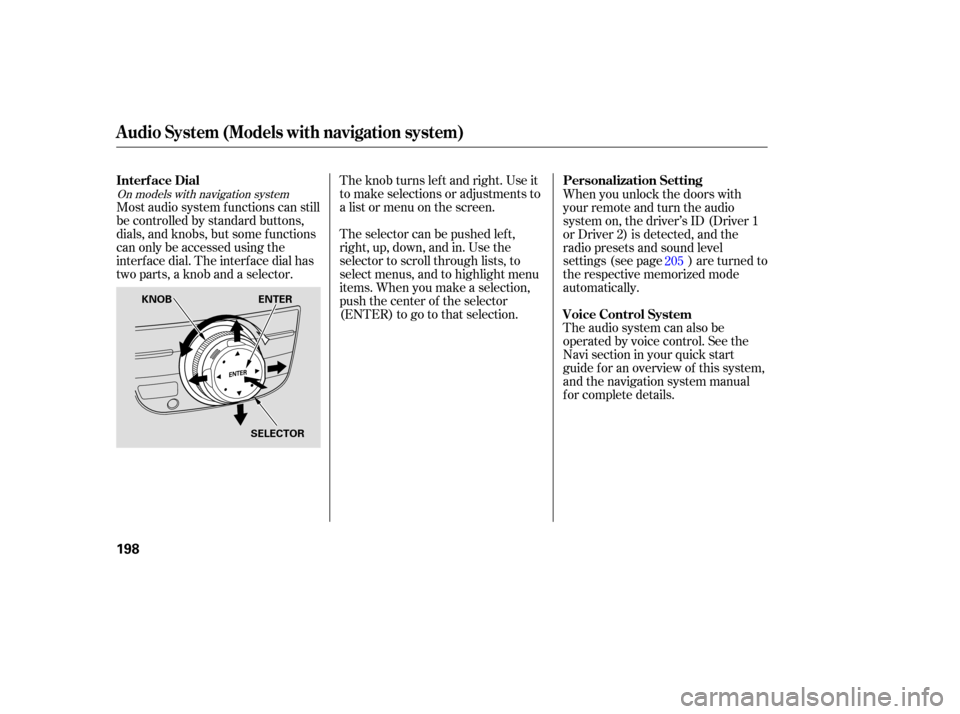
The selector can be pushed left,
right, up, down, and in. Use the
selector to scroll through lists, to
select menus, and to highlight menu
items. When you make a selection,
push the center of the selector
(ENTER)togotothatselection. The knob turns left and right. Use it
to make selections or adjustments to
a list or menu on the screen.
Most audio system functions can still
be controlled by standard buttons,
dials, and knobs, but some functions
can only be accessed using the
interface dial. The interface dial has
two parts, a knob and a selector. When
you unlock the doors with
your remote and turn the audio
system on, the driver’s ID (Driver 1
or Driver 2) is detected, and the
radio presets and sound level
settings (see page ) are turned to
the respective memorized mode
automatically.
The audio system can also be
operated by voice control. See the
Navi section in your quick start
guide f or an overview of this system,
and the navigation system manual
f or complete details. 205
On models with navigation system
Interf ace Dial
Personalization Setting
Voice Control System
Audio System (Models with navigation system)
198
KNOB ENTER
SELECTOR
�����—�����—�����y�
�������������y���
�(�)�-�������y���������y
Page 218 of 479
The XM satellites are in orbit over
the equator; therefore, objects south
of the vehicle may cause satellite
reception interruptions. To help
compensate f or this, ground-based
repeaters are placed in major
metropolitan areas.
Satellite signals are more likely to be
blocked by tall buildings and
mountains the f arther north you
travel from the equator.
Playing the XMSatellite Radio (Models with navigation system)
214
Signal may be blocked by
mountains or large obstacles to
the south.Signal weaker in
these areas.
SATELLITE GROUND REPEATER
�����—�����—�����y�
�������������y���
�(�)�-�������y�����
���y
Page 236 of 479

�Ý�Û
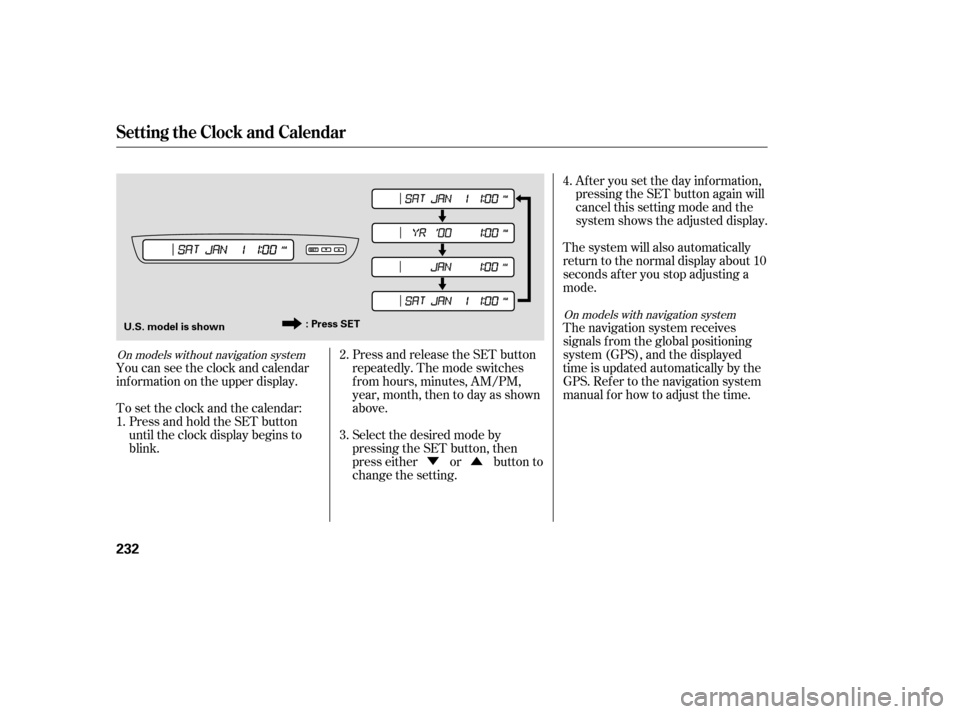
Press and release the SET button
repeatedly. The mode switches
f rom hours, minutes, AM/PM,
year, month, then to day as shown
above.
Select the desired mode by
pressing the SET button, then
presseitherorbuttonto
change the setting. Af ter you set the day inf ormation,
pressing the SET button again will
cancel this setting mode and the
system shows the adjusted display.
The system will also automatically
return to the normal display about 10
seconds af ter you stop adjusting a
mode.
The navigation system receives
signals f rom the global positioning
system (GPS), and the displayed
time is updated automatically by the
GPS. Ref er to the navigation system
manual f or how to adjust the time.
You can see the clock and calendar
inf ormation on the upper display.
Press and hold the SET button
until the clock display begins to
blink.
To set the clock and the calendar:
1. 2.
3.4.
On models with navigation system
On models without navigation system
Setting the Clock and Calendar
232
: Press SET
U.S. model is shown
�����—�����—�����y�
������
����
�y���
�(�)�-�������y���������y
Page 267 of 479
CONT INUED
Auxiliary input jacks and headphone
connectors f or the rear
entertainment system are on the
back of the center console
compartment.
Remove the battery. Install the new
battery in the earpiece as shown in
the diagram next to the battery slot.
Slide the cover back into place on the
earpiece, then press down on the
back edge to lock it in place.
Each headphone uses one AAA
battery. The battery is under the
cover on the lef t earpiece. To
remove the cover, insert a coin in the
slot and twist it slightly to pry the
cover away f rom the earpiece. Pull
the cover outward, and pivot it out of
the way.
Rear Entertainment System
Replacing Bat t eriesAuxiliary Input Jacks
Features
263
COVER
BATTERY
TAB
�����—�����—�����y�
�������������y���
�(�)�-�������y���������y
Page 269 of 479

Once the security system is set,
opening any door, the tailgate, or the
hood without using the key or the
remote transmitter, will cause it to
alarm. It also alarms if the radio is
removed f rom the dashboard or the
wiring is cut.The security system will not set if
the hood, tailgate, or any door is not
f ully closed. If the system will not set,
check that the doors, the tailgate and
the hood are f ully closed.
Do not attempt to alter this system
or add other devices to it.
The security system helps to protect
your vehicle and valuables f rom thef t.
The horn sounds and a combination
of headlights, parking lights, side
marker lights, and taillights f lash if
someone attempts to break into your
vehicleorremovetheradio.This
alarm continues f or 2 minutes, then
it stops. To reset an alarming system
bef ore the 2 minutes have elapsed,
unlock the driver’s door with the key
or the remote transmitter.
The security system automatically
sets 15 seconds after you lock the
doors, hood, and the tailgate. For the
system to activate, you must lock the
doorsandthetailgatefromthe
outside with the key, the lock tab,
the door lock switch, or the remote
transmitter. The security system
indicator in the instrument panel
starts blinking immediately to show
you the system is setting itself .
Security System
Features
265
SECURITY SYSTEM INDICATOR
�����—�����—�����y�
�����������
�y���
�(�)�-�������y���������y
Page 273 of 479

�µ�µ�Ý
�µ�µ
�Ý
CONT INUED
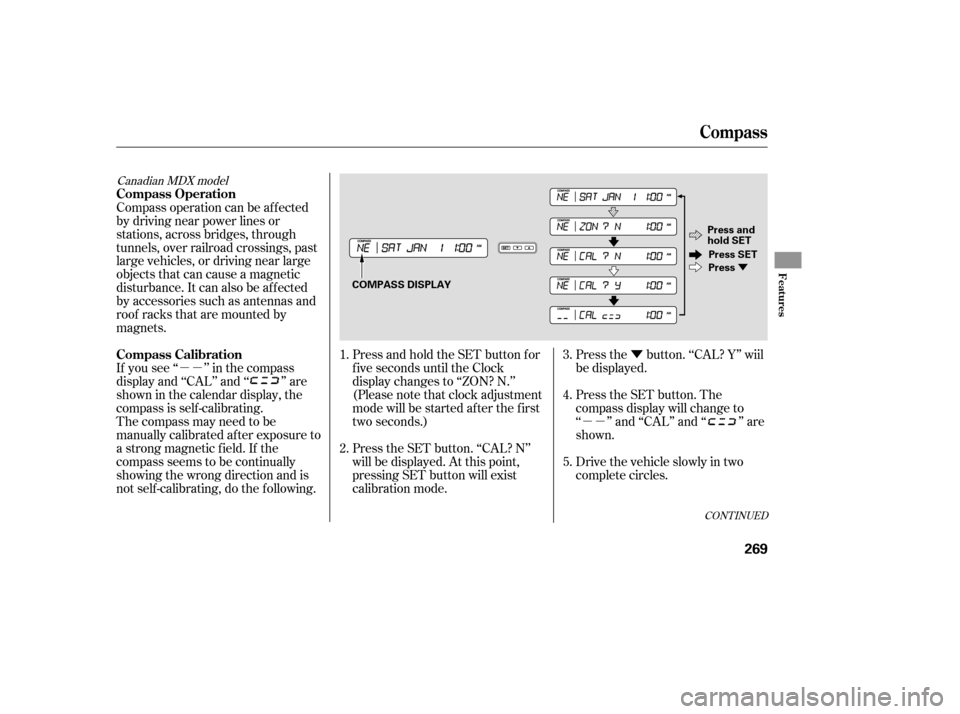
Press and hold the SET button for
f ive seconds until the Clock
display changes to ‘‘ZON? N.’’
(Pleasenotethatclockadjustment
mode will be started af ter the f irst
two seconds.)
The compass may need to be
manually calibrated af ter exposure to
a strong magnetic field. If the
compassseemstobecontinually
showing the wrong direction and is
not self -calibrating, do the f ollowing. If you see ‘‘ ’’ in the compass
display and ‘‘CAL’’ and ‘‘ ’’ are
showninthecalendardisplay,the
compassisself-calibrating. Compass operation can be af f ected
by driving near power lines or
stations, across bridges, through
tunnels, over railroad crossings, past
large vehicles, or driving near large
objects that can cause a magnetic
disturbance. It can also be af f ected
by accessories such as antennas and
roof racks that are mounted by
magnets.
Press the SET button. ‘‘CAL? N’’
will be displayed. At this point,
pressing SET button will exist
calibration mode.Press the button. ‘‘CAL? Y’’ wiil
be displayed.
Press the SET button. The
compass display will change to
‘‘ ’’ and ‘‘CAL’’ and ‘‘ ’’ are
shown.
Drive the vehicle slowly in two
complete circles.
1.
2.
3.
4.
5.
Canadian MDX model
Compass
Compass Calibration Compass Operation
Features
269
COMPASS DISPLAY
Press and
hold SET
Press SET
Press
�����—�����—�����y�
�������������y���
�(�)�-�������y���������y
Page 274 of 479

�µ�µ�Ý�Ý
�Û
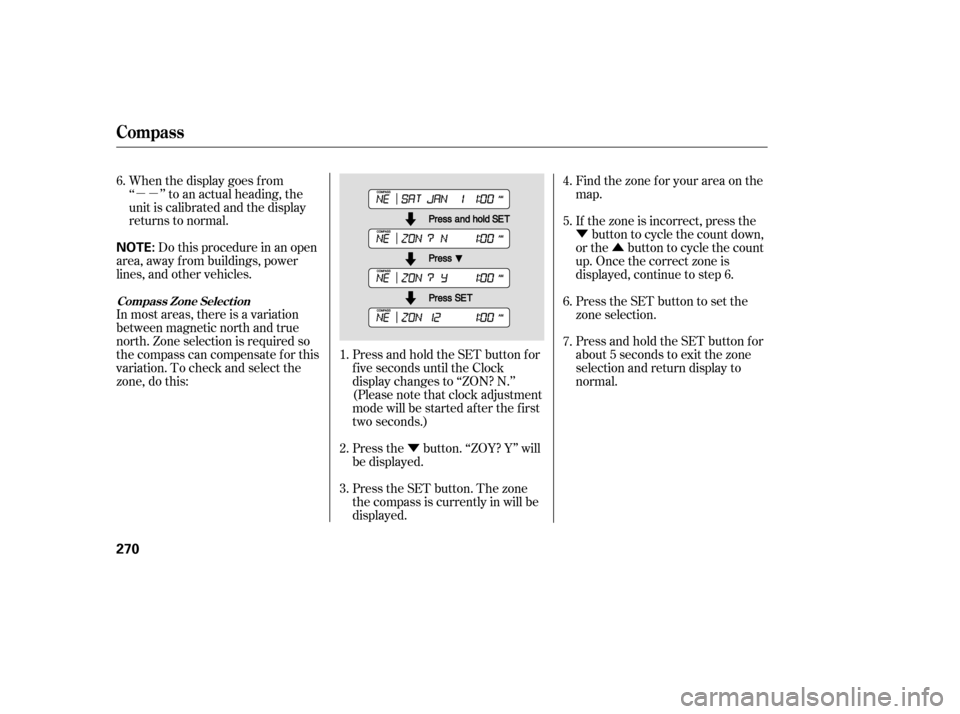
Press and hold the SET button for
f ive seconds until the Clock
display changes to ‘‘ZON? N.’’
(Pleasenotethatclockadjustment
mode will be started af ter the f irst
two seconds.)
When the display goes f rom
‘‘ ’’ to an actual heading, the
unit is calibrated and the display
returns to normal.
Do this procedure in an open
area, away f rom buildings, power
lines, and other vehicles.
In most areas, there is a variation
between magnetic north and true
north. Zone selection is required so
the compass can compensate f or this
variation. To check and select the
zone, do this:
Press the button. ‘‘ZOY? Y’’ will
be displayed.Find the zone f or your area on the
map.
If the zone is incorrect, press the
button to cycle the count down,
or the button to cycle the count
up. Once the correct zone is
displayed, continue to step 6.
Press the SET button to set the
zone selection.
Press and hold the SET button for
about 5 seconds to exit the zone
selection and return display to
normal.
Press the SET button. The zone
the compass is currently in will be
displayed.
1.
2.
3. 4.
5.
6.
6.
7.
Compass
Compass Zone Select ion
270
NOTE:
�����—�����—�����y�
���������
���y���
�(�)�-�������y���������y