Page 77 of 479

position. Some of the message")
�Û�Ý�Û�Ý
�Û�ÝThe
multi -information display in the
instrument panel displays various
inform ation and messages when the
ignition switch is in the ON (II)
position. Some of the messages help
you operate your vehicle more
comfortably.
Others help to keep you aware of the
periodic maintenance your vehicle
needs for continued trouble-free
driving.
When you open the driver’s door, a
‘‘Welcome’’ message is shown on the
multi-info rmation display. When you
turn the ignition switch from the ON
(II) position to the ACCESSORY (I)
position, a ‘‘Goodbye’’ message is
shownonthedisplay. To
change the display, press the
INFO( / )buttononthesteering
wheel repeatedly until the main
menu appears (see page ). With
the ignition switch in the ON
(II) position, the multi -information
display changes as shown in the next
page each time you press the INFO
( / ) button or SEL/RESET
button.
Wh en you turn the ignition switch to
the ON (II) position, what you last
selected is displayed.
In the multi-information display, the
system message is also displayed
(see page ) and you can
customize your vehicle control
settings (see page ).
74 80
83
CONT INUED
Multi-Inf ormation Display
Inst rument s and Cont rols
73
INFO ( / )
BUTTON
SEL/
RESET
BUTTON
�����—�����—�����y�
����
����
���y���
�(�)�-�������y���������y
Page 84 of 479

�Û�Ý�Û�Ý
�Û�Ý
If there is a problem with your
vehicle, f or example, the engine oil
level is low or a door is not f ully
closed, the multi-inf ormation display
will show you the problem. It does
this by interrupting the current
display with one or more messages. The system message(s) triggers the
appropriate indicator(s) on the
instrument panel, including the
system message indicator, to come
on. The system message indicator
does not go of f until the problem(s)
is corrected.
You will also hear a beep when the
system message indicator comes on
for the first time.
Most of the messages are displayed
f or about 5 seconds, and then the
normal display returns. If there are
several system messages to be
shown, the display switches these
messages every 5 seconds.
To cancel the message(s) bef ore 5
seconds elapsed, press the INFO
( / ) button on the steering wheel.
Even if you press the INFO ( / )
button, some messages stay on or
come on again at regular intervals
until the problem is corrected.
You can see the message(s) again by
pressing the INFO ( / ) button
repeatedly if the system message
indicator remains lit on the
instrument panel.
Here is a list of all messages:
Multi-Inf ormation Display
System Messages
80
SYSTEM MESSAGE INDICATOR
�����—�����—�����y�
����
�
������y���
�(�)�-�������y���������y
Page 88 of 479
 3°C 0°C 3°C
(Canada)
ON
OFF
HIGH
MID
LOW
MANUAL ONLY
IGN OFF
TRI")
�Î�Î�Î
�Î �Î
�Î
�Î
�Î
�Î
�µ�™ �¶�™
�µ�™�¶�™
�ΠTRIP B
LOW
MIN
OFF
ENGLISH
FRENCH
SPANISH
5°F 0°F 5°F
(U.S.) 3°C 0°C 3°C
(Canada)
ON
OFF
HIGH
MID
LOW
MANUAL ONLY
IGN OFF
TRIP A
MAX
HIGH
MID
ON
OFF
ON
OFF
Changes the language used in the display.
Changes the outside temperature reading a
bove or
below i ts current reading.
Causes trip me ter A and the average fuel e conomy
to reset when you refuel.
Changes the indicator alarm volumes into three
levels.
Resets the elapsed time of your current trip.
Changes the interior light sensitivity to your liking.
Changes the driver’s seat, the steering wheel, and
the outside mirror positions to a stored setting.
Mo ves the steering wheel fully in and up when
the key is removed.
METER SETUP
(P.89)
POSITION SETUP
(P.97)
90
91
92
93
94
95
98
99
LANGUAGE
SELECTION
ADJUST OUTSIDE
TEMP. DISPLAY
TR IP A & AVG. FUEL
RESET with REFUEL
ADJUST
ALARM VOLUME
ELAPSED TIME RESET
AUTO INTERIOR
ILLUMINATION
MEMORY POSITION LINK
AUTO TILT & TELESCOPE
STEERING WHEEL
: Default setting
Setting Option
Description
Group Setup Page
Menu Item
Multi-Inf ormation Display
84
�����—�����—�����y�
����
�
������y���
�(�)�-�������y���������y
Page 101 of 479
�Û
�Ý
�Û�Ý
�Û�Ý
CONT INUED
Here are the two custom settings for
the position setup:MEMORY POSITION LINK
AUTO TILT & TELESCOPE
STEERING WHEEL
While ‘‘POSITION SETUP’’ is shown,
press the SEL/RESET button to
enter the customize mode.
Each time you press the INFO ( / ) button, the screen changes as
shown in the illustration. Press the
INFO ( / ) button until you see
the setting you want to customize,
then press the SEL/RESET button
to enter your selection.
Multi-Inf ormation Display
Position Setup
Inst rument s and Cont rols
97
SEL/RESET
BUTTON
INFO ( or )
BUTTON
�����—�����—�����y�
����
��������y���
�(�)�-�������y���
�����y
Page 102 of 479
�Û�Ý�Û�Ý
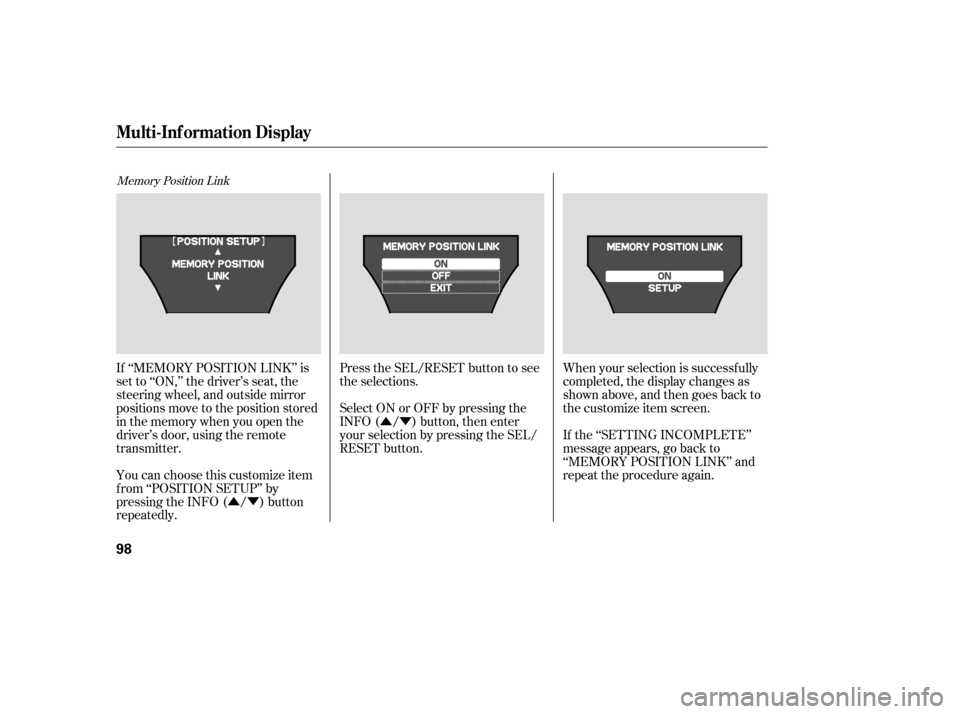
Memory Position Link
If ‘‘MEMORY POSITION LINK’’ is
set to ‘‘ON,’’ the driver’s seat, the
steering wheel, and outside mirror
positions move to the position stored
in the memory when you open the
driver’s door, using the remote
transmitter.
You can choose this customize item
f rom ‘‘POSITION SETUP’’ by
pressing the INFO ( / ) button
repeatedly. Press the SEL/RESET button to see
the selections.
Select ON or OFF by pressing the
INFO ( / ) button, then enter
your selection by pressing the SEL/
RESET button.
When your selection is successf ully
completed, the display changes as
shown above, and then goes back to
the customize item screen.
If the ‘‘SETTING INCOMPLETE’’
message appears, go back to
‘‘MEMORY POSITION LINK’’ and
repeat the procedure again.
Multi-Inf ormation Display
98
�����—�����—�����y�
����
��������y���
�(�)�-�������y���
�����y
Page 103 of 479
�Û�Ý�Û�Ý
CONT INUED
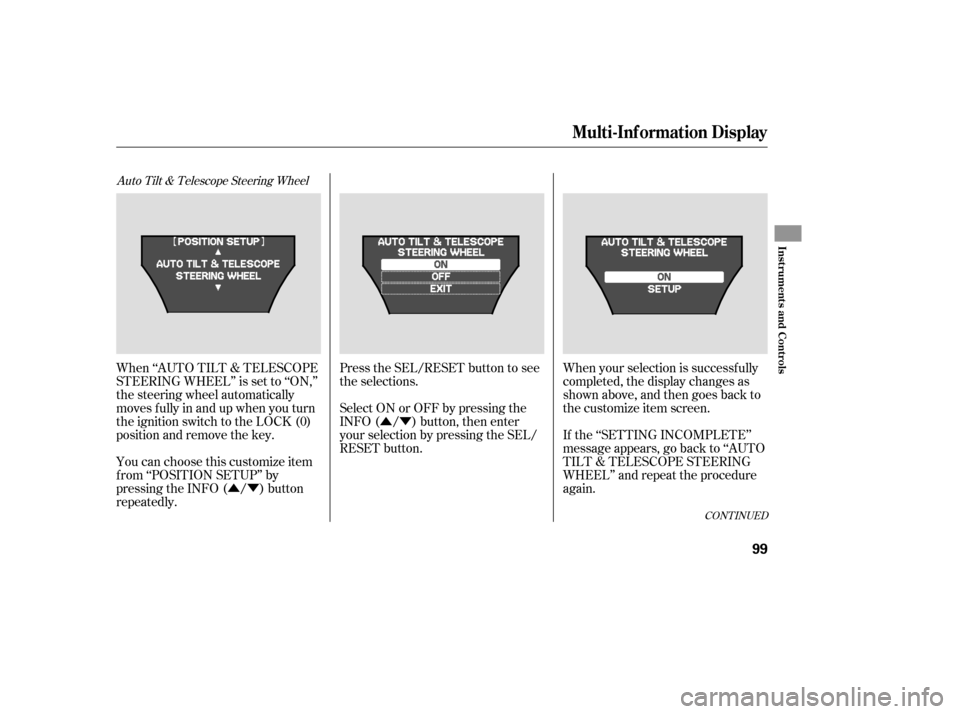
Auto Tilt & Telescope Steering Wheel
When ‘‘AUTO TILT & TELESCOPE
STEERING WHEEL’’ is set to ‘‘ON,’’
the steering wheel automatically
moves f ully in and up when you turn
the ignition switch to the LOCK (0)
position and remove the key.
You can choose this customize item
f rom ‘‘POSITION SETUP’’ by
pressing the INFO ( / ) button
repeatedly. Press the SEL/RESET button to see
the selections.
Select ON or OFF by pressing the
INFO ( / ) button, then enter
your selection by pressing the SEL/
RESET button.
When your selection is successf ully
completed, the display changes as
shown above, and then goes back to
the customize item screen.
If the ‘‘SETTING INCOMPLETE’’
message appears, go back to ‘‘AUTO
TILT & TELESCOPE STEERING
WHEEL’’ and repeat the procedure
again.
Multi-Inf ormation Display
Inst rument s and Cont rols
99
�����—�����—�����y�
����
��������y���
�(�)�-�������y���
�����y
Page 119 of 479
�Î�Î
�Î �Î
�Î
�Î
To use the horn, press the center pad of the steering wheel.
:
If equipped
1:
Controls Near the Steering Wheel
Instru me ntsand Cont ro ls
115
DRIVING POSITION
MEMORY SYSTEM
VEHICLE
STABILITY
ASSIST SYSTEM
OFF SWITCH
REAR WINDOW
DEFOGGER
HAZARD
WARNING
BUTTON
HEADLIGHT
WASHER
SWITCH
ACTIVE DAMPER
SYSTEM SWITCH
MIRROR
CONTROLS
POWER TAILGATE
BUTTON PASSENGER
AIRBAG
OFF INDICATOR
INSTRUMENT
PANEL
BRIGHTNESS
WINDSHIELD
WIPERS/WASHERS
STEERING
WHEEL
AUDIO CONTROLS
FUEL FILL DOOR
RELEASE BUTTON
CRUISE CONTROL
BUTTONS
HORN
HEADLIGHT/TURN
SIGNAL/
FRONT FOG LIGHTS
POWER DOOR LOCK
MASTER SWITCH
POWER WINDOW
SWITCHES
STEERING WHEEL
ADJUSTMENTS SEAT HEATER
SWITCHES
HOOD RELEASE
HANDLE
(P.117)
(P.352)
(P.153)
(P.147)
(P.317) (P.132) (P.319) (P.353)
(P.266) (P.146)(P.164)
(P.122)
(P.122) (P.34) (P.123)
(P.116)
(P.229)
(P.118)
(P.124)
(P.155)
(P.130) ACCESSORY POWER
SOCKETS
1
�����—�����—�����y�
����
��������y���
�(�)�-�������y���
�����y
Page 121 of 479
�µ
When you turn the wiper switch to
the ‘‘OFF’’ position, the wiper will
return to its parked position.
Rotate the switch
clockwise to turn the rear window
wiper ON. The wiper operates
intermittently.
The headlight washers can be
operated at any time by pressing the
headlight washer button located next
to the steering wheel column. The
headlights must be turned on to use
this button. In addition, the headlight
washer operates when the
windshield washers are f irst turned
on. The headlight washers use the same
f luid reservoir as the windshield
washers.
1.
2.
CONT INUED
Windshield Wipers and Washers
Headlight Washers(On Canadian models)Rear Window Wiper and Washer
ON
Inst rument s and Cont rols
117
�����—�����—�����y�
����
��������y���
�(�)�-�������y���
�����y