Page 57 of 166

56Navigation System
Distance and Time to
Destination
When you select a destination, the
distance to the destination is the actual
road distance of the calculated route,
and “not as the crow flies.” When
viewing a list of destinations (points of
interest), such as restaurants, the
distance is “as the crow flies” (see Sort
by Distance to Travel on page 37).
The displayed time to destination may
differ from the actual travel time
because the time is calculated based on
the posted road speed data and your
current speed. If part of your route
includes unverified roads, the “distance”
and “time to go” fo r that portion is
estimated using 25 mph as an average
speed.
Map Menu
When the map screen is displayed,
pressing in on the Interface Dial
displays the Map menu. If the map is
scrolled, the Map menu will not
appear. Move the Interface Dial left,
and press the CANCEL button to return
to the basic map screen.
Voice - button shown if currently on a
route. Select to hear the next guidance
maneuver (see page 57).
Directions - button shown if currently
on a route. Select to see a list of
directions to your destination (see
page 57). North-up/Heading-up -
Select
Heading-up or North-up button to
change map orientation. See Map
Orientation on page 61 for details. On
scales greater than 1 mile, this button is
“grayed out” (North up only mode).
Show Icon on Map - allows you to
select the icons displayed on the map
(for a thorough description of this
feature, see Showing Icons on the Map
on page 65).
New Messages - button indicates that
there are AcuraLink messages for you to
read. These messages consist of quick
tips, and other information
communicated to you by Acura. If the
button is grayed out, you have no
messages. See page 75 for more
information on this feature.
Traffic Incidents - select this button to
display a list of the traffic incidents
within a 30-mile radius of your current
position. You can view this same list by
saying “Display traffic incidents.” See
page 24 for a discussion of this feature.
Driving to Your Destination
Page 58 of 166

Navigation System57
Driving to Your Destination
Voice Guidance Prompts
As you get near the maneuver, you will
hear a voice reminder, and see a pop-up
window showing you the maneuver.
The number of reminders that you will
hear before a maneuver is determined
by Guidance Prompts in Setup on
page 83.
With the factory default (NORMAL),
typically you will hear two prompts:
The first is about 1/4 mile from the maneuver.
The final prompt is close to your actual turn.
If the distance between the next two
driving maneuvers is very small, both
maneuvers are displayed on the screen
in a single window, and the voice will
remind you of both of them at the same
time. NOTE:
You can say “Voice” at any time, or
select Voice after pushing on the
Interface Dial to be reminded of the
next maneuver.
Typically a pop-up guidance window shows your next turn, and a voice
guidance prompt is heard. The timing
of these prompts varies, depending on
the type of road you are on, and the
distance to your next maneuver.
When given guidance in unverified
areas, the words, “If Possible,” are
inserted before each guidance prompt.
See Unverified Area Routing on page 92
for more details about unverified
routing.
Direction List
If you select Directions from the Map
menu, the display changes to:
NOTE:
The map and voice guidance in unverified areas differ from those in
verified areas. See Unverified Area
Routing on page 92.
Only maneuvers that occur at freeway exits or contain freeway exit
information will show the exit info
icon (“i” icon) on the right end of the
items in the direction list. If no exit
info icon is shown on the list, the
EXIT INFO is not displayed.
Page 59 of 166

58Navigation System
You can see the direction list and the
distance to each maneuver. Press the
MAP/GUIDE button to return to the
previous screen.
You can scroll through the direction list
screen by screen by moving the
Interface Dial up or down, or one
instruction at a time by rotating the
Interface Dial knob .EXIT INFO (Freeway Exit
Information)
You can search freeway exit
information and add new destinations or
waypoints to the calculated route as a
new destination or waypoint. The exit
info icon (“i” icon) on the right end of
the items in the direction list indicates
that there is freeway exit information
available. Say or select EXIT INFO, and
choose the exit and place to set as a new
destination or waypoint.
On the map screen, you can display
freeway exit information using the
Interface Dial . The exit info icon will
only be displayed on the map screen if
there is any freeway exit information
available. Choose the 1/4, 1/2, and
1 mile scale, then move the cross hairs
to the desired exit info icon and push in
on the Interface Dial . Choose a place
from the list and set as a new destination
or waypoint.
NOTE:
To turn on “Freeway exit information”
on the map screen display the icon bar
and select the“i” icon (see page 65).
Split Screen Guidance
When on route to a destination, you
have two display options: single screen
mode (the factory default) and the split
screen mode.
Single screen mode - a map is
displayed with occasional guidance
pop-up windows as you approach a
maneuver.
Split screen mode - the map is always
displayed on the left of the screen, and
the maneuver or direction list is
displayed on the right hand side of the
screen.
Guidance mode can be changed in either
Setup (see Guidance Mode on page 99),
or by accessing the icon bar (see
CHANGE GUIDANCE MODE on
page 65).
Driving to Your Destination
Page 60 of 166
Navigation System59
Driving to Your Destination
When you get near the maneuver, the
map screen changes to:
On the map screen, the location of the
maneuver is marked with a small yellow
square. The guidance window is simply
an enlargement of the area indicated by
the yellow square. After you complete
the maneuver, the display returns to a
full map screen when the single screen
mode is set, or to a map and direction
list screen when the split screen mode is
set.
Page 61 of 166
 to change the scale of the
map. Zooming in increases the detail,")
60Navigation System
Map Scale
Rotate the Interface Dial knob or a voice command such as “Display 1/2 mile scale” (see page 141) to change the scale of the
map. Zooming in increases the detail, whil e zooming out gives you a view of a wider area. After changing the scale, give the
system a few moments to update the display.
Functions available at various map scales
NOTE:
You can change between miles or kilometers in Setup (see Units on page 90).
For information on the available voice commands, see Voice Command Index on page 140.
Map Scale (English and Metric)
For selecting uni ts, see page 90.1/20 mi.1/8 mi. 1/4 mi. 1/2 mi. 1 mi. 2 mi. 5 mi. 15 mi. 50 mi. 150 mi. 350 mi.
80 m200 m 400 m800 m1.6 km3km 8km24 km 80 km240 km 560 km
POI icon symbols (like ATM) page 62 XX
Breadcrumbs (off-road tracking dots) page 67 XXXX
Freeway exit info rmation icons page 62 XXX
Unverified road displa y (light brown) page 92 XXX
Map orientation “Heading up” page 61 XXXXX
Map orientation “North up” page 61 XXXXXXXXXXX
Map features (like pa rk, golf course) page 54 XXXXXXXXXX
Avoid area shown on map page 96 XXX
Avoid area scales (when creating) page 96 XXX
Waypoint “flag” icons page 70 XXXXXXXXXXX
Traffic speed page 22 XXXX
Traffic incident page 22 XXXX
Driving to Your Destination
Page 62 of 166

Navigation System61
Driving to Your Destination
Map Orientation
The map can be orientated two ways:
North-up: North pointing up as you
would normally view a paper map.
Heading-up: The map constantly rotates so the road you are driving on
always points up (as you see the road
through your front windowshield).
NOTE:
The red arrow in both heading symbols
always shows the direction north. Push in on the
Interface Dial on the
map or guidance screen and select
North-up or Heading-up to switch
between the available orientation, or say
“Display heading up” or “Display north
up.”
In the larger map scales (above 1 mile or
1.6 kilometer), the map is always
oriented with north facing upward. You
cannot change the orientation.
To view other areas on the map, move
the Interface Dial left, right, up, or
down. The map will shift in that
direction. To return the map to your
current location, press either the MAP/
GUIDE , the CANCEL , or the NAVI
BACK button on the steering wheel. The display automati
cally changes to
the map screen when you reach your
destination. Press the MENU button to
return to the Enter destination by
screen.
NOTE:
For information on the available voice commands, see Voice
Command Index on page 140.
If you are on a route and the Interface Dial is moved, the “Time
to Destination” and “Distance to
Destination” indications are
replaced with an indicator showing
distance from the current vehicle
location.
“North Up”
“Heading Up”
Page 63 of 166

62Navigation System
Destination Icon
The destination icon only shows the
approximate location of the destination.
This occurs because a city block can
have as many as 100 possible addresses
(for example, the 1400 block is followed
by the 1500 block.) Since most cities
use only a portion of the 100 possible
addresses (for example, in the 1400
block, the addresses may only go up to
1425 before the 1500 block starts).
Therefore, the address 1425 will be
shown a quarter of the way down the
block by the system instead of near the
end of the block where the destination is
actually located.
Tip:
When on a route, you can view a map
showing your destination. Using voice
control, say “Display destination map.”
Landmark and Incident
Icons
Landmark icons are shown in the map
screen on 1/20 and 1/8 mile scale, or 80
and 200 meter scale. The Freeway exit
information is displayed on the 1/4, 1/2,
and 1 mile scales. Incident icons are
displayed on the 1/2 through 5 mile
scales. The icons are:
Landmark icon
Incident icon Some icons can be turned on or off;
you can either display them or hide
them by pushing in on the
Interface
Dial on the map or guidance screen
and select Show Icon on Map (see
page 65), or by using voice commands
(see page 140).
You can select most landmark and
incident icons with the Interface Dial
to display the icon’s information. See
the table on the following page for
exceptions.
NOTE:
The same icon list can be viewed on the screen by selecting Map Legend
from the Information screen.
When there are overlapping landmark icons, a list of the points of
interest (POIs) is displayed.
For information on the available voice commands, see Voice
Command Index on page 140.
Acura Dealer
School
Restaurant
AT M
Parking Lot
Post OfficeHonda Dealer
Hospital
Grocery Store
Gas Station
Hotel/Lodging
Parking Garage
Freeway Exit Information
Weather
Accident / Incident (other)
Construction
Driving to Your Destination
Page 64 of 166

Navigation System63
Driving to Your Destination
For some icons you can choose either to show or hide them on th e map, while others like Acura Dealers, are always shown. The
table below shows the features for each icon type. Some Points of Interest (POIs) like Police Stations are not shown as an icon ,
but you can still locate the near est one with the voice command, “Find nearest Police station.”
Landmark icon
POI type Icon can be
manually
displayedIcon can be
manually
hiddenIcon
selection by
voiceIcon can be selected as
a destination on the
map
screen with the
Interface Dial POI can be found on
the
map screen using
voice command
“Find...”
Honda/Acura dealer Ye s, always No No Yes Yes
Hospital Yes Yes Yes Yes Yes
School Yes Yes Yes Yes Yes
ATM Yes Yes Yes Yes Yes
Gas station *1 Yes Yes Yes Yes Yes
Restaurants *2 Yes Yes Yes Yes Yes
Post office Yes Yes Yes Yes Yes
Grocery store Yes Yes Yes Yes Yes
Hotel/ Lodging Yes Yes Yes Yes Yes
Police station No icon No icon No No Yes
Shopping, Tourist attraction, Bank No icon No icon No NoYes
Parking garage Yes Yes Yes Yes Yes
Parking lot Yes Yes Yes Yes Yes
Freeway exit information Yes Yes Yes Yes (choose POI) No
 1
1 2
2 3
3 4
4 5
5 6
6 7
7 8
8 9
9 10
10 11
11 12
12 13
13 14
14 15
15 16
16 17
17 18
18 19
19 20
20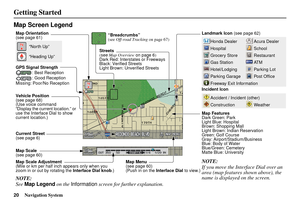 21
21 22
22 23
23 24
24 25
25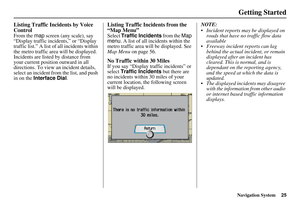 26
26 27
27 28
28 29
29 30
30 31
31 32
32 33
33 34
34 35
35 36
36 37
37 38
38 39
39 40
40 41
41 42
42 43
43 44
44 45
45 46
46 47
47 48
48 49
49 50
50 51
51 52
52 53
53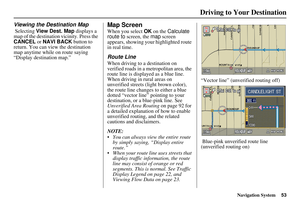 54
54 55
55 56
56 57
57 58
58 59
59 60
60 61
61 62
62 63
63 64
64 65
65 66
66 67
67 68
68 69
69 70
70 71
71 72
72 73
73 74
74 75
75 76
76 77
77 78
78 79
79 80
80 81
81 82
82 83
83 84
84 85
85 86
86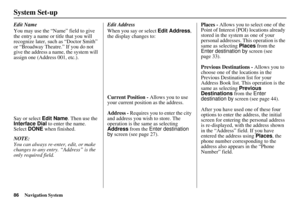 87
87 88
88 89
89 90
90 91
91 92
92 93
93 94
94 95
95 96
96 97
97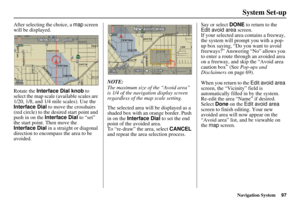 98
98 99
99 100
100 101
101 102
102 103
103 104
104 105
105 106
106 107
107 108
108 109
109 110
110 111
111 112
112 113
113 114
114 115
115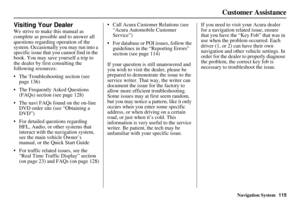 116
116 117
117 118
118 119
119 120
120 121
121 122
122 123
123 124
124 125
125 126
126 127
127 128
128 129
129 130
130 131
131 132
132 133
133 134
134 135
135 136
136 137
137 138
138 139
139 140
140 141
141 142
142 143
143 144
144 145
145 146
146 147
147 148
148 149
149 150
150 151
151 152
152 153
153 154
154 155
155 156
156 157
157 158
158 159
159 160
160 161
161 162
162 163
163 164
164 165
165